Active Directory
Overview
Integration with Active Directory is implemented by importing Active Directory (AD) objects to Matrix42 Enterprise Service Management and synchronizing changes in these objects from Matrix42 Enterprise Service Management to the AD server.
The overall integration framework is applicable to each specific Data Provider.

Import from Active Directory
As a rule, Matrix42 Enterprise Service Management cannot access corporate networks and collect their data. Therefore, the Data Gateway service is installed within the corporate network that is managed by an AD server. The gateway collects the data on the AD server and sends it to Matrix42 Enterprise Service Management.
1 - Activating the Active Directory Data Provider
The AD import can be triggered in several ways in Matrix42 Enterprise Service Management:
- Manually run AD connector data import with one of the following actions available in Administration application → Integration → Data Providers → Active Directory:
- Activate (Full Import) action retrieves all data available at the configured remote AD server(s).
- Activate action imports only records that have been added or changed in the Active Directory after the last import instance.
- Scheduled: configured AD Connector engine activation runs the import and triggers the Active Directory Data Provider according to the specified import schedule.
2 - Launching the AD Server Workflow
The Active Directory Data Provider launches the AD workflow. It is a server workflow that is run in Matrix42 Enterprise Service Management.
3 - Launching the AD - Client Workflow
The AD workflow creates jobs according to the specified configurations of the Data Provider. The Data Provider configurations contain the information on the target domain and stipulate the conditions of import. When the Data Gateway finds the jobs, it starts the AD - Client workflow.
4 - Retrieving AD Objects
The AD - Client workflow is run on the Data Gateway server and therefore it can access the network data. Based on settings in the Data Provider configuration, the workflow collects data on AD objects and saves it as a package of XML files. A separate XML file is created for each imported object and for each type of deleted objects. If the import is configured for accounts, groups, and computers, the workflow generates the following list of files:
- Account.xml contains all AD users that are currently active.
- Computer.xml contains all AD computers that are currently active.
- Group.xml contains all AD groups that are currently active.
- DeletedAccount.xml is relevant for partial import and contains users that have been deleted on an AD server since the last import.
- DeletedComputer.xml is relevant for partial import and contains computers that have been deleted on an AD server since the last import.
- DeletedGroups.xml is relevant for partial import and contains groups that have been deleted on an AD server since the last import.
- Members.xml contains the relations between AD groups and their members.
5 - Passing AD Objects to Matrix42 Enterprise Service Management
The Data Gateway passes XML files to the AD workflow in Matrix42 Enterprise Service Management.
6 - Creating and Updating Objects Based on Imported Data
The AD workflow executes import definitions for each imported object. It uses the XML files as the data source to either update Matrix42 Enterprise Service Management objects with new values from AD objects or create new objects in Matrix42 Enterprise Service Management.
The following import definitions are executed:
- AD: Import Accounts
The import definition updates the existing accounts and creates new ones based on active users on an AD server. It uses the Account.xml file as a data source. - AD: Import Computers
The import definition updates existing computers and creates new ones based on active computers on an AD server. It uses the Computer.xml file as a data source. - AD: Import Groups
The import definition updates existing groups and creates new ones based on active groups on an AD server. It uses the Group.xml file as a data source. - AD: Import Persons
The import definition updates existing persons and creates new ones based on active users on an AD server. It uses the Account.xml file as a data source. - AD: Membership
The import definition updates group membership for accounts, computers, and groups based on data from an AD server. It uses the Members.xml file as a data source. - AD: Update Deleted Accounts
If some AD users have been deleted since the last import, this import definition changes the Status field value to Deleted for corresponding accounts in Matrix42 Enterprise Service Management. It uses the DeletedAccount.xmlfile as a data source. - AD: Update Deleted Computers
If some AD computers have been deleted since the last import, this import definition changes the Account Status field value to Deleted for corresponding computers in Matrix42 Enterprise Service Management. It uses the DeletedComputer.xml file as a data source. - AD: Update Deleted Groups
If some AD groups have been deleted since the last import, this import definition changes the Status field value to Deleted for corresponding groups in Matrix42 Enterprise Service Management. It uses the DeletedGroups.xmlfile as a data source. - AD: Update Deleted Persons
If some AD users have been deleted since the last import, this import definition changes the Status field value to Deleted for corresponding persons in Matrix42 Enterprise Service Management. It uses the DeletedAccount.xml file as a data source.
Synchronization to Active Directory
If AD synchronization is enabled in Matrix42 Enterprise Service Management, the changes that are made to the Matrix42 Enterprise Service Management objects are automatically transferred to the corresponding AD objects.
By default, synchronization between Matrix42 Enterprise Service Management and AD covers accounts, computers, and groups.
1 - Triggering Compliance Rules
Five compliance rules are configured for each synchronized object. A relevant compliance rule is triggered for each of the following five use cases, depending on the data source and the type of changes in the Active Directory (AD) objects:
- Create AD object in Matrix42: a new account, computer or group is created in Matrix42 Enterprise Service Management and assigned to a domain that is configured for synchronization in the Active Directory Data Provider.
- Update AD object in Matrix42: an object that has been previously synchronized with Active Directory is updated in Matrix42 Enterprise Service Management. This case also covers the situation when the status of the object is manually changed to Deleted (the Status field for accounts and groups and the Account Status field on the Identification dialog page for computers).
- Delete AD object in Matrix42: a synchronized object is physically deleted from Matrix42 Enterprise Service Management.
- Update AD object in AD: an existing account, group, or computer is assigned to a domain that is configured for synchronization in the Active Directory Data Provider.
- Delete AD object in AD: a synchronized object is physically deleted from the Active Directory. Correspondingly, during the next import to Matrix42 Enterprise Service Management, its status is changed to Deleted (the Status field for accounts and groups and the Account Status field on the Identification dialog page for computers). Then the status is manually set to Active in Matrix42 Enterprise Service Management.
2 - Running Synchronization Workflows in Matrix42 Enterprise Service Management
The triggered compliance rule starts a workflow in Matrix42 Enterprise Service Management. Depending on the use case, one of the three server workflows can be started for each object. For example, compliance rules for accounts can start the following workflows:
- Create AD Account
- Synchronize AD Account
- Synchronize Deleted AD Objects
3 - Running Synchronization Workflows on AD Servers
The relevant server workflow retrieves domain data and synchronization settings from the Active Directory Data Provider and passes them to a Data Gateway service that is installed on the AD server. The Data Gateway launches a corresponding client workflow on the AD server. Four types of client workflows can be run for each of the synchronized objects. For the account object, the following workflows are executed:
- Create AD Account on Agent
- Synchronize AD Account on Agent
- Synchronize Deleted AD Objects on Agent
- Synchronize AD Membership on Agent
4 - Modifying AD Objects
Each of the client workflows modifies objects in the Active Directory based on the information that has been passed from Matrix42 Enterprise Service Management.
The Create AD Account on Agent workflow creates a new account on the AD server.
The Synchronize AD Account on Agent workflow updates attributes of the account object based on changes that have been made for the corresponding account record in Matrix42 Enterprise Service Management.
The Synchronize Deleted AD Objects on Agent workflow is common for accounts, groups, and computers. It moves objects that have been physically deleted from Matrix42 Enterprise Service Management to a separate AD container for deleted items.
The Synchronize AD Membership on Agent workflow is also common for three object types. It updates group memberships in Active Directory based on current data in Matrix42 Enterprise Service Management.
5 - Passing the uSNChanged Attribute
The client workflow retrieves the uSNChanged attribute for the change that is made in Active Directory. The Data Gateway passes this attribute to Matrix42 Enterprise Service Management.
6 - Processing Synchronization Results
The server workflow saves the SID attribute value for an object that has been synchronized to Active Directory for the first time and also saves or updates the uSNChanged attribute for this object.
Synchronization Cases
The tables below list all synchronization cases that are possible in the system. Different compliance rules and workflows are triggered in each case.
Accounts
|
Use Case |
Compliance Rule |
Server Workflow |
Client Workflow(s) |
|
|---|---|---|---|---|
|
Account is created. |
AD Create Account |
Create AD Account |
1. Create AD Account on Agent 2. Synchronize AD Membership on Agent |
|
|
Existing account is assigned to the synchronized domain. |
AD Synchronize New Account |
|||
|
Synchronized account was deleted from AD and then set to the Active status. |
AD Restore Deleted Account |
|||
|
Synchronized account is updated or set to the Deleted status. |
AD Synchronize Existing Account |
Synchronize AD Account |
Synchronize AD Account on Agent |
|
|
Synchronized account is physically deleted. |
AD Synchronize Deleted Accounts |
Synchronize Deleted AD Objects |
Synchronize Deleted AD Objects on Agent |
|
Groups
|
Use Case |
Compliance Rule |
Server Workflow |
Client Workflow(s) |
|
|---|---|---|---|---|
|
Group is created. |
AD Create Group |
Create AD Group |
1. Create AD Group on Agent 2. Synchronize AD Membership on Agent |
|
|
Existing group is assigned to the synchronized domain. |
AD Synchronize New Group |
|||
|
Synchronized group was deleted from AD and then set to the Active status. |
AD Restore Deleted Group |
|||
|
Synchronized group is updated or set to the Deleted status. |
AD Synchronize Existing Group |
Synchronize AD Group |
Synchronize AD Group on Agent |
|
|
Synchronized group is physically deleted. |
AD Synchronize Deleted Groups |
Synchronize Deleted AD Objects |
Synchronize Deleted AD Objects on Agent |
|
Computers
|
Use Case |
Compliance Rule |
Server Workflow |
Client Workflow(s) |
|
|---|---|---|---|---|
|
Computer is created. |
AD Create Computer |
Create AD Computer |
1. Create AD Computer on Agent 2. Synchronize AD Membership on Agent |
|
|
Existing computer is assigned to the synchronized domain. |
AD Synchronize New Computer |
|||
|
Synchronized computer was deleted from AD and then set to the Active status. |
AD Restore Deleted Computer |
|||
|
Synchronized computer is updated or set to the Deleted status. |
AD Synchronize Existing Computer |
Synchronize AD Computer |
Synchronize AD Computer on Agent |
|
|
Synchronized computer is physically deleted. |
AD Synchronize Deleted Computers |
Synchronize Deleted AD Objects |
Synchronize Deleted AD Objects on Agent |
|
Configuring the AD Data Provider
For information on required ports, see Ports Used by Connectors and Data Providers.
The Active Directory Data Provider is designed for establishing the integration between Matrix42 Enterprise Service Management and an AD server.
To configure the Active Directory Data Provider:
- In Matrix42 Enterprise Service Management, open the Data Providers search page under Administration > Integration.
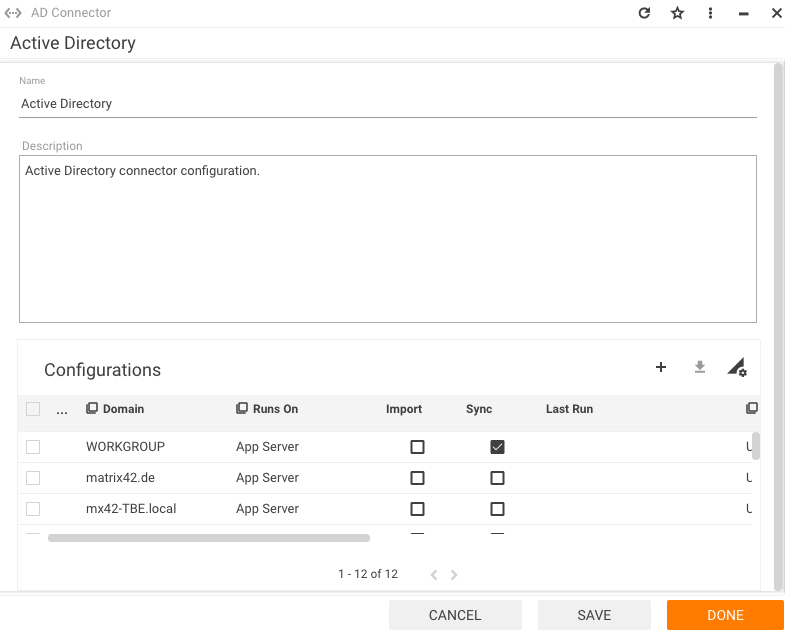
- Double-click the Active Directory Data Provider to open it. The General dialog page contains the Configurations list where configurations for this provider can be managed.
- On the Implementation page, you can define settings that will govern the execution of all configurations.
- Import Workflow: The workflow that enables data import from an AD server.
- Change Password /Unlock Account Workflow: The workflow which is launched by the Reset Account action and is used to change the account password and unlock an account that belongs to the AD domain.
- Run Full Synchronization interval, days: Specify how often the system should execute full import as by default only updates are imported from the AD server (only values between 1-7 are possible).
- Force import of "User cannot change password" attribute: Select this checkbox to download the corresponding information for AD accounts.
If account for accessing the domain is not an Administrator on the AD server, the time needed for import might increase significantly.
- To add a new configuration for the Data Provider, use the + action on the General page. The new properties dialog will open:
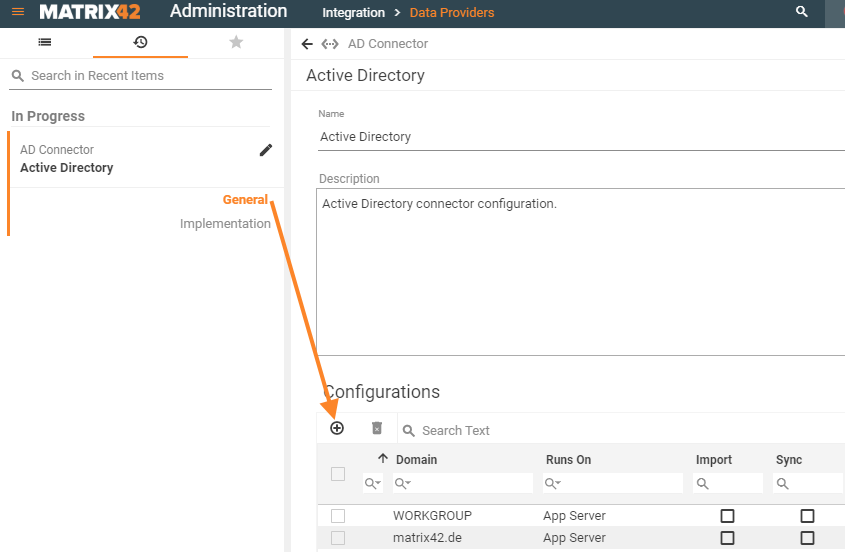
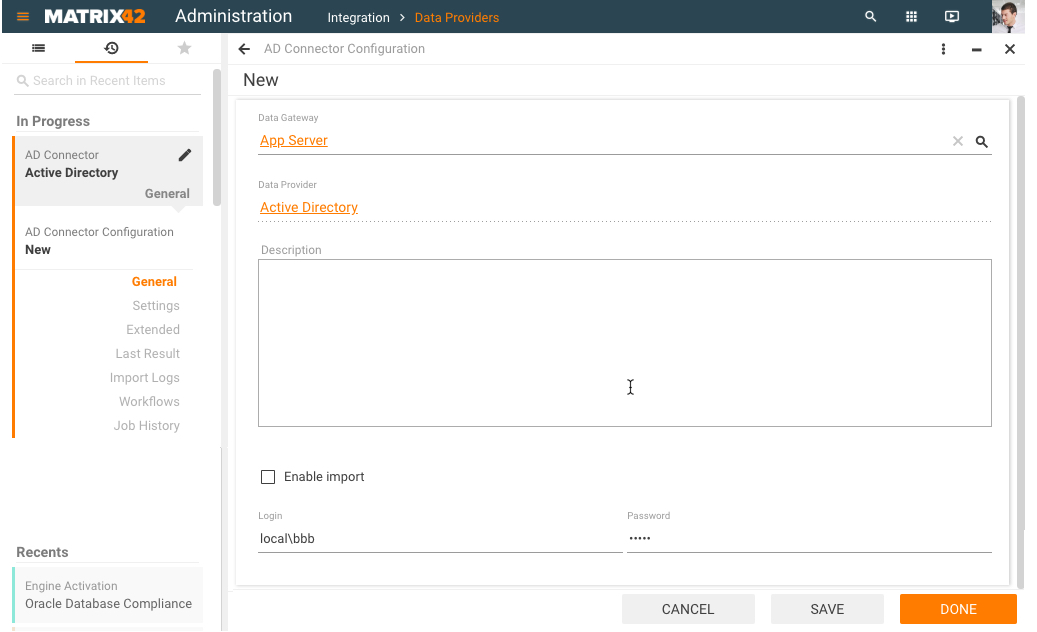
Fill in the General and Settings dialog pages for the new configuration.
General
- Data Gateway: Select the Data Gateway instance that will execute the configuration.
- Data Provider: The Data Provider for which the configuration is created. This field is for informational purposes only.
- Description: Provide additional details about this configuration.
- Enable import: Select the checkbox to activate this configuration for import. Otherwise, it will be used only for synchronization.
- Login, Password: Provide the credentials for accessing the domain. By default, the user account that is specified for the Data Gateway is used (credentials for the corresponding Windows Service).
Settings
This section contains a number of settings grouped as follows:
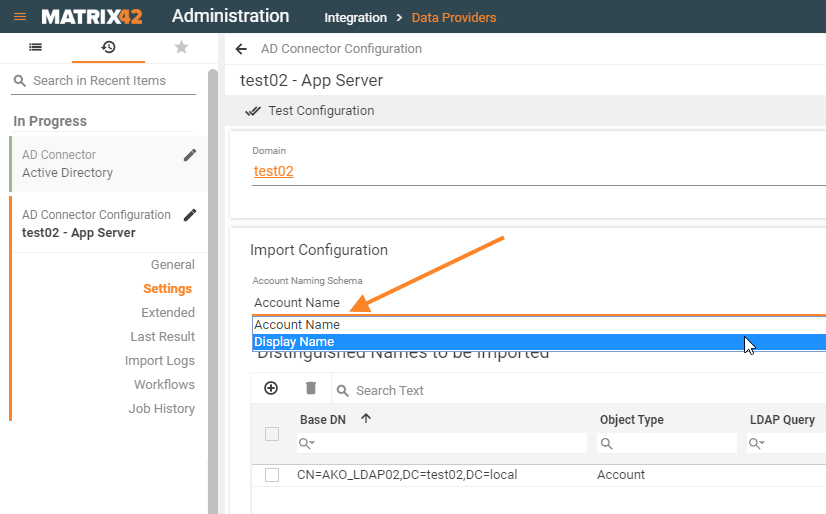
- Domain: Use the single selection button to select the domain for which the integration should be established.
Import Configuration
- Account Naming Schema: this setting is necessary for AD data synchronization and specifies the account name synchronization source. Select an account naming schema from the following options:
- Account Name (default): Account Name is used as a login name to the Matrix42 platform. With this option enabled, any modifications of the associated data are performed in relation to the user's account name. Thus, when modifying any values of the user account data in Matrix42 platform, for instance, adding contact information without applying any changes in the Account Name field, the next run of the AD data synchronization will apply necessary changes on AD server by updating the modified contact information and use the Account Name as an identifier of the applied changes.
- Display Name: when changing the default option to Display Name, all user account data modifications applied in Matrix42 platform are accompanied by the change of the user name in the AD server. In case when the Account Name was previously used as a data synchronization identifier on the AD server, the import with new Account Naming Schema set to Display name will change the user name to the display name on the AD server accordingly and apply any associated data changes. For instance, in Matrix42 platform, we are adding user contact information only without applying any changes in the Account Name field or the Display name. The next run of the AD data synchronization will apply necessary changes on AD server by updating the modified contact information and additionally changing the Account Name to the Display Name on the AD server so that the Display Name will be used as an account identifier for all the consecutive runs of the AD data synchronization. Switching back to the default option implies additional data changes and changing the user data identifier to the Account Name on the AD server accordingly.
Account Name and Display Name are both used in the user account information. The main difference is that the option selected in the Account Naming Schema of the Matrix42 platform can modify the AD account name on the AD server. Despite the chosen Account Naming Schema, both properties are used as identifiers of the same set of data, implied by the user account information.
- Distinguished Names to Be Imported: Use the + action to add distinguished names to be imported. The Add New dialog that appears contains several fields in which you should specify the AD object that should be imported. The following fields are available:
- Base DN: Enter the distinguished name of an object as it is specified in Active Directory. The import considers the specified CN/OU together with all underlying OUs. The notation should correspond with the AD distinguished names, for example: CN=Computers,DC=MyDomain,DC=de. For detailed information about the syntax, refer to Distinguished Names.
- Object Type: Select the Matrix42 Workspace Management object to which the AD object corresponds. It can be Account, Group or Computer.
- LDAP Query: Use the standard LDAP syntax to specify a condition that will define which objects will be imported from the distinguished name that is provided in the Base DN field. For detailed information about the syntax, refer to LDAP Query Basics.
- Name, Description: These fields can be used for informational purposes.
Default Asset Statuses
Use the following fields to specify which statuses should be applied respectively for active, deleted, and disabled computers that are imported from an AD server:
- Status for Active Computers
- Status for Deleted Computers
- Status for Disabled Computers
These transformations are made only for computers whose management type is Active Directory.
Additional Import Attributes
If the default import configuration does not include certain AD attributes, you can add them in these fields:
- Account Attribute Names (Separated by Commas)
- Computer Attribute Names (Separated by Commas)
- Group Attribute Names (Separated by Commas)
The corresponding import definition also needs to be edited to map AD attributes to Matrix42 Enterprise Service Management attributes. For more information, see editing the import definition.
Extended
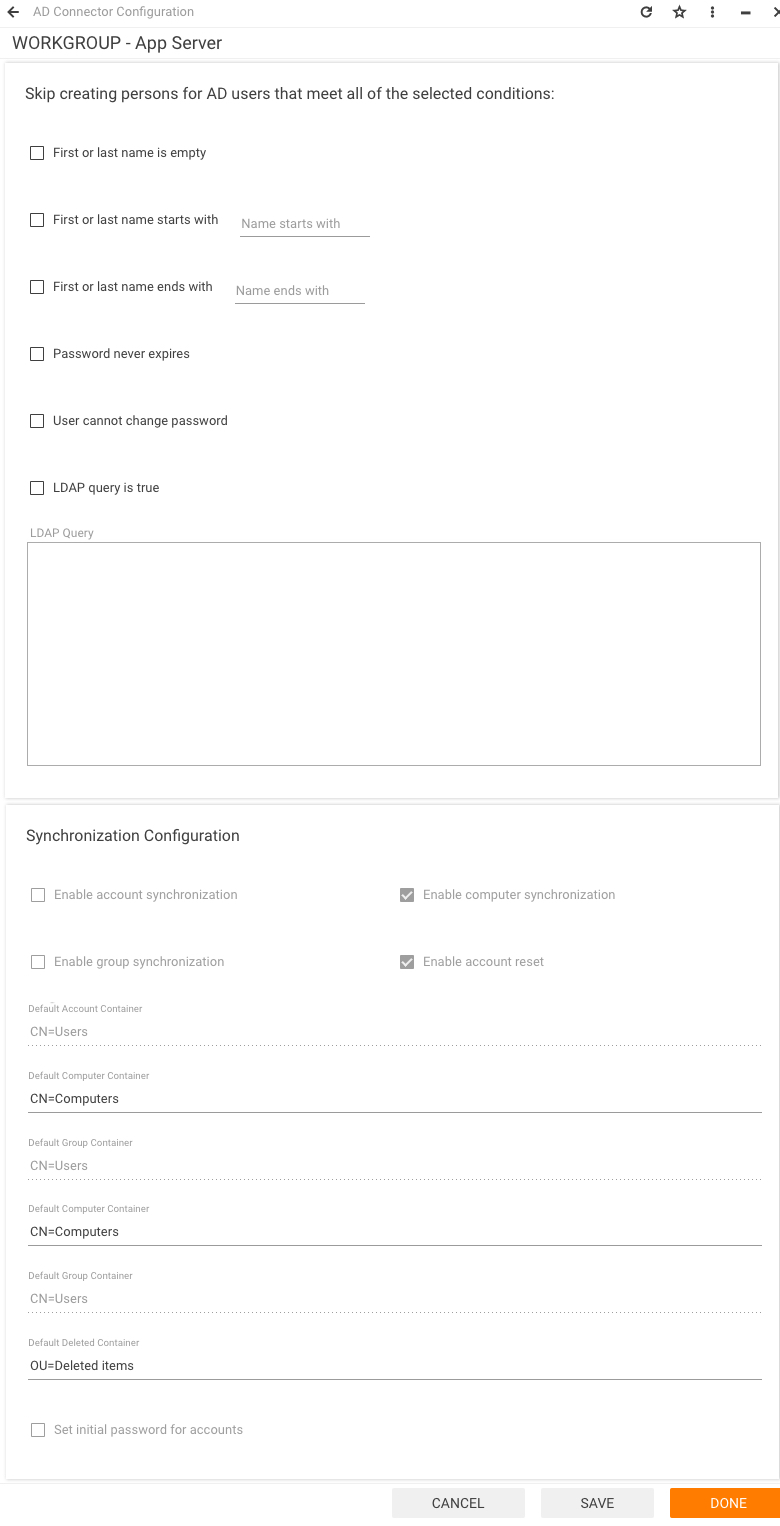
Skip creating persons for AD users that meet all of the selected conditions:
- First or last name is empty, First or last name starts with..., First or last name ends with..., User cannot change password, Password never expires, LDAP query is true: Select the conditions and specify values where applicable to avoid creating persons for non-human users that are imported from an AD server. By default all checkboxes are cleared. When you define the criteria, existing persons are not affected. The conditions apply only to AD users that are imported for the first time.
Synchronization Configuration
- Enable account synchronization, Enable computer synchronization, Enable group synchronization: To change values in these fields, click the Configure Synchronization action in the action pane. When an additional dialog opens, select the checkboxes for those objects that should be synchronized from Matrix42 Enterprise Service Management to an AD server. Click Configure Synchronization.
- Enable account reset: To change this value, you also need to run the Configure Synchronization action, select the relevant checkbox, and click Configure Synchronization. The selected checkbox will activate the workflow that is specified in the Change Password / Unlock Account Workflow field on the Implementation tab of the Active Directory Data Provider. As a result, the Data Provider will be able to change password and perform the "unlock" action for accounts that are included in this configuration.
- Default Account Container, Default Computer Container, Default Group Container, Default Deleted Container: Specify the containers to which Matrix42 Enterprise Service Management objects should be synchronized on an AD server. All accounts, computers, and groups that are physically deleted in Matrix42 Enterprise Service Management are moved to the default container for deleted items on an AD server.
- Set initial password for accounts: Select the checkbox if passwords that are stored for accounts in Matrix42 Enterprise Service Management should be synchronized to an AD server. Otherwise the account data will be transferred without passwords.
- Click Save or Done to save the configuration.
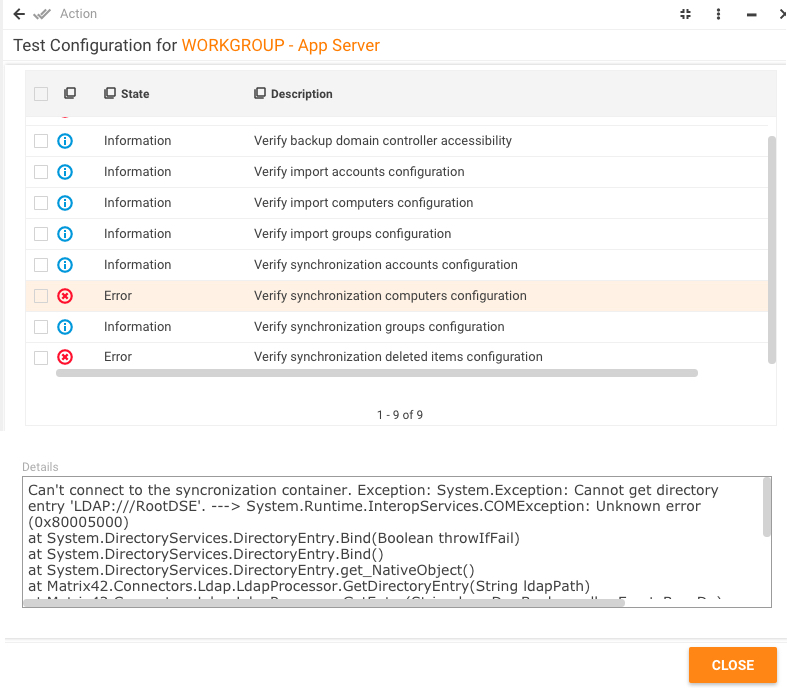
- You can run the Test Configuration action to check whether all configured settings are correct. As a result, the additional dialog will display validation results for this configuration.
Configuring the AD Domain
Integration with an AD server requires the configured AD domain. This domain will later be specified in the Active Directory Data Provider settings.
To configure a domain:
- Open Matrix42 Enterprise Service Management and go to Administration.
- In the navigation area, go to Integration > Domains.
- Click the Add Active Directory Domain action on the toolbar or double-click a domain that you want to configure.
- Fill in the following fields on the General dialog page:
- Domain: Fully qualified domain name, such as monsono.com.
- NT4 Domain Name: NT4-compatible domain name, such as MONSONO.
- Domain Controller: Short name of your domain controller that is addressed for import or synchronization, such as DC01.
- Backup Domain Controller: Alternative domain controller, such as DC02. The Active Directory Data Provider addresses this domain controller if the primary domain controller cannot be reached. This field is optional.
Note: All connections to domain controllers that run on a Windows Server system (version 2000 and later) are supported. - Directory Type: A type of a directory to be created. There are options. Active Directory (on premise), Microsoft Entra ID / Microsoft 365, Internal.
Note: Internal domains act as their own user management system and are independent from an AD server. User accounts that are assigned an internal domain have their passwords saved directly in Matrix42 Enterprise Service Management and do not require a domain controller. In this case, Matrix42 Enterprise Service Management authenticates the user account independently. - Use SSL: If this option is checked - LDAP connections will be performed over SSL.
- LDAP Port: A port to be used for LDAP connections.
- Click Done at the bottom of the dialog to save the changes and close the dialog.
LDAPs support (Secure LDAP / LDAP over SSL)
To use LDAP over SSL the following adjustments in configuration are required:
- The Domain Controller should be specified as a FQDN. Using IP address won't work.
- Enable the Use SSL checkbox option;
- Change the LDAP Port value to port 636 that establishes TLS/SSL upon connecting with a client.
If you want to use LDAP connection over SSL you'll have to install a proper certificate to the application server.
Activating and Monitoring the Import from AD
The general approach to activating and monitoring the Data Provider operational flow is described in the Activating Data Providers and Progress Monitoring for Data Providers sections.
The standard Activate action performs only incremental import of AD objects; therefore, the Activate (Full Import) action is also available for the Active Directory Data Provider.
The AD Connector engine activation launches the import of objects from the AD server into Matrix42 Enterprise Service Management. The import is executed according to the settings that are specified in the AD Data Provider. The engine activation should be configured to run according to a schedule and can also be triggered immediately by using the Activate action.
The progress tracking for the Active Directory Data Provider includes the following:
- Import monitoring by domain
- Tracking results for each configuration
- Viewing workflow instances for objects
- Visual tracking of workflow instances
The Visual Tracking action is available in all search pages that contain workflow instances. If you run this action, the selected workflow instance will be opened in the Tracking mode in the Workflow Studio. For more information about visual tracking, see Tracking Mode.
Import Monitoring by Domain
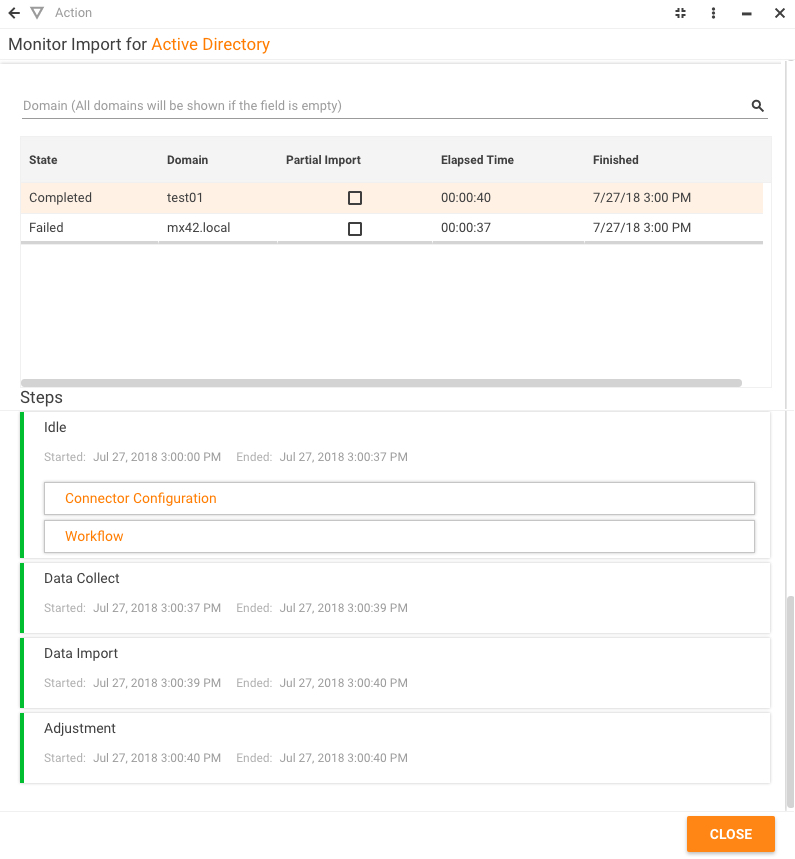
The Monitor Import action of the Active Directory Data Provider displays step-by-step progress of the latest import per each domain from all Data Provider configurations.
Based on the value selected in the Domain drop-down, The Domains list contains information either for all configured domains or for the one pre-selected domain. The Steps section shows the progress of the currently selected import. Its data is updated as the import proceeds. Progress of each step is shown as a percentage. You can use the active links in the Steps section to open the corresponding configuration, workflow instance, and import logs.
Monitoring the AD Import and Synchronization for Configurations
To track import and synchronization progress for an AD configuration:
- Go to the Data Providers search page under Administration > Integration and open the Active Directory Data Provider.
- Click the relevant configuration to open its Preview.
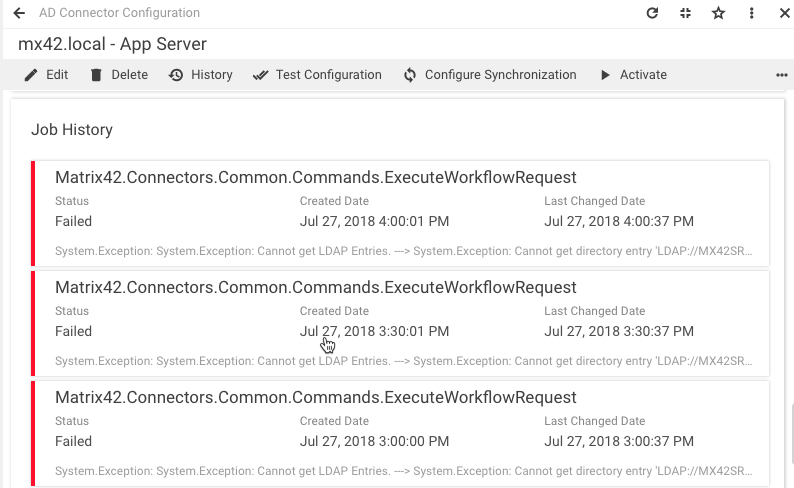
- Scroll down to the Job History section. It contains the list of commands (jobs) that are performed by the Data Gateway for this configuration. The page displays jobs that are performed for the AD data import. Analyze the job statuses to see whether the data was successfully collected.
The list of the Data Gateway jobs is also provided on the Job History dialog page of the corresponding Data Gateway, but it contains commands for all configurations that use this Data Gateway.
- To review all instances of server workflows that were run for this configuration, go to the Workflows section. The page displays both import and synchronization workflows.
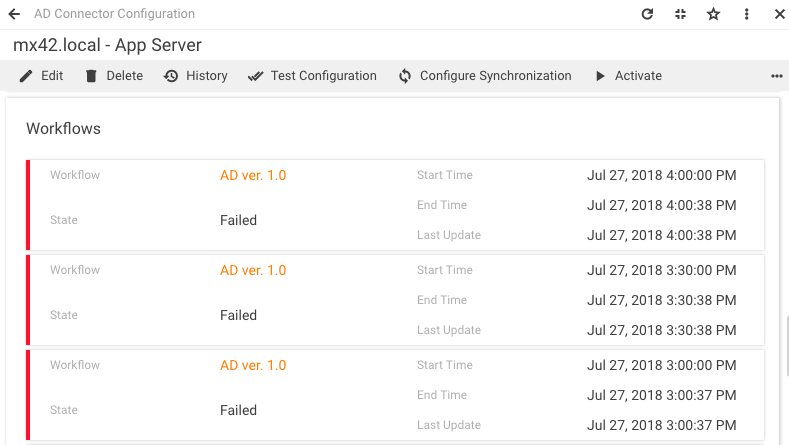
-
The State field shows the current status of each instance. Click a workflow instance in the list to open its properties dialog and view the detailed data.
For more information about the properties dialog and statuses of the workflow instance, refer to Workflow Instances.
- The Import Logs section displays all instances of running the import definitions (sequences) for this configuration and the respective results.
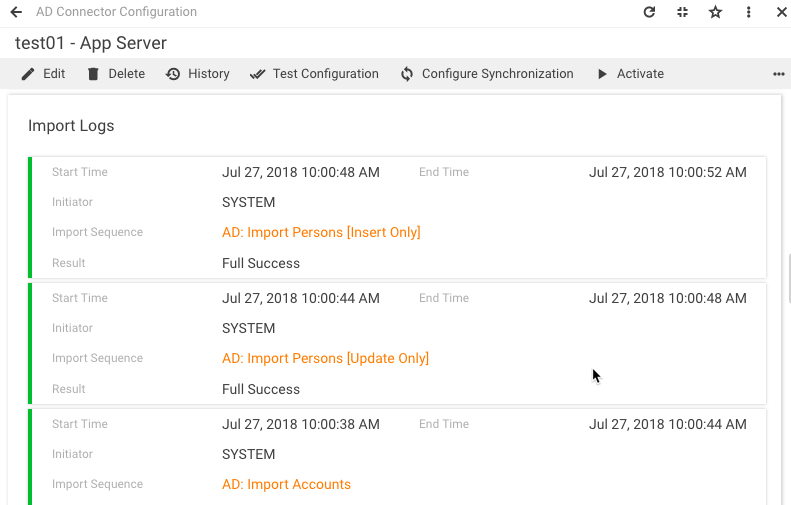
Click an import log record in the list to open its properties dialog and view the detailed data.
For more information on import logs, see Import Log Files.
To get summarized result of the last import, go to the Last Result section.
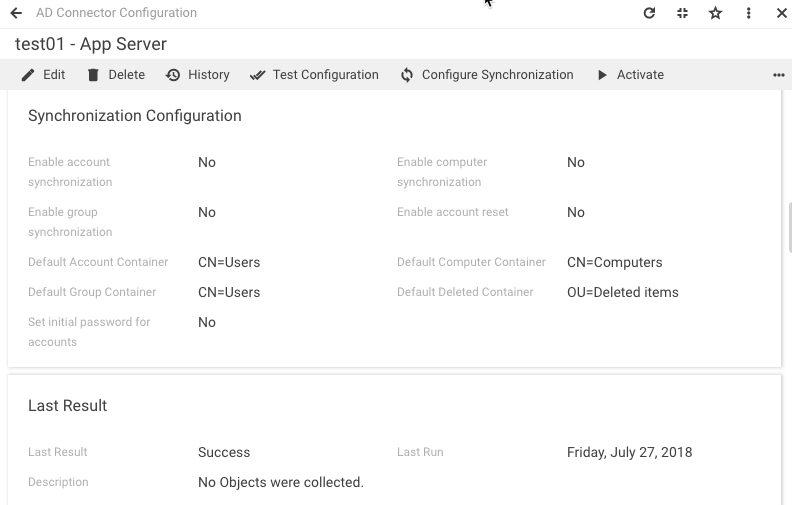
- Last Result: An outcome of the import, whether it was successful or failed.
- Last Run: Date and time of the last import.
- Description: Summarized data about the imported objects.
Walkthroughs
Adding a New Attribute for Import
The Active Directory Data Provider that is available in Matrix42 Enterprise Service Management provides the ability to import users, computers, and groups from an AD server. By default the AD Data Provider imports a certain set of attributes for each object. However, you can expand this set to include as many attributes as necessary. You can add AD object attributes that already exist on an AD server and match them with attributes in Matrix42 Enterprise Service Management as well as create additional custom attributes in two systems.
The Active Directory Data Provider uses a specific import workflow to perform the import of records into Matrix42 Enterprise Service Management. By default it is the AD workflow. The AD workflow contains a nested workflow that is run on an AD server to collect data (by default it is the AD - Client workflow). When the AD - Client workflow is successfully completed, the AD workflow uses the import definitions to import or update records of each object into Matrix42 Enterprise Service Management.
When a new attribute should be imported for a certain object, it has to be explicitly specified in the Active Directory Data Provider configuration and in a corresponding import definition.
Prerequisites for Importing a New Attribute
- AD object has an attribute that is not currently imported by the AD Data Provider
- The corresponding object in Matrix42 Enterprise Service Management has the same attribute
For example, you need to store the weight of organization's computers. Therefore, the "Computer Weight" custom attribute should be added for the computer object on an Active Directory server. Then the corresponding "Computer Weight" attribute for the computer configuration item should be created in Matrix42 Enterprise Service Management.
For guidance on adding a new attribute for a configuration item, see Adding a Custom Attribute.
Modifying the Active Directory Data Provider Configuration
The Data Provider configuration item is designed to summarize main settings and interface controls for integration with various systems. A dedicated Active Directory Data Provider is a starting point that triggers the import from an AD server.
If the AD Data Provider should retrieve the additional "Computer Weight" attribute, make the following changes:
- Under Administration > Integration > Data Providers, double-click the Active Directory Data Provider to open it.
- On the General dialog page, click the configuration to be edited, and then click Edit.
- In the configuration that opens go to the Settings page.
- In the Computer Attribute Names field, specify computerWeight (name of the custom attribute that has been added on the AD server).
- Click Done or Save to save the configuration.
As a result, the Active Directory Data Provider will retrieve the additional computerWeight attribute from the AD server.
Editing the Import Definition
To edit the AD: Import Computers import definition:
- Under Administration > Import > Import Definitions > All, use the search field to find the AD: Import Computers import definition and select it.
- Run the Edit Import Definition action. As a result, a wizard where you can edit settings of the import definition opens.
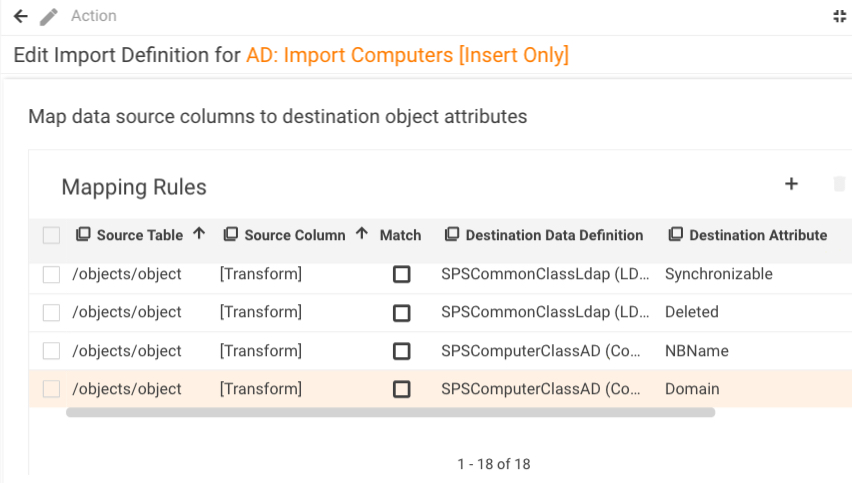
- Follow the wizard until you reach the Mapping Rule Definition dialog page.
- Click the Add button to create a new mapping rule and fill in the following fields:
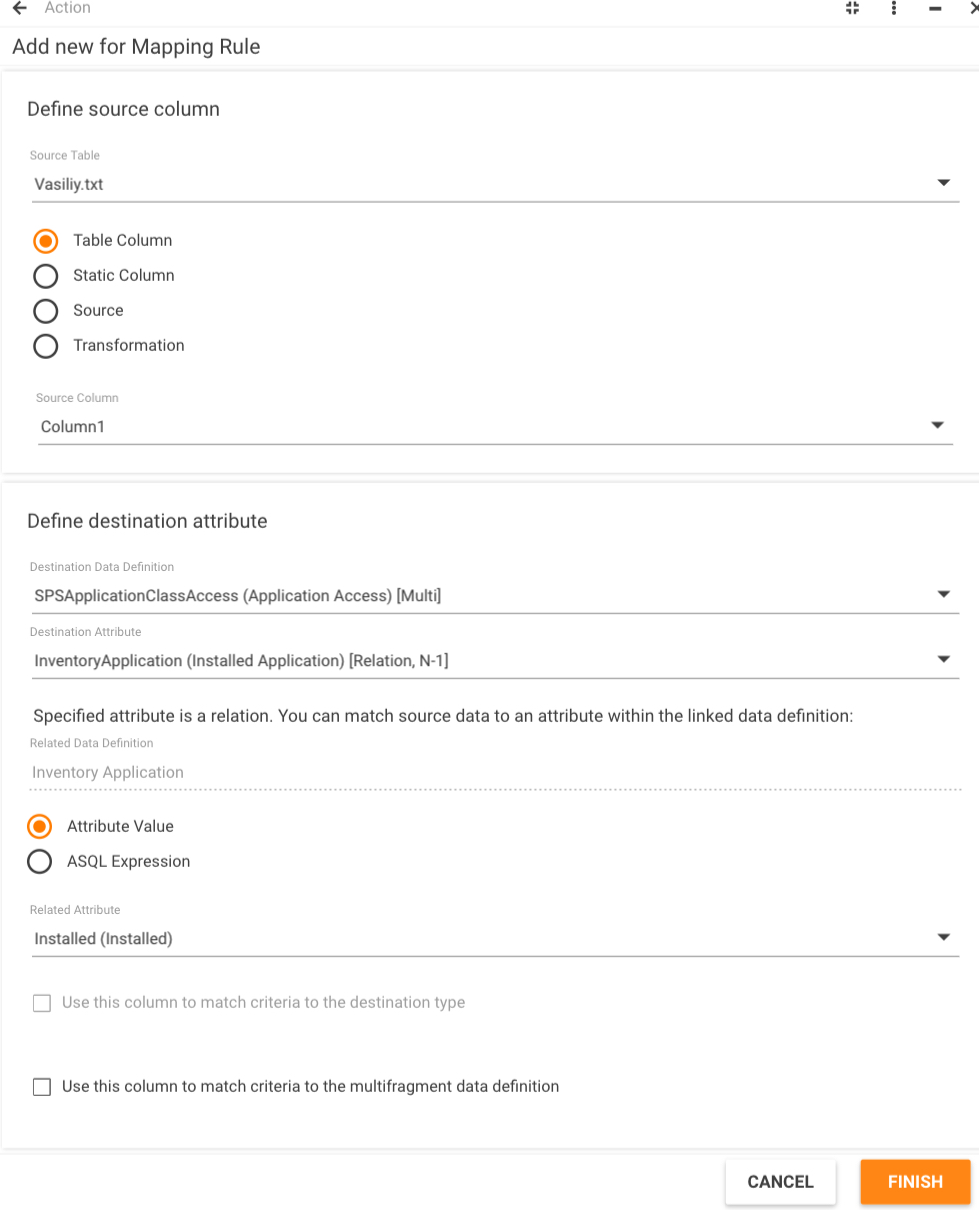
- Column Type: Select the Table Column value to directly match the attribute retrieved from the AD server to an attribute in a Matrix42 Enterprise Service Management data definition.
- Source Column: Select the computerWeight value from the drop-down list.
- Destination Data Definition: Select the SPSComputerClassBase (Computer) value as it contains the attribute to which the retrieved attribute should be matched.
- Destination Attribute: From the drop-down list, select the ComputerWeight (Computer Weight (kg)) attribute.
- Click Finish to save the import definition.
For more information on import definitions, refer to the Import section.
As a result, the next AD import for all configurations and domains will be able to retrieve an additional Computer Weight attribute for computers.
Adding a New Attribute for Synchronization
This section describes how to add a custom attribute to the list of attributes that are synchronized to the Active Directory server for the Computer object.
Prerequisites for Synchronizing a New Attribute
- An object in Matrix42 Enterprise Service Management has an attribute that is not currently synchronized to the Active Directory server
- The corresponding AD object has the same attribute
For example, you need to store the weight of organization's computers. Therefore, the "Computer Weight" custom attribute should be added for the computer object on an AD server. Then the corresponding "Computer Weight" attribute for the computer configuration item should be created in Matrix42 Enterprise Service Management.
For guidance on adding a new attribute for a configuration item, see Adding a Custom Attribute.
Modifying the Synchronization Workflows and Compliance Rules
To add a new attribute to the list of synchronized attributes for computers, you should use the default Create AD Computer and Synchronize AD Computer workflows to create new workflows that will contain the new attribute. Then new compliance rules that will launch these workflows should be created.
Editing the Synchronization Workflows
The Create AD Computer workflow runs a nested Create AD Computer on Agent workflow which transfers the data to the Active Directory server. Similarly, the Synchronize AD Computer workflow runs a nested Synchronize AD Computer on Agent workflow. Therefore, four workflows should be modified in Workflow Studio in order to add a new attribute for synchronization.
The default Matrix42 workflows cannot be modified, but they can be used as templates for creation of new workflows, components, or templates. If you wish to customize the data synchronization to AD servers, you will need to use the existing workflows as templates to create new workflows and then customize the new synchronization workflows.
Editing the Create AD Computer on Agent Workflow
The Create AD Computer on Agent workflow contains two activities that pertain to the set of passed attributes. The Get Computer Data activity retrieves a set of computer attributes from Matrix42 Enterprise Service Management while the Create Computer activity adds a new computer entry on an Active Directory server. Therefore, if a new attribute must be synchronized for computers, you should create a new Create AD Computer on Agent workflow that will be based on the default workflow and will also be configured to pass the additional attribute.

The pane is activated and deactivated by clicking the Properties button in the Editor menu.
To add the new attribute to the list of passed attributes:
- Go to Administration > Quick Start > Workflows and run the Workflow Studio action to open the Workflow Studio. In the studio click New menu item in the File window and select the Create AD Computer on Agent workflow. Double-click the selected workflow or click Create to create a workflow copy and switch to the Editor window.
- Select the Get Computer Data activity and go to the Properties pane.
- Configure the activity to retrieve a new attribute:

In this dialog you can see the list of retrieved attributes that are currently passed to the AD server. Each attribute is saved as a workflow variable in order to be later used in the Create Computer activity.
- In the Properties pane, select the Where Expression property and click the corresponding selection button. The Configure Get Data Designer opens.
- Click the Add button to open the Select Attribute Designer that allows to create a new variable. In the Select a related object section, expand the SPSComputerClassBase schema and find the required attribute. In our example, it is the Computer Weight (kg) (Ud_ComputerWeight) attribute.
- Double-click the Create Variable button and enter a name for the new variable, for example, ComputerWeight. Click OK to save the variable.
- Consequently click OK in the Select Attribute Designer and Configure Get Data Designer dialogs to save changes for the activity.
- Select the Create Computer activity and go to the Properties pane.
- Configure the activity that will pass a new computer attribute to the AD server:
As a result, the list of attributes that are synchronized to the Active Directory server for each new computer will include the computer weight.

- In the Properties pane, select the Static property and click the corresponding selection button. The Edit Ldap Properties Designer opens.
- Click the Add button to create an additional row. In the Name column, enter the attribute name as it is specified on the AD server, for example, computerWeight. In the Type column, select Integer according to the type that is specified for this attribute in Matrix42 Enterprise Service Management and on the AD server. In the Variable / Argument / Expression column, click the selection button, select the ComputerWeightvariable from the list, and click OK.
- Click the Save and Check In buttons in the Editor menu to commit changes to Workflow Studio.
- Use the Release button and then the Publish button if you want to use this workflow in business processes.
Editing the Create AD Computer Workflow
To create a customized Create AD Computer workflow for synchronization of a new attribute:
- In the Workflow Studio, click New menu item in the File window and select the Create AD Computer workflow. Double-click the selected workflow or click Create to create a workflow copy and switch to the Editor window.
- Select the Run Client Workflow activity and go to the Properties pane. You will need to edit two properties for this activity.

- In the Properties pane, click the selection button for the Workflow property. The Select Related Object Designer opens. Double-click the Create AD Computer on Agent (Custom) value (or any other client workflow that was earlier customized). The selected workflow will appear in the bottom box. Click OK to save changes for this property.
- In the Properties pane, click the selection button for the Arguments property. The Arguments dialog contains a list of all input arguments that should be passed to the client workflow. You need to enter VB expressions to set values for these arguments. The values should be identical to those that are specified for the default Create AD Computer workflow. Enter the values and click OK.
As a result, the custom Create AD Computer workflow will use a new Create AD Computer on Agent (Custom) workflow.
- Click the Save and Check In buttons in the Editor menu to commit changes to Workflow Studio.
- Use the Release button and then the Publish button if you want to use this workflow in business processes.
Editing the Synchronize AD Computer on Agent Workflow
The Synchronize AD Computer on Agent workflow contains two activities that pertain to the set of passed attributes. The Get Computers Data activity retrieves a set of computer attributes from Matrix42 Enterprise Service Management while the Update Computer activity updates these computer attributes on the AD server. Therefore, if a new attribute must be synchronized for computers, you should create a new Synchronize AD Computer on Agent workflow that will be based on the default workflow and will also be configured to pass the additional attribute.
To add the new attribute to the list of passed attributes:

As a result, the list of attributes that are synchronized to the Active Directory server for each existing computer will include the computer weight.
- In the Workflow Studio, click New menu item in the File window and select the Synchronize AD Computer on Agent workflow. Double-click the selected workflow or click Create to create a workflow copy and switch to the Editor window.
- Select the Get Computers Data activity and go to the Properties pane.
- Configure the activity in the same manner as for the Create AD Computer on Agent workflow.
- Consequently double-click Get Computer Data and Flowchart.
- In the flowchart that opens, select the Update Computer activity and configure it in the same manner as for the Create AD Computer on Agent workflow.
- Click the Save and Check In buttons in the Editor menu to commit changes to Workflow Studio.
- Use the Release button and then the Publish button if you want to use this workflow in business processes.
Editing the Synchronize AD Computer Workflow
To create a customized Synchronize AD Computer workflow for synchronization of a new attribute:
- In the Workflow Studio, click New menu item in the File window and select the Synchronize AD Computer workflow. Double-click the selected workflow or click Create to create a workflow copy and switch to the Editor window.
- Select the Run Client Workflow activity and go to the Properties pane. You will need to edit two properties for this activity.

- In the Properties pane, click the selection button for the Workflow property. The Select Related Object Designer opens. Double-click the Synchronize AD Computer on Agent (Custom) value (or any other client workflow that was earlier customized). The selected workflow will appear in the bottom box. Click OK to save changes for this property.
- In the Properties pane, click the selection button for the Arguments property. The Arguments dialog contains a list of all input arguments that should be passed to the client workflow. You need to enter VB expressions to set values for these arguments. The values should be identical to those that are specified for the default Synchronize AD Computer workflow. Enter the values and click OK.
As a result, the custom Synchronize AD Computer workflow will use a new Synchronize AD Computer on Agent (Custom) workflow.
- Click the Save and Check In buttons in the Editor menu to commit changes to Workflow Studio.
- Use the Release button and then the Publish button if you want to use this workflow in business processes.
Editing the Compliance Rules for Synchronization
The following compliance rules are used for synchronization of attributes for Computer objects:
- AD Create Computer
- AD Synchronize New Computer
- AD Synchronize Existing Computer
- AD Restore Deleted Computer
The AD Create Computer, AD Synchronize New Computer, and AD Restore Deleted Computer compliance rules launch the Create AD Computer workflow. The AD Synchronize Existing Computer rule starts the Synchronize AD Computer workflow. Default compliance rules cannot be changed, but can be used as templates. Therefore, you should create custom compliance rules and redefine the workflow that each of the compliance rules starts.
The same procedure should be used for all rules.
For example, to edit the AD Create Computer compliance rule:
- Go to Administration > Services & Processes > Compliance Rules, select the AD Create Computer compliance rule, and then click Edit in the action pane. The system will automatically change the quick filter flag of the compliance rule to Custom and add the UD prefix for the compliance rule name.
- Follow the wizard until you reach the Actions page.
- Click the Start Workflow action row. In the dialog that appears, go to the Workflow Details page.
- Select the Create AD Computer (Custom) workflow from the list. Click Select and then Finish.
- Edit the description field on the previous page to specify that this compliance rule should launch a custom workflow.
- On the final page of the wizard, click Finish to save the changes.
- Save the changes to the Compliance Rule dialog.
This way the custom UD_AD Create Computer compliance rule will trigger the Create AD Computer (Custom) workflow.