Getting started with Data Protection SaaS
Overview
This article describes the first steps with your Matrix42 Endpoint Data Protection SaaS solution and also offers links to the documentation of the different possibilities / topics. If you have opened this page from your welcome E-Mail, you should have received your certificates, passwords and login data. Overall, you need the following:
- An Matrix42 Account
- Your Matrix42 EgoSecure FQDN and Port
- Your Username and Password for accessing the EgoSecure Server via the EgoSecure Console
- The Authentication certificate for the Console including the corresponding password
- The Password for the Client authentication certificate
Features and Capabilities
Supported Modules
| Access Control | Application Control | Removable Device Encryption | Cloud Storage Encryption | Local Folder Encryption |
| Network Share Encryption | Permanent Encryption | EgoSecure Antivirus | BitLocker Management | Full Disk Encryption |
| Green IT | Secure Erase | Inventory | Password Manager | IntellAct Automation |
| Data Loss Prevention - Data in Use | Data Loss Prevention - Data at Rest |
Supported directory services:
- Microsoft Entra ID
- EgoSecure "Own Directory“ mode
Agent
- Communication of Agents with Server via polling
Server Connection
Download and start the EgoSecure Console
- Download the EgoSecure Console from the Matrix42 Marketplace (login required).
- Import the Console certificate for the current Windows user.
- Start the EgoSecureConsole.exe or EgoSecureConsoleWin32.exe.
Connect to the EgoSecure Server
- The Console login dialog appears.
- Enter the Server connection data in the Server and Port fields.
- Click on the lock in the Server field.
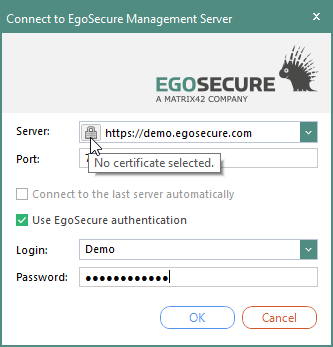
- The dialog where you need to select the certificate appears.
- Click OK to confirm.
- The lock in the Server field becomes green.
- Enable the Use EgoSecure authentication check box.
- Enter the login data you received.
- Click OK.
- The Console is now ready to use.
- The Welcome dialog with first steps opens.
Connect with Microsoft Entra ID
- If you use the Entra ID directory service, you can now set it up in the Console.
- For details, please refer to: Setting up Azure AD in EgoSecure Data Protection SaaS
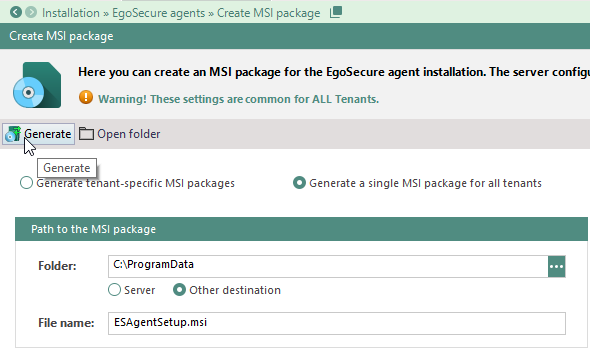
Install the EgoSecure Agent Client
- In the Console, navigate to Installation | EgoSecure agents | Create MSI package.
- In the Path to the MSI package area, enable the Other destination radio button and click
 to select location for the MSI package on the computer.
 - In the Settings of MSI package area, enable the Add authentication certificate option and enter the password for the Client certificate.
- Specify other settings, if necessary.
- Click Generate.
- Install the MSI package:
- locally on the Client: the authentication certificate is imported automatically. Enter the password during the installation.
- via software distribution or group policy: the authentication certificate is imported automatically. Transfer the certificate password via the following script parameter:
PKCS12_PASS ="mypassword"
The EgoSecure Agent is now installed and connected to the EgoSecure Server. The Client computer and the user logged on to Agent appears in Console under User management/Computer management. You can now activate products and manage rights.
Review Online Documentation
Sending E-Mails
We provide a pre-configured SMTP Server with your Installation so you could start sending mails right away with you EgoSecure Data Protection SaaS solution. You can change this configuration at any time and replace it with your own SMTP Server if available from the internet.
We recommend to change the pre-configured SMTP Server to your own when you are using EgoSecure Data Protection SaaS productively. With the default SMTP Server provided by Matrix42 you cannot change the Sender E-Mail address which must end with @m42cloud.com, otherwise E-Mails will be rejected. You are also not able to change SMTP related settings or will be able to see logs, activity etc.
Limitations
- Initial Agent installation is possible only locally or via software distribution tools, although the remote Agent update can be performed via the Installation section of Console
- The EgoSecure Supervisor Account is used by Matrix AG for administration and therefore not available
- The Check Agent state option doesn't work
- If Console and Agent are in different networks: not possible to compress Agent log files and scan computer to get the list of devices or application
Document information
|
ID: 19061801
Languages: EN, DE
Components: EgoSecure Console, EgoSecure Agents
Operating system: Windows
|