Service Connections
Overview
Service Connections allow you to configure and maintain connections to 3-rd party services like Microsoft 365, Dropbox, or Google Workspace. With Service Connections, you can share data and files across your organization without sharing the credentials to these resources.
Service Connections are available without extra licenses in the following cases:
- SMTP server connection via OAuth (see Administration application → Settings → Edit Global System Settings → Emails)
- E-mail Robot (see Service Desk → Settings → E-mail Robot settings)
Other configuration scenarios are available with ESMP Subscription and SMTP server connection via OAuth2.0 is available staring from v.11.0.1.
Once authorized, the users can get the necessary information and connect to provided services automatically, while credentials and access are securely managed by the system.
Service Connections are configured by the Administrator in the Administration application and include the following steps:
- Services: use the default-provided Services or add and configure a new service provider, set authentication type and capabilities;
- Tenants: add a new tenant for the created service;
- Connections: add a service connection.
When everything is set up, Service Connections can be used in:
Service Connections Configuration
Service Connections are configured by the Administrator in the Administration application → Integration → Service Connections.
Service Connections keep and maintain the information needed to set up the connectivity with the various external Services.
Services
Use the suggested or add a new service provider.
By default, the system has the following pre-configured services that can be easily adjusted and integrated, among them:
- Matrix42 Accounts: use for connecting Matrix42 Cloud Services like Marvin, etc.
- Dropbox file storage
- Google Workspace: in particular, Google Drive
- Microsoft 365:
- One Drive
- AAD (Delegated): stands for Azure Active Directory authorization with a specific personal account, i.e. login with username and credentials. All communication is executed under user permissions. This option is considered more secure and therefore recommended for usage.
- AAD (Application): in this scenario, the communication is based on Azure Active Directory Application permissions, the configuration requires Application client ID and client credentials.
AAD (Delegated) and AAD (Application) pre-configured services are introduced in 10.1 ESMP release version.
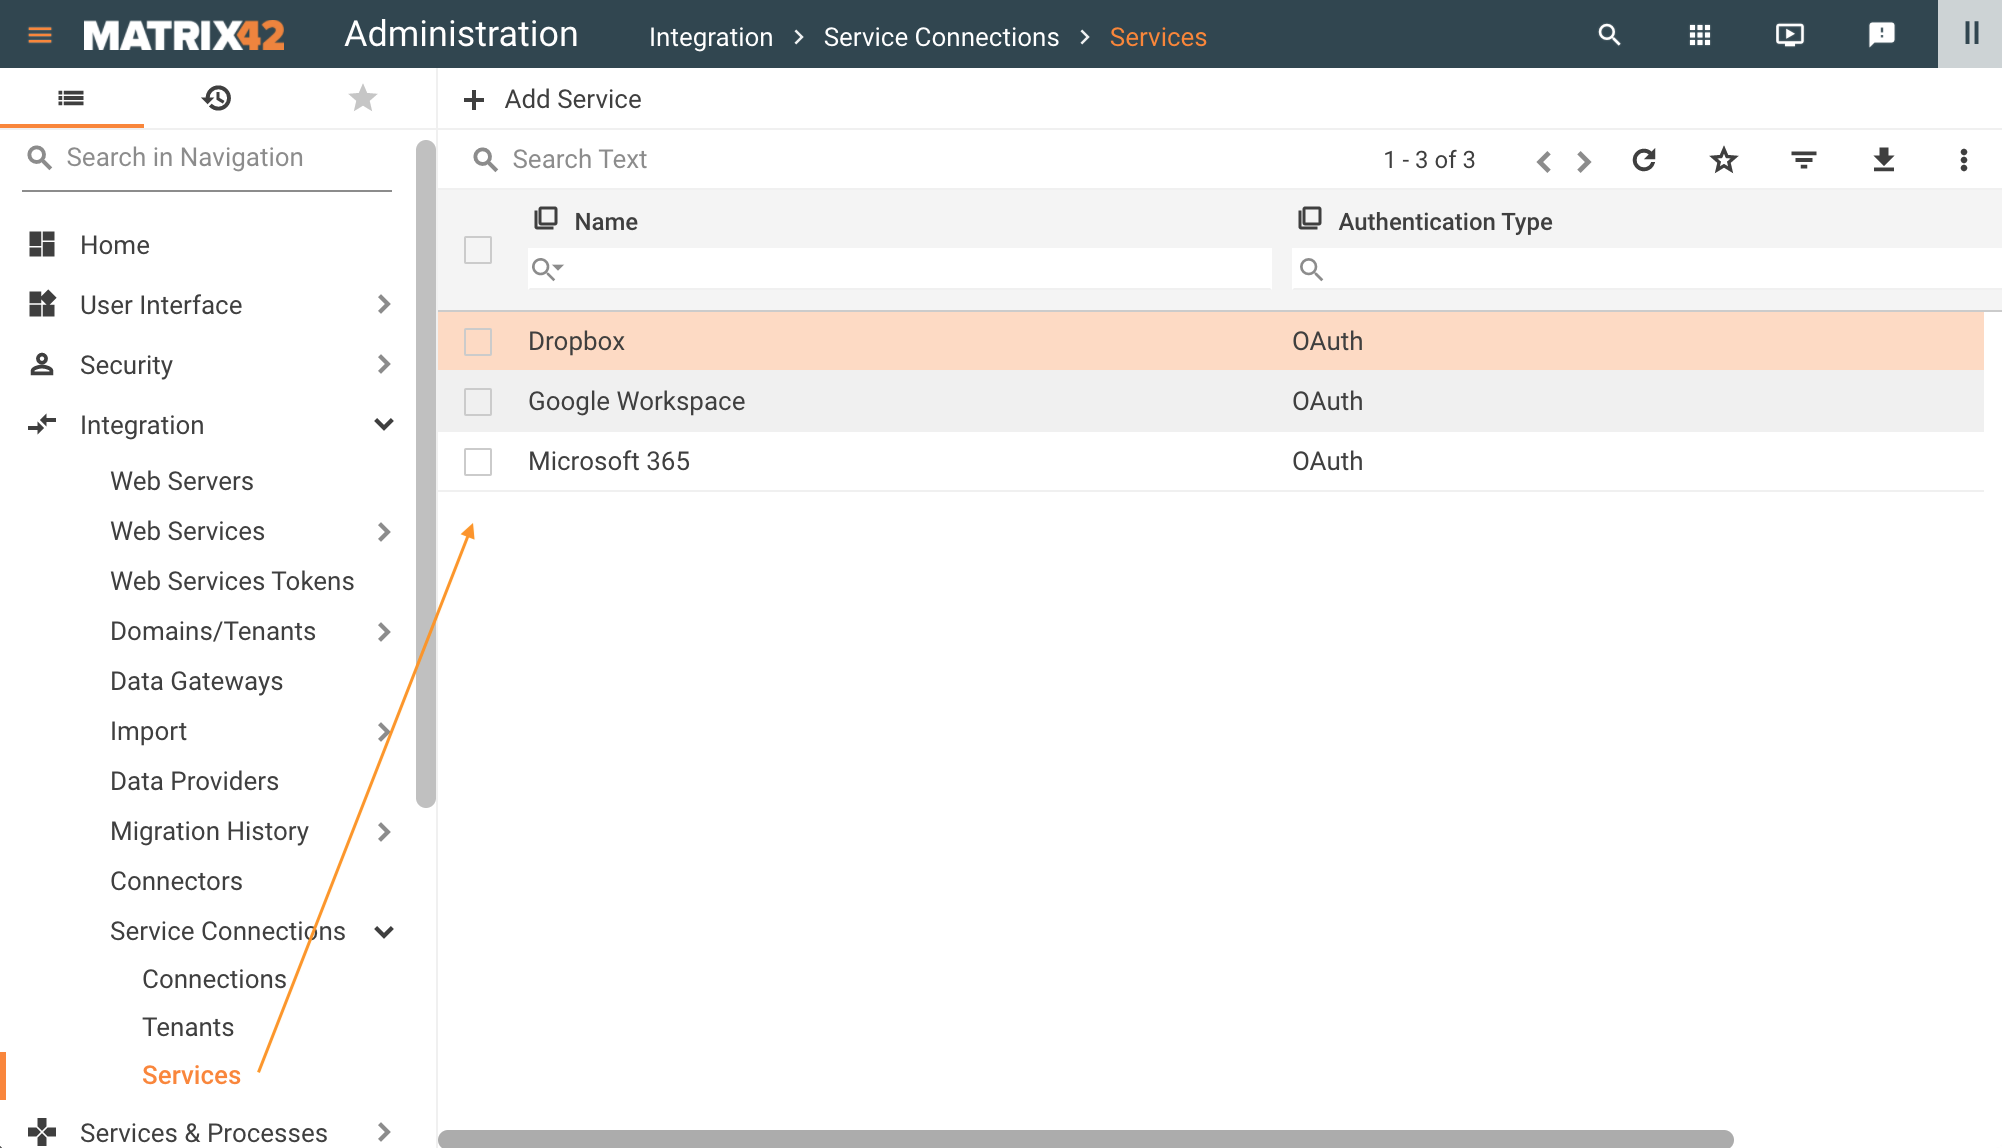
Default-provided Services of the Service Connections
You can add a new Service via the Administration application → Integration → Service Connections → Services → Add Service or adjust the default one with the Edit action for the suggested item.
The new Service additionally requires adjustments in the PDRServiceConnectionProviderClass Data Definition, where Metadata in JSON format stores the information on how to download and process the link to the file from the created Service provider.
Service has the following configurable options:
- Name: internally used name of the service;
- Description: service provider description;
- Authentication Type: subsequent settings differ based on the selected Authentication Type. Currently, the system supports the following types of authentication:
- OAuth (2.0): use this option if you want users to easily provide authorization to applications without needing to share private data or dig through developer documentation.
- Username/Password: use this option if you expect developers to build internal applications that do not need to access more than a single user’s data.
- JWT Authentication: JSON Web Tokens is a good way of securely transmitting information between parties because they can be signed, which means you can be sure that the senders are who they say they are.
OAuth Authentication Type configuration
- Grant Type: choose from the list of suggested OAuth 2.0 Grant Types. This option defines the Grant Type for every Capability of the Service and can also be referred to as a Service Grant Type. Available options:
- Authorization code
- Client credentials
- Client Assertion
- Authorization code with credentials
To redefine the Grant Type for a specific Capability, see also Capabilities Grant Type vs. Service Grant Type section of this page.
- OAuth section depends on the selected Grant Type. Configurable options:
- URL: the authorization code flow begins with the client directing the user to the authorization endpoint.
- Token URL: before the ESMP application can access private data using configured Service, it must obtain an access token that grants access to the Service resources.
In the Microsoft 365 OAuth configuration example, the {tenant-id} corresponds to the data from the Tenants configuration.
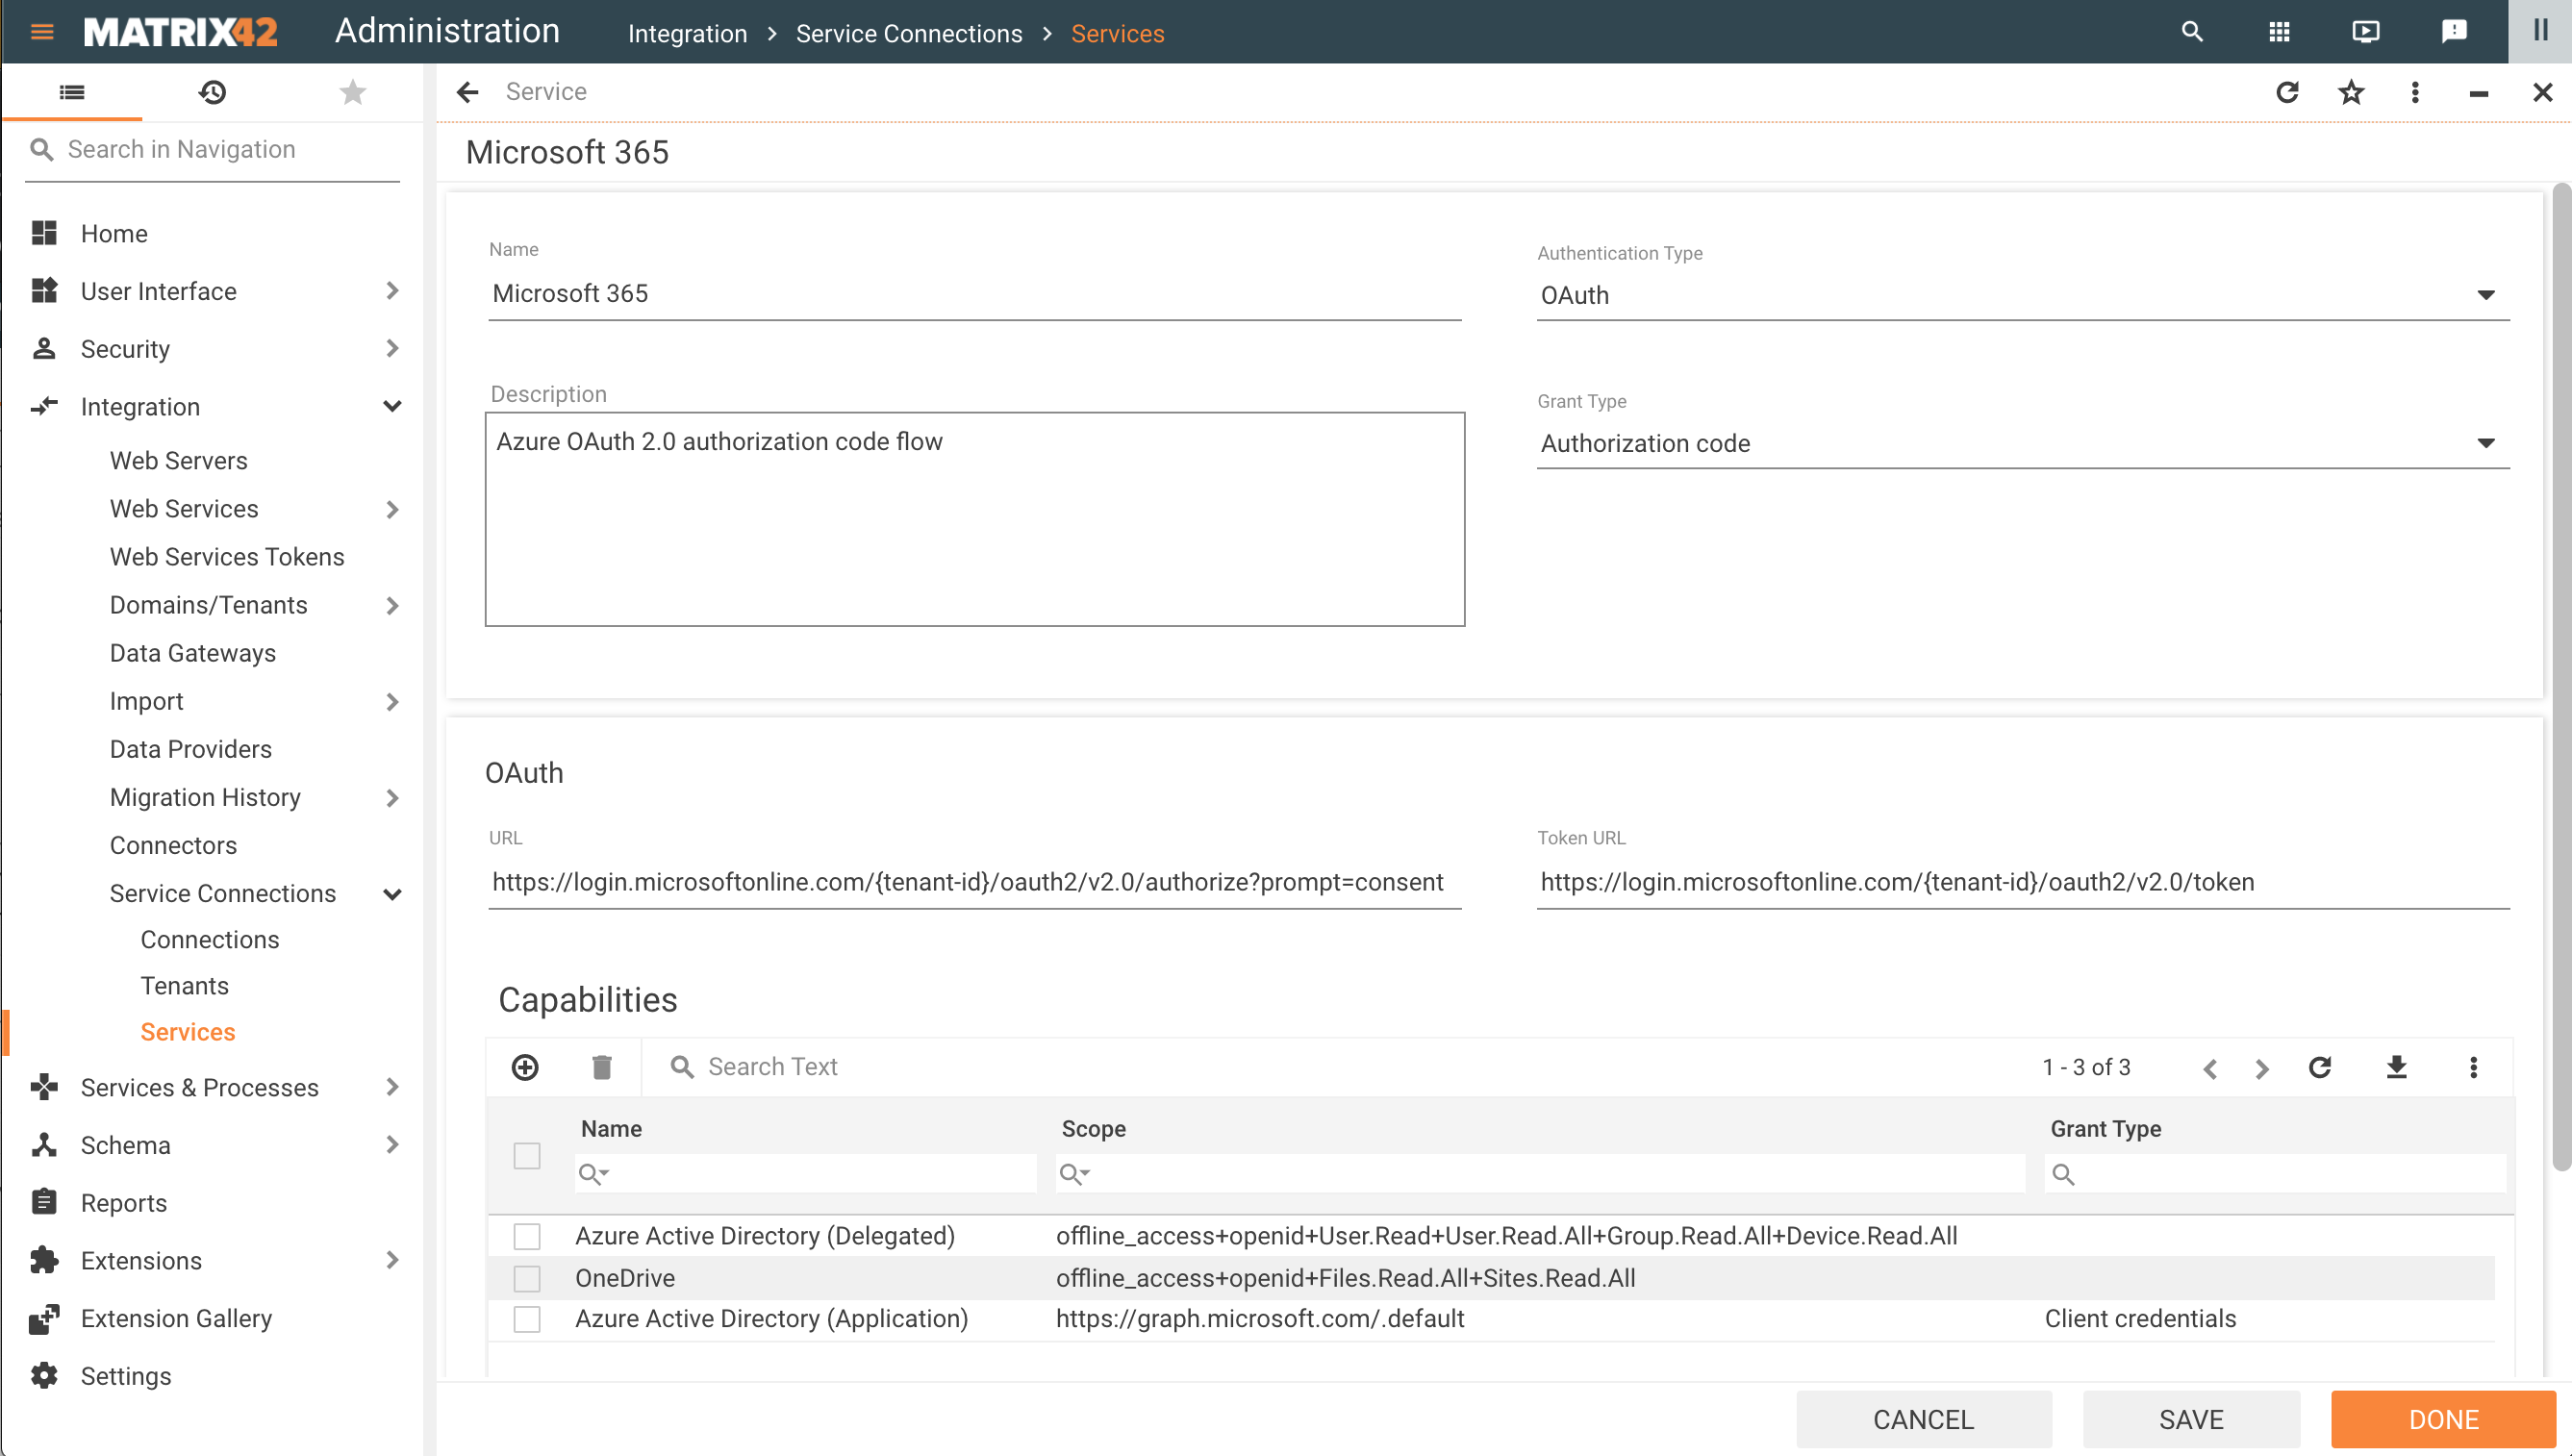
Services configuration example for OAuth Authentication Type
The System automatically tracks the Service Connection Token Expiration and refreshes the token over the OAuth refresh Token Mechanism.
Capabilities section
- Name: internally used name for the defined scope;
- Scope: define a set of resources and operations that can be granted for the service. Configure the scope according to the Service specifications that you can find in online resources:
- Google Identity: OAuth 2.0 Scopes
- Microsoft identity platform: permissions and consent
Additionally, starting from the 10.1 ESMP release version you can define a Validate Uri and set a specific Grant Type for every of the added Capabilities. For more details see also the Capabilities Grant Type vs. Service Grant Type section of this page.
- Grant Type: can be optionally set for each Scope and override the selected option for the Service Grant Type. Available options:
- Not set: the system uses the default option from the Service Grant Type
- Authorization code
- Client credentials
- Client Assertion
- Authorization code with credentials
- Validate Uri: this property is necessary for the Service Connection Validation. Reference to the API service or API methods that will be executed when you try to set up the Service Connection.
- Description: internally used optional description.
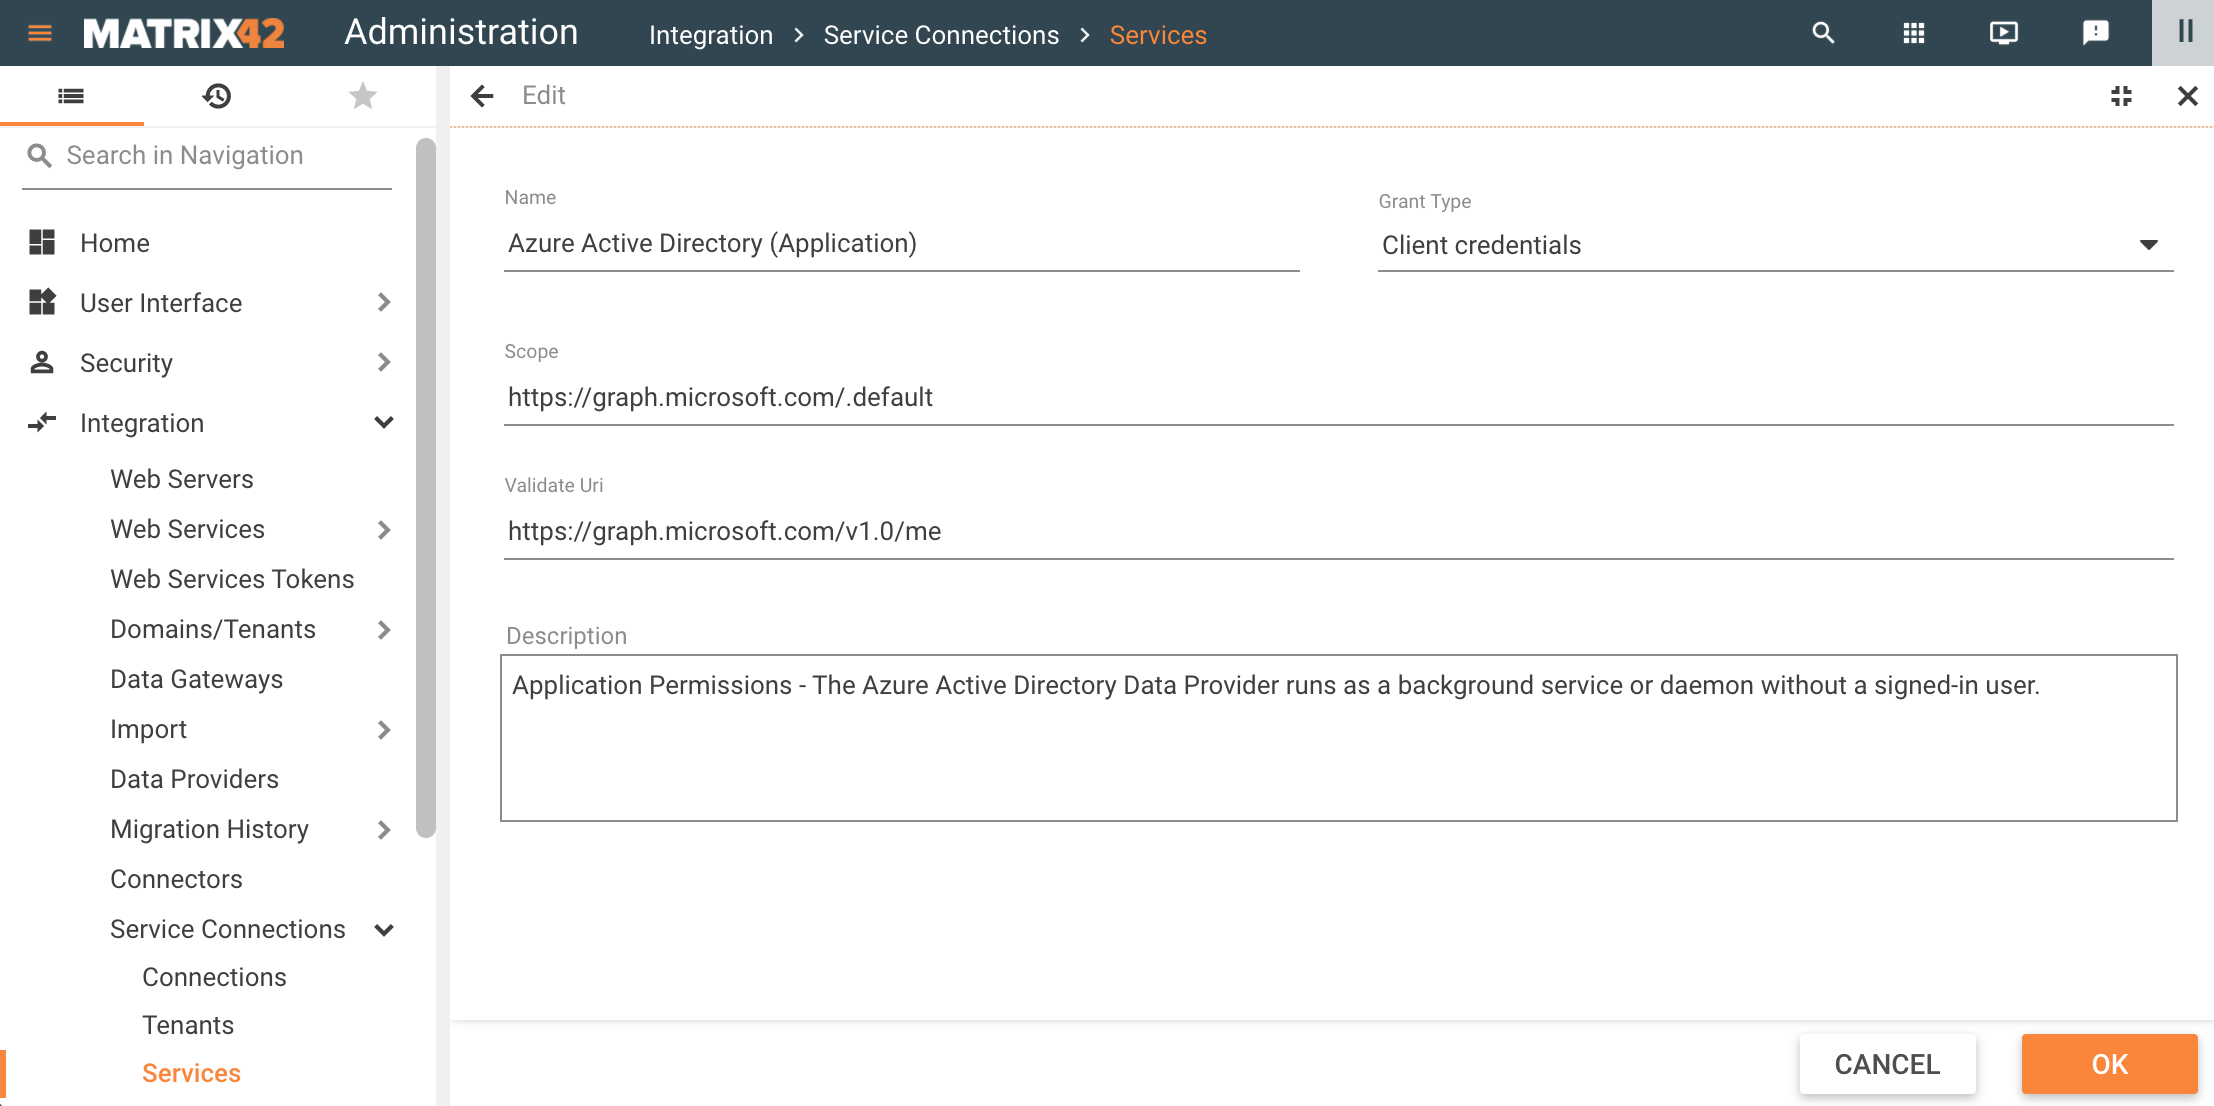
A Service can have more than one set of scopes in the Capabilities section. A pair of Service name and the name of the Scope can be chosen later when configuring the Connection, thus allowing you to set up different access levels to the same Service provider.
Capabilities Grant Type vs. Service Grant Type
- By default, the system applies the selected Service Grant Type if the Capabilities Grant Type is not set;
- To override the selected Service Grant Type property, select an option in Capabilities Grant Type for the specified Scope:
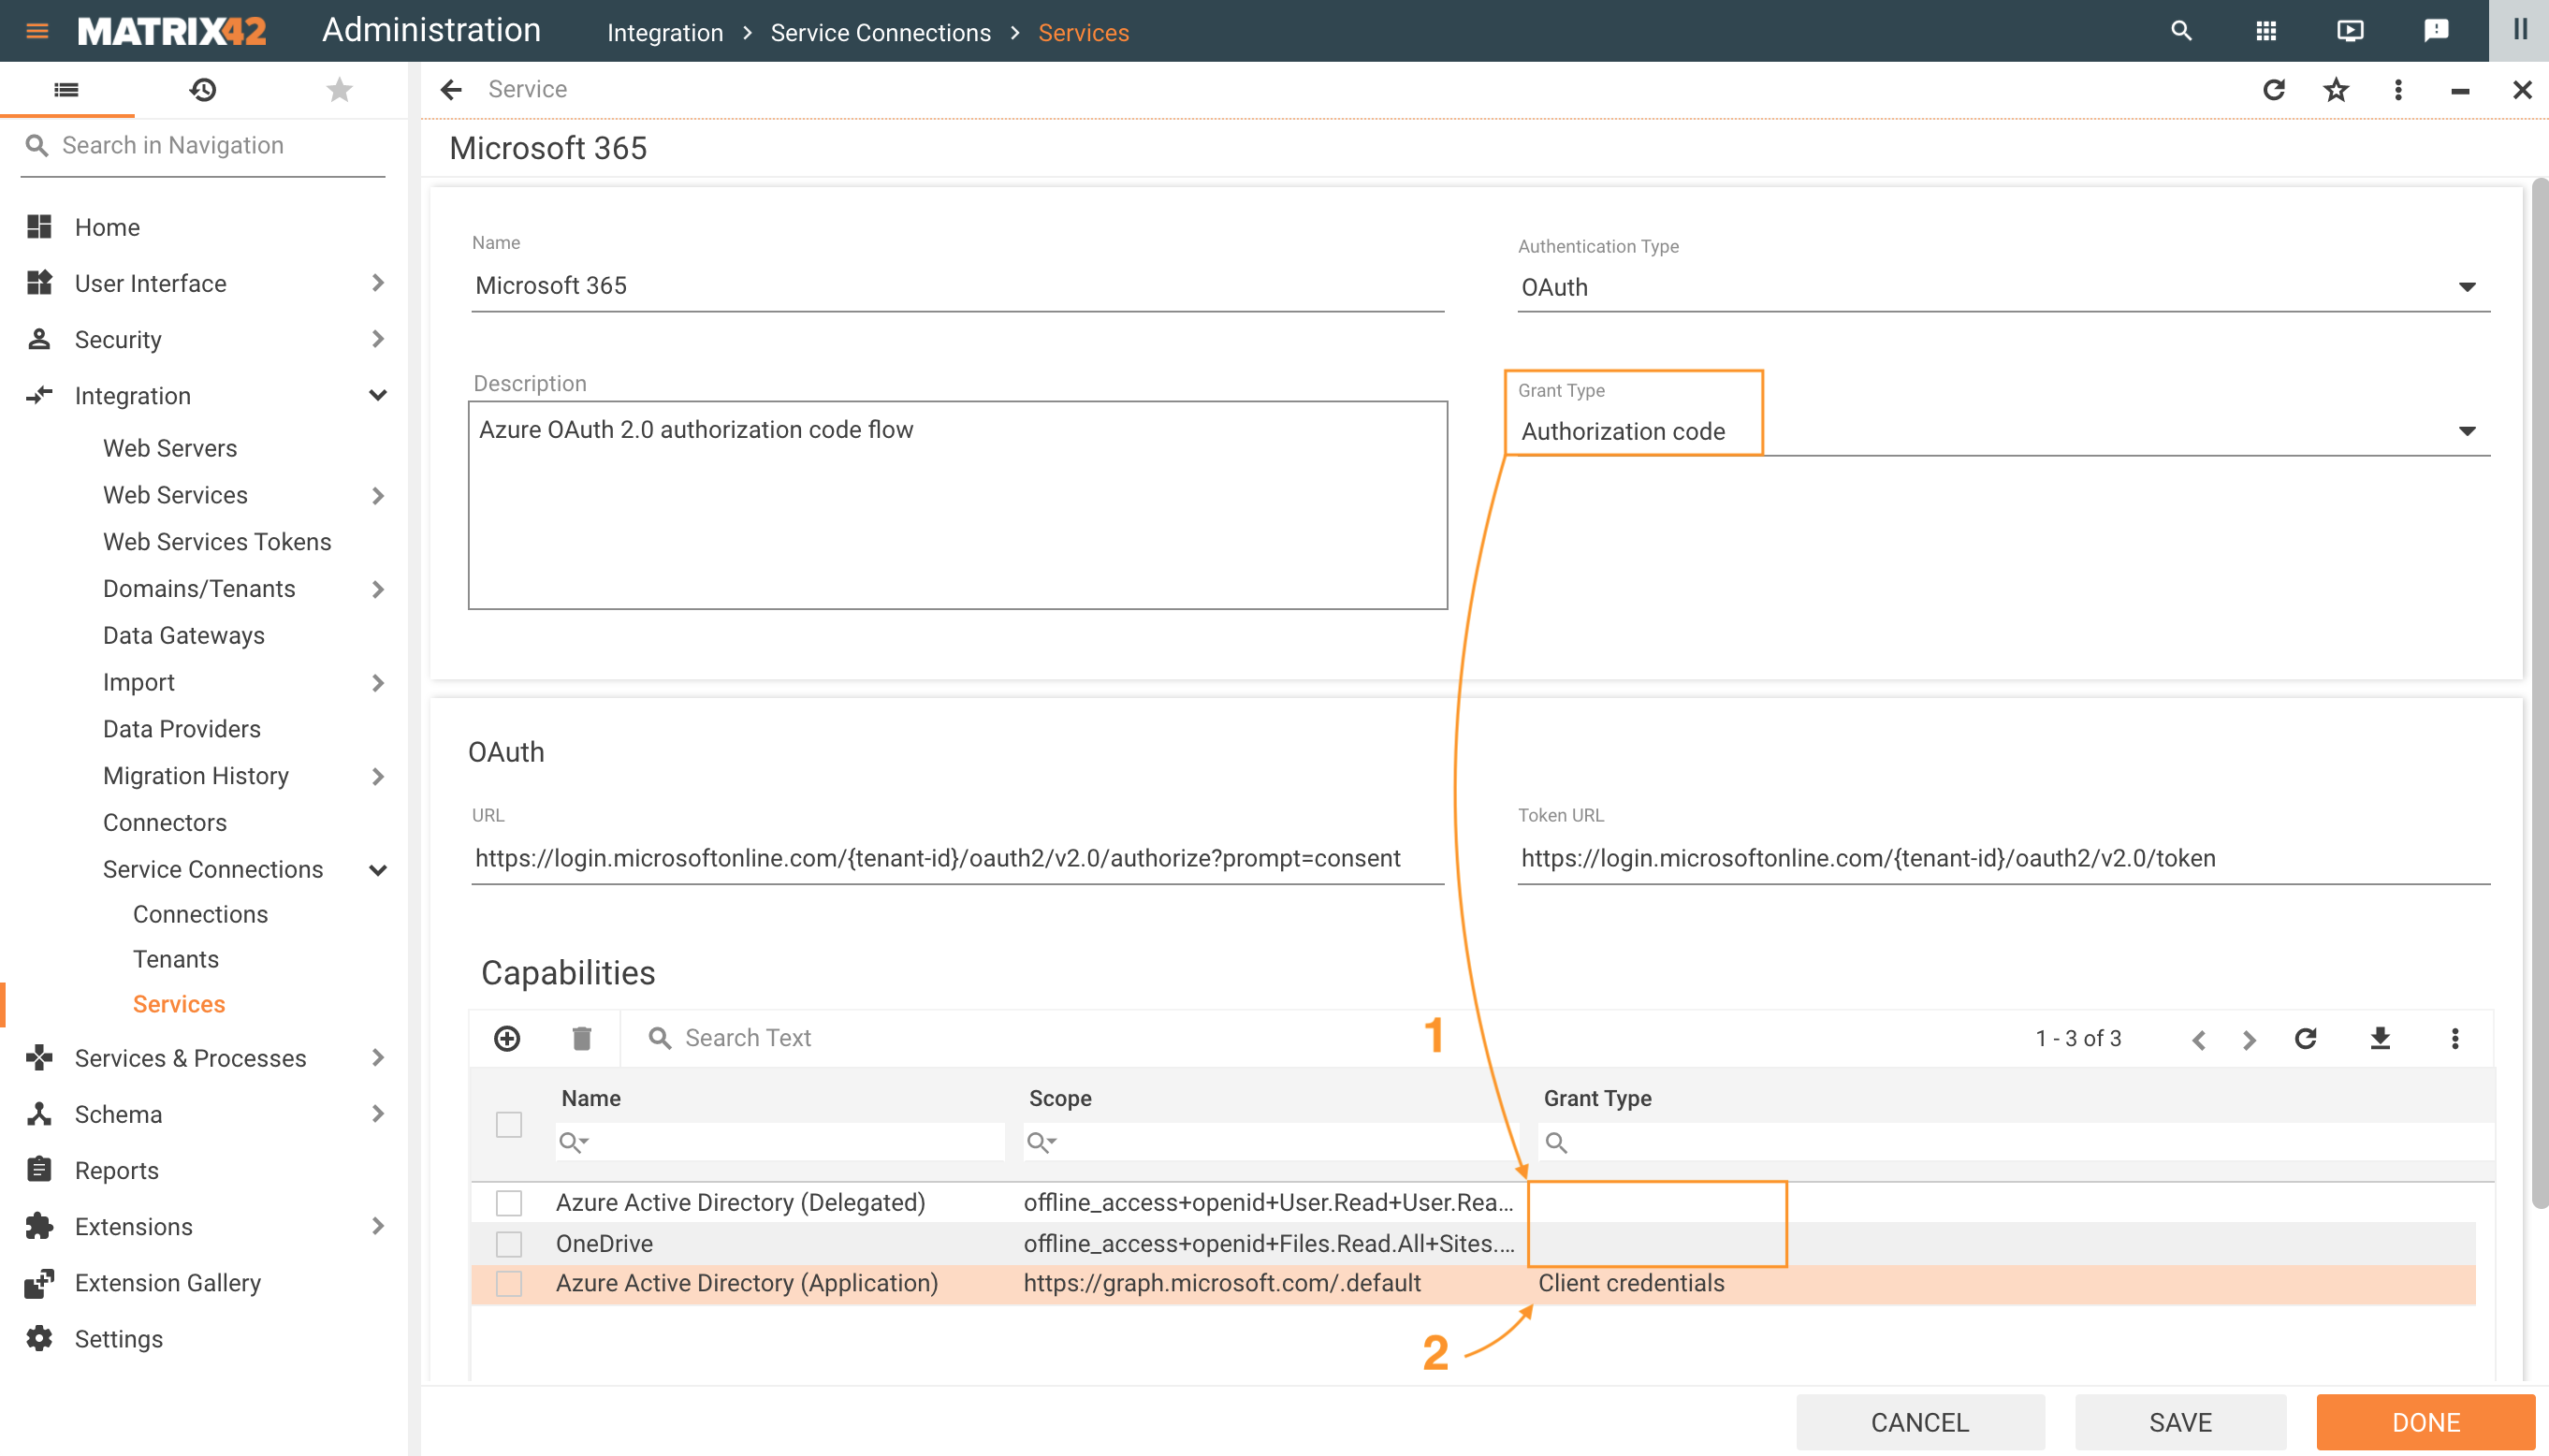
Capabilities Grant Type is available starting from 10.1 ESMP release version.
JWT Authentication
JSON Web Token (JWT) is an open standard (RFC 7519) that defines a compact and self-contained way for securely transmitting information between parties as a JSON object.
JSON Web Tokens are a good way of securely transmitting information between parties:
- Simple: easy to construct and read because of friendly JSON format
-
Flexible: add any extra information for any purpose
-
Popular: it is widely used mechanism, especially for APIs authentication
-
Secure: the transmitted information can be verified and trusted because it is digitally signed
JWT is an open and standard way for you to represent your user’s identity securely during a two-party interaction. When two systems exchange data you can use a JWT to identify your user without having to send private credentials on every request. The information can be verified and trusted because it is digitally signed using a secret (with the HMAC algorithm) or a public/private key pair (RSA or ECDSA). Upfront the configuration of the Service Connection the Private/Public Keys need to be generated, and the Public Key has to be provided to the external System (some Vendors offer a possibility to generate Keys on their side and give you back the Private Key).
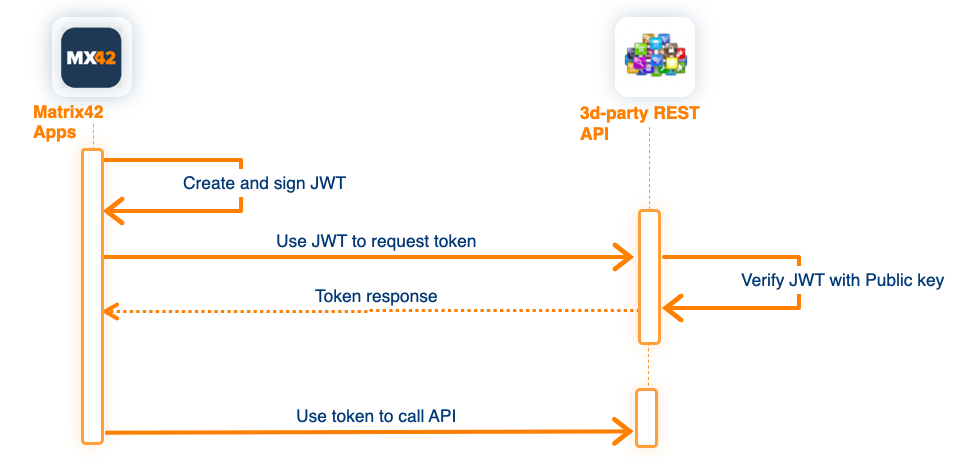
The configuration of the "JWT Authentication" for Service Connections in general is identical to the OAuth authentication configuration, except for parameters describing the format of the JWT Token ("JWT Token Format") and the format of the request to external service to exchange the JWT token to Access Token ("Exchange Token Body Format")
JWT Token Format - defines the structure of the JWT Token sent to external REST API for authentication. In general, the format of the token is similar for vendor to vendor implementations, nevertheless, it can be slightly different.
- Sub (subject)- in other words, a way to identify the user making the request/being authenticated. You can use the predefined placeholder {user-name} to refer to the value specified in the Service Connection form.
- Iss (issuer)- or rather, the server that issued the token. Usually, this value is generated by the External REST API on configuration, and can be inserted into the related Tenant object into the field "Account ID" and referenced here by placeholder {account-id}
- Aud (audience)- it tried to provide some form of identification of the recipient of this token.
- Scope - limit the usage of the API to the specified scope. Use the predefined placeholder {scope} to refer to the used Capability.
Exchange Token Body Format - defines the format of the Request Body sent to the external service to exchange the JWT Token to Access Token.
Supported Placeholder
| Placeholder | Description |
|---|---|
| {token} | Replaced by the created and signed JWT token. Used in "Exchange Token Body Format" only |
| {client-id} | Replaced by the related Tenant object "Client ID" property |
| {client-secret} | Replaced by the related Tenant object "Client Secret" property. Used in "Exchange Token Body Format" only |
| {account-id} | Replaced by the related Tenant object "Account ID" property |
| {tenant-id} | Replaced by the related Tenant object "Tenant ID" property |
| {scope} | Replaced by the scope value defined in related Capability used for establishing Service Connection |
| {user-name} | Replaced by the value provided to the property "User Name" in the Service Connection dialog |
| {now} | Replaced by the current time in Unix Timestamp format |
Examples
| Adobe Service Account | Google API over Service Account | |
|---|---|---|
| Vendor Documentation |
https://www.adobe.io/authentication/auth-methods.html#!AdobeDocs/adobeio-auth/master/JWT/JWT.md |
https://developers.google.com/identity/protocols/oauth2/service-account#httprest |
| Token URL | https://ims-na1.adobelogin.com/ims/exchange/jwt/ | https://oauth2.googleapis.com/token |
| JWT Token Format | iss={tenant-id}&sub={account-id}&aud=https://ims-na1.adobelogin.com/c/{cl...}&{scope}=true | iss={account-id}&aud=https://oauth2.googleapis.com/token&...ame}&iat={now} |
| Exchange Token Body Format | jwt_token={token}&client_id={client-id}&client_secret={client-secret} | grant_type=urn:ietf:params:oauth:grant-type:jwt-bearer&assertion={token} |
| Tenant object | 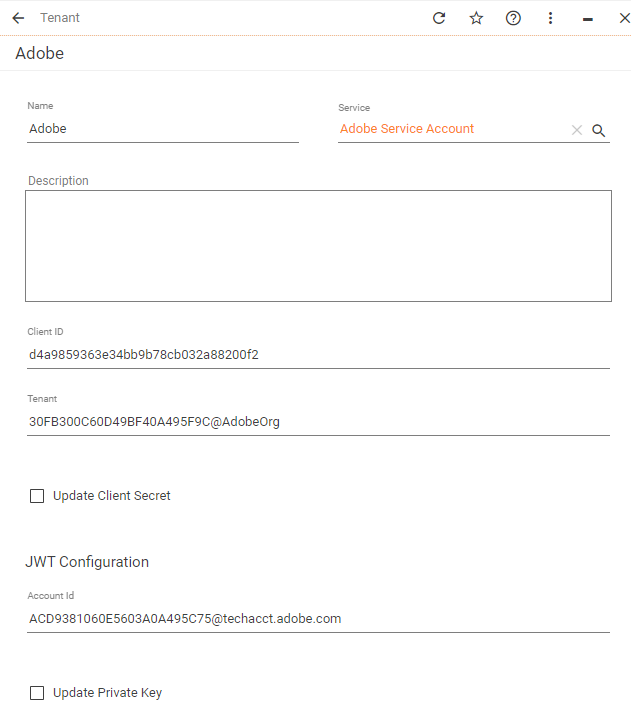 |
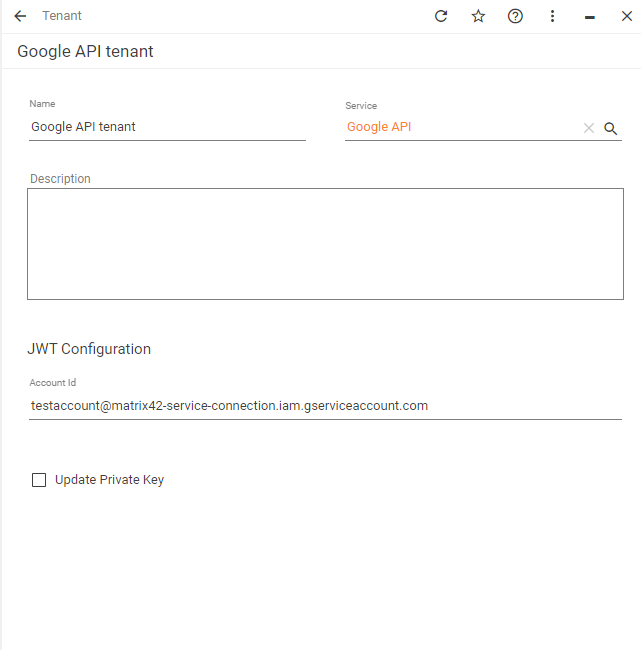 |
Tenants
Visit the Service provider website to obtain OAuth 2.0 credentials such as a Client ID and Client Secret that are known to both the Service provider and ESMP application.
Very often you need to define the Authorization callback URL at the Service Provider settings:
https://{your_domain_name}/wm/externalAuth/redirect.html.
The default Authorization callback URL can be redefined in the Production database in attribute [SPSGlobalConfigurationClassSecurity].[AuthenticationRedirectURISuffix].
Like in example:
UPDATE SPSGlobalConfigurationClassSecurity SET AuthenticationRedirectURISuffix = '/externalAuth/exchange'
For more information about Tenants configuration and credentials from the Service provider see also:
- Google Drive Tenant Configuration for Google Workspace Service Connection
- OneDrive Tenant Configuration for Microsoft 365 Service Connection
- Dropbox Tenant Configuration for Dropbox Service Connection
Use the obtained from the Service provider website data in the Tenants configuration as follows:
- Name: internally used name of the Tenant;
- Service: choose from the list of available Service providers;
- Description: optional Tenant description;
- Tenant: enter the ID. The name of this ID on the Service provider website may vary. Depending on the Service where you have registered the ESMP. This might be the Tenant ID, Directory ID, etc.
- Client ID: enter the ID. The name of this ID on the Service provider website may vary. Depending on the Service where you have registered the ESMP. This might be the Client ID, Application ID, etc.
- Client Secret: enter the client secret. When you save the Tenant configuration, the Client Secret will be encrypted and no longer visible in the Tenant configuration. You can use the Update Client Secret option if necessary later on when editing the Tenant configuration.
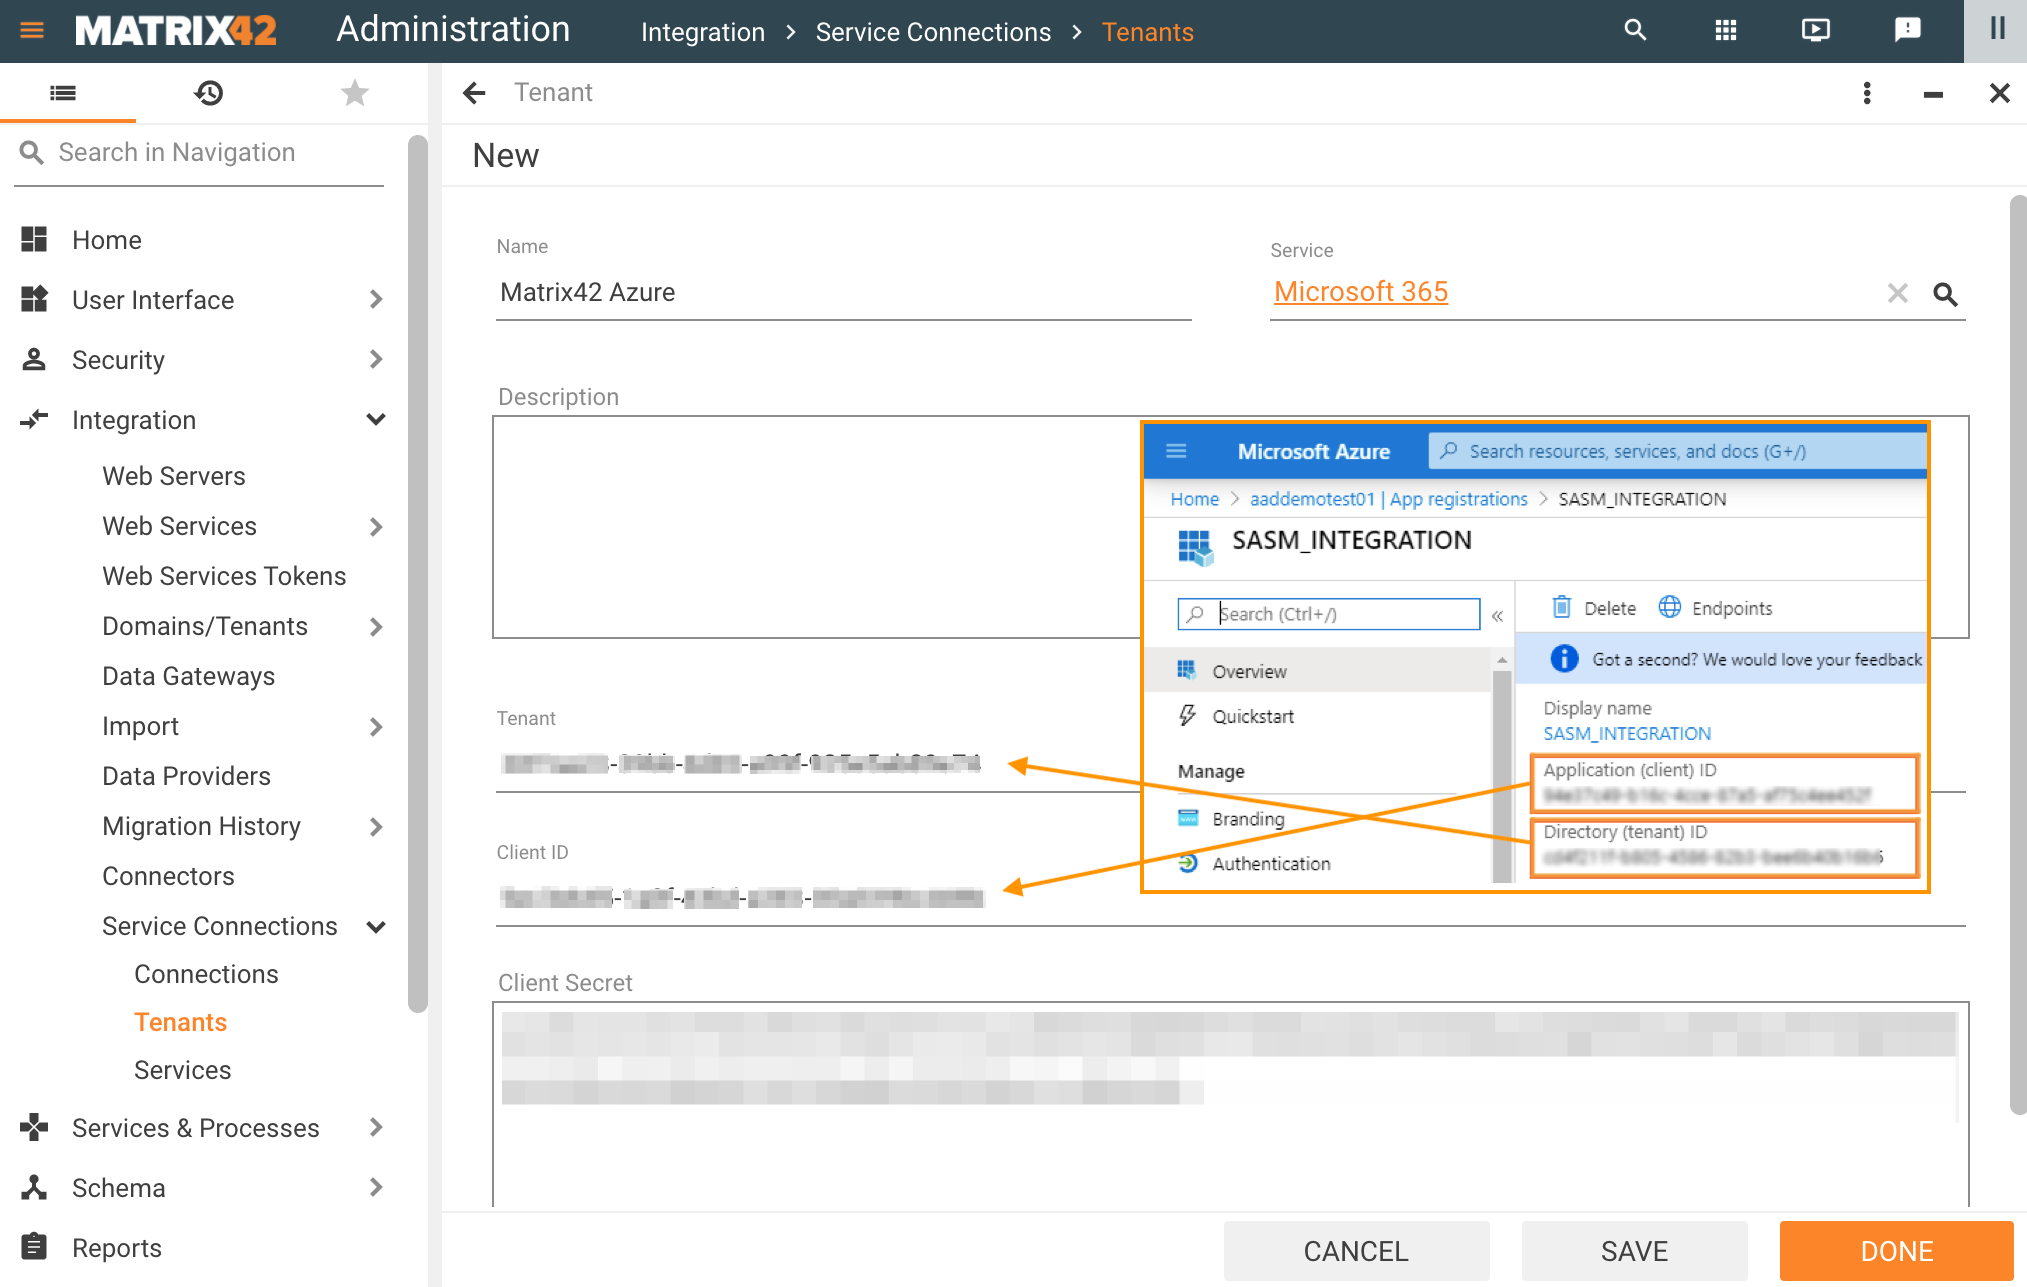
Service Connections: adding a new Tenant configuration example with data from the Azure portal
Connections
On the last step of the configuration add a Service Connection and Setup Authentication:
- Service: choose from the suggested options. The list includes a pair of configured Services and their Scope (see Capabilities section);
- Tenant: choose from the available in the system Tenants;
- Name: internally used name of the Connection;
- Description: optional description.
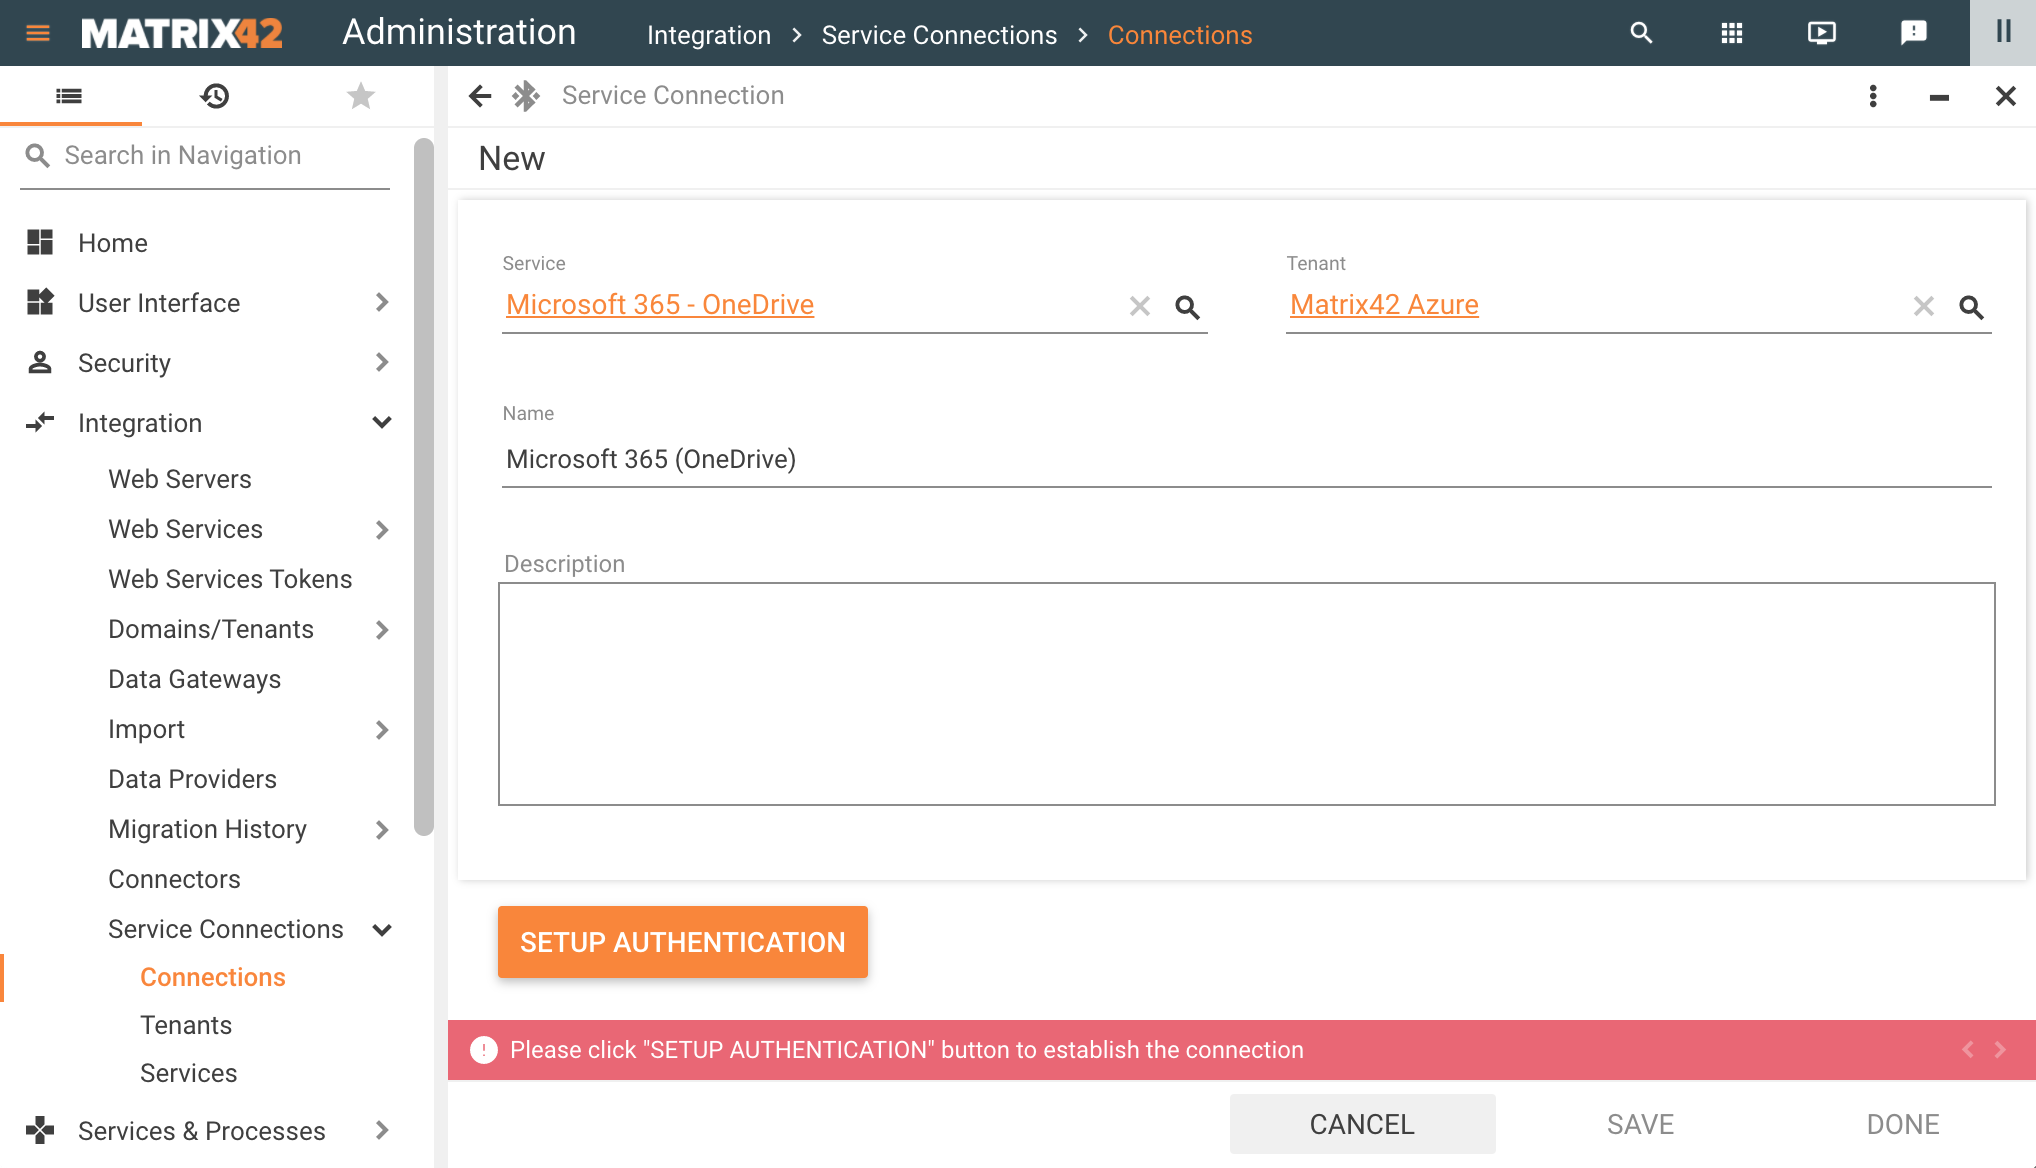
Service Connections: adding a new Connection configuration example
Click Setup Authentication and grant consent as suggested by the Service you are trying to connect to. The granted permissions correspond to the configured Scope of the chosen Service.
The system supports Azure Active Directory Multi-Factor Authentication (MFA/2FA) starting from 10.1.0 ESMP release version.
After the authentication is successfully completed, you can retrieve necessary files with the configured Service Connection via Import Definitions and, for example, connect to your Google Drive to import Tickets that are collected with some Google form or use REST API in the Workflow Studio with HTTP Send Workflow Activity.
Service Connections Usage
Cloud Data Providers in Import Definitions
Import Definitions support processing files from the direct link to Cloud Drive (Google Drive, One Drive, Dropbox, etc). In such a way it is possible to execute Import Definition regularly using Engine Activations. When the file content has changed, the changes are applied automatically with the next run of the import.
Create a new Import Definition and choose the Cloud Drive in Data Source Definition configuration:
- File Path: enter the path to the file in the cloud storage;
- Cloud Drive Connection: choose from the available in the system connections.
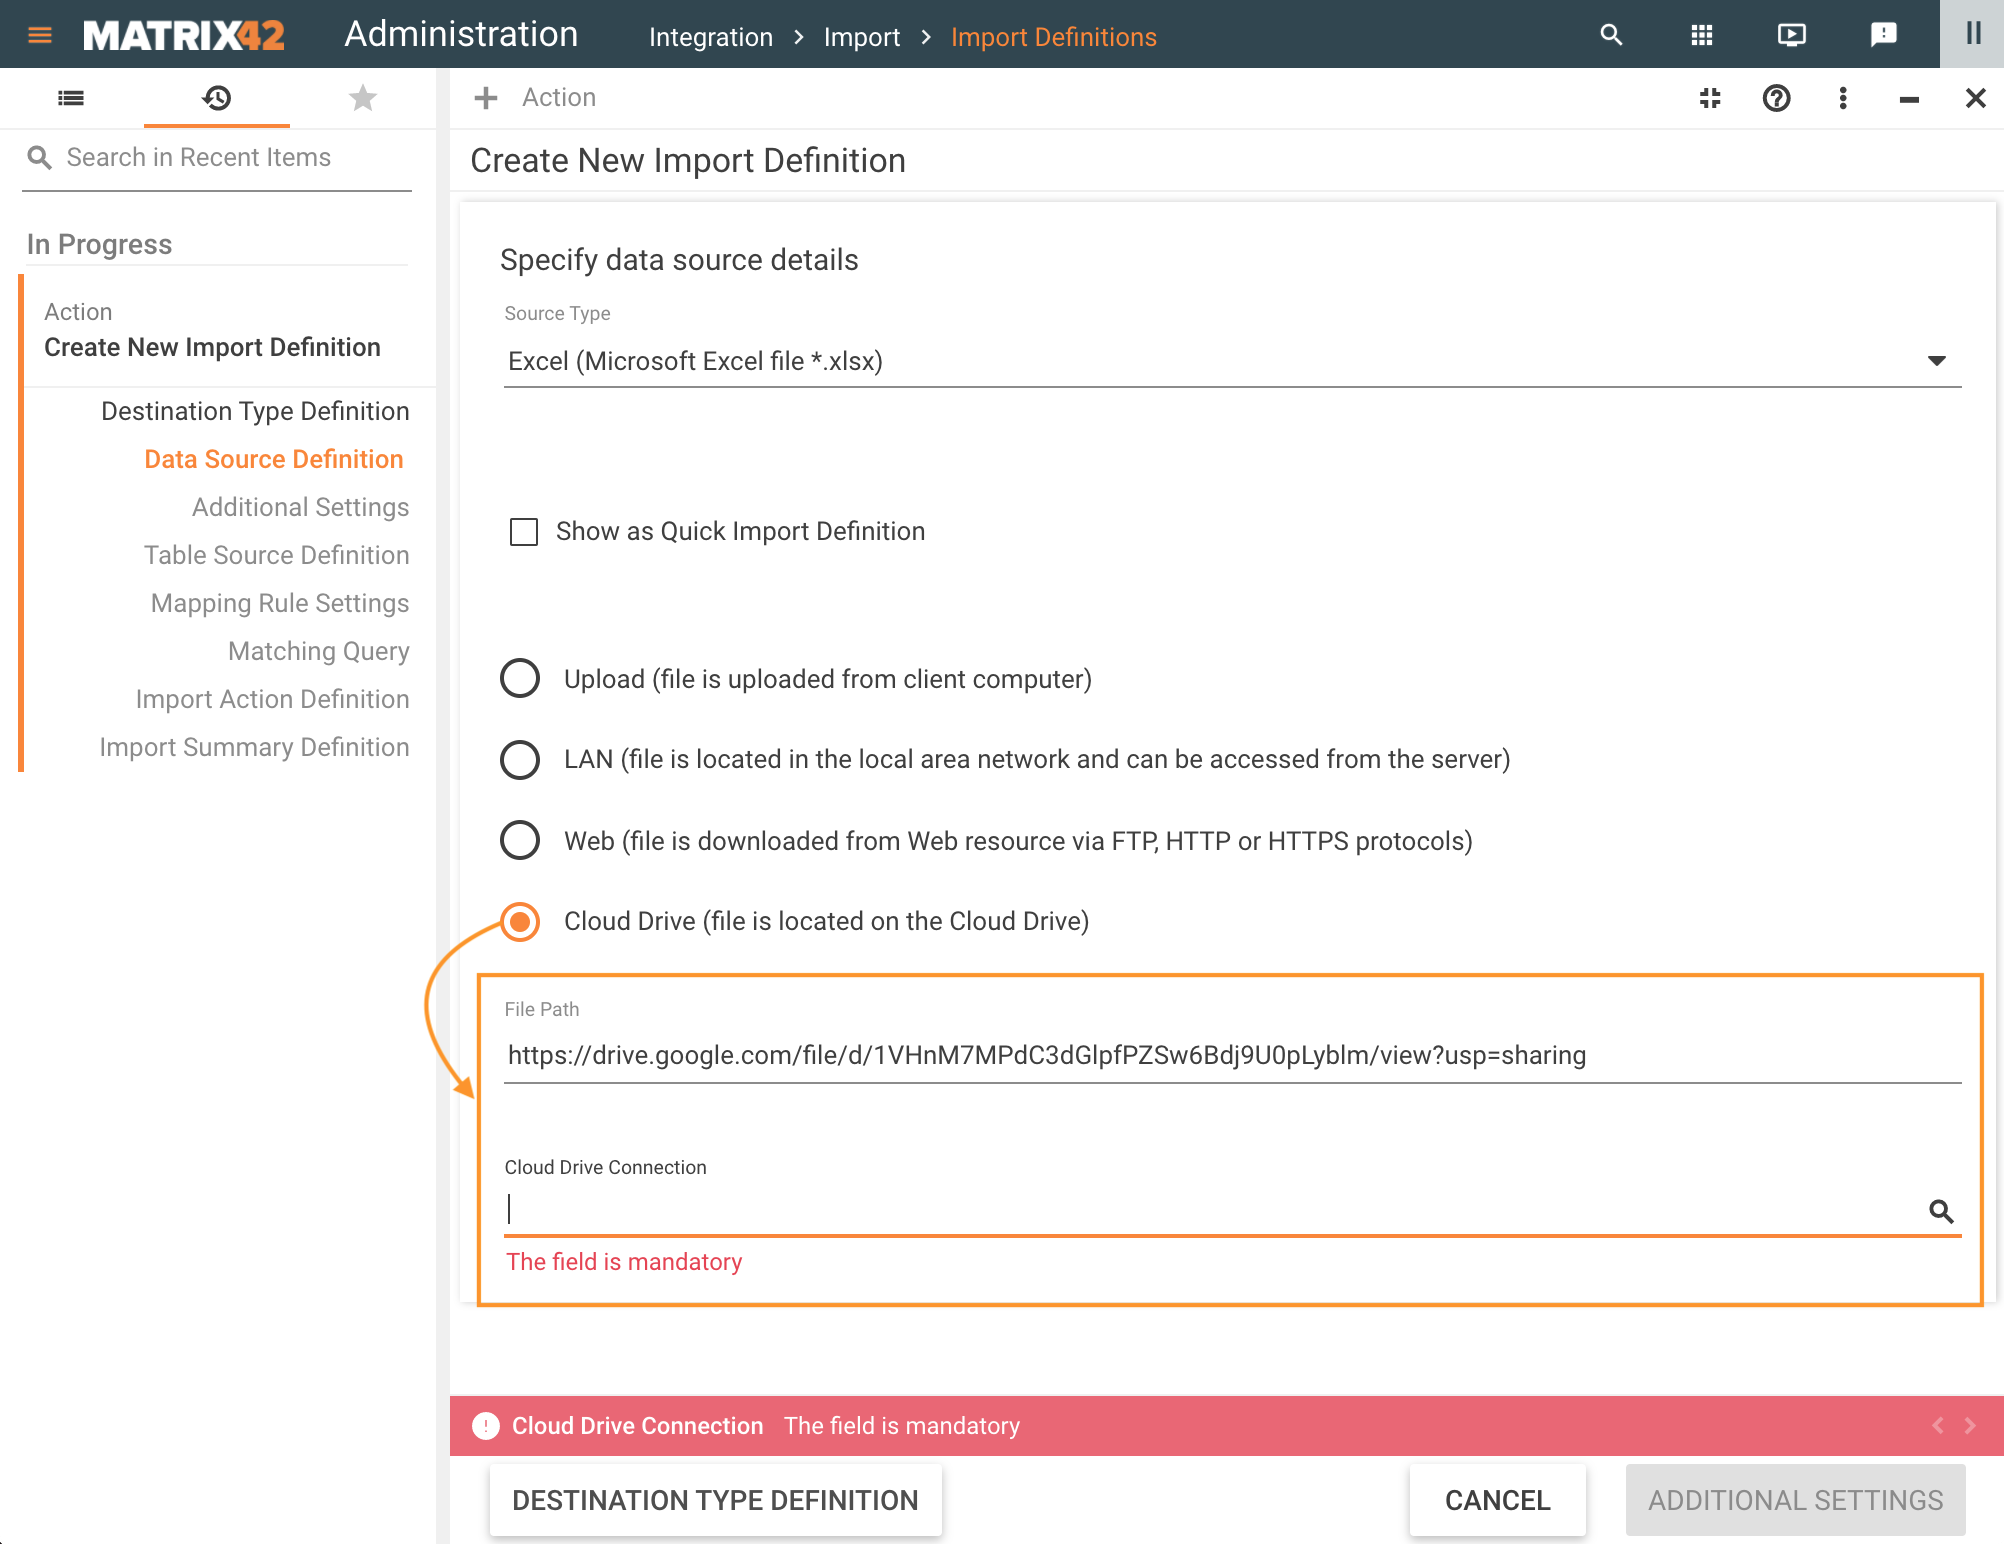
Choose the active CLoud Drive Connection and proceed to the next page of the Wizard. The System automatically validates the provided parameters and shows an error in case the connection is not set up of the referenced file is missing:
- "The connection to the Cloud Drive {0} failed due to the following reason: {error message}"
- "The file {0} cannot be found on the {1} Cloud Drive"
File Path is designed for the type of links that are suggested by the Service providers for sharing, for instance, in Google Drive, right-click on the file, choose the Get Link option and copy the suggested file path to the Import Definition. Use a similar approach to get the links from other Service providers.
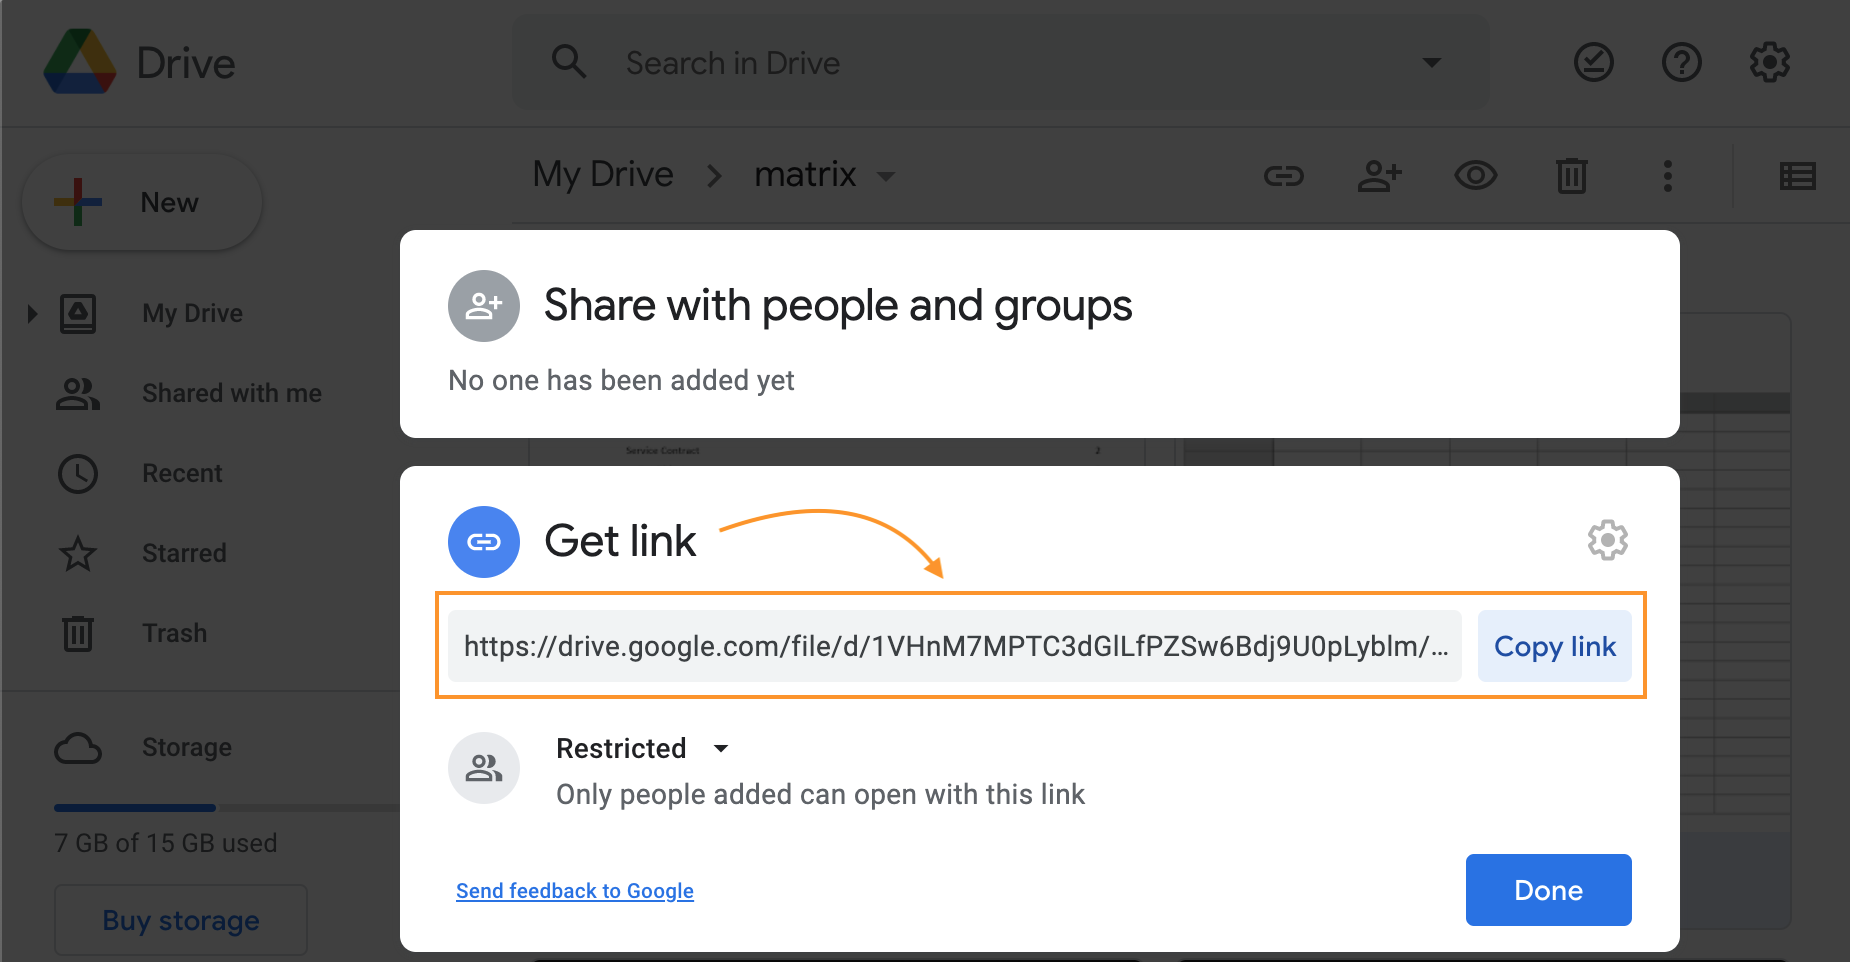
Google Drive: get link option example with the link that can be used in the File Path of the Import Definition
HTTP Send Workflow Activity
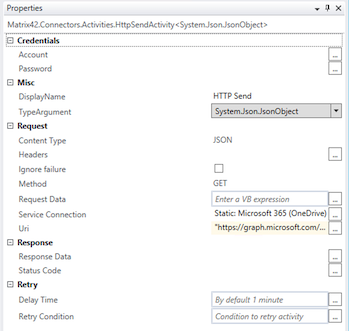
To use Service Connections in the Workflows, configure the following properties of the HTTP Send Workflow Activity:
- Service Connection: choose from the list of the configured in the system Service Connections:
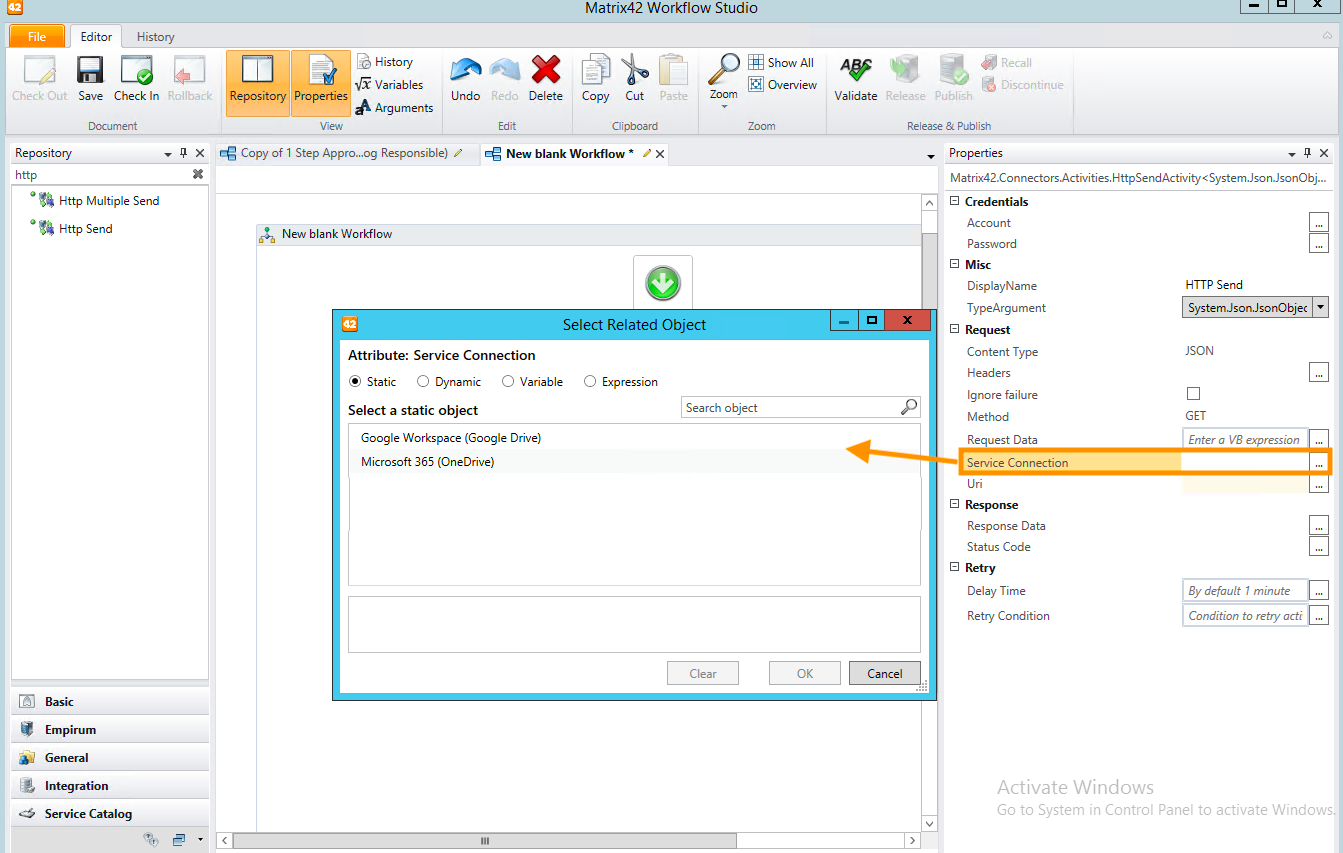
The selected connection already includes all necessary authentication and authorization data to the requested resource. - Uri: specify the Uniform Resource Identifier (URI) of the Internet resource that responds to the request. Place the Uri in the double quotes, for example:
"https://graph.microsoft.com/v1.0/me/drive/root"
For more information on how to access the resources, see also:
- Sample queries for Microsoft 365 connection: Graph Explorer.
Invoke PowerShell Workflow Activity
To retrieve data via the Service Connection using Invoke PowerShell Workflow Activity you will need:
- Connection: configure a Service Connection as described in the Connections section of this article. The pre-configured and working connection is a necessary prerequisite. The ID of the configured Connection can be found via Export action: export the Connection information to XML format and search for the
IDelement value in thePDRServiceConnectionClasselement. - Workflow Studio: configure the properties of the Invoke PowerShell Workflow Activity in your Workflow as follows:
- Run on Application Server: select this checkbox to run the script on the Application Server.
- Script: enter the PowerShell script, executed by the workflow activity. Modify and extend the code example according to your needs:
Example #1:
param(
    [System.Guid] $id
)
# from version 12.1.2
$authInfo = $M42_ServiceConnection.GetAuthData($id)
$M42_Log.Info("Service Connection {0} {1}", $authInfo.AuthHeader, $authInfo.Type)

# before version 12.1.2
Add-Type -AssemblyName Matrix42.ServiceConnection.BizLogic
$authInfo =[Matrix42.ServiceConnection.BizLogic.ServiceConnectionManager]::GetAuthInfo($id)
$authInfo.Schema
$authInfo.Token
Find more info about Private SDK API
To learn more about the Invoke PowerShell Workflow Activity see Matrix42 Workflow Studio: General Workflow Activities page.
Troubleshooting
Service Connection Validation
Service Connection Validation is an Engine Activation that starts regularly and validates Service Connections that are present in the system.
It is available in Administration application → Services & Processes → Engine Activations → Service Connection Validation
This Engine Activation is run once a day to:
- Maintain active Connection: updates the access token required for the successful connection;
- Updates the Refresh Token if it has expired;
- Validates the Required Permissions: checks if the permissions for the connection are still granted.
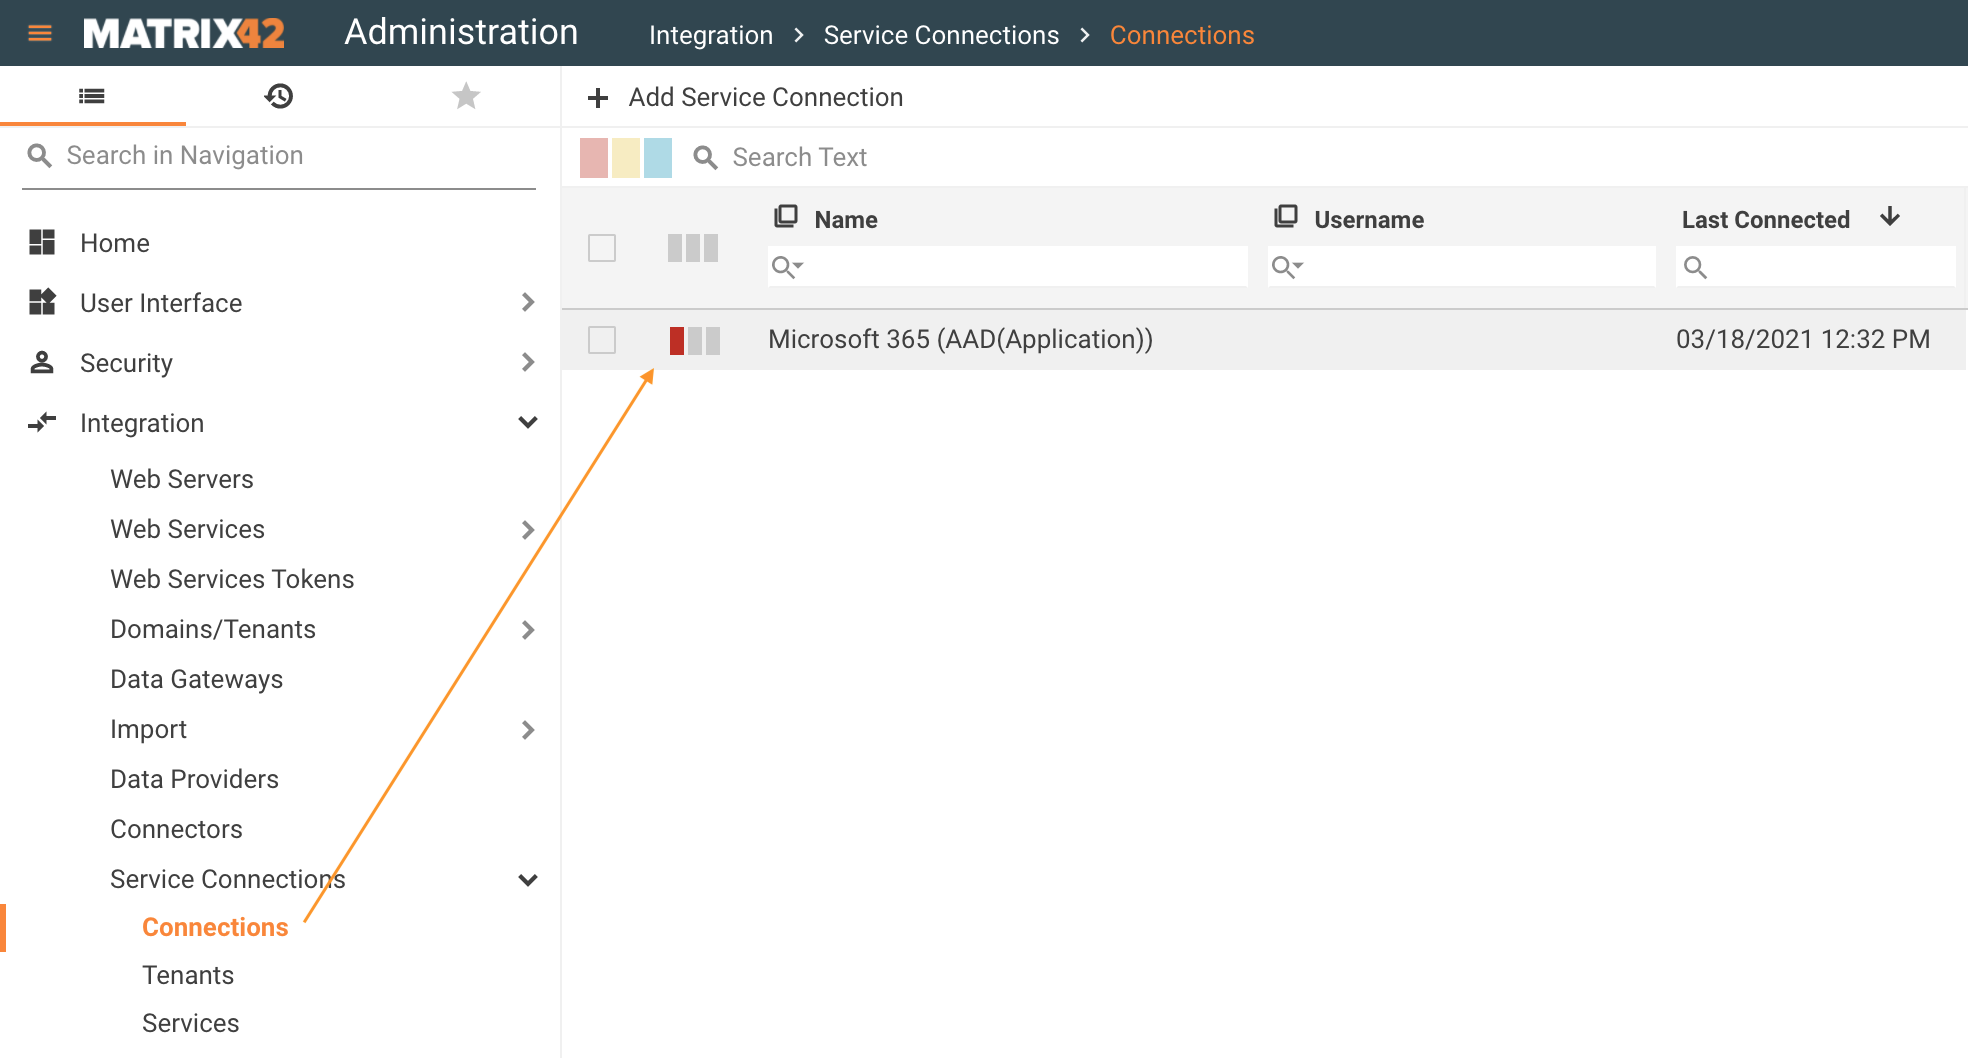
Engine Activation marks the Service Connection as invalid if any of the validation parameters fail:
System Diagnostics
Service Connection Validation check is also run by System Diagnostics.
Run the System Diagnostics from the Home page of the Administration application to analyze the system for possible configuration problems:
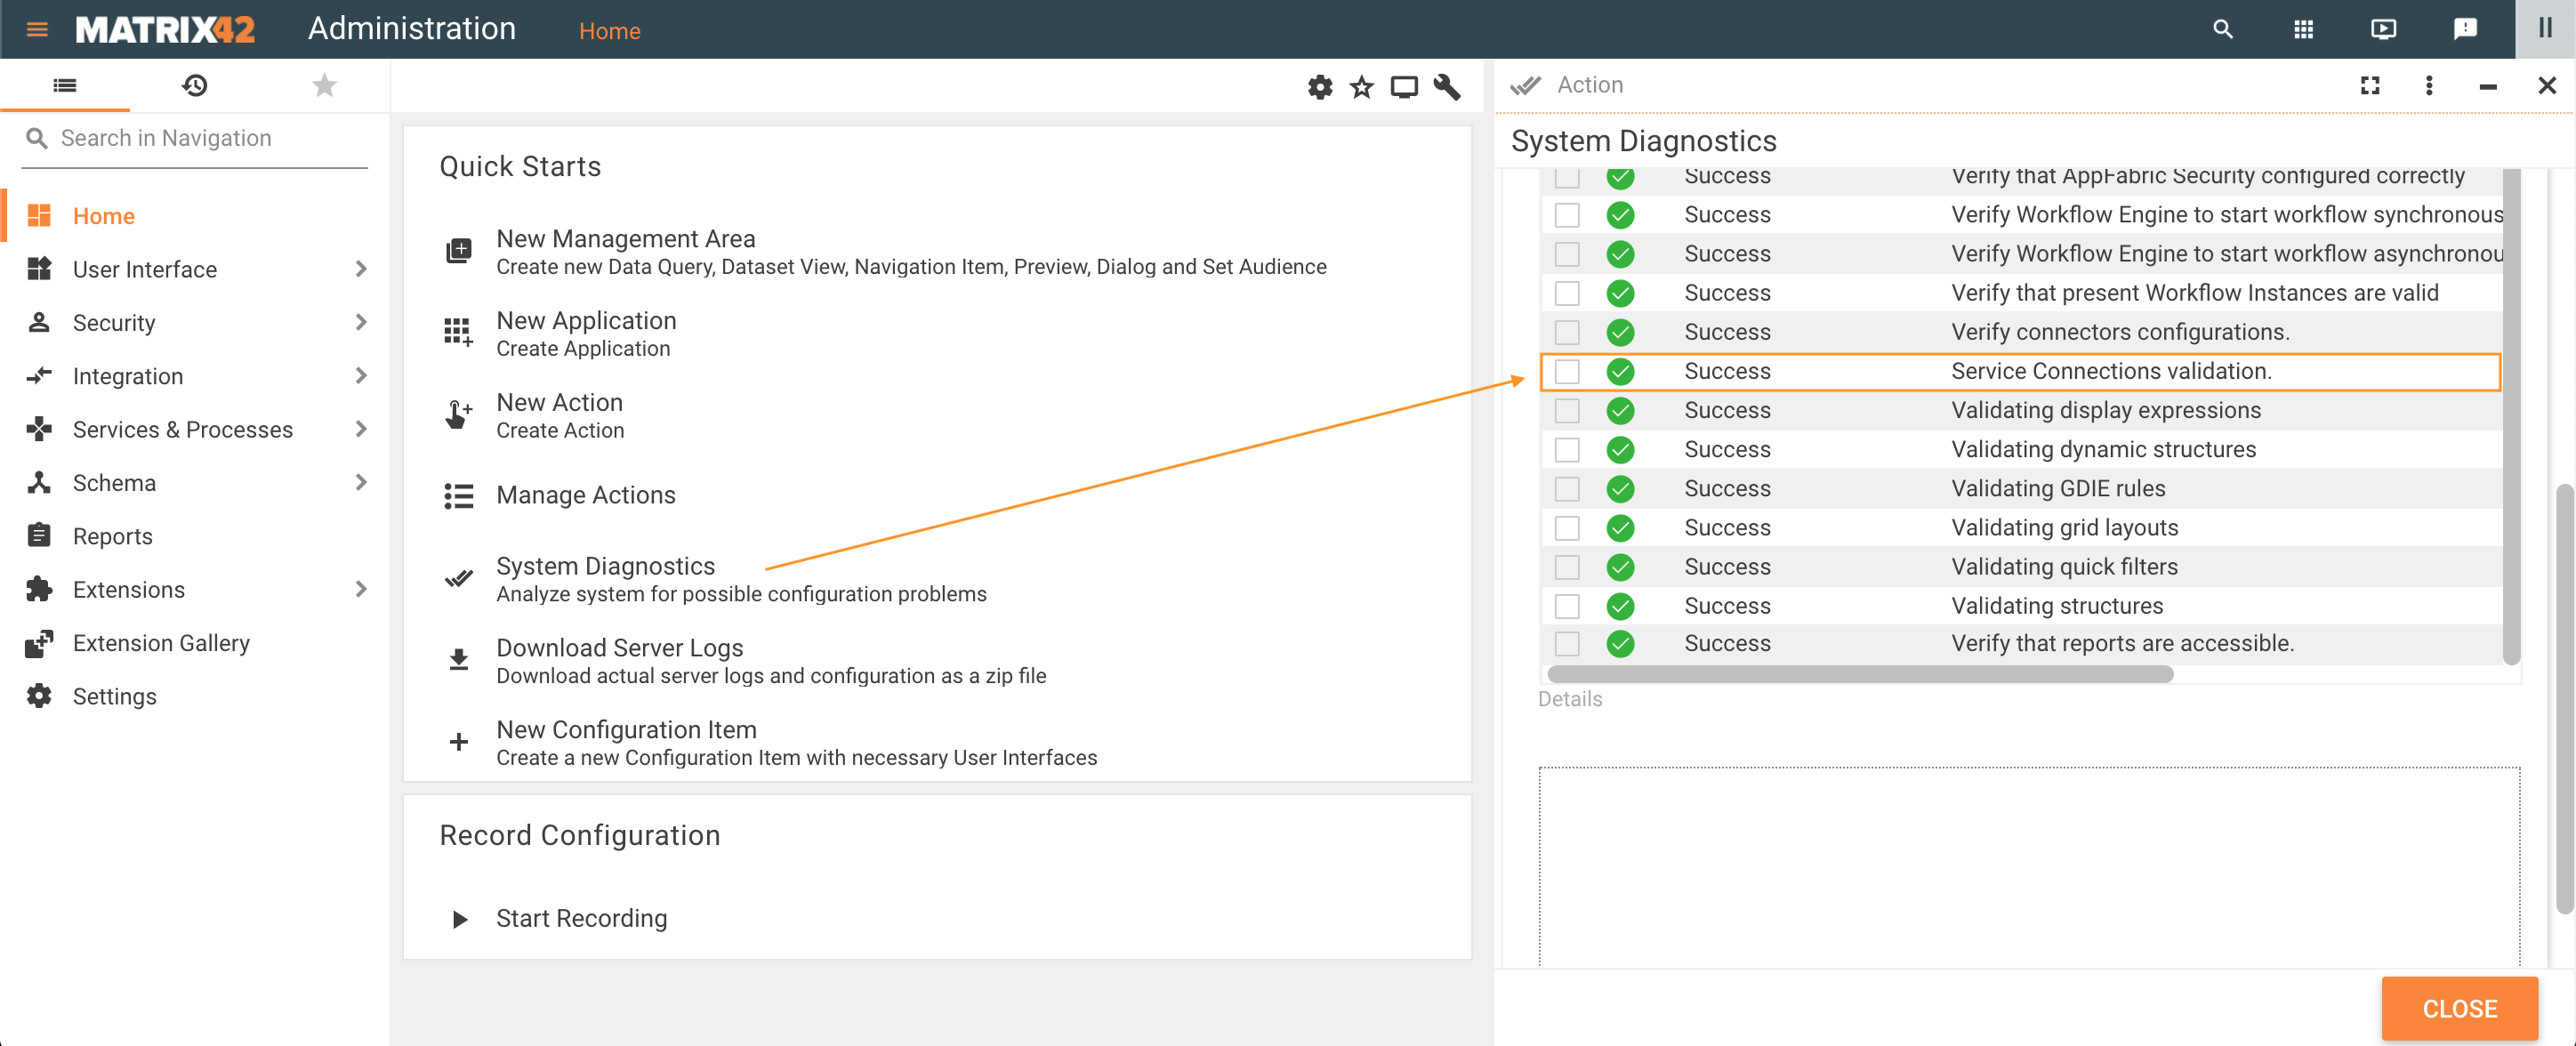
Error details show the following message:
- The following Service Connections {Connection name 1, Connection name N} are broken. Please proceed to the Administration/Service Connection area to re-establish the connection or consider removing the Service Connection when it is not in use.
Go through the Service Connection Configuration section of this page to fix the issue and re-run the System Diagnostics.