Email settings: Microsoft Exchange Server and Service Connections
Overview
This page provides a step-by-step guide on how to configure email sending in Enterprise Service Management Platform Administration application via Microsoft Exchange Server, involving modern authentication (OAuth 2.0) and Service Connections.
This configuration is available starting from ESMP v.11.0.1 or higher.
Email sending belongs to the basic settings of the ESMP, therefore no extra subscriptions (ESMP Subscription) or licenses are required.
Prerequisites
- Enterprise Service Management Platform v.11.0.1 or higher
- Microsoft Azure account with granted permissions for Applications Registration
- An active and available mailbox that is the same as the one registered for your Microsoft Azure Account
Configuration
Use this video tutorial as a reference:
Configuration steps:
- New Service Connection using Microsoft Entra ID Service with Exchange capabilities;
- Emails settings in ESMP Administration area.
Sending emails with Application Permission is not possible, only configurations via Delegated Permission are supported.
Service and Tenant used in Service Connection Configuration can be created before the Service Connection is established.
See also, Configuring Microsoft Azure settings for the E-mail Robot service connection.
Service Connection
Log in to the Administration area of the Enterprise Service Management Platform, proceed to Integration navigation Item → Service Connections → choose Connections.
- To start configuration, click Add Service Connection action:

- Fill out the required fields:

- In the Service field, select Microsoft Entra ID Exchange object, which is available by default in the system:

The name for your Service Connection is auto-generated, but you can modify it if necessary. - In the Tenant field, proceed with creating a new tenant. Fill out the name:

- In the Service field choose Microsoft Entra ID with OAuth Authentication Type:

- For Client ID, Tenant ID, and Client Secret, login to Microsoft Azure portal:

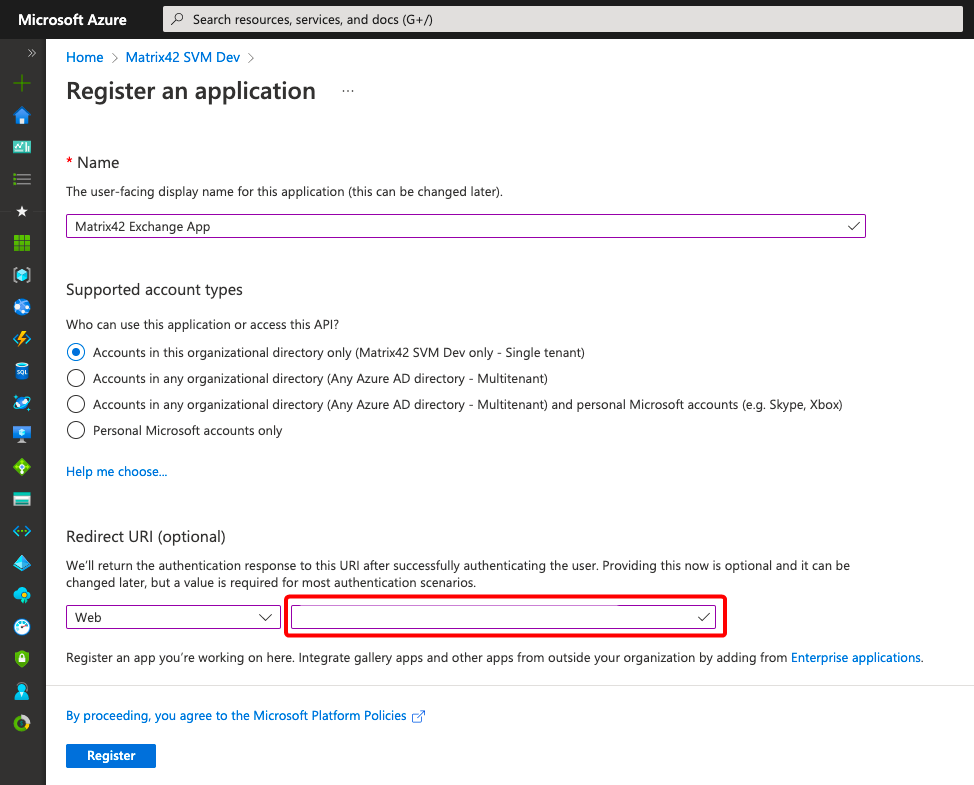
- On the home page of the Microsoft Azure Portal, go to App registrations area, and create New Registration

- Provide an application name. Leave the default configuration in the Supported account types
-
To set the Redirect URI, select a Web platform option. Modify the Redirect URI according to the example:
https://{hostname}/wm/externalAuth/redirect.html
-
Click Register to proceed.
-
Copy and paste Client ID and Directory ID values from the Microsoft Azure portal to the Service Connections Tenant configuration:
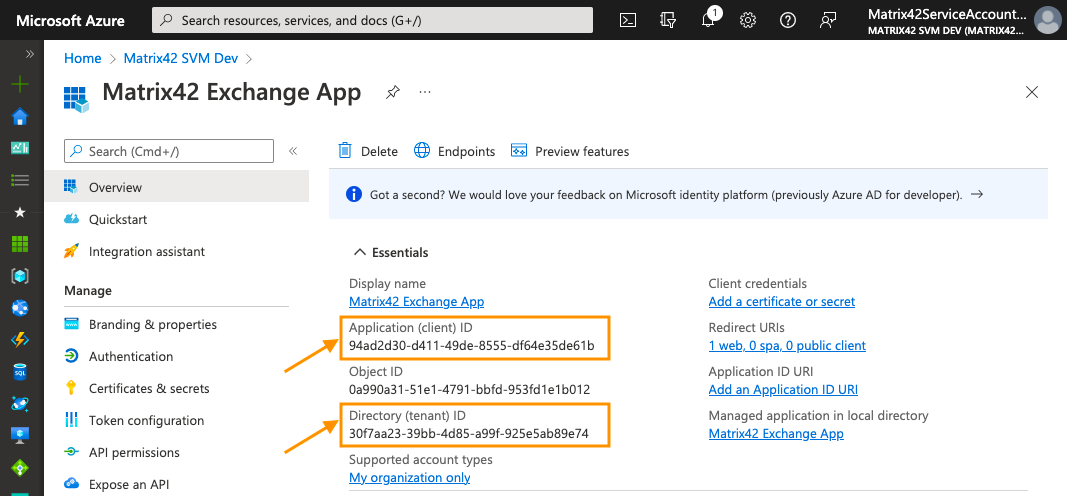
Microsoft Azure Portal: Application (client) ID and Directory (tenant) ID for Service Connections Tenant configuration

Enterprise Service Management Platform: Client ID and Tenant ID values for Service Connections Tenant configuration -
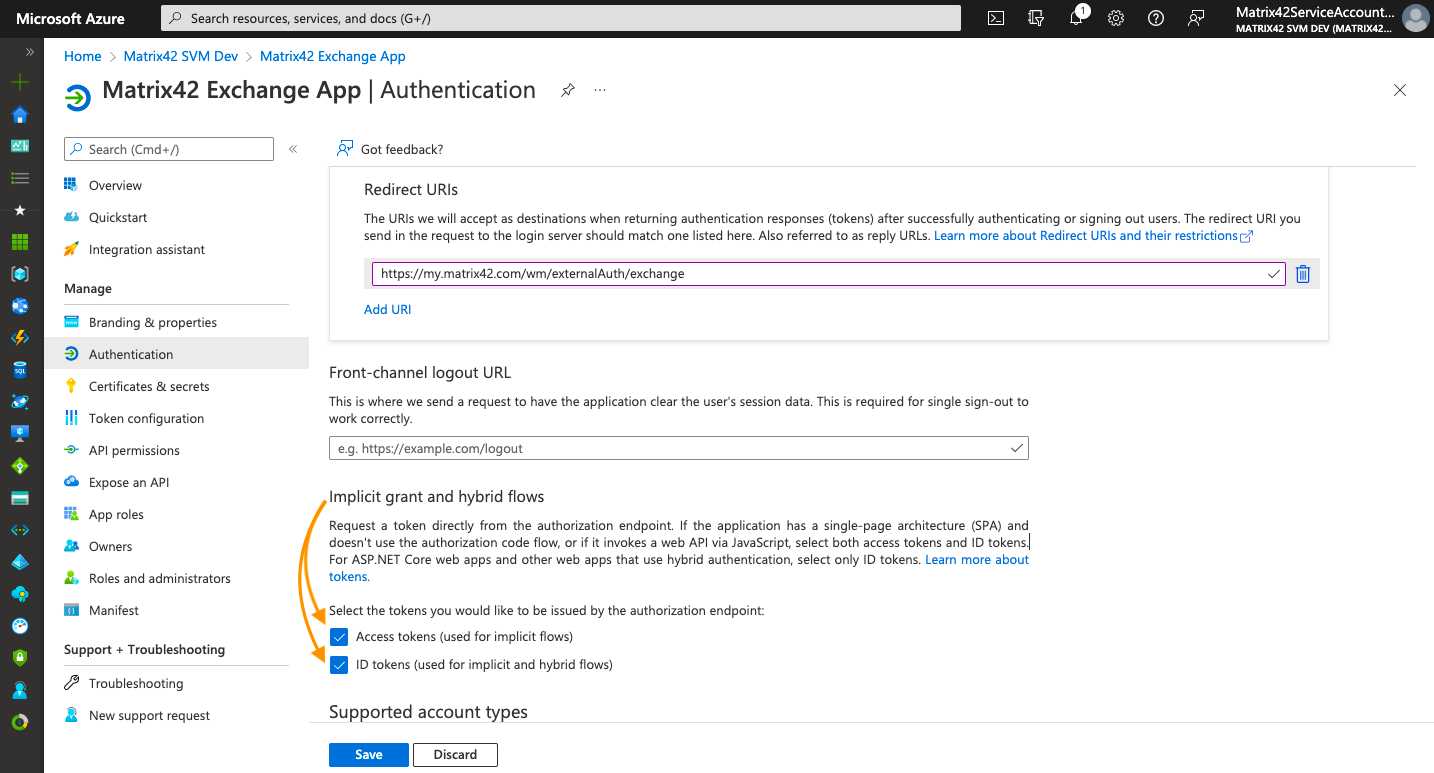
Go back to Microsoft Azure portal, open Authentication area, and scroll down to the Implicit grant and hybrid flows section. Enable Access Tokens, ID Tokens:
-
Click Save to apply changes.
-
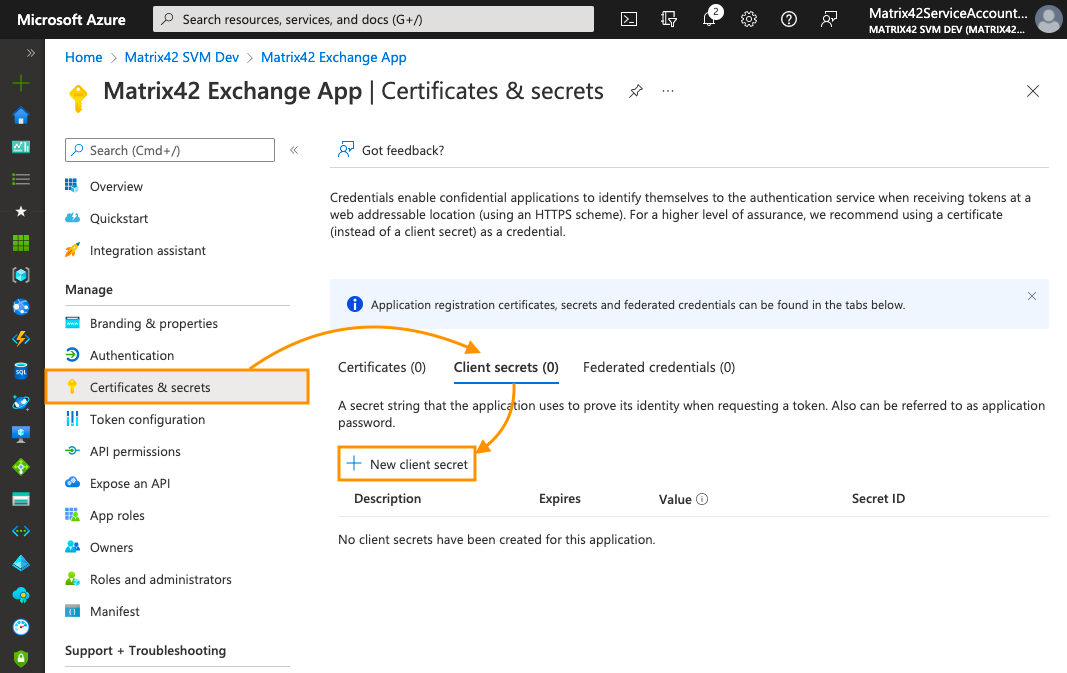
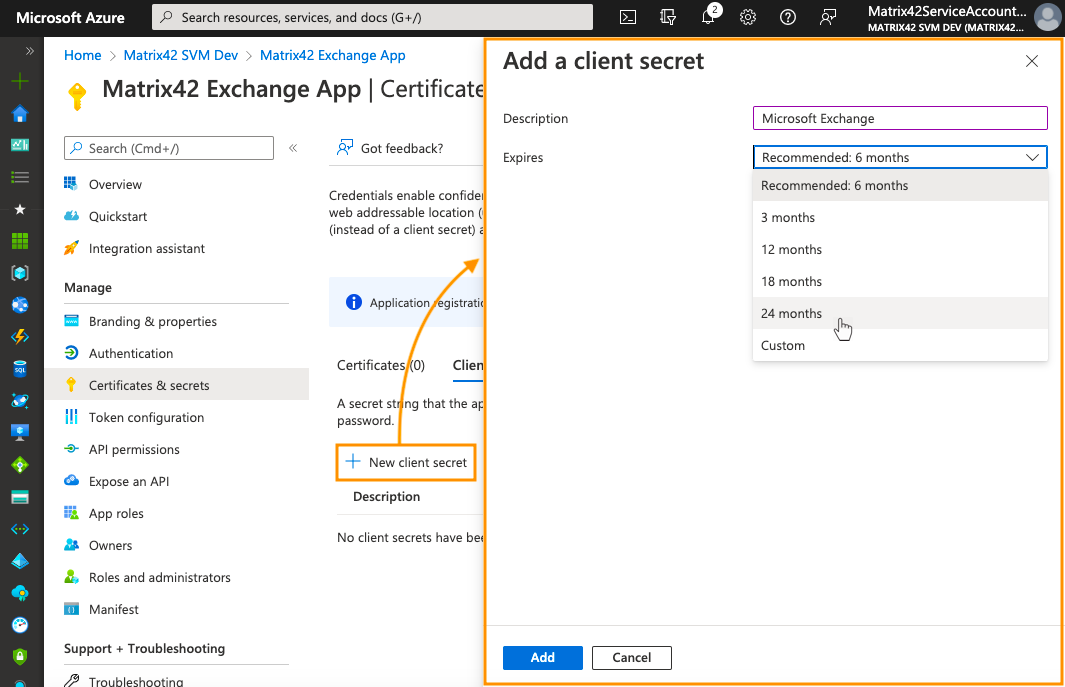
For Client Secret, switch to Certificates & secrets area and create a New Client secret from Client secrets tab:
-
Add the description, choose the Client secret expiration period and click Add:
-
Copy and paste the Client secret value from the Azure Portal to the Tenant configuration. Please note that the secret value will be decrypted and no longer available if you refresh the page of the Microsoft Azure portal, so make sure to save it to the clipboard:
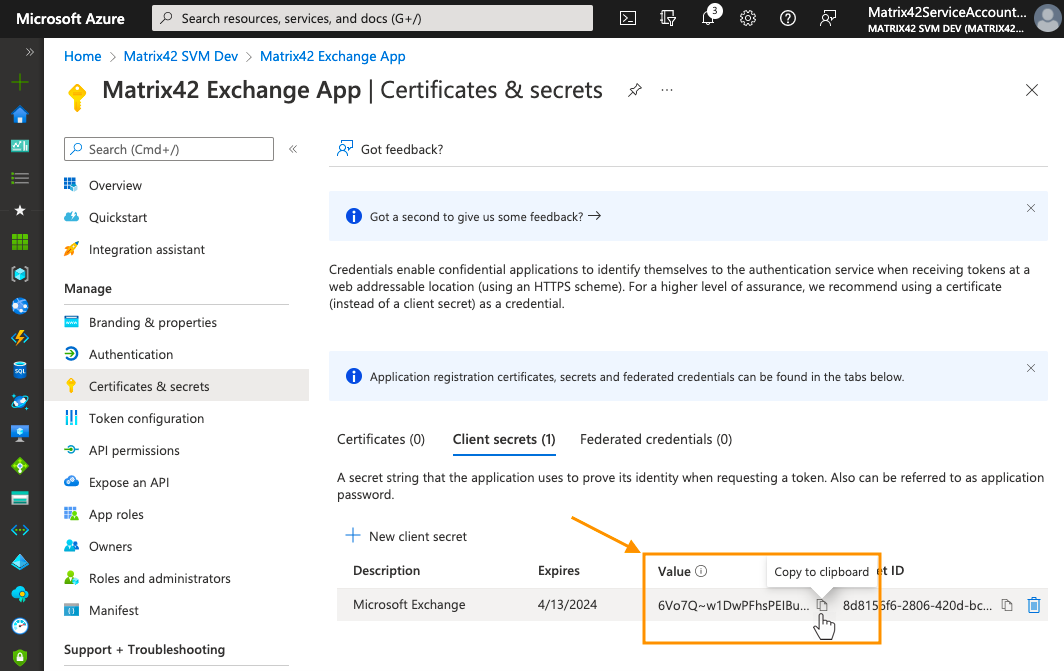
Microsoft Azure Portal: Client secret Value

Enterprise Service Management Platform: Client Secret Value in Service Connections Tenant configuration -
Go back to the Microsoft Azure portal and grant permissions using API Permissions area. Remove the default configuration and click Add a permission, choose Microsoft Graph:

-
Choose Delegated permissions:

-
One by one add the following permissions:
-
offline_access
-
SMTP.Send
-
Mail.Send

Verify the successfully saved permission status in the Notifications area.
-
-
To finalize the Service Connection configuration, in the Administration area click Setup Authentication:

-
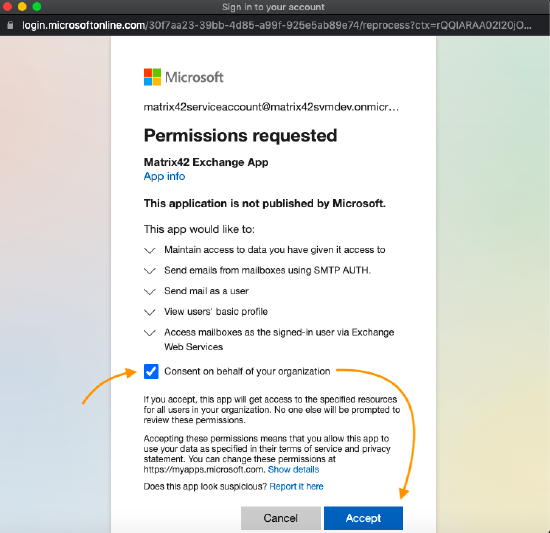
Sign in with your Microsoft SMTP account (mailbox user). For accounts with Multi-factor authentication, choose the necessary authentication method and proceed.
Accept the requested permissions:
-
When Service Connection Authentication has been successfully fulfilled, click Save & Close:

Emails settings
To finalize the emailing configuration, in Administration area, open Settings → Edit Global System Settings.

In the Emails view:
- Enabled: select the checkbox to enable emailing
- Specify SMPT server according to the email server configuration, e.g. smtp.office365.com:587
- Verify the Default Sender
- Enable SMTP Authentication
- Enable Use SSL option
- Select Modern Authentication (OAuth 2.0) property
- Mailbox Email Address: enter an address of an active and available mailbox that is the same as the one registered for your Microsoft Azure Account
- Service Connection: choose a previously created Service Connection

Click Save & Close to finalize the configuration and save changes.
Now your Enterprise Service Management Platform emailing is working.