Creating a Test Environment Based on Production Environement
Overview
This guide explains how to create a test environment based on a production environment, ensuring that all necessary data and configurations are available.
Disclaimer: Completing all the steps described in this article does not guarantee that the application will function correctly. While the application can be copied, its extensions may differ in logic, lack necessary uninstallation scripts, or come from third-party sources outside our control. As a result, proper reinstallation or full compatibility cannot be ensured.
Prerequisites
- Windows Server 2016 or higher
- SQL Server 2016 Standard / Enterprise SP3 or higher
- Production environment with Enterprise Service Management v. 12.1.1 or higher used as a basis for copying
- Enterprise Service Management version of the test environment is the same as the production environment
Steps
- If your Service Account in the test environment differs from the one in the production environment, prepare an account in the internal M42 Enterprise Domain with Administrative rights before proceeding to ensure that you still have access to the new test environment:
- Prepare the test server. See System Requirements
- Install on test server the Matrix42 Enterprise as usual. See Installation: Step by Step
- Back up the necessary databases of the production environment:
-
Main Database (by default M42Production)
-
History Database (by default M42Archive)
-
Warehouse Database (by default M42Warehouse)
See How to Determine Which Databases are Used by EAP Installation.
-
-
Make sure the backups are accessible by the new test environment:
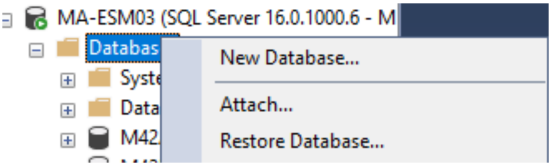
In SQL Server Management Studio, right-click on Databases of the new Database Server and select Restore Database...
Select Device as a source and press the button [….] on the right. Select the path and the
.bakfile of the associated Database:

Since your production databases are older than the just-created test DB, you must select these 2 options in the Restore Database window:
1. Overwrite the existing database (WITH REPLACE)
2. Close existing connections to the destination database
Otherwise, you will be unable to restore the databases.
Click OK to restore the necessary databases -
Execute the following SQL Update Statements in the M42Production database of your test instance.
In the examples below, the DB Server of the productive environment isMA-ESM01\MATRIX42but the Database Server of a new test environment isMA-ESM03without an instance. Replace the example nameMA-ESM03with the Servername\Instance of your Test Environment Database Server.UPDATE [PDRDwpConfigurationClass] SET [Value] = N'server=MA-ESM03;database=M42Production;integrated security=True' WHERE [Key] = N'update4u.SPS.DatabaseFileStorage-connectionString' UPDATE [PDRDwpConfigurationClass] SET [Value] = N'database=M42WareHouse;server=MA-ESM03;integrated security=True' WHERE [Key] = N'update4u.DataWarehouse-databaseConnectionString' UPDATE [PDRDwpConfigurationClass] SET [Value] = N'database=M42Archive;server=MA-ESM03;integrated security=True' WHERE [Key] = N'update4u.SPS.History-databaseConnectString' UPDATE [PDRDwpConfigurationClass] SET [Value] = N'data source=MA-ESM03;initial catalog=M42Production;integrated security=True' WHERE [Key] = N'Matrix42.ServiceLayer-workerMonitoringConnectionString' UPDATE [PDRDwpConfigurationClass] SET [Value] = N'data source=MA-ESM03;initial catalog=M42Production;integrated security=True' WHERE [Key] = N'Matrix42.ServiceLayer-workerPersistenceConnectionString'
The rest can be updated in the setup later in the Configuration Wizard under “Change Reporting and Analysis Services Server”.
If you want to update it now, you can adjust the example name and use these UPDATE statements as well.
The necessary parameters for the UPDATE scripts can be found in the Reporting Server settings of the test server:

UPDATE [PDRDwpConfigurationClass] SET [Value] = N'data source=MA-ESM03;integrated security=True;initial catalog=M42AnalysisServices' WHERE [Key] = N'update4u.DataWarehouse-cubeConnectionString'

--additionally adjust the value below by replacing http with https and port 443 if needed:

UPDATE [PDRDwpConfigurationClass] SET [Value] = N'http://MA-ESM03:80/ReportServer'  WHERE [Key] = N'update4u.SPS.ReportingServices-server'

UPDATE [PDRDwpConfigurationClass] SET [Value] = N'data source=MA-ESM03;integrated security=True;initial catalog=M42AnalysisServices' WHERE [Key] = N'update4u.DataWarehouse-cubeConnectionString'
-
Copy the cryptography key from your production environment and paste it into the test environment. It is stored in the application path
\bin\securityCryptographyConfiguration.configfile:

In your new test environment, there should also be an empty key0 value. Store the cryptography key from your production environment there for backwards compatibility.
More on that you can find here Database Security: Encryption Key.
If you receive the error message to one of your Data Provider configurations that “padding is invalid”, even though you copied your cryptography key, go to your ActiveDirectory Data Provider and retype the password into every configuration you have, otherwise, the Data Provider will fail to run.
-
If your Service Account in the test environment is different than the one in the production environment, open the Matrix42 Setup in
/binfolder to run the Configuration Wizard and select "Change Service Account". Provide the credentials for the service user that will be used in the test environment. -
On the Test Server, open the Matrix42.Setup.exe in
/binfolder to run the Configuration Wizard and select Change Security Configuration:

Select change Security Configuration:

Make sure to type in the correct FQDN of your test environment:

Make sure to select Regenerate security keys in the next step:

This generates a new entry in the
securityCryptographyConfiguration.configfile stored in/bin -
Reconfigure the Service Layer by clicking on “Configure Service Layer”, provide the password of your service user, and continue until the setup is finished.

-
You should now be able to access your ESM Test environment under the correct link. Open it and navigate to the Administration application → Services and Processes → Workflow Studio → Workers.
There should be 2 Workers:

Delete the Worker entry that belongs to the productive environment. -
If you have issues with your new worker, e.g. you cannot see 2 worker entries (from production and test environment), update the worker token by navigating to the
application path\worker\coreon the test server and open theupdatetoken.cmdfile.In the test environment, open Administration → Integration → Web Service Tokens → Generate API Token. The user for the API Token should be the SYSTEM user.
Paste the new API token into the
updatetoken.cmdfile and run it. -
Go to Integration → Data Providers → Data Provider Pool, select the App Server, and make sure that the worker of your test environment is listed there.
-
Check the Queue Task by making a SELECT statement on the table QueueTask in the M42Production database of the test server . If there are any entries where the Server name of the Productive Environment is written in the column Server, delete those entries.
Select * from QueueTask
-
If you need working e-mailing, reconfigure the Email Settings in the Administration application → Global system settings because sending emails will fail with the error message: “Installation ID does not match. Message will not be sent".
-
Copy the
application path\Licensingfolder from the productive server and paste it into the path of the test server. This will prevent you from getting error messages regarding the license files. -
If you receive an error message that mentions “no valid license”, you must check the
PDRConfigurationPackageClassBaseand search for duplicate entries which must be removed. This is because the license files are hardware-bound. If that doesn’t help, contact our support. -
Copy all files for the installed Extensions from the
/installedPackagesapplication folder of the Production Server to the corresponding folder on the Test Server.Then, in the Administration application, navigate to the Extension Gallery and reinstall each extension one by one. This is necessary because every extension that copies files into /wm or copies any .dll files will not work out of the box.