Configuration Project Development
Overview
Configuration Packaging is installed as an additional extension and can be found in Administration application → Extensions → Configuration Projects navigation item:
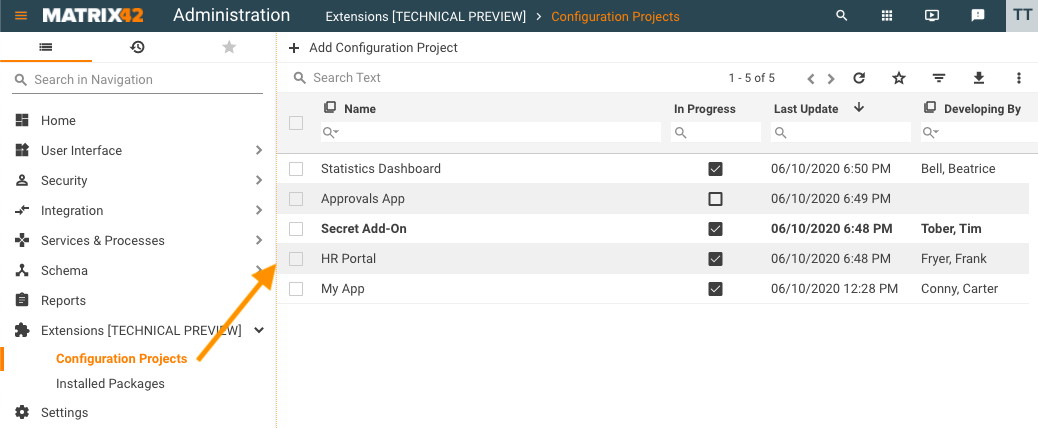
The Configuration Projects page provides the following information on the available in the system packages under development:
- Name: the manually created name of the project;
- In Progress: current status of the project development;
- Last Update: date and time of the latest recorded changes in the project;
- Developing By: list of users who are currently working on the project and are automatically recording the changes. If the project is not set to In progress by any user this field is empty. Also, the user is not shown if any changes are currently applied or edited manually while the project is not set to In progress.
All the changes, either recorded automatically, added manually, or edited, as well as the change contributors, are tracked in the Change Log of the project.
Add Configuration Project
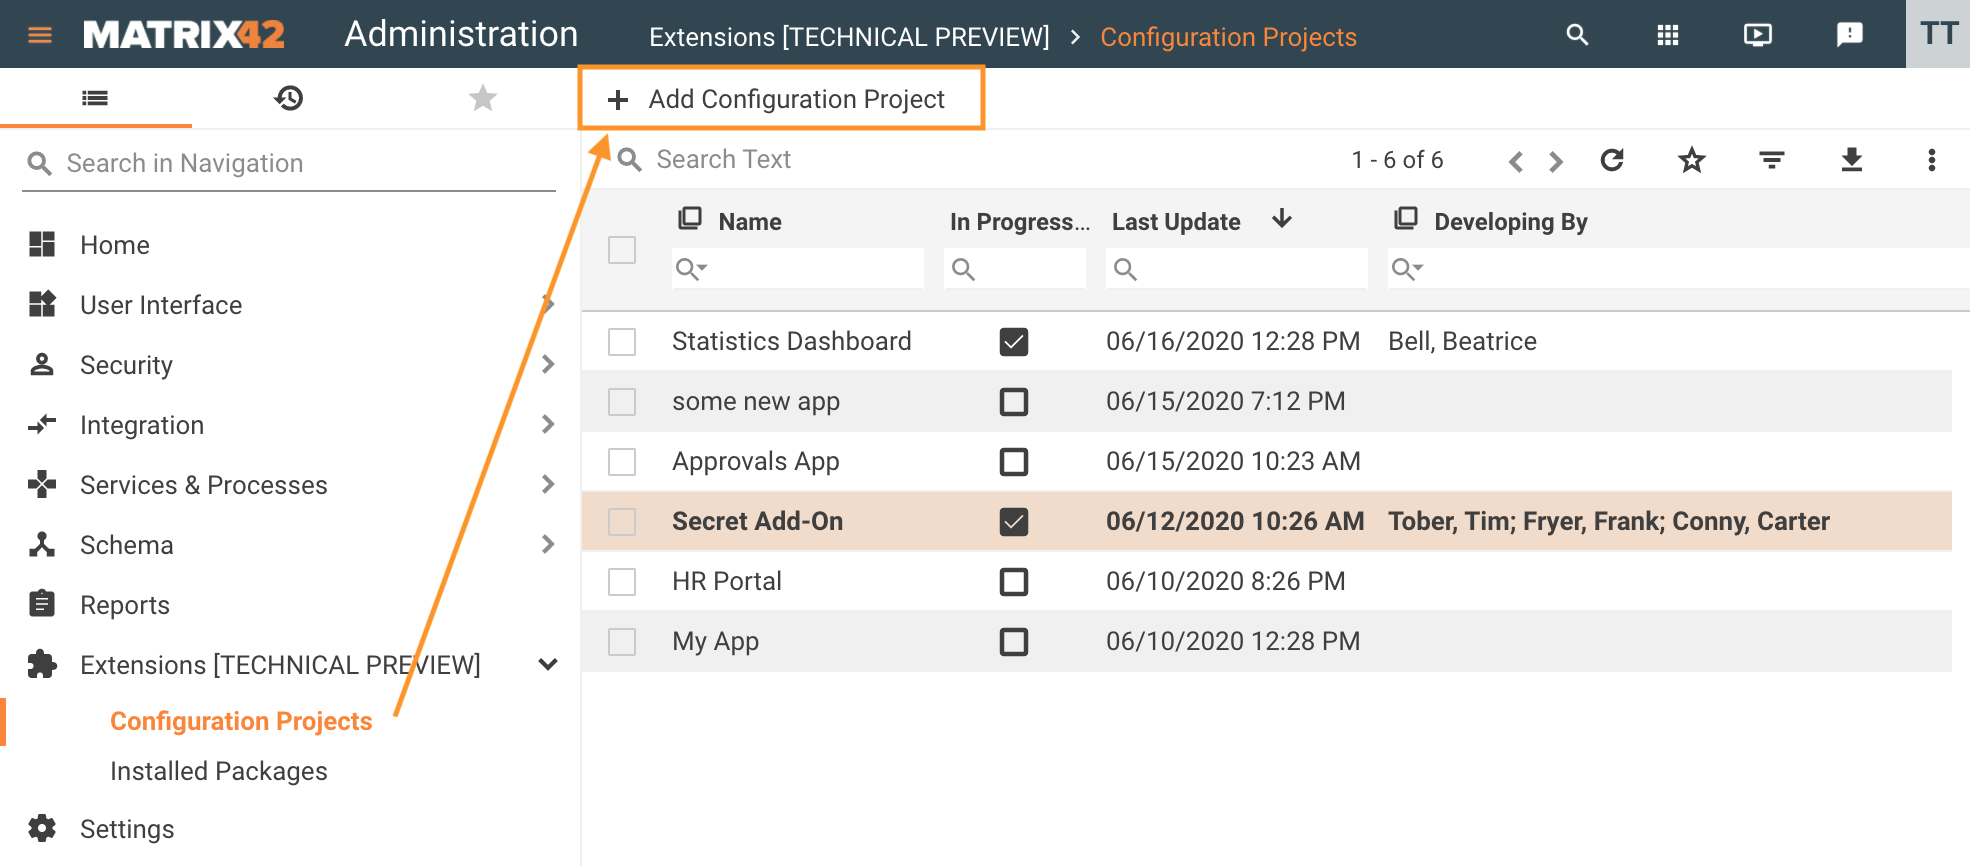
To add a new project click Add Configuration Project action:
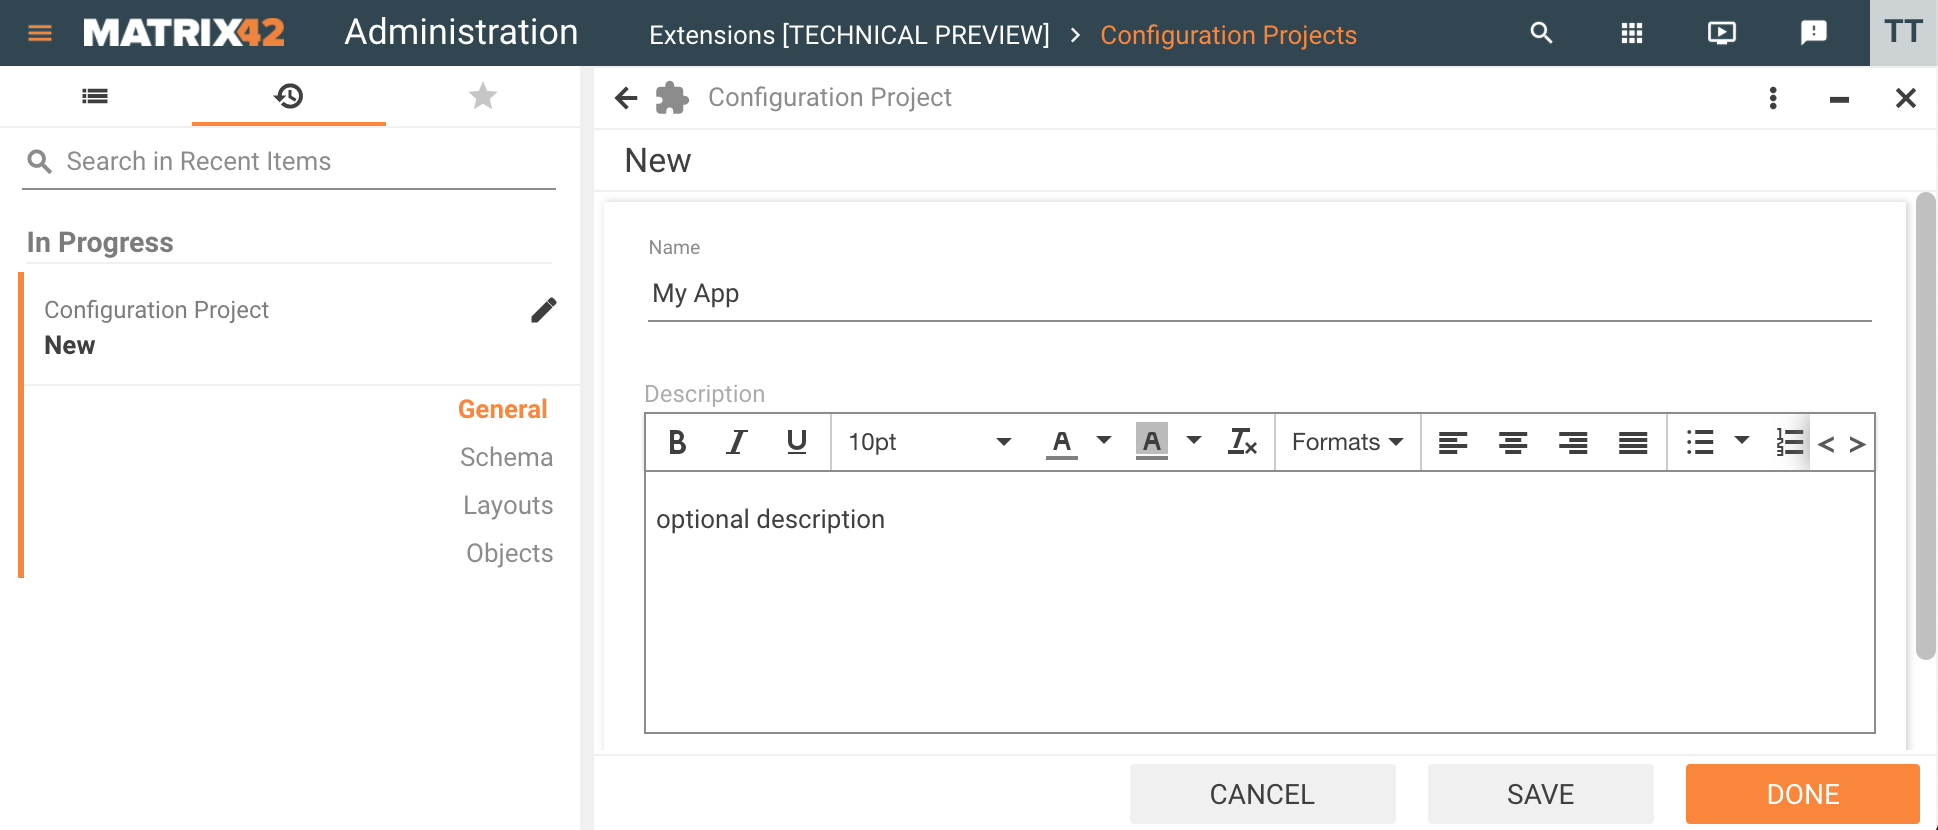
Fill out the necessary information and click Done:
- Name: project name;
- Description: provide a general overview of the project in the description, its purpose, usage, show how it looks like in the user interface, what are the configured properties with examples and explanation, links to the vendor website, or any other helpful information.
The Name and Description are available in the package.json file of the exported project and visible in the package installation preview and Installed Packages section of the Administration application.
The created project is available for all users of the system who have access to the Configuration Projects extensions and can be picked for development by one or several users at the same time.
The project is created but the automatic recording of the changes has not started yet.
Start Recording
Only one project can be actively developed by the same user in the current environment at the same time.
To start automatic recording in the Configuration Projects:
- Click on the necessary Configuration Project;
- Apply Start Recording action:

Only one project recording can be In Progress. When you Start Recording for a project and there is another project recording in progress, the latter will be automatically stopped.
The project you are currently developing is marked in bold.
The automatic recording is performed for all newly added and all changes of the user interface elements, layouts, schema modifications, and objects that are present in the default installation of the Matrix42 Solution Builder. All required and essential for the Configuration Project package changes are tracked automatically.
Stop Recording
Stop Recording when all the necessary changes were introduced via the user interface and automatically recorded to the project, or the development should be paused, or you want to switch to another project.
In the Configuration Projects navigation item:
- Click on the necessary Configuration Project;
- Apply Stop Recording action:
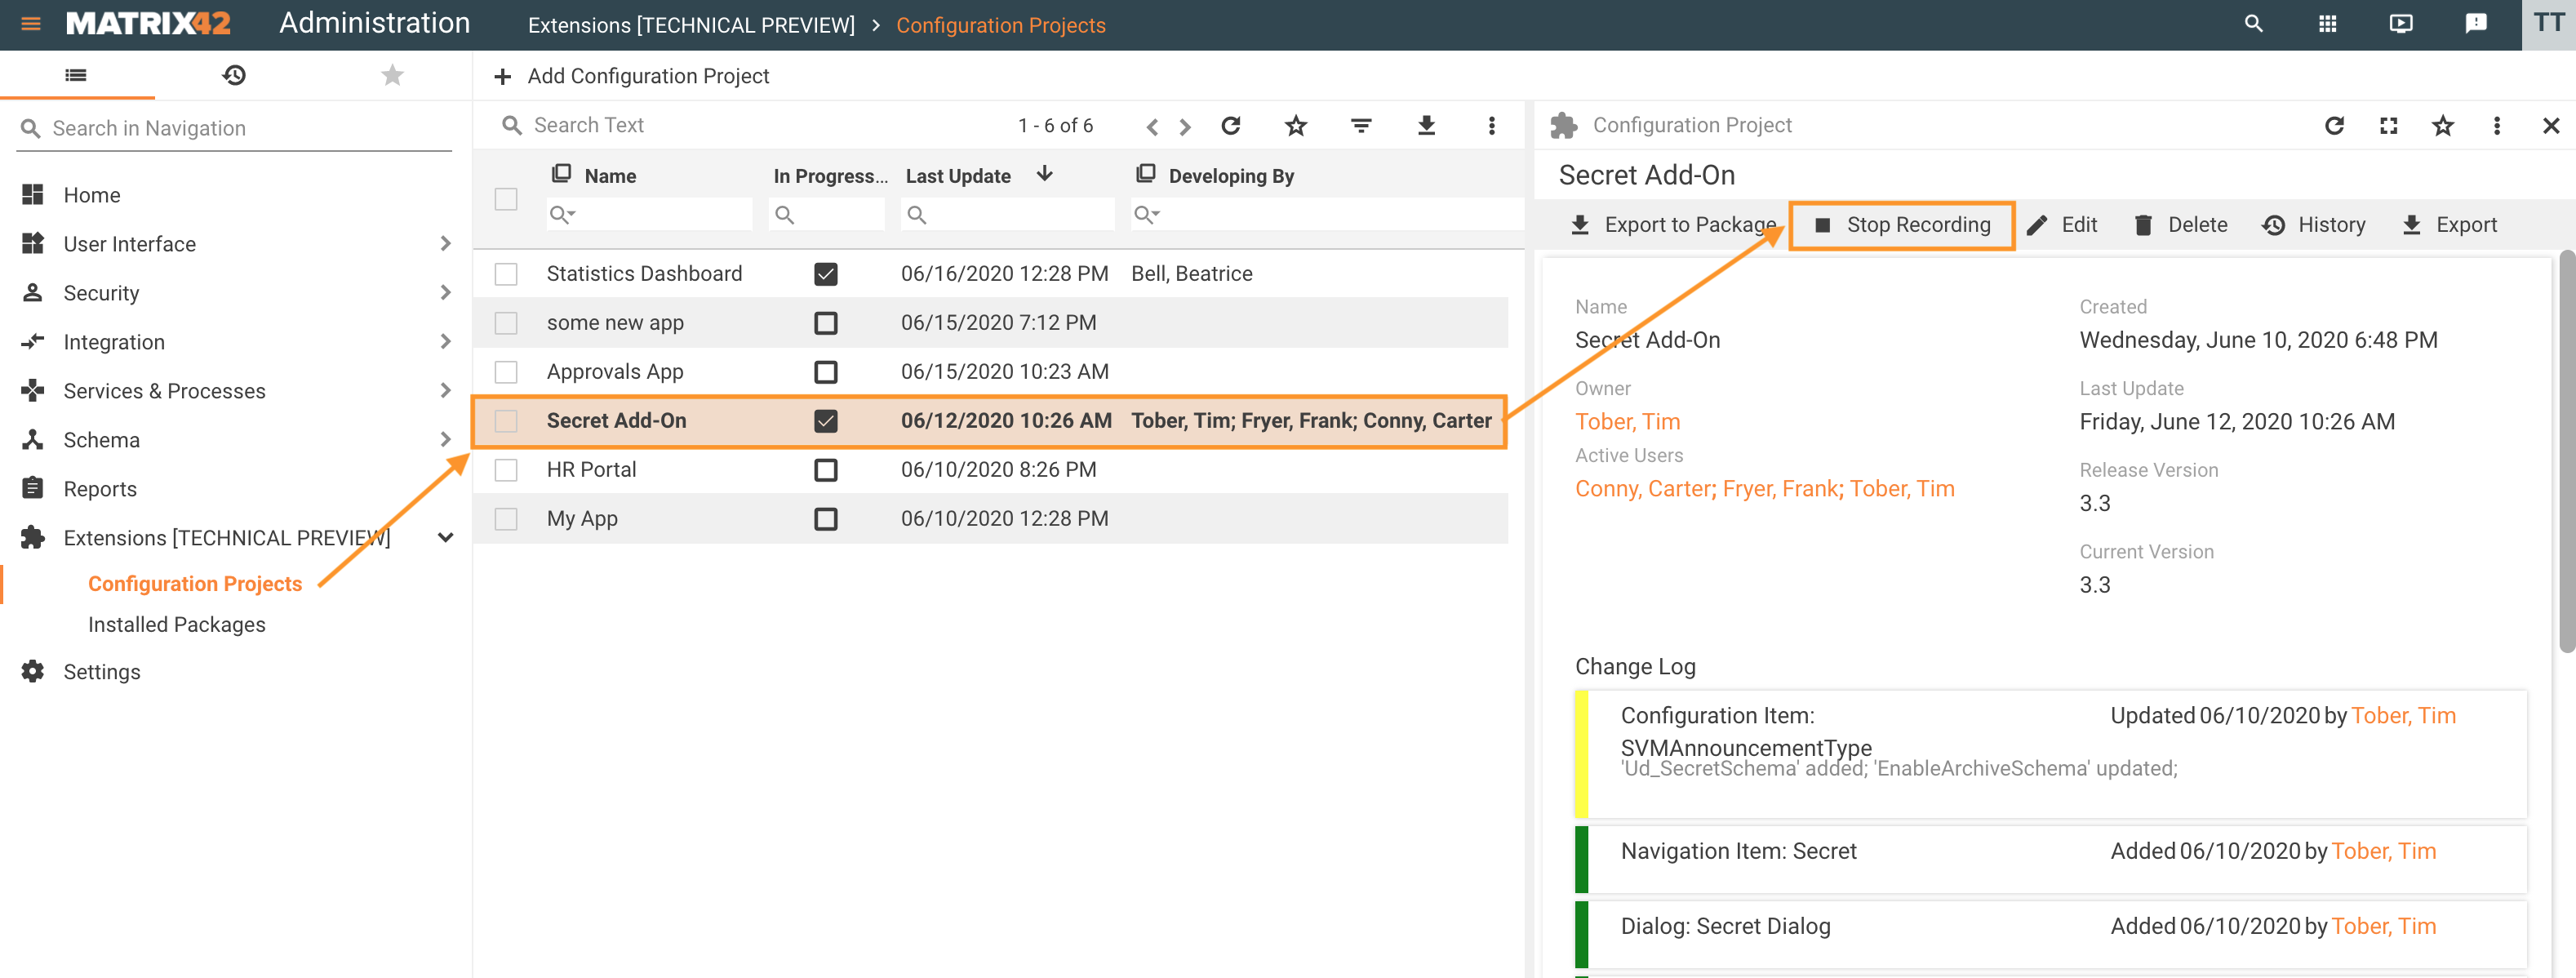
Changes are no longer recorded automatically to the project and you can Start Recording in another project.
At the same time, all projects can be edited manually without changing the recording status. Therefore, the manually applied changes in one project will not interfere with another project that is currently In Progress.
Project Preview
Click on the Configuration Project for preview:
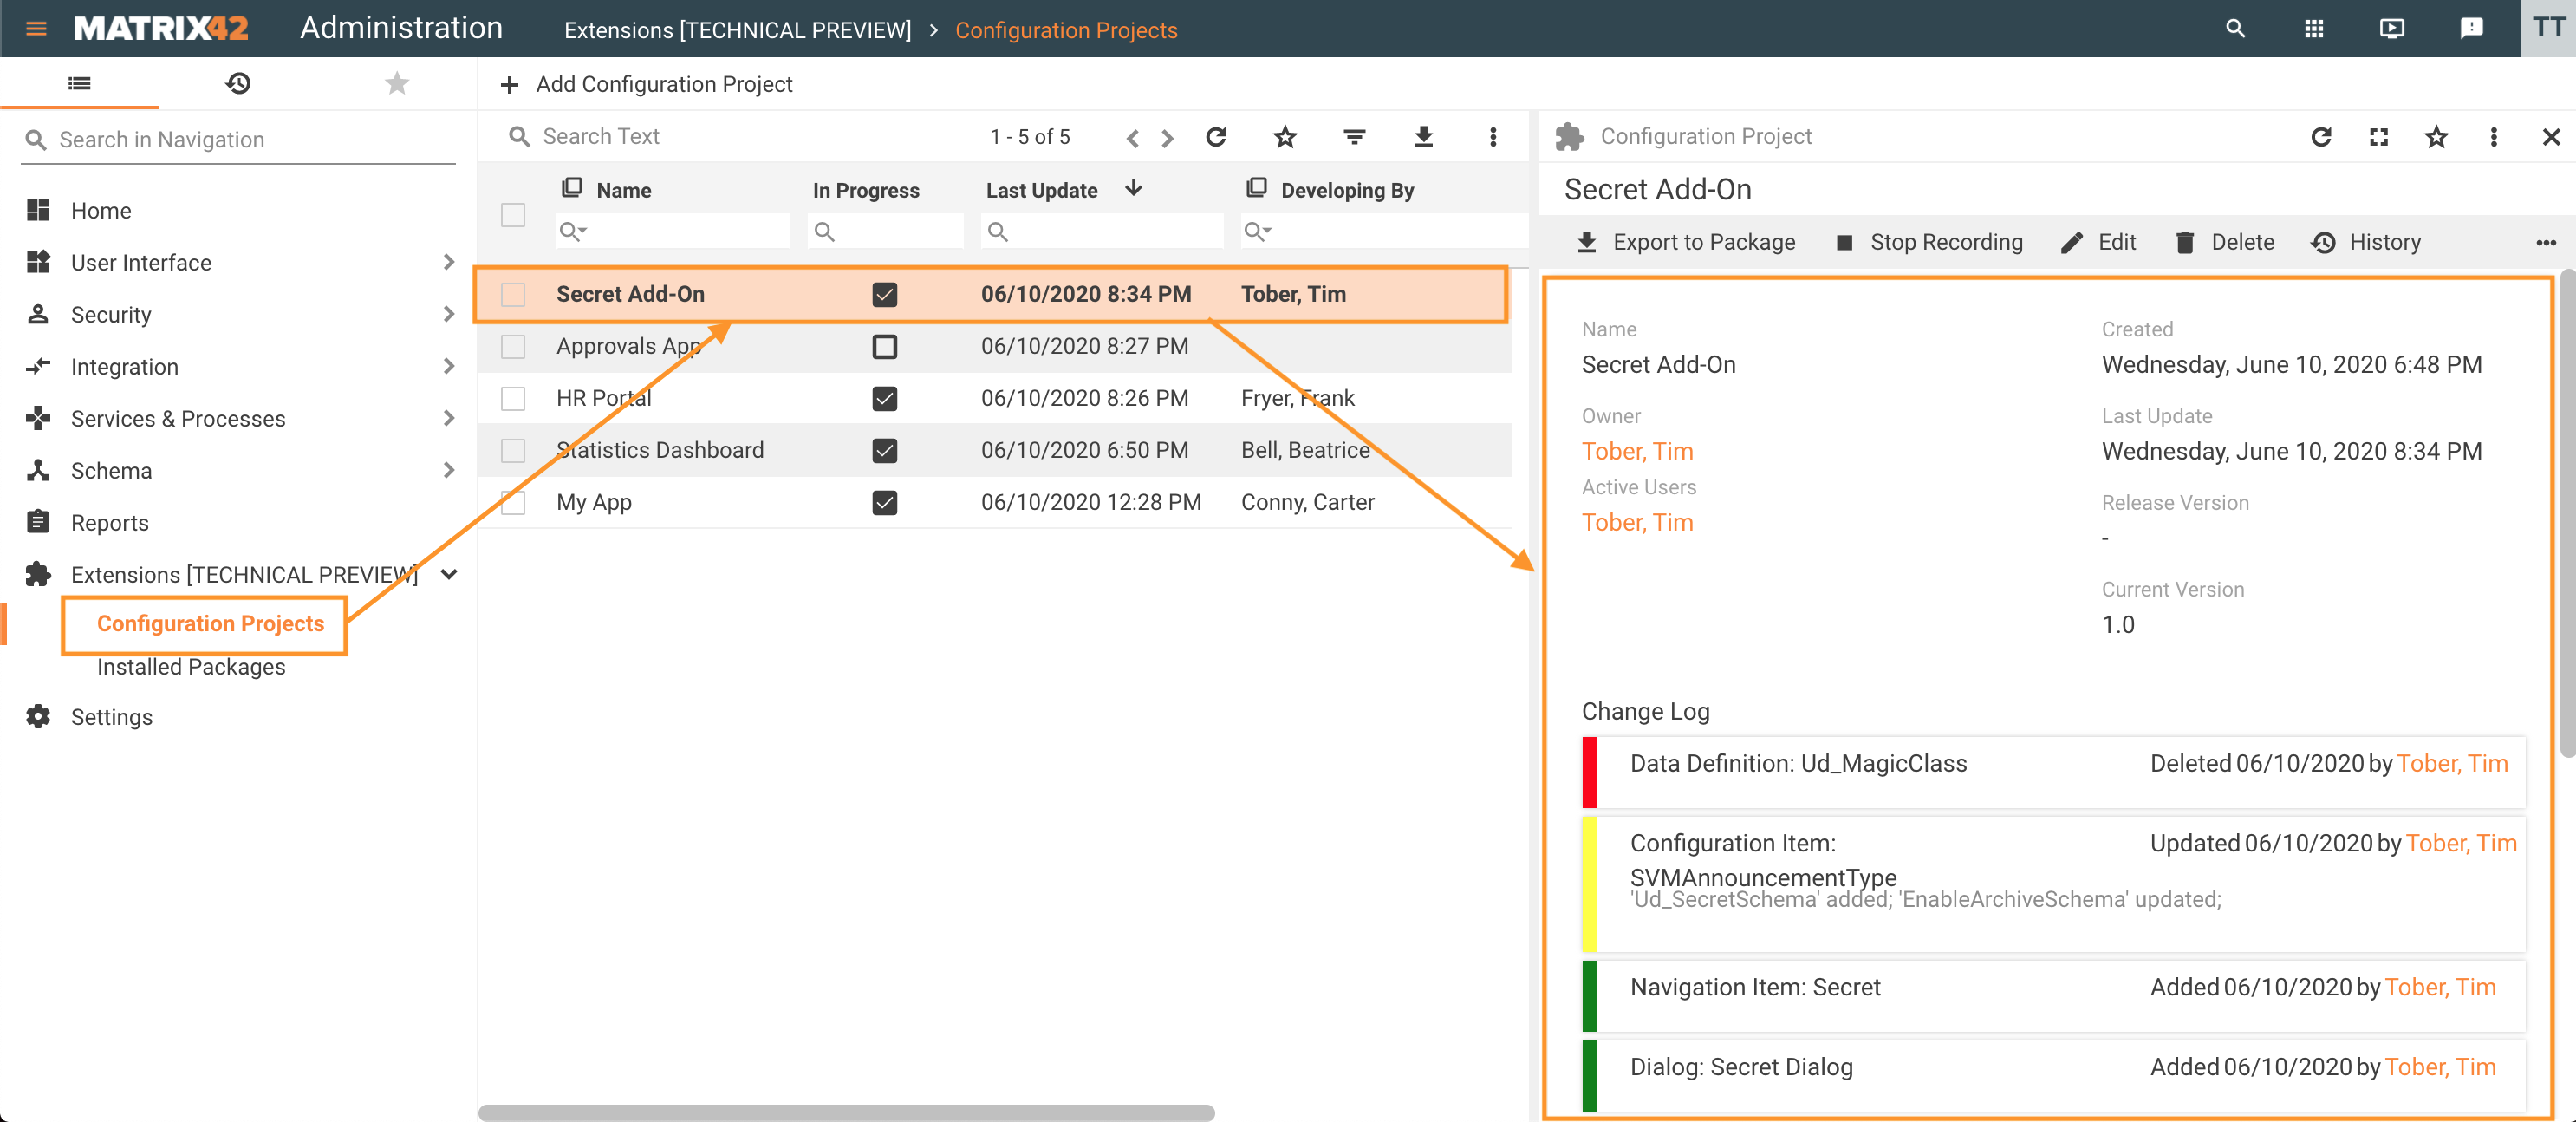
- Name: the name of the project;
- Owner: a person who created the Configuration Project;
- Active Users: persons who Started Recording of the project and are considered by the system as active users;
- Created: date and time when the project was created;
- Last Updated: date and time of the latest applied changes in the project;
- Current Version: current version of the project under development;
- Change Log: lists a set of changes that were applied in the scope of the Configuration Project. Includes:
- entity type
- entity name
- optional enumeration of the applied changes if they are automatically grouped and optimized in one record (for automatic recording)
- operation type (create, update, or delete marked with the color label of the record), date, and contributor name
Change Log does not include all changes as they can be optimized, combined, automatically removed due to redundancy or not tracked by design. Therefore, all objects that are considered as required and essential for the Configuration Project are tracked, e.g. new User Role; the new user added to the system or changes in the Global System Settings are not tracked by design.
For more details see Change Optimization section.
Edit Project
On the preview page, click Edit action to modify the general information of the Configuration Project, manually introduce new, edit, or delete available changes of the project, as listed on the dedicated views.
General
- Name: the name of the project that later will be used in the package export and subsequent installation on another environment.
- Description: optional description of the project.
Schema
This view provides a list of schema changes that were recorded automatically or added/edited manually for the current Configuration Project.
Configuration Items section
Schema changes in the Configuration Items may look as follows:

- Name: the name of the Configuration Item;
- Operation: operation type used for the Configuration Item (add, update, delete);
- Date: date and time of the change;
- Changed By: author of the change;
- Version: package version indicating when the change was introduced;
- Order: information denoting in which order the changes of the package are installed. The order is assigned automatically with the first export of the package and if necessary can be further edited manually. See Schema Scripts Order section for more details;
- Description: automatically generated description of the change.
Possible operations when adding or editing the Configuration Item (CI) change manually:
- update CI: this operation allows you to update CI property and add/delete Data Definition from the CI;
- CI properties store the settings of the Configuration Item, like display name, description, CI type, etc. See Configuration Item page for more details.
- Data Definitions (DD) are the main components of the CI that create a new object. Each DD is represented by a table in the database and contains attributes providing the Schema for user data. See Configuration Item page for more details.
- add CI: choose from the list of available in the system Configuration Items;
- delete CI: this operation requires the technical name and ID of the Configuration Item. Tend to use the automatic recording to fill out all necessary fields correctly. Please note, that in case of manual editing the system uses the Configuration Item ID as the main identifier of the object that will be deleted by the installed package. Configuration Item name is not verified by the system or bound to the Configuration Item ID and may be used for your convenience for differentiating the manually added change.

Configuration Items section: example of delete operation for the Configuration Item
Schema script order field is available for editing once the Configuration Package is exported. The Export to Package action assigns the schema scripts execution order automatically for each change in the package.
Data Definitions section
Schema changes in the Data Definition may look as follows:

- Name: the name of the Data Definition;
- Operation: operation type used for the Data Definition (add, update, delete);
- Date: date and time of the change;
- Changed By: author of the change;
- Version: package version indicating when the change was introduced;
- Order: information denoting in which order the changes of the package are installed. The order is assigned automatically with the first export of the package and if necessary can be further edited manually. See Schema Scripts Order section for more details;
- Description: automatically generated description of the change.
Possible operations when adding or editing the Data Definition (DD) change manually:
- update DD: this operation allows you to update the property, change attribute of the Data Definition, or add new relation;
- properties store the general settings of the Data Definition, like display name, description, class type, etc. See Data Definition: General page for more details.
- attributes of the Data Definition represent the columns in the database tables. See Data Definition: Attributes page for more details.
- relations allows you to add relations between DDs. See Data Definition: Relations page for more details.
- add DD: choose from the list of available in the system Data Definitions;
- delete DD: this operation requires the technical name and ID of the Data Definition. Tend to use the automatic recording to fill out all necessary fields correctly. Please note, that in case of manual editing the system uses the Data Definition ID as the main identifier of the object that will be deleted by the installed package. Data Definition name is not verified by the system or bound to the Data Definition ID and may be used for your convenience for differentiating the manually added change.
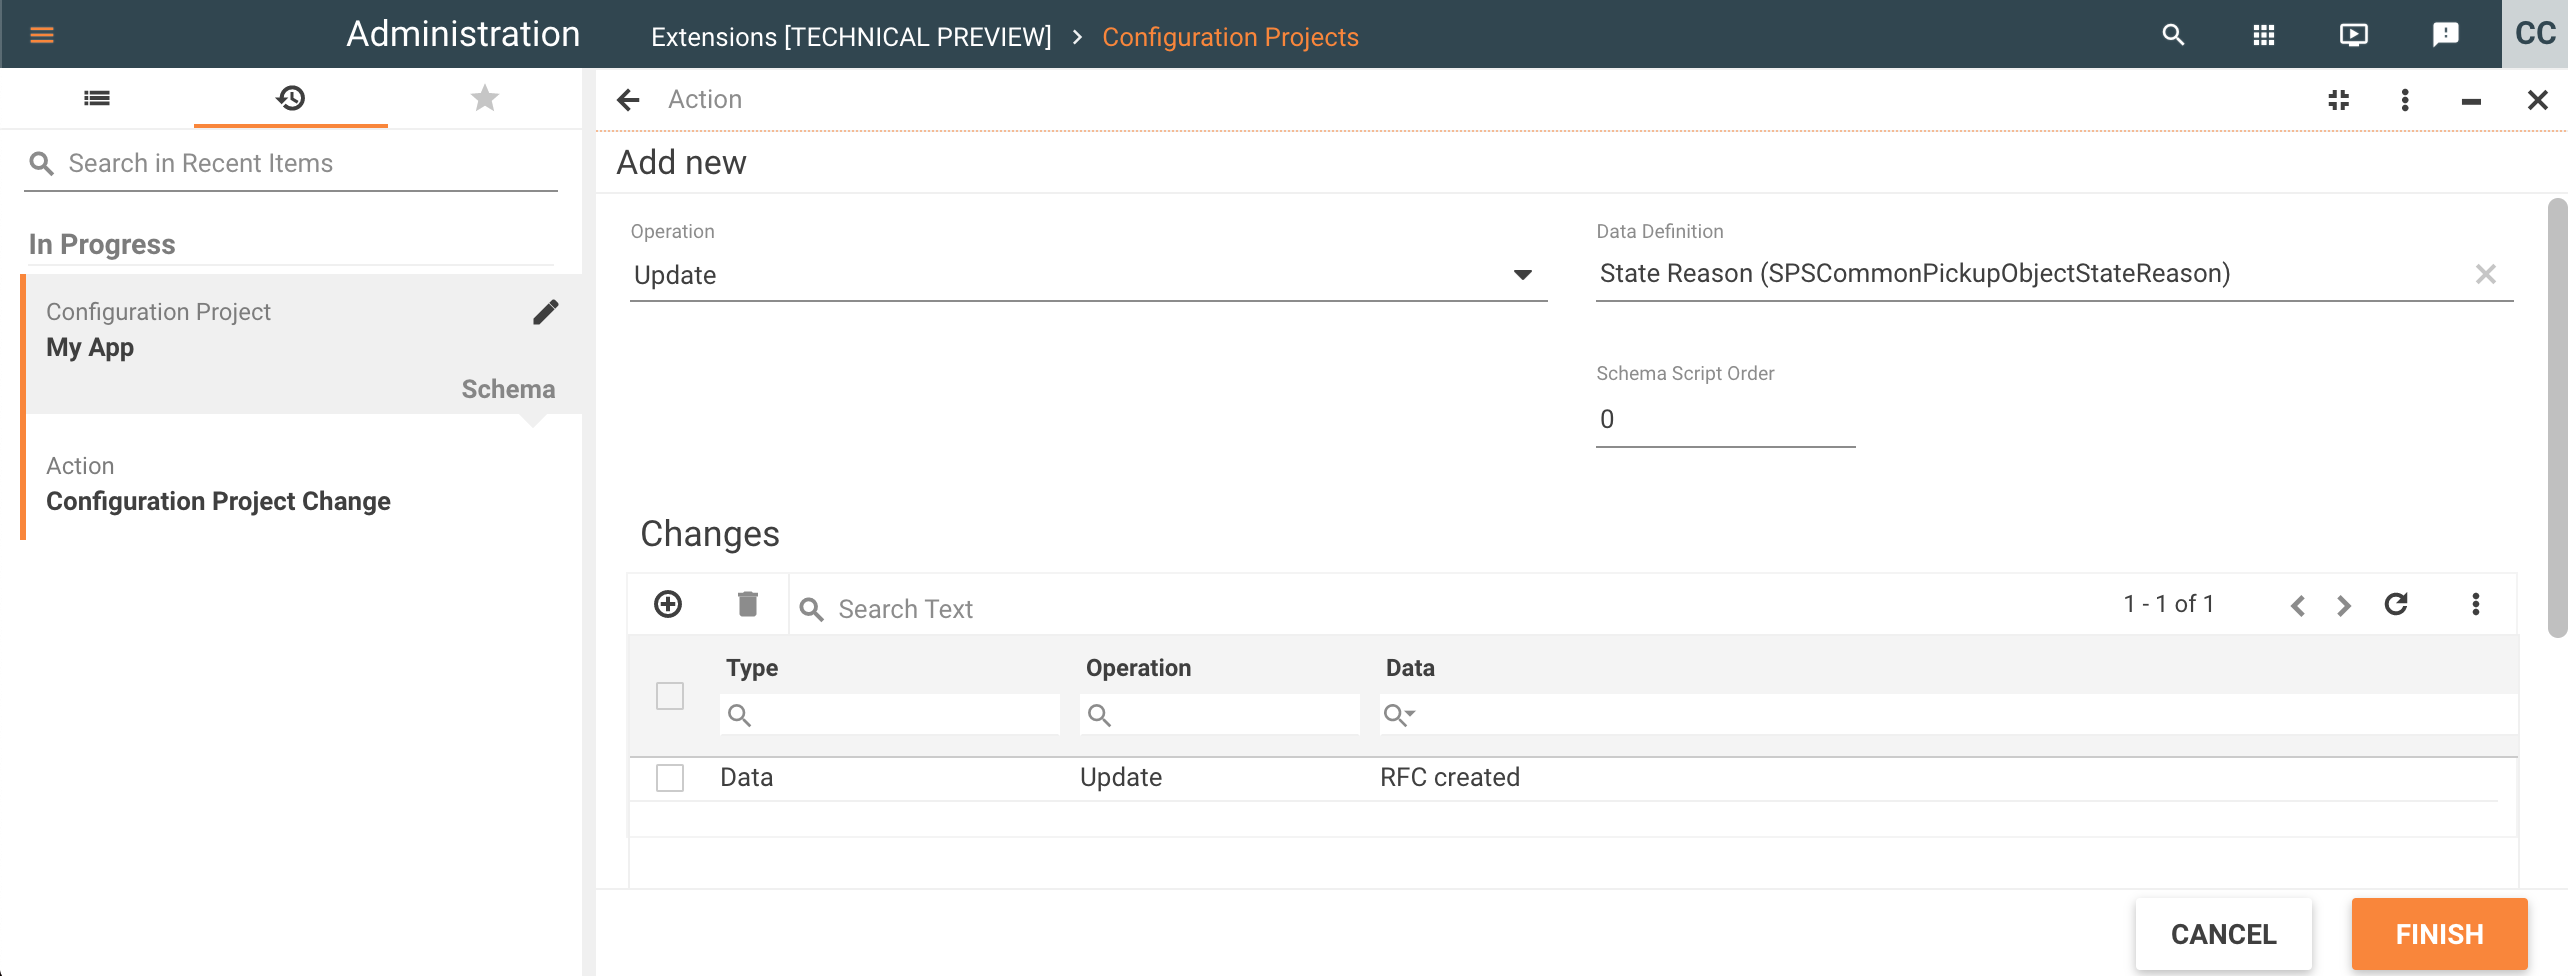
Data Definitions section: example of manually updating a Data Definition property Data listed in the Changes section of the page
Layouts
This view provides a list of changes related to the Layouts and Global Localization Strings that were recorded automatically or added/edited manually for the current Configuration Project.
Layouts
Changes in the Layouts section may look as follows:

- Name: the name of the Layout;
- Operation: operation type used for the Layout (add, update, delete);
- Date: date and time of the change;
- Changed By: author of the change;
- Version: package version indicating when the change was introduced;
- Order: information denoting in which order the changes of the package are installed. The order is assigned automatically with the first export of the package and if necessary can be further edited manually. See Schema Scripts Order section for more details;
- Description: automatically generated description of the change.
Layouts section lists all possible changes in the project that include the following types of Layouts:
- Control Descriptor
- Dataset View
- Dialog
- Landing Page
- Preview
- Wizard
- Widgets (for ESMP v.12.1.0 and higher)
Only published layouts are exported to the package. See also, Layout Designer: "Publish"layout function page.
Possible operations when adding or editing the Layout change manually:
- update: this operation allows you to update the property, localization, layout view or audience of the Layout;
- add: choose the layout type and the name of the layout from the list of available in the system items;
- delete: this operation requires the Layout type, Display Name, and ID of the Layout. Tend to use the automatic recording to fill out all necessary fields correctly. Please note, that in case of manual editing the system uses the Layout ID as the main identifier of the object that will be deleted by the installed package. Display Name is not verified by the system or bound to the Layout ID and may be used for your convenience to differentiate the manually added change.

Layouts section: example of manually adding a Dataset View to the Configuration Project
Troubleshooting: Merge Configurations
During configuration project development when there are multiple changes for the same elements of the same layout there might be a case when it is not always visualized correctly. This might be caused by the duplicate entries with layout customizations generated due to the project development process violation or transferring project development to other environments.
Merge Configurations action was designed for such advanced cases where the layout duplicates must be merged.
Merge Configurations action is available starting from ESMP v.11.0.1.
Merge Configurations action is managed in Administration application → User Interface → Actions. By default, the action is not shown in the user interface:
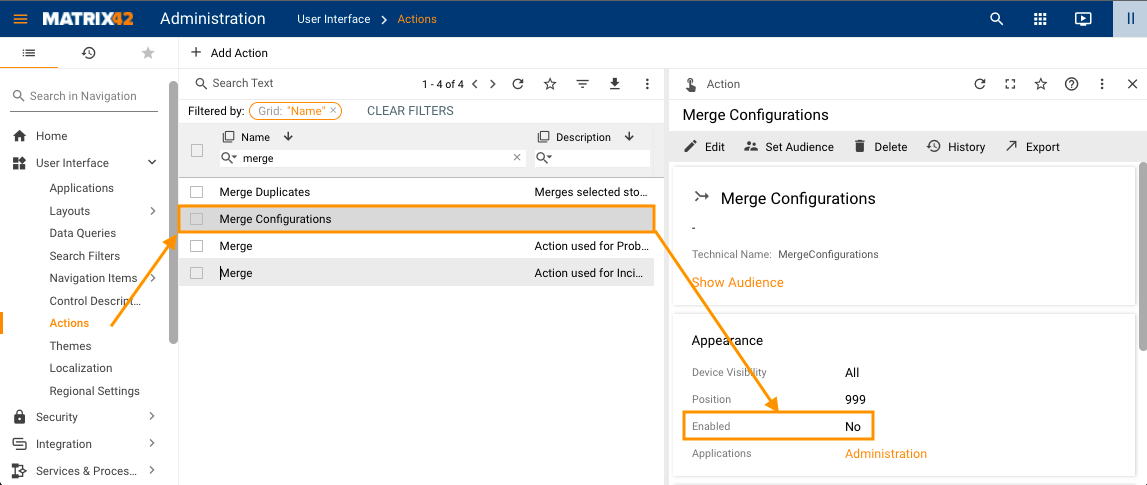
Edit the action and set Enabled to Yes so that it can be used in the system.
Merge Configurations action can be applied for the following Layouts:
- Preview
- Dialog
- Wizard
In Administration application, open User Interface → Layouts → choose the necessary Layout → click Show more actions option → apply Merge Configuration actions:
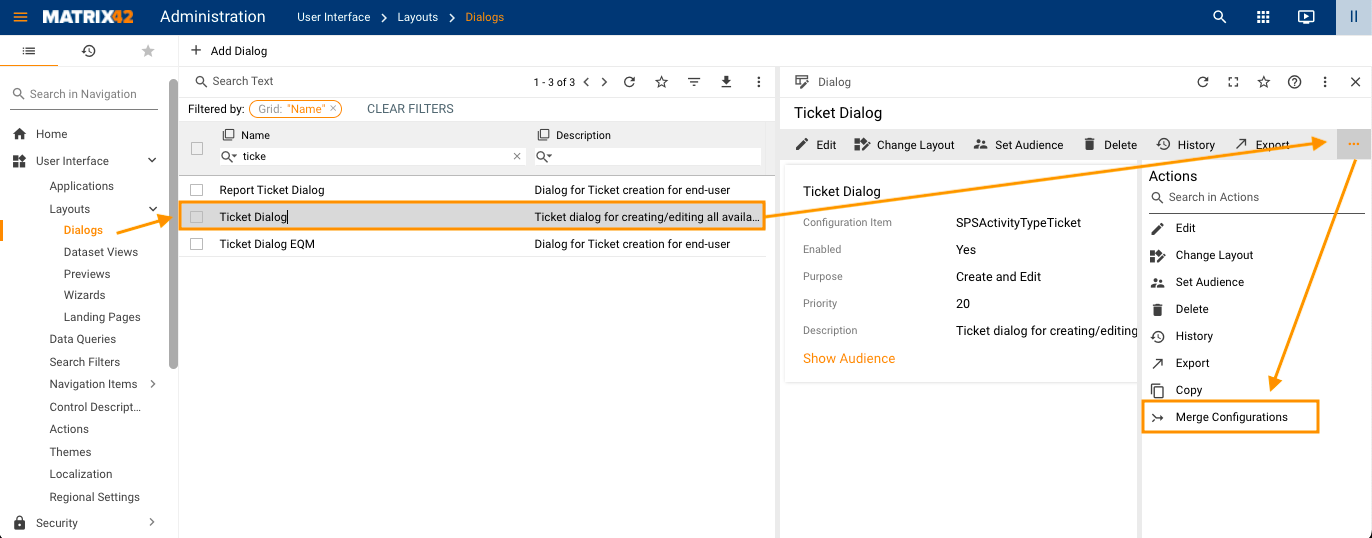
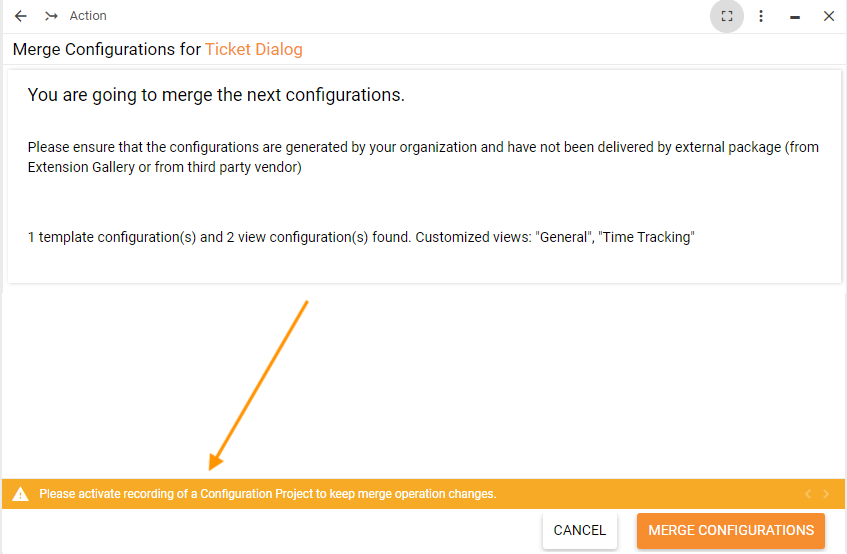
Possible changes will be listed in the wizard. Please make sure that before applying the action the recording in the related Configuration Project is active, otherwise, the following warning is shown:
See also, Start Recording section of this page.
When the Configuration Project is active, apply Merge Configurations:
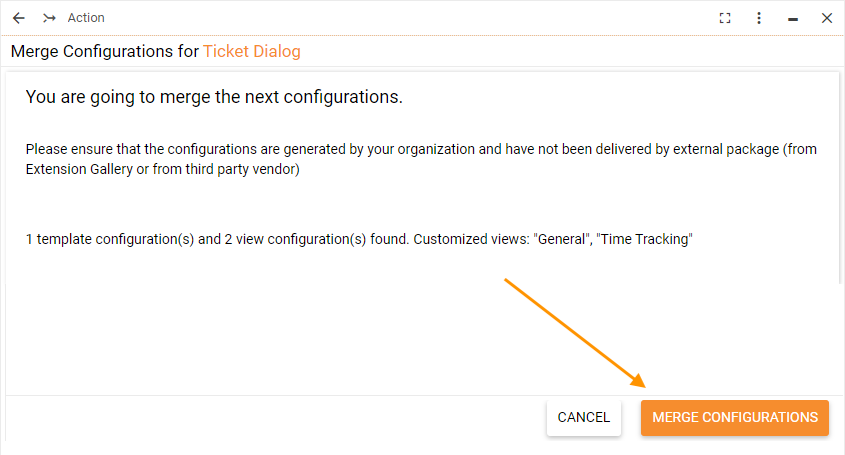
The action merges all changes applied to the layout and records them to the currently active Configuration Project. If the base template is a System one, all the configurations are merged into one, so that there is a System template and a configuration, otherwise, all configurations are merged into the template itself. The same applies to the views.
When applied, open the layout to verify the results of the merge and adjust it according to your needs.
Exporting Layout changes
The Configuration Project can register and then export only the layout changes implemented directly in the Environment where the project is running. All the layout customizations are applied to this environment over installing other Packages that are considered as the "Partner Customization" and are not included in the exported Configuration Package.
Global Localization Strings
Changes in the Global Localization Strings section may look as follows:

- Name: the name of the Global Localization Strings;
- Operation: operation type used for the Layout (add, update, delete);
- Date: date and time of the change;
- Changed By: author of the change;
- Version: package version indicating when the change was introduced;
- Order: information denoting in which order the changes of the package are installed. The order is assigned automatically with the first export of the package and if necessary can be further edited manually. See Schema Scripts Order section for more details;
- Description: automatically generated description of the change.
Global Localization Strings can be added in the Layout Designer and imported/edited in the Administration application → User Interface → Localization (use Reload action to retrieve the latest changes to the list).
Possible operations when adding or editing the Global Localization Strings change manually:
- update: this operation allows you to update the localization string;
- add: choose the Localization String name from the list of available in the system items;
- delete: this operation requires the Display Name and Localization String ID.
- Automatic recording of delete operations: for the proper functioning of the generated in the package script and correct data recording, it is recommended to use the automatic recording for the delete operations.
- Manual adding of delete operations: in case the delete operation is added manually to the change log, the system uses the specified Localization String ID as the main identifier of the object that will be removed from the system. Display Name is not verified by the system or bound to the Localization String ID and may be used for your convenience for differentiating the manually added change.

Global Localization Strings section: example of manually adding a Localization String to the Configuration Project
Objects
This view provides a list of changes related to other Objects that are considered by the system as required and essential for Configuration Project development. These include changes in Applications, Navigation Items, Data Queries, User Roles, Actions, Widget Instances, Diagnostics Rules, etc..
If the package contains Widget Instance(s) in the Objects section, enabling the Recycle Web Application (M42Services) property in the Setup Directives is recommended.
Objects section does not include changes in the data, for instance, a new User Role is tracked automatically by the system and is recorded to the package, while adding a new user to the User Role is not tracked automatically, but starting with v.25.4, this change can be added to the project manually.
Not all objects are tracked automatically. For a complete list of tracked objects and object changes, see Configuration Package features section.
Changes in the Objects section may look as follows:

- Name: the name of the Object;
- Operation: operation type used for the Object (add, delete);
- Date: date and time of the change;
- Changed By: author of the change;
- Version: package version indicating when the change was introduced;
- Order: information denoting in which order the changes of the package are installed. The order is assigned automatically with the first export of the package and if necessary can be further edited manually. See Schema Scripts Order section for more details;
- Description: automatically generated description of the change.
Possible operations for manual editing of the Object changes:
- add/update: choose the Configuration Item and the name of the Object from the list of available in the system items. Additionally, you can specify:
- Include Multi Relations allows selecting the related to the object items that should be exported to the package (N:M relations), for instance, an Action can be used in several Applications. Include as many multi-relations as necessary for the object. Make sure that the environment where the package is going to be installed already has the object referenced by the multi-relation. Single relation is considered as a part of an object and is included in the package by default;
- Always Full Import option by default is disabled so that the object will be installed only once on the target system and the changes will be merged if such an object already exists. Select the checkbox to always run the full import of the object. Please note, that with this option enabled, the custom changes of this object will be overwritten each time the package is installed. From a technical perspective, the enabled Always Full Import option generates scripts that are run in the merge mode and have Register="false" property during installation on the target system.
- update (v. 25.4): this operation requires the Configuration Item, object, and change operation(s) for properties or fragment(s). Properties can be updated, fragment(s) can be updated, added, or deleted. See also, Update Operation: Properties and Fragments section.
- delete: this operation requires the Configuration Item, Display Name, and Object ID. Tend to use the automatic recording to fill out all necessary fields correctly. Please note, that in case of manual editing the system uses the Object ID as the main identifier of the object that will be deleted by the installed package. Display Name is not verified by the system or bound to the Object ID, and may be used for your convenience for differentiating the manually added change.
If the Object is not tracked automatically or you forgot to start the recording when making changes to the system, add the Object to the Configuration Project manually, for instance, the custom Diagnostics Rule might look as follows:

Objects section: example of manually adding/updating an Object in the Configuration Project.
Add/Update Operation: select multiple objects
Starting with v. 25.4, it is possible to select and add multiple objects at once manually:
- In the Objects view, select the Operation
- Choose the Configuration Item, e.g., add a set of Widget Instances of a Dashboard
- In the Object IDs field, click on the lookup icon
- Select the necessary Objects with a checkbox and click Select
- The selected Object IDs are shown in the example below
- Click Finish

Update Operation: Properties and Fragments
Beginning with version 25.4, granular object update operations can be manually added to a package. While earlier versions supported only full-object updates, this enhancement enables partial updates, allowing you to define precisely which elements to update. This applies to properties, related objects, and fragments.
For instance, to add the changes related to the specific Knowledge Base article:
- In the Objects view, add a new Object
- In the Operation field, choose Update
- Fill out the required fields. This operation requires the Configuration Item, Object, and change operation(s):
- Configuration Item: as an example, choose the
Knowledge Base Article (SVMKBArticleType) - Object: choose an object from the available system objects associated with this configuration item, for instance, KBA00003: How to report issue

- Configuration Item: as an example, choose the
- Add changes: this section allows adding changes for properties and fragments of the selected Configuration Item
- Properties: only Update operation is possible for properties. The list of properties includes all the available properties from the Data Definitions associated with the previously selected Configuration Item. You can update properties with or without relation.
Select the property from the suggested list, for instance, the following change updates the title of the selected Knowledge Base Article, which is stored in theSVMKBArticleClassBase.Subjectproperty of the previously selected Knowledge Base Article Configuration Item:

If the selected property has relations, for instance, Tasks related to the selected Knowledge Base Articles, an additional field for selecting Related Objects is suggested, as on the example below:

In other words, when the selected Property has N:M relation, e.g., SPSActivityClassBase.AttachedUsers, you can specify a reference to the affected objects.
During export, if the reference exists, the export generates an adding script. When the reference to the object is missing, the removal script is generated.
To add all Related Objects for the selected property, leave this field empty. - Fragments: the Data Definition field suggests all the available options (Data Definitions with cardinality Optional or Optional (Multi)) associated with the previously selected Configuration Item. Possible operations:
- Add: select a Data Definition from the suggested list and choose from the available in the system Fragment(s)
- Update: select a Data Definition from the suggested list and choose from the available in the system Fragment(s)
- Delete: select a Data Definition from the suggested list and specify Fragment IDs (comma-separated)
The example below adds to the package the records containing 2 reviews of the previously selected Knowledge Base Article. The reviews are stored in theSPSRatingClassBaseData Definition, and the specific records with the submitted reviews are stored in the selected Fragments:

Limitations:
It is not possible to save the change if there are duplicates, i.e., when adding Fragment changes that include different operation types for the same Data Definition, you need to keep only one operation type, for instance, add, update, and delete operations for the ratings submitted for the selected Knowledge Base Article are not possible within one change record as it's executed as one script and it's not specified in which order these changes should be applied. The system allows you to add them to the change, but when you try to save it, the following error message is shown:

If you still need to use different operations, add them as separate objects and make sure they will be executed in the correct order with the Adjust Schema Scripts Order action:

- Properties: only Update operation is possible for properties. The list of properties includes all the available properties from the Data Definitions associated with the previously selected Configuration Item. You can update properties with or without relation.
It is often the case that when the objects are added manually, some external references can be overlooked and not included in the package. For this, the system checks missing external references when exporting the package, highlights them, and allows resolving them directly before exporting the package or adjusting the package by adding missing references and restarting the package export. See also, Configuration Package Export: Resolve External References Conflicts section.
Example: Adding a Dashboard or Report to the Configuration Project
In a custom Navigation Item Statistics Report (1), create a custom Dashboard Personal Statistics (2) and configure some widgets for the dashboard (3):

Custom Dashboard example
See also, Managing Dashboards and Reports in New Look.
All these objects are tracked and added to the project automatically if the recording was started, or, if necessary, they can be added manually as described below.
To export a Dashboard or Report, add the following items to the project in the Objects view:
- Navigation Item (PDRNavigationItemType), for example, Statistics_Report
- Sub-navigation item if you add another tab to your dashboard, which is also stored in Navigation Item (PDRNavigationItemType), e.g., Personal_Statistics
- Widget Instances (PDRWidgetInstanceType): widgets that were added to the dashboard or report and configured based on the standard widget library available in the system.

Objects that represent the components of the Dashboard or Report
Optionally, if the Dashboard or Report contains a Widget Instance that is created based on the custom Widget Layout, which is not part of the standard widget library, additionally add the following items in the Layouts view:
- Widget Layout

Adding a custom Widget to the Layout in the Configuration Project
Particularities
Layout objects can not be managed from the Object view and must be handled in the Layouts section:

Workflows
The package stores only the newest changes and only one and the latest version of the workflow.
The workflow that is set to run on Matrix42 Worker workflow engine is not published. Workflows that are running on AppFabric workflow engine are published automatically.
The system automatically tracks only workflows that have the status "Released" and the Configuration Project is actively tracked (is set to "In Progress").
Changes in the Workflows section may look as follows:
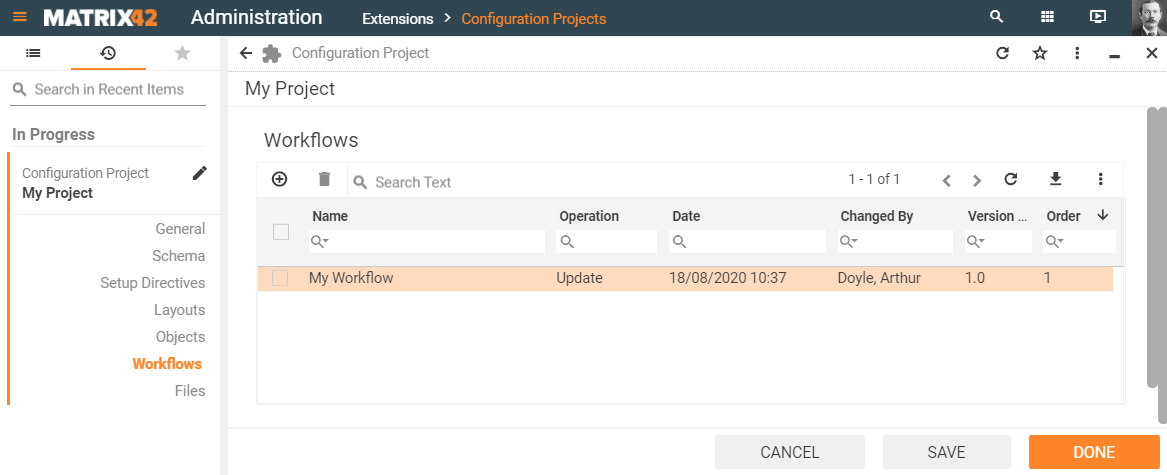
- Name: the name of the Workflow;
- Operation: operation type used for the Object (update);
- Date: date and time of the change;
- Changed By: author of the change;
- Version: package version indicating when the change was introduced;
- Order: information denoting in which order the changes of the package are installed. The order is assigned automatically with the first export of the package and if necessary can be further edited manually. See Schema Scripts Order section for more details.
Possible operations for manual editing of the Workflow changes:
- add/update: choose the Workflow from the list of available in the system items:

Workflows section: example of manually adding/updating the Workflow in the Configuration Project.
Files
This view includes the following categories:
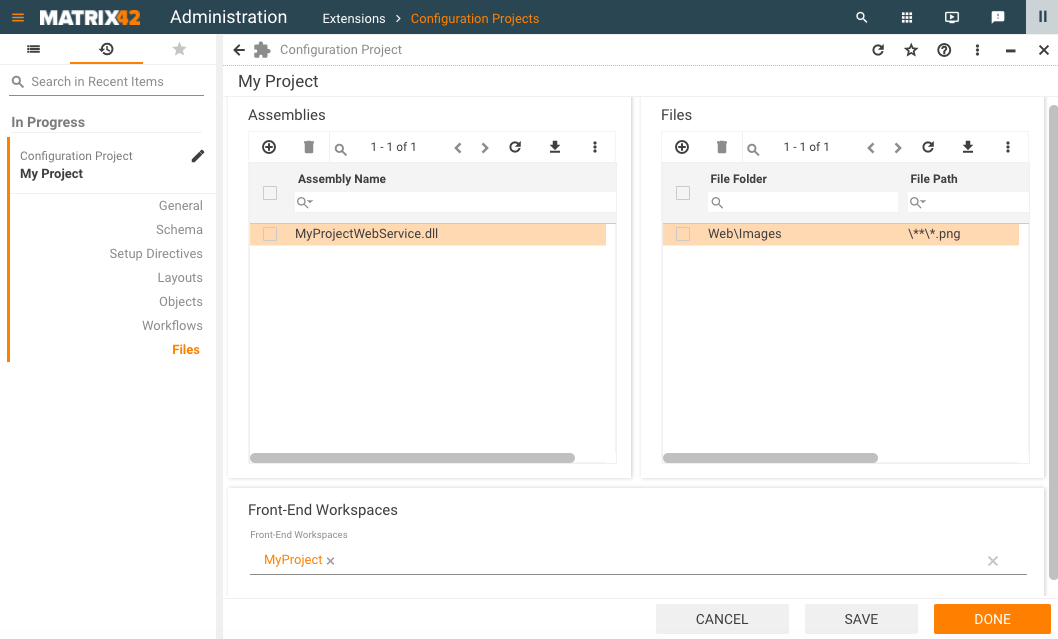
Assemblies: allows adding the .dll files.
Find more about the assemblies in Configuration Project structure
Choose from the list of suggested files. The list includes only custom files that have been changed in the system. The files that are a part of the standard system are not suggested in the list. Use Assemblies section to include assemblies from the following folders:
- %AppFolder%\InstalledPackages\Assemblies\{package ID}
Project-specific folder used to store sandboxed assemblies and related artifacts.
Available starting with version 26.1 and becomes the only source of assemblies from version 26.2.When exporting a Project, the output Package includes not only the referenced assembly but also all related artifacts, such as: runtime folders (win-x64, linux-x64), .dll.config, .dll.host.config, .deps.json
Read more about Sandboxed Extensions - bin, svc\bin, ServiceRepository\BinaryComponents
For versions older than 26.2, when custom assemblies were integrated directly to Application Folders
Front-End Workspaces: choose the workspace from the list. The package will include everything that is present in the selected folder. Workspaces include front-end resources (like Javascript libraries, CSS, images, etc.) required for building user interfaces in Matrix42 platform. For more details see Front-End Workspaces page
Files: allows adding other files that do not belong to any of the available sections of the Configuration Project, like images or icons that are not a part of the Workspaces, configuration files, other special files, like .XML, and Reports.
Reports
SSRS Reports are no longer supported starting with version 26.1. Any reports included in the package will be ignored from version 26.1 onward.
To add a report, choose the Reports File Folder and specify the File Path, for instance:

Ways to define the path and the file:
Define the relative path to the directory and files, wildcards * and ? are supported (e.g. Web\*.ico).
Use \**\ before mask to search in all subdirectories (e.g. Web\Images\**\*.png):

Samples:
| Case | Path |
|---|---|
| Specific file | DataGateway\Apps\Matrix42.DataGateway.Inventory\Extensions\AntiXssLibrary.dll |
| Files with '.png' extension from 'Web\Images' directory (doesn't include files from the subdirectory) | Web\Images\*.png |
| Files with '.png' extension from 'Web\Images' directory and all subdirectories | Web\Images\**\*.png |
| All files from 'Web\Images' directory and all subdirectories | Web\Images\** |
| Find subdirectories having the name ending with 'x64' on any level in 'Web\Images' directory and include all files with '.ico' extension located in found directories and all subdirectories |
Web\Images\**\*x64\**\*.ico |
Files section can't be used to include files from the following folders:
- bin
- svc\bin
- ServiceRepository\BinaryComponents
- Messages
Setup Directives
Use this section to manually configure the Configuration Project installation/uninstallation properties and provide additional SQL and/or PowerShell scripts.
Extensions containing PowerShell setup directives are not supported for installation in Cloud environments.
By default, all properties are disabled:
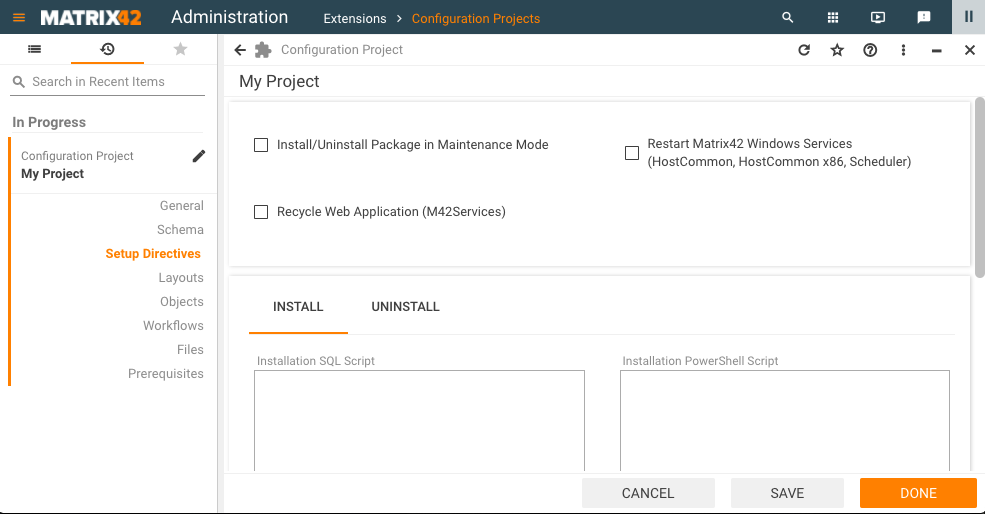
Such configuration allows minimizing the Configuration Package installation time, makes it seamless and unnoticeable for the active users, and essentially reduces or even brings down to zero the system's downtime.
The system downtime is possible when the Configuration Package includes assemblies added in the Files section of the Configuration Project. In this case, the system can stop/restart the necessary services and turn on the maintenance mode during the package installation even if it is not explicitly configured in the Setup Directives.
All configured properties are exported to the Configuration Package.
Properties:
- Install/Uninstall Package in Maintenance Mode: select the checkbox to explicitly enable the Configuration Package installation in system maintenance mode.
- Recycle Web Application (M42Services): select the checkbox to restart the services necessary for running the website. This option should be enabled if your package contains Widget Instance objects.
When the checkbox is enabled, the system warns that the package will be installed in maintenance mode:

- Restart Matrix42 Windows Services: select the checkbox to restart the following services:
- HostCommon: part of the background engines infrastructure that handles the background processes that run on the application server;
- HostCommon x86: part of the background engines infrastructure that handles the background processes that run on the application server. This service specifically operates the processes that still need to run on the 32-bit subsystem;
- Scheduler: a background engine that is responsible for activating scheduled tasks;
- Data Gateway: a container for the logic that is executed remotely;
- Worker: part of the Matrix42 Workers infrastructure.
Install:
- Installation SQL Script: optional script that can be used for the database changes that cannot be added in the other way, e.g. with Schema Scripts. SQL script is applied after Schema Script installation. See Package Installation Sequence section for details.
- Installation PowerShell Script: optional script that is applied after SQLScript installation. See Package Installation Sequence section for details.
For more details see Configuration Package Installation page.
Uninstall:
- Uninstallation SQL Script: optional script that can be used for the database changes that cannot be added in the other way, e.g. with Schema Scripts. SQL script is applied during the Configuration Package uninstallation.
- Uninstallation PowerShell Script: optional script that is applied during the Configuration Package uninstallation.
Prerequisites
Optional settings where you can define system version and dependent packages:
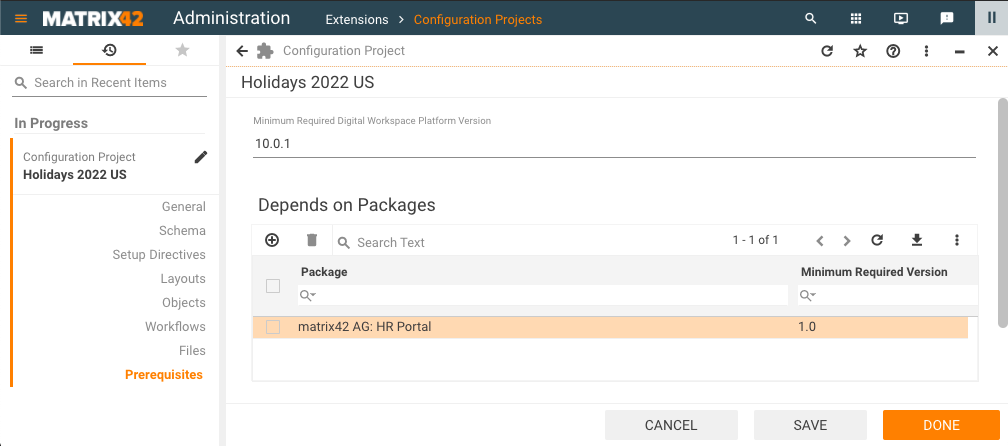
- Minimum Required Enterprise Service Management Platform Version: the minimum required version of the Enterprise Service Management Platform that allows the installation of the edited package;
- Format: xx.x.x includes major, minor, and build version.
- Example: 10.0.1
- MaximumRequired Enterprise Service Management Platform Version: the maximum required version of the Enterprise Service Management Platform that allows the installation of the edited package;
- Format: xx.x.x includes major, minor, and build version.
- Example: 10.0.1
- Depends on Packages: a list of packages that must be installed before running the installation of the package we are currently editing, otherwise, the package installation is not possible.
- Package: name of the required package;
- Minimum Required Version: the minimum required version of the package that must be already present in the system before running the installation of the currently edited package.
To add a package dependency specify:
- Package: choose from the list of the previously installed in the system packages;
- Minimum Required Version: optional field. By default, the version is taken from the selected package. Clear this field if any version of the package is acceptable for this dependency Edit the version manually, if necessary:
- Format: xxxx.xxxx.xxxxxx includes major (up to 4 digits), minor (up to 4 digits), and build version (up to 6 digits).
- Example:
- 1.0
- 10.0.1
- 1.1.184697
- 1234.1234.123456

Do not include the same package with the lower version as a dependency. The same package with a higher version always includes changes from the previous versions.
The prerequisites settings are exported to the package.json file and are checked before the Configuration Package installation.
Behaviors
See more details in Middleware Behaviors
Update Operations: Full Export & Changes Only
Update operations can be configured and exported in two modes. These options are applied for:
- Schema changes (Configuration Items, Data Definitions)
- Layouts (Previews, Dialogs, Control Descriptors, Landing Pages, Wizards, Dataset Views)
Export Changes Only
By default, all update operations for the enumerated above entities automatically track only the changes that can be listed as follows:
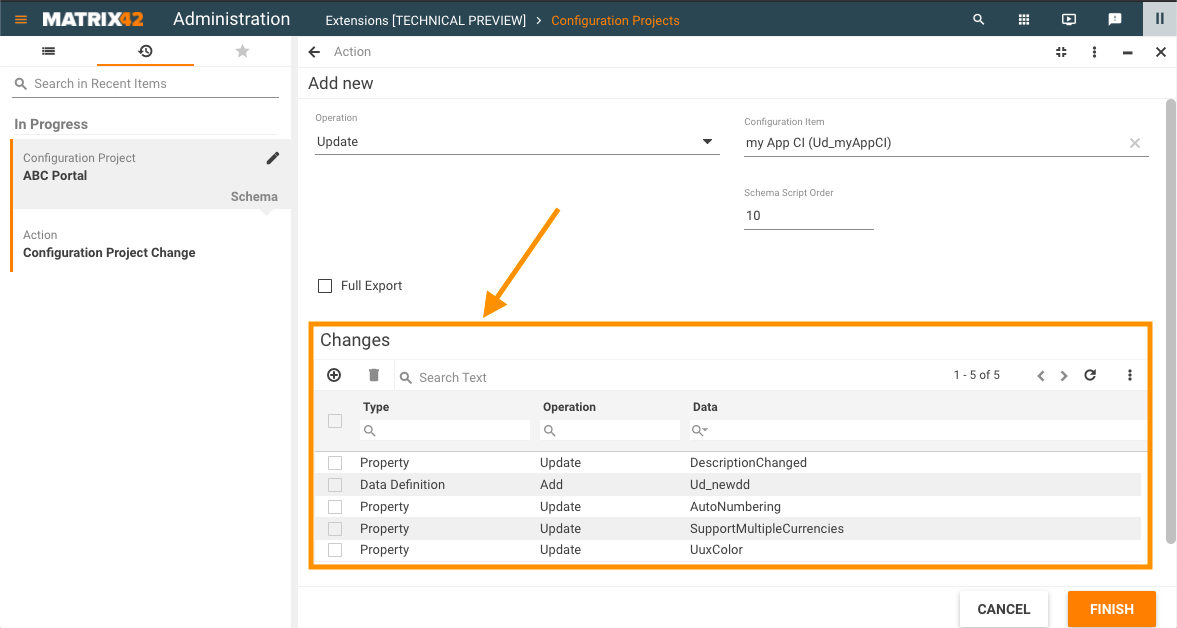
The Export to Package action retrieves only the changes of the entity.
This approach allows working on several projects in the same environment and tracks only relevant Configuration Project changes for each Configuration Package.
Full Export
The enabled Full Export option allows exporting the entire entity and all its properties as is, including all configuration options of the entity that are stored in the system at the given moment.
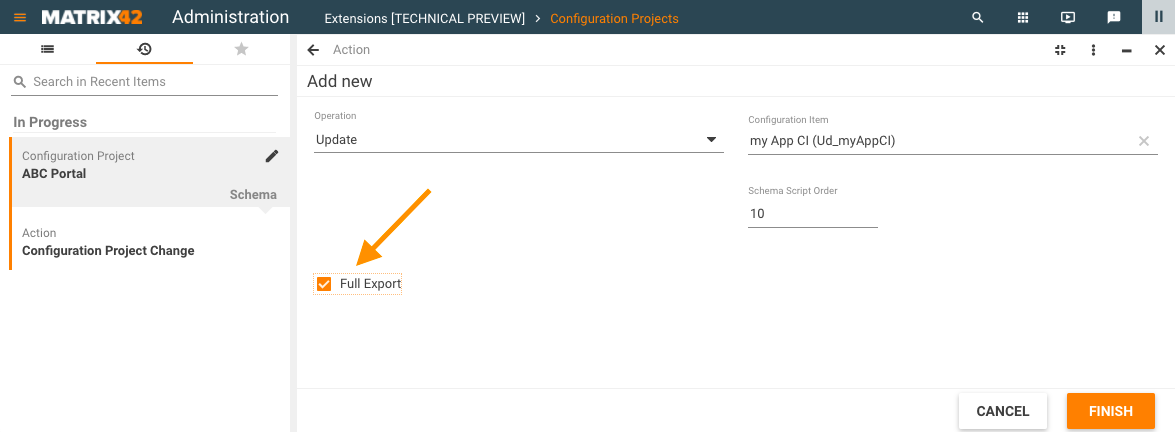
Once the entity is saved in the Full Import mode the list of changes is no longer available and can not be restored automatically if the Full Import mode is disabled.
The full import option generates scripts that are run in the merge mode on the target system.