Backend
Remote Assistance Backend
To use Remote Assistance, it must be enabled and configured beforehand.
Do not install Remote Assistance on the same server as Matrix42 Enterprise Service Management Platform, but on a separate system, otherwise, there will be unnecessary configuration challenges.
The installation instructions can be found in your own FastViewer portal under "General" --> "Documents" --> "Server".
License Activation
Cloud
If the Remote Assistance Backend is installed in the Matrix42 Cloud, then it is always ensured that they have the latest version available and that it is already activated and configured accordingly.
On-Premise
The license must now be imported into the local installation.
Proceed as follows:
- Change to the local installation directory e.g. C:\Program Files (x86)\WebConferenceServer
- Run the program "ServerAdmin.exe".
- Click the button "Import Licenses" in the lower right corner of the dialog.
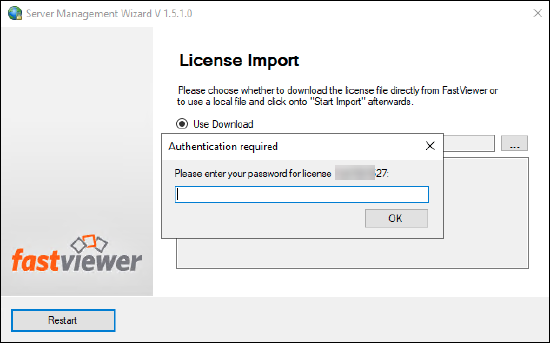
- Choose the option "Use Download" and press the button "Start Import".
- Then enter your individual license password from your installation to start the import.
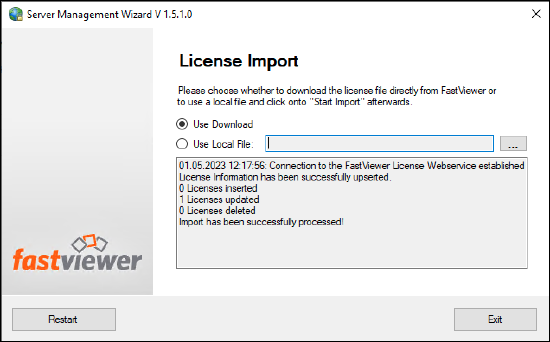
- After successfully importing the license, click on "Exit".
Service Bus Settings
Cloud
If the Remote Assistance Backend is installed in the Matrix42 Cloud, then it is always ensured that they have the latest version available and that it is already activated and configured accordingly.
On-Premise
Make sure that the on-premise server version you are using is at least version 3.3.8541.36312 or greater. If this is not the case, then install or upgrade your installation.
The individual service bus settings must still be entered in the Remote Assistance backend.
Proceed as follows:
- Change to the local installation directory e.g. C:\Program Files (x86)\WebConferenceServer
- Run the program "ServerAdmin.exe".
- Click the button "ServiceBus Settings" in the lower left corner of the dialog.
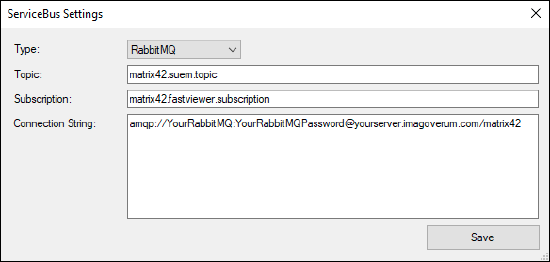
- Enter the following information:
Type: RabbitMQ
Topic: matrix42.suem.topic
Subscription: matrix42.fastviewer.subscription
Connection String: Type here the RabbitMQ Connection String from your own RabbitMQ installation.
If the connection string contains special characters, e.g. # $ &, it must be encoded! (e.g. # becomes %23.)
For example, go to the following link and encode the entire connection string. https://www.freeformatter.com/url-encoder.html - Click on "Save".
SSL-Certificate
A valid SSL certificate is always mandatory for a secure encrypted connection.
The backend server must be accessible via HTTPS and must have a valid certificate.
Cloud
If the Remote Assistance Backend is installed in the Matrix42 Cloud, then it is always ensured that there is a valid SSL certificate available and that it is already configured accordingly.
On-Premise
To activate an SSL certificate, proceed as follows:
Change to the local installation directory e.g. C:\Program Files (x86)\WebConferenceServer
- Run the program "CertificateInstaller.exe".
- In the right drop-down select the IP address to which you want to bind the SLL certificate.
- Click the button "Select cert". A dialog for selecting the certificate appears.
- Choose the valid certificate for your server (dedicated server certificate or wildcard certificate).
- Click the "OK" button to confirm the certificate.
- Click the button "Install cert.
- Confirm the successful installation with "OK".
- With the "Show installed" button you can view the installed certificates.
- Close the program "CertificateInstaller.exe".
HTTPS Settings
For problem-free communication via https, it is necessary to make appropriate changes in the settings.ini configuration file.
- Change to the local installation directory e.g. C:\Program Files (x86)\WebConferenceServer and open the settings.ini file.
- Adjust the following parameters:
- ExternalAddress - Here please enter the FQDN under which your server is reachable.
If the Webconference Server should also be reachable from the internet, this must be an external FQDN.
e.g. ExternalAddress=yourservername.imagoverum.com - Listen2 - In case you use a wildcard certificate, the FQDN of your server must be stored in the parameter listen2.
e.g. The certificate runs on "*.imagoverum.com".
The parameter listen2=https://yourservername.imagoverum.com/
- ExternalAddress - Here please enter the FQDN under which your server is reachable.
- Save the settings.ini file.
- Restart the service "WebconferenceServer" so that the settings are applied.
Check the functionality by calling the FQDN of your server with https://prefix in the browser.
e.g. https://yourservername.imagoverum.com
As a response the following text appears in the browser: FastViewer Webconference Server
The configuration of the infrastructure is now complete.
ServiceBus Connection Tester
With this tool you can test the connection to a RabbitMQ or Azure Servicebus instance. Download here
FastViewer Server Requirements
Here are the server requirements for our on-prime solution: FastViewer_Server_Requirements.pdf
FastViewer Server Installation and Configuration
FastViewer_Server_Installation_and_Configuration.pdf