System Requirements
System Requirements
This article outlines the system requirements and installation prerequisites for deploying and operating Matrix42 Enterprise Service Management. It is intended to guide IT administrators through the essential hardware, software, operating system, account, and SQL Server configurations required for a successful deployment.
The guide is structured into key sections covering:
- Hardware and software prerequisites
- Windows Server roles and features
- Installation options (automated or manual)
- Supported browsers and account requirements
- SQL Server compatibility and configuration steps
Following the instructions in each section will help ensure optimal performance, security, and stability of the system in your environment.
Hardware Requirements
For more information on all hardware requirements, refer to the Hardware Sizing page.
Software Requirements
Operating System
Supported Operating Systems
For installing web-, application- and database server for Matrix42 Enterprise Service Management the following editions and versions of Windows Server are supported until the End of Extended Support provided by Microsoft.
Only 64-bit Operating Systems are supported.
| Edition/Version | Released | End of Basic Support | End of Extended Support |
|---|---|---|---|
| Windows Server 2016 Standard / Datacenter | 15.10.2016 | 11.01.2022 | 12.01.2027 |
| Windows Server 2019 Standard / Datacenter | 13.11.2018 | 09.01.2024 | 09.01.2029 |
| Windows Server 2022 Standard / Datacenter | 18.08.2021 | 11.10.2026 | 14.10.2031 |
| Windows Server 2025 Standard / Datacenter | 01.11.2024 | 09.10.2029 | 10.10.2034 |
Source: Microsoft Lifecycle Policy.
Roles and Features
Matrix42 Enterprise Service Management requires the following Roles and Features:
| Windows Server 2025, 2022 | Windows Server 2019 | Windows Server 2016 | |
|---|---|---|---|
| Server Roles |
|
|
|
| Features |
|
|
|
|
Web Server Role (IIS) Role Services |
|
|
|
Additional Software
Option 1: Use the package installer
A .zip package (Setup & Runtime Redistributables) is available on the Matrix42 Marketplace to simplify the installation of the required components. It also includes additional useful scripts to help automate the installation process—for example, by installing the necessary roles and features on the server. If you prefer to install the components manually, please follow the order listed below to ensure proper setup of the components. If you want to use the Setup & Runtime Redistributable, run first the 1.Set-ExecutionPolicy.ps1 as an administrator to set your execution policy to Unrestricted, followed by the Install_Prerequisites.ps1.
The latest script automates the installation of the following components:
- Activation of automatic Windows updates
- Installation of .NET Framework 4.7.2
- Adding Windows roles/features (via XML template)
- Installation of URL rewrite 2.0 (for IIS)
The package installer is not supported on Windows Server 2025. If you are running on this server version ensure to have installed the Roles and Features, including the IIS URL Rewrite Module and the Microsoft Visual C++ Redistributable Version 2015-2022.
Option 2: Manual Installation
- Minimum Installed IIS URL Rewrite Module 2.0
- Minimum installed Microsoft .NET Framework Runtime Version 4.7.2. - required since Matrix42 Enterprise Service Management 11.0.2 and higher
- To review your current version, open the File Explorer and browse to the following path: C:\Windows\Microsoft.NET\Framework, Enter the folder with the latest version – for example, v4.0.30319. and Right-click any of the ".dll" files and select the Properties option. Click the Details tab. Under the "Product version" section, confirm the version of .NET is not lower than 4.7.2
- This runtime is also required for users with access to the Workflow Studio
- Latest Microsoft Visual C++ Redistributable Version 2015-2022
- Office System Driver: Data Connectivity Components (x64) - obsolete since Matrix42 Enterprise Service Management v.12.1.2.
- This component is required to process Text and Excel file imports. Previously to process such GDIE processes, the 32-bit Windows system compatible version was suggested to install, but as of v.12.1.0 the Setup & Runtime Redistributables folder has a 64-bit Windows compatible component. Starting from ESMP v.12.1.0 if you have an earlier version running it is necessary to uninstall the component that is compatible with 32Bit Windows systems and install from the redistributable an AccessDatabaseEngine (Microsoft Access 2016 Runtime) component compatible with 64Bit Windows. The system update will not proceed without the 64-bit Windows-compatible component.
Accounts
Service Account
A domain account is required for the Matrix42 Enterprise Service Management server; it receives the client requests and communicates with the IIS [application pool]. This account should have the following properties:
- Name, e.g.: Domain\M42Service
- Membership in the application server groups:
- Administrators
- IIS_WPG or IIS_UISRS
Grouped Manage Service Accounts (gMSA) are not supported.
- In case of distributed environments, ensure that the service user is a member of an Active Directory group, as described in Preparations.
- Ensure that the Service Account is authorized for "Log on as batch job": on the Application Server, open Local Security Policy → Security Settings → Local Policies → User Rights Assignment. Without this security setting, IIS application pool cannot be started.

Account for Installation and Administration
To perform the installation or the update, you need a domain account with the following privileges:
- Local administration privileges on the Matrix42 Workspace Management application server.
- Administrator role in SQL Server Analysis Services. For more information, see the Microsoft website.
- Content Manager Role for SQL Server Reporting Services. For more information, see the Microsoft website.
- Full administration privileges (sysadmin) on the database server (you can remove these privileges from the user after successful installation). The simplest way is to run the installation or the update under an account that has the sysadmin rights on the SQL Server. In some cases, it is not possible because of corporate security policy. The table below lists minimal permissions to perform the installation or the update.
You can start the installation or the update with a new blank login in SQL Server that has only the right to log on. SQL Server will check the required permissions and you will be able to continue the process if the permissions are changed during the setup.
Supported Browsers
- Chrome (latest)
- Firefox (latest)
- Edge (latest based on Chromium)
- Safari (latest)
- iOS (up-to-date)
- Android (up-to-date)
SQL Server
Supported SQL Versions
For Matrix42 Enterprise Service Management the following editions and versions of Microsoft SQL Server are supported until the End of Extended Support provided by Microsoft.
Express and other editions of SQL Server are NOT supported.
| Edition/Version | Released | End of Basic Support | End of Extended Support |
|---|---|---|---|
| SQL Server 2022 Standard / Enterprise | 16.11.2022 | 11.01.2028 | 11.01.2033 |
| SQL Server 2019 Standard / Enterprise (Win) | 04.11.2019 | 07.01.2025 | 08.01.2030 |
| SQL Server 2017 Standard / Enterprise (Win) | 29.09.2017 | 11.10.2022 | 12.10.2027 |
|
SQL Server 2016 Standard / Enterprise SP3 The SQL server requires the Microsoft OLE DB Driver for SQL Server ( |
01.06.2016 | 13.07.2021 | 14.07.2026 |
Source: Microsoft Lifecycle Policy.
- Starting from Matrix42 Enterprise Service Management v.11.0.2.3492 and higher, SQL Server Native Client installation and configuration is no longer required. For earlier versions, SQL Server Native Client needs to be configured.
- The SQL Native Client has been removed from SQL Server 2022 (16.x) and SQL Server Management Studio 19 (SSMS) and thus, for Enterprise Service Management versions lower than 11.0.2.3492 it should be downloaded, installed, and configured additionally, both on the Application Server as well as on the Database Server.The SQL Server Native Client can be downloaded from the Microsoft portal. For more details, see also Microsoft documentation: Installing SQL Server Native Client.
SQL Account Requirements
|
REQUIRED RIGHTS |
REASON |
| Global Permissions | |
| Server: VIEW ANY DATABASE | Check if a database with the same name already exists |
| Server: CREATE ANY DATABASE | Create new databases. The permission is required for an update when a new database has to be created. In most cases, you do not need to create any databases during the update. |
| Server: VIEW SERVER STATE | Check if SQL Server Agent is running |
| Service Account: VIEW DEFINITION | Check rights |
If a service account has no sysadmin rights, then you should enable Microsoft System CLR Types of SQL Server before the installation.
For more information, see the following articles at the Microsoft website:
SQL Server and Database configuration
Before you install Matrix42 Enterprise Service Management, you should completely install and start:
- SQL Server with Analysis Services and Full-text search features
- Turn on the automatic start of SQL Server Agent and other SQL-related services
- Adjust SQL Server Configuration Manager settings
- Configure SQL Server Reporting Services
- Install SQL Server Management Studio (optional)
These steps are described below.
Install and configure SQL Server
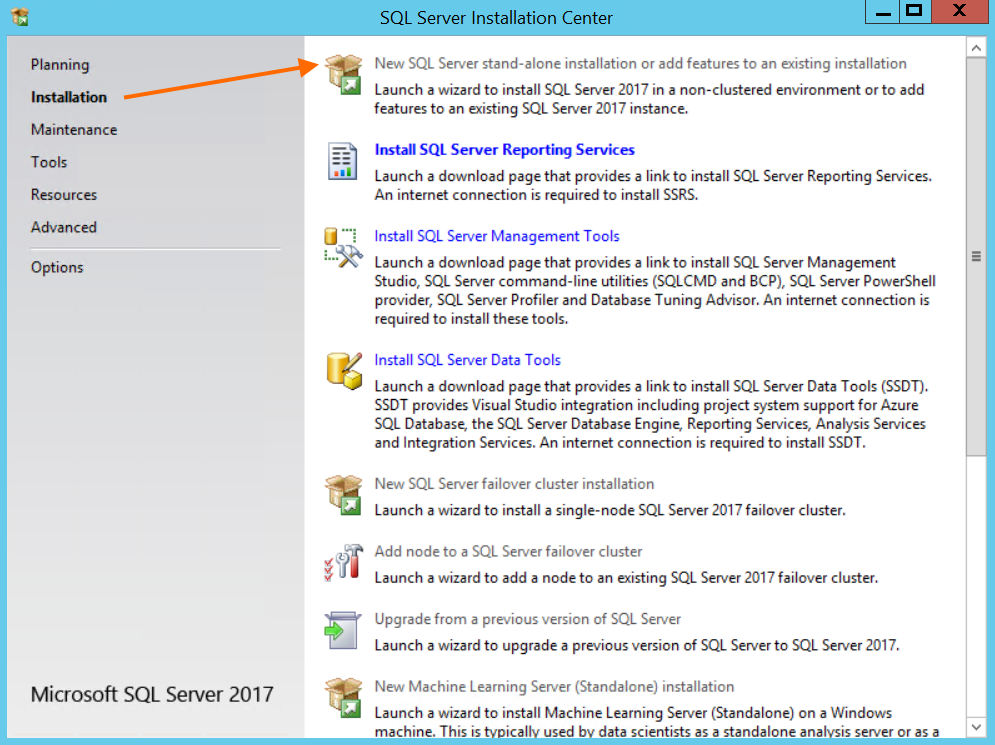
- Open the SQL Server Installation Center → Installation section and run SQL server setup:
- Click Next and apply the suggested options to proceed to the Feature Selection section.
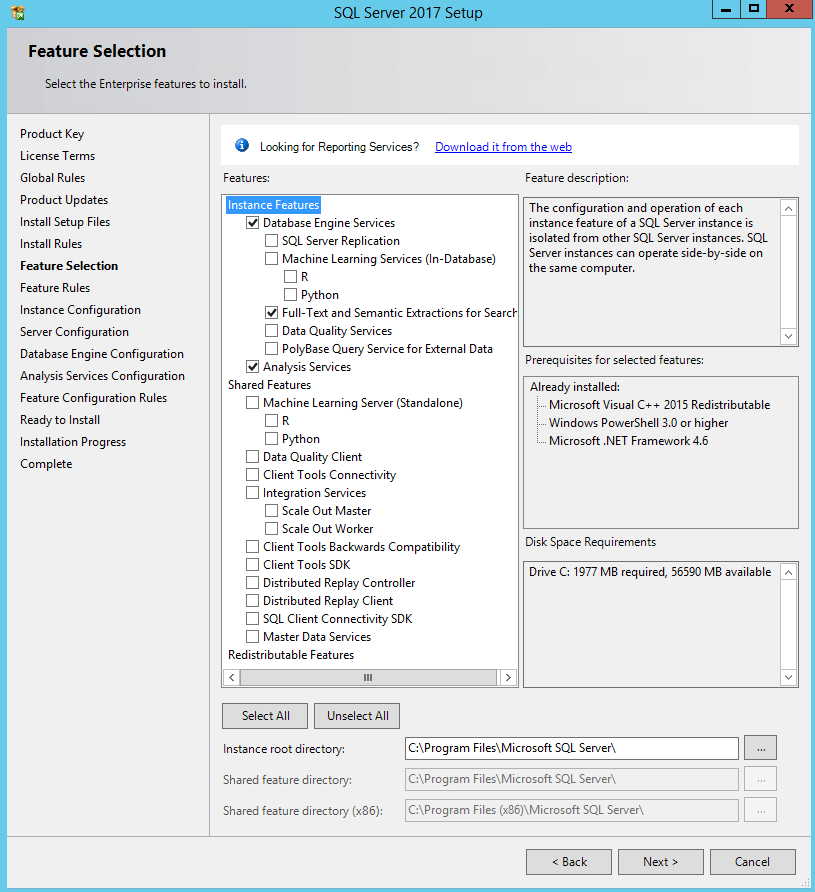
Features
- Select the Full-Text Search and Analysis Services features as shown in the image below and click Next:
Service Accounts
- In the Server Configuration section → Service Accounts tab set the Startup Type for all suggested SQL-related services to Automatic:
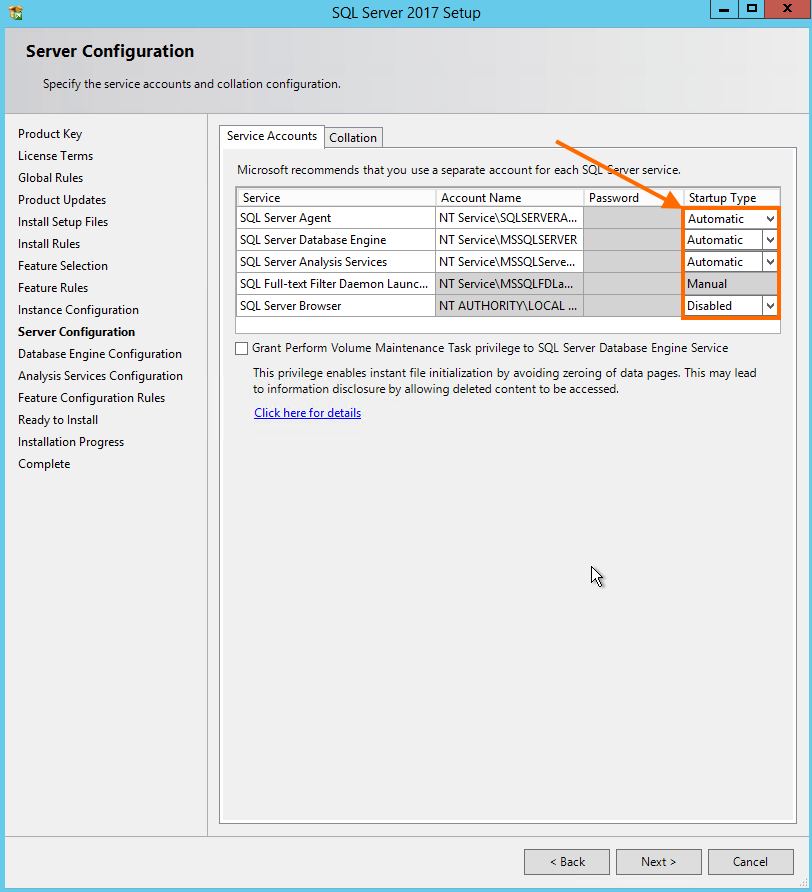
The Startup Type can also be changed later as described in the Starting Services section of this page.
Collation
- In the Server Configuration section → Collation tab use the following language scheme:
- "Latin1_General_CI_AS" or
- "SQL_Latin1_General_CP1_CI_AS"

During the migration or update make sure that all Matrix42 product-related databases have the same collation!
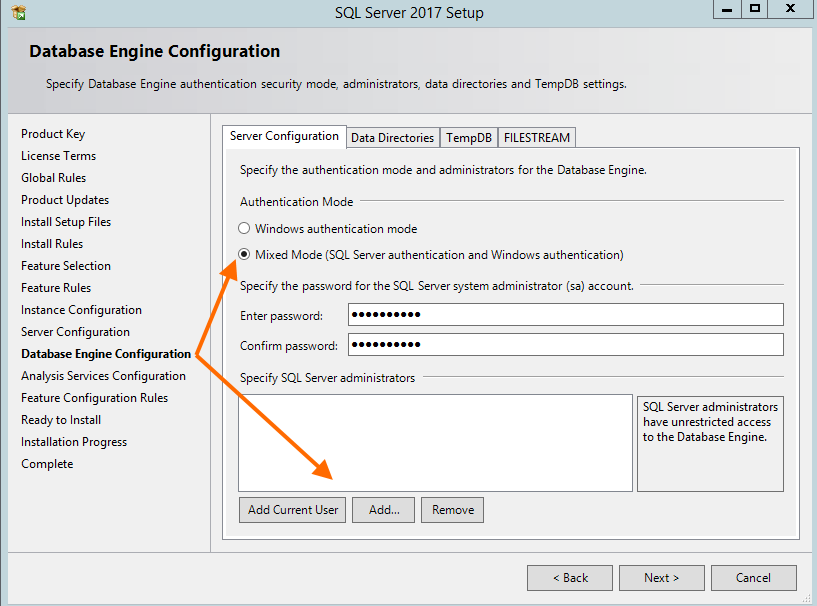
Database Engine Configuration
- In Database Engine Configuration section → in Server Configuration tab:
- Set the SQL Server to operate in the Mixed Mode (SQL Server and Windows authentication mode);
- Specify the password for the SQL Server account;
- Specify necessary SQL Server administrators or add the current user and click Next:
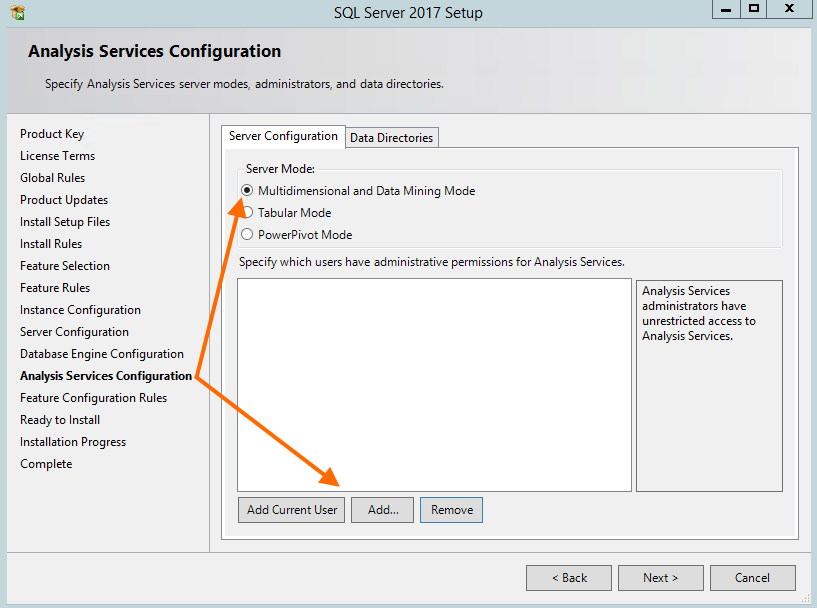
Analysis Services
- Analysis Services need to be configured to run in “Multidimensional” mode. For more information on how to determine if “Tabular” or “Multidimensional” mode is required, see the Microsoft article. Specify necessary Analysis Server administrators, who will be granted the database owner rights during the Matrix42 Enterprise Service Management setup or add the current user and click Next:
- Restart the system to apply the installed changes.
Change Startup type and start service
Open Services to configure and start Windows services. Set all of the SQL-related services Startup Type to Automatic:
- Right-click the service to open the context menu;
- Open Properties;
- Set Startup Type to Automatic;
- In the Service Status section, click the Start button to run the service.

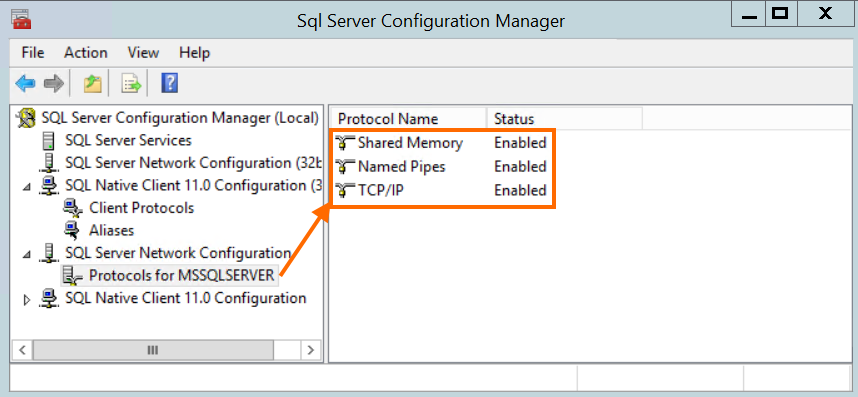
Enable TCP/IP Protocols and Named Pipes
Enable the required client protocols before you install Matrix42 Enterprise Service Management. To do it, open the SQL Server Configuration Manager:
- In SQL Native Client Configuration, enable the TCP/IP protocol;
Starting from Matrix42 Enterprise Service Management v.11.0.2.3492 and higher, SQL Server Native Client installation and configuration is no longer required. For earlier versions, SQL Server Native Client needs to be configured.
- In SQL Server Network Configuration, enable the Named Pipes and TCP/IP protocols.
- Restart the SQL server service.
Additionally, you can Force Encrypt the SQL Server connection in the SQL Server network configuration as described here.
To avoid performance issues, it is recommended to set SQL Server processor affinity for half of the processors.
Configure Reporting Services Web Portal URL
Open the SQL Server Installation Center to install and configure the Reporting Services and test access to the Web pages of your reporting services.
- Download and run the Reporting Services installation file from the suggested by SQL Server Installation Center link;
- Restart the computer once the installation is completed;
- Run Report Server Configuration Manager:
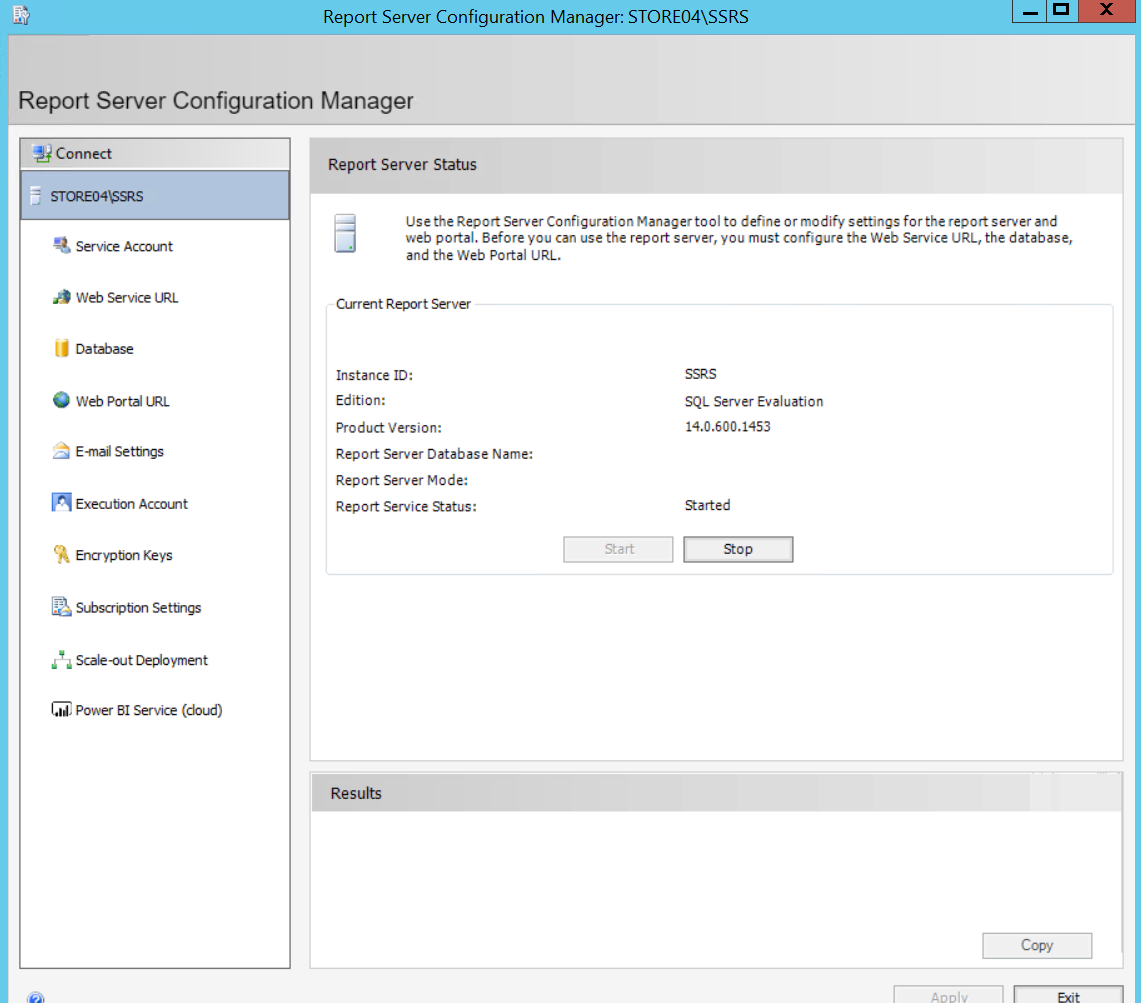
- In the Web Service URL section, click Apply to accept the default settings or adjust if necessary:
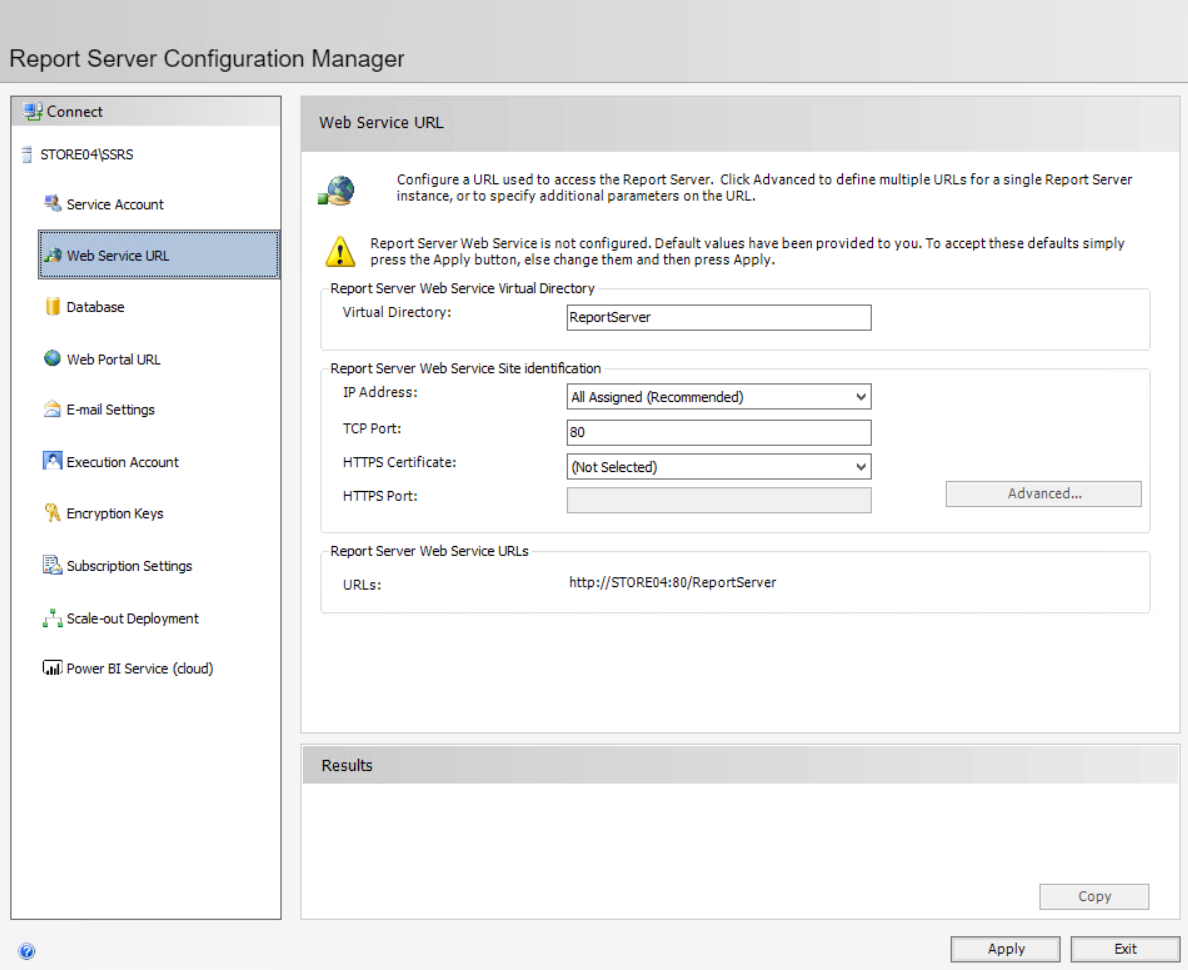
Learn how to remove unsecured HTTP connection for Web Service URL here.
- The successfully applied configuration activates the Report Server Web Service URL link:

- If the URL remains unavailable, complete the Reporting Services configuration and restart the computer.
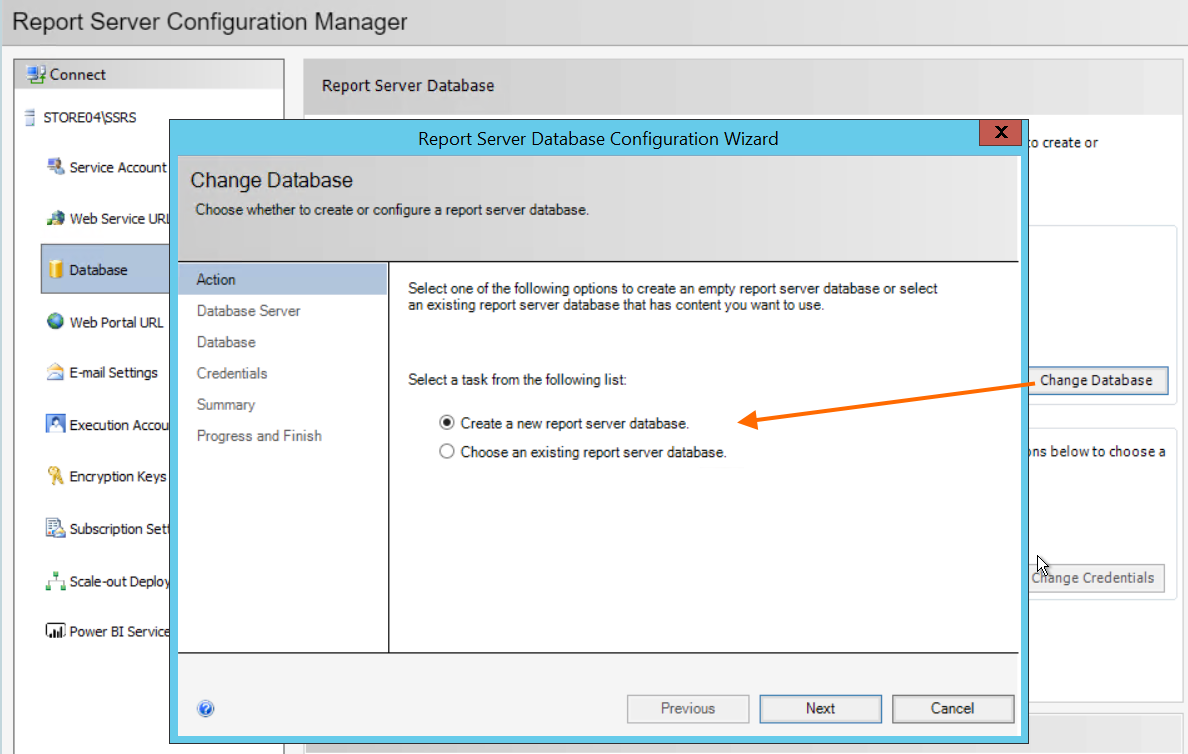
- In the Database section, click Change Database and create a new report server database.
Follow the instructions of the wizard to apply the default settings. For more information about the Reporting Services configuration watch this video tutorial.
- In the Web Portal URL section, click Apply:
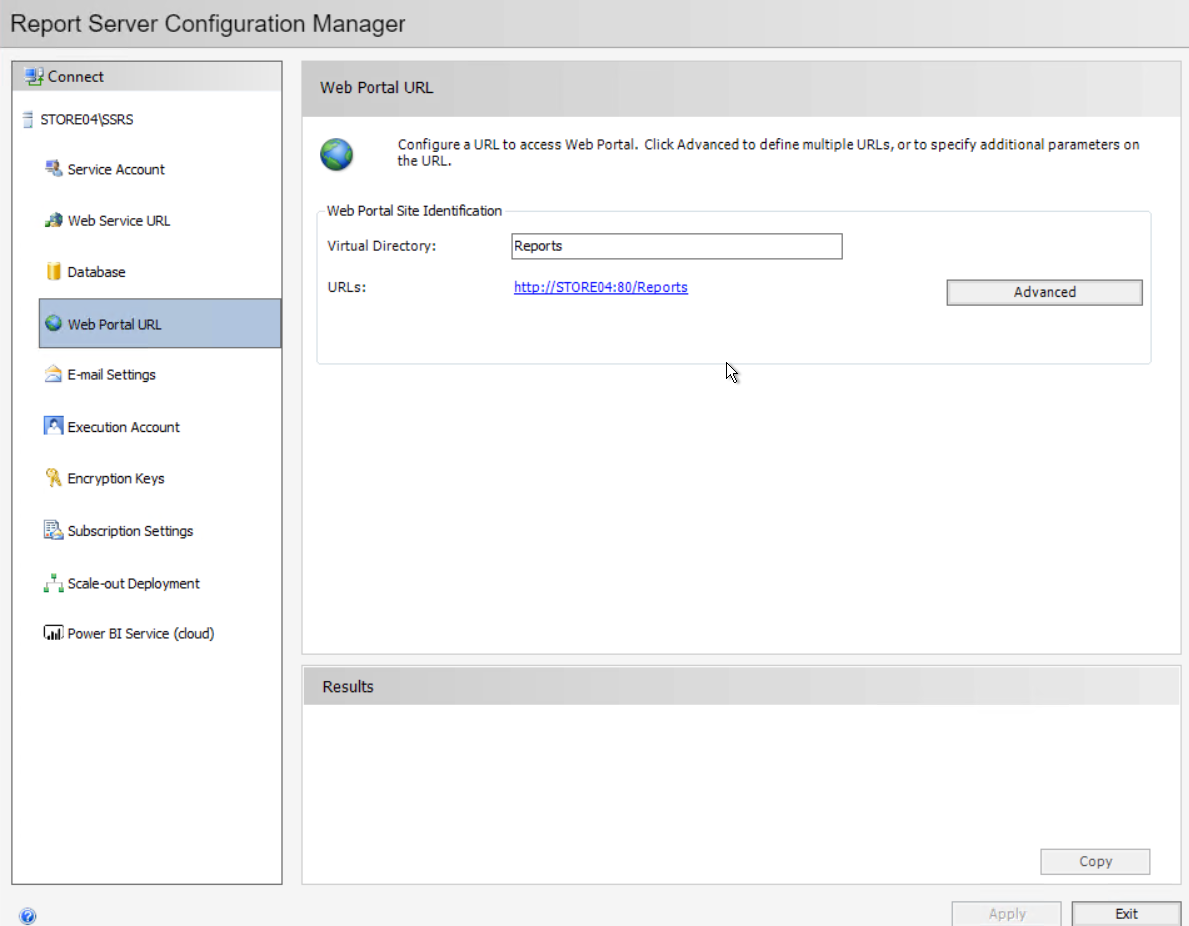
Learn how to remove unsecured HTTP connection for Web Service URL here.
- The successfully applied configuration activates the Web Portal URL link:
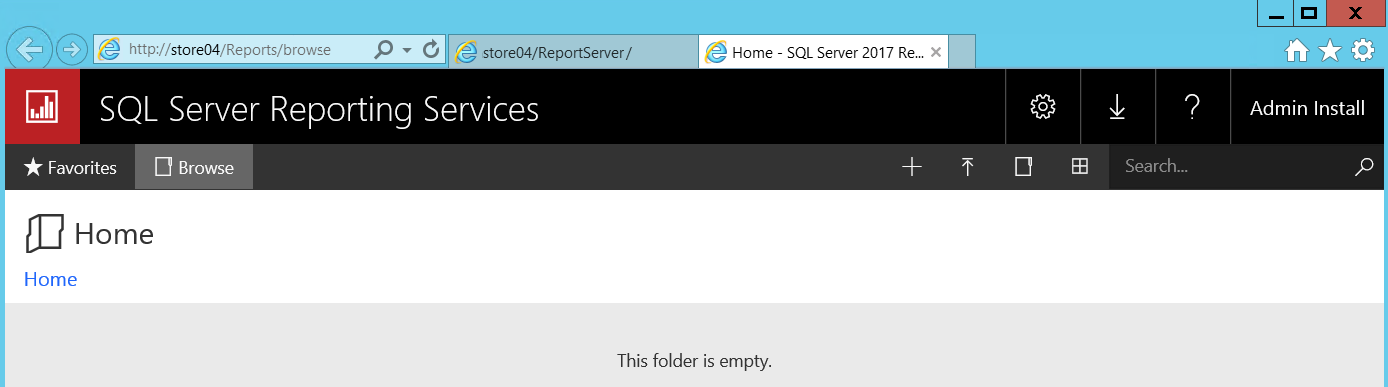
- The Reporting Services configuration is completed.
- If the Web Portal URL remains unavailable restart the computer.
SQL Server Management Studio
Optionally, install SQL Server Management Studio which is an integrated environment for managing SQL infrastructure. Open the SQL Server Installation Center → Installation section and click Install SQL Server Management Tools. Download and run the suggested installation file. Follow the instructions of the installation wizard to complete the setup.