Matrix42 Documents
Overview
As part of Mobile Content Management in Silverback, the Documents app provides secure access to corporate documents from Matrix42 Silversync and Microsoft Sharepoint, at any time on any device. Navigate through Silversync and Sharepoint, view and download files. Read Word documents, PDF files, Excel sheets and PowerPoint presentations. Do many operations on files and folders like renaming, moving, deleting, cloning. View images format like heic, jpg, png and many others. The Documents App for feature set includes:
- Access to Matrix42 Silversync file shares
- Access to Microsoft Sharepoint repositories
- Access to centralized Windows file shares
Managed Installation
- Review the App for iOS from Apple App Store here.
- Review the App for Android from Google Play Store here.
On managed device
Supported Content Provider
If your device is managed you can use Documents App for setting up Silversync and Sharepoint. Documents App supports following Content Provider:
- Silversync
- Sharepoint 2013 with Basic Authentication
- Sharepoint 2016 with Basic Authentication
- Sharepoint with Office 365 Authentication
Additionally, users can add manually the following Content Providers to the Matrix42 Documents application:
- SharePoint
- OneDrive / OneDrive for Business
- Google Drive
Supported Operations
- Open folder*
- Viewing files* (png, jpg, pdf, pptx, docx, xlsx, mov, mp4, mp3 and many more)
- Operations on folder
- Rename
- Delete
- Operations on files
- Move
- Duplicate
- Rename
- Delete
- Information*
- Information of a file
- Name*
- File Size*
- Create Date*
- Modified Date
- Encryption information*
- Add and Create
- Add files from different other applications from iOS Files App / Android File System Browser*
- Add image from Gallery or from Camera*
- Adding new folder
*Available for Silversync
Silverback, Silversync and Documents App
Silversync is only available in combination with Silverback. Here you can read how to enable Silversync in Documents App unsing Silverback.
On iOS
The following sections describes how to use the Matrix42 Documents application in combination with Silversync as the Mobile Content Solution for Silverback. Additionally, it demonstrates how to configure additionally the application with several application features like Branding, Security settings, Restrictions of executable actions and Encryption
Setup Silversync
To setup Silversync to use it in Documents application for iOS please follow this guide.
Import and configure Documents application
- Import Matrix42 Documents to the App Portal
- Assign Matrix42 Documents to a Tag
- Click the Edit button for Managed Config
- Review XML configuration options and example configuration as listed below
- Paste your configuration into to the App Configuration XML area
- Save the configuration
- Assign the tag to a test device or Push the tag to your already assigned devices
- Install the application
- Check your configuration
XML configuration options
Review all available XML configuration options for Matrix42 Documents below:
Branding
These settings allow you to customize the colors or the presented websites for this application. Enter your settings under the section “Common”:
- TintColor: Setup color of buttons. Use the RGB code colors in decimal format separated by comma. If this key isn’t set, then the yellow color will be used.
- HelpUrl: Setup help URL. This link is visible in the settings screen
- HomepageUrl: Setup homepage URL. This link is visible in the settings screen
<key>Common</key>
<dict>
    <key>TintColor</key>
    <string>252,191,34</string>
    <key>HelpUrl</key>
    <string>https://help.matrix42.com</string>
    <key>HomepageUrl</key>
    <string>https://www.matrix42.com</string>
</dict>
Security Settings
These settings allow you to setup the security settings for the user. Enter your settings under the section “Security”:
- Password: Force or forbid the user to setup the application password. After that the user must enter it each time when the application is started or is moved to the foreground
- TouchID/FaceID: Enforces or forbids the user to authorize via Touch ID or Face ID instead of an application password
- PrivacyScreen: All sensitive information will be blurred when switching out the app or when switching between the applications in the iOS task bar
<key>Security</key>
<dict>
    <key>Password</key>
    <string>true</string>
    <key>TouchID/FaceID</key>
    <string>false</string>
    <key>PrivacyScreen</key>
    <string>true</string>
</dict>
Restrictions of executable actions
These settings allow you to setup multiple content providers restrictions for them. In this case the strongest by priority will be used. Enter your settings under the section “ContentProvider”:
- Type: Setup type of content provider. Currently Documents application supports following types:
- SharePoint
- Silversync
- ServerUrl: Setup a server URL. Changes will be applied for this server.
- AllowUnmanaged: Setup this key in case you want to allow unmanaged content providers which match the ‘Type’ or the ‘ServerUrl‘
- ForbiddenActions: Setup a list of actions which should be disabled. Currently Documents supports following actions
- DeleteFile
- RenameFile
- MoveFile
- DuplicateFile
- UploadFile
- UploadImage
- CreateDocument
- CreateFolder
- DeleteFolder
- RenameFolder
Example: Configure restrictions only for example: https://cmmsp.imagoverum.com. Result: The user can not delete, rename or move files in this content provider:
<!-- Setup a list of content providers with their restrictions -->
<key>ContentProvider</key>
<array>
    <dict>
        <key>ServerUrl</key>
        <string>https://cmmsp.imagoverum.com</string>
        <key>AllowUnmanaged</key>
        <string>true</string>
    <key>ForbiddenActions</key>
    <array>
        <string>DeleteFile</string>
        <string>RenameFile</string>
        <string>MoveFile</string>
    </array>
</dict>
</array>
Example: Configure restrictions for all SharePoints. Result: The user can not delete, rename or move files in all SharePoints in this application
<!-- Setup a list of content providers with their restrictions -->
<key>ContentProvider</key>
<array>
    <dict>
        <key>Type</key>
        <string>SharePoint</string>
        <!--<key>ServerUrl</key> -->
        <!--<string>https://cmmsp.imagoverum.com</string> -->
        <key>AllowUnmanaged</key>
        <string>true</string>
    <!-- Setup a list of actions on content which should be disabled -->
    <key>ForbiddenActions</key>
    <array>
        <string>DeleteFile</string>
        <string>RenameFile</string>
        <!-- <string>MoveFile</string> -->
        <string>DeleteFile</string>
        <string>CreateFolder</string>
        <!--  <string>CreateDocument</string> -->
    </array>
    </dict>
</array>
Encryption
These settings allow you to setup the encryption feature in Documents application. Enter your settings under the section “Encryption”:
- EncryptionEnabled: Enable or disable the encryption in the application choosing true or false value.
- EncryptionType: Choose the encryption type. Currently Documents application supports following types of encryption:
- MobileEncryption
- PermanentEncryption
- Common Key Encryption (Only availble if CPKFile and CPKPassword are available)
- EncryptionStrength: Setup the encryption strength by choosing one of following sizes 1024, 2048 or 4096
- EncryptBeforeUpload: Setup if files should be encrypted before uploading to the server by choosing true or false value.
- CPKFile: The base64 encoded xml content .cpk file which contains the information about the used common key encryption. The encode the xml content and the password you can use an online tool like https://www.base64encode.org.
- CPKPassword: The base64 encoded password which is needed to encrypt the cpk file content
<key>Encryption</key>
<dict>
    <key>EncryptionEnabled</key>
    <string>true</string>
    <key>EncryptionType</key>
    <string>PermanentEncryption</string>
    <key>EncryptionStrength</key>
    <string>2048</string>
    <key>EncryptionBeforeUpload</key>
    <string>true</string>
    <key>CPKFile</key>
    <string>PD94bWwdmVyc2lvb..vha1Adj</string>
    <key>CPKPassword</key>
    <string>MTeXMQ==</string>
</dict>
Example XML for iOS
<key>UDID</key>
<string>{DeviceID}</string>
<key>DocumentsAppConfiguration</key>
<dict>
<!-- Configure your branding -->
<key>Common</key>
<dict>
    <!-- Setup button color. Default is yellow -->
    <key>TintColor</key>
    <string>153,131,202</string>
    <!-- Setup help url -->
    <key>HelpUrl</key>
    <string>https://www.google.de</string>
    <!-- Setup homepage url -->
    <key>HomepageUrl</key>
    <string>https://www.google.de</string>
</dict>
<!-- Configure security settings -->
<key>Security</key>
<dict>
    <key>Password</key>
    <string>false</string>
    <key>PrivacyScreen</key>
    <string>false</string>
</dict>
<!-- Setup the encryption functionality in the application -->
<key>Encryption</key>
<dict>
    <key>EncryptionEnabled</key>
    <string>true</string>
    <key>EncryptionType</key>
    <string>MobileEncryption</string>
    <key>EncryptionStrength</key>
    <string>2048</string>
    <key>EncryptBeforeUpload</key>
    <string>OnDemand</string>
</dict>
<!-- Setup a list of content providers with their restrictions -->
<key>ContentProvider</key>
<array>
    <dict>
        <key>Type</key>
        <string>SharePoint</string>
        <!--<key>ServerUrl</key> -->
        <!--<string>https://cmmsp.imagoverum.com</string> -->
        <key>AllowUnmanaged</key>
        <string>true</string>
    <!-- Setup a list of actions on content which should be disabled -->
    <key>ForbiddenActions</key>
    <array>
        <string>DeleteFile</string>
        <string>RenameFile</string>
        <!-- <string>MoveFile</string> -->
        <string>DeleteFile</string>
        <string>CreateFolder</string>
        <!--  <string>CreateDocument</string> -->
    </array>
</dict>
</array>
</dict>
On Android Enterprise
The following sections describes how to configure Matrix42 Documents application in combination with Silversync as the Mobile Content Solution for Silverback. Additionally, it demonstrates how to configure additionally the application with several application features like Branding, and Security settings. Please note that the connection to Silversync will be automatically established a successful Silversync integration and when content is distributed via a Tag.
Import and configure Documents application
- Import Matrix42 Documents to the App Portal as Managed Play application
- Assign Matrix42 Documents to a Tag
- Click the Edit button for Managed Config
- Press Edit managed configuration
- Review the app configuration scenarios given by the Application
- The following configuration represents an individual working setup
- Tint Color: 17,59,84
- Setup help webpage URL: https://help.imagoverum.com
- Setup homepage url: https://www.imagoverum.com
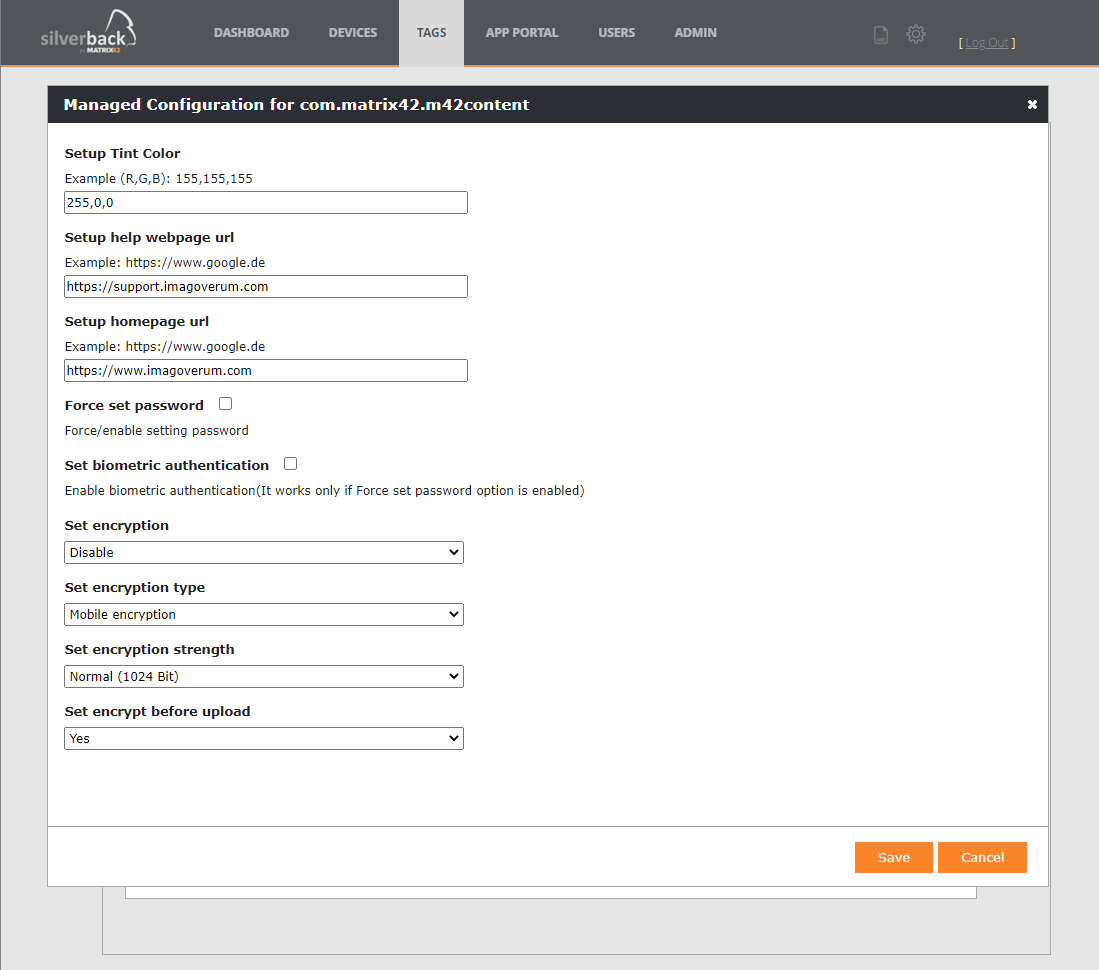
- Press Save
- Assign the tag to a test device or Push the tag to your already assigned devices
- Open Companion, navigate to Profiles and check if a Managed Configuration for Matrix42 Documents is present
- Install the application from Managed Google Play
- Check your configuration
If you have troubles seeing some extension add the missing extension like ".espe" in Silverback Admin Console under Silversync/ System Settings/ Allowed Extensions
How to use Common Key Encryption
Preparation Silverback
Install Silverback and Silversync. Please check the help for, available here.
Preparation EgoSecure
Install EgoSecure and Setup Common Key Encryption. Please check release documentation of EgoSecure available here.
Combine Silversync and EgoSecure
After Silverback, Silversync and EgoSecure are installed and configured, a EgoSecure Client Agent needs to be installed on the same machine as Silversync running on.
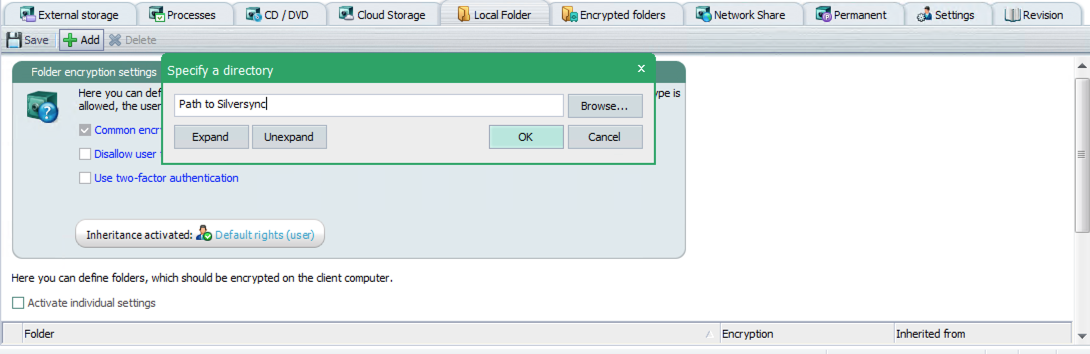
Define in EgoSecure Console the Silversync root path as a location on system that needs to be encrypted by Common Key Encryption. EgoSecure Agent will encrypt files.
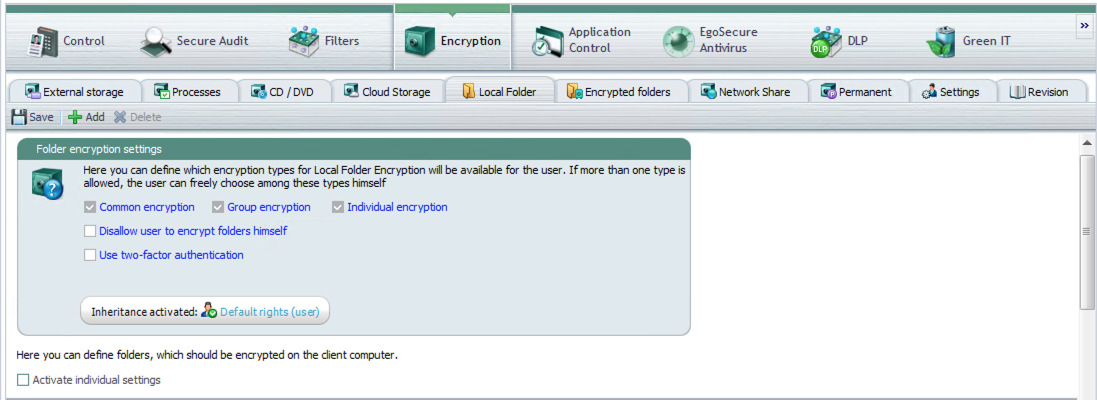
Add the Local Folder to be encrypted. The Local Folder is in this case the Silversync Root Folder.
Export Common Key Encryption
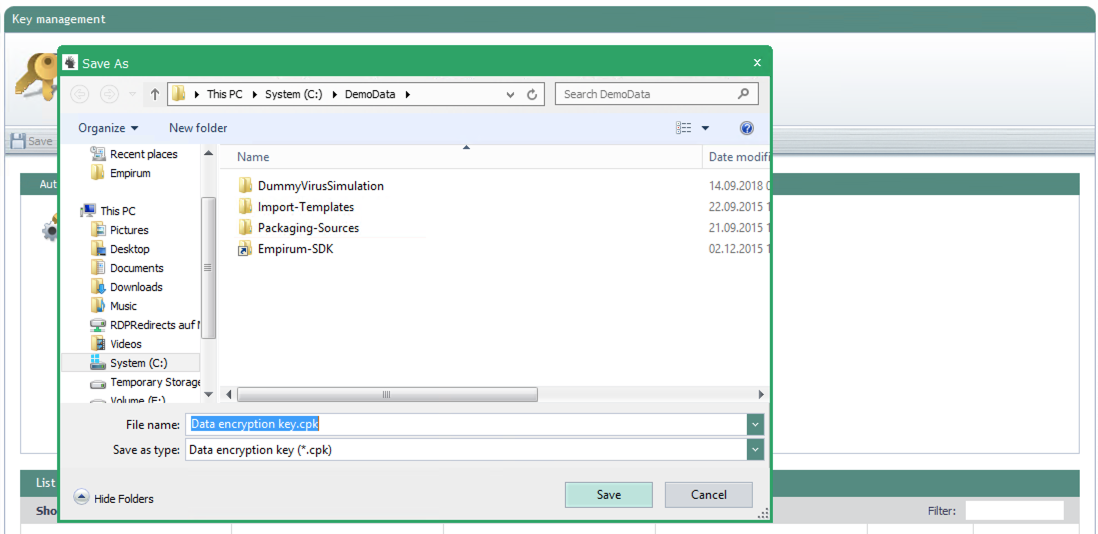
To use the Common Key Encryption in Documents App, you need to export the Common Key from EgoSecure Console.
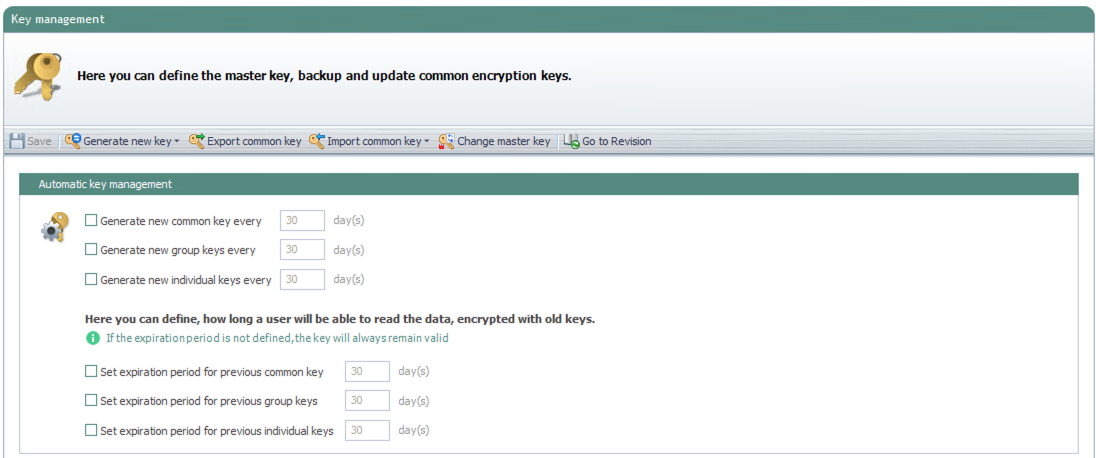
In Key Management, you can export the Common key. After that you will be prompt to enter a passwort to protect the common key. This feature is available from EgoSecure 14.2.
Remember the password.
After the successfull export you can open up the CPK file with an Editor like Notepad++.
At this point you can now got to section Encryption to configure the XML for the App.