Exchange Protection Integration I: Exchange Online with Modern Authentication
Exchange Protection with Modern Authentication
The PowerShell Integration establishes a remote connection to Exchange with modern authentication. The Silverback server establishes the remote connection to the Exchange Server via Remote Powershell and performs cmdlet commands to automatically allow only Silverback managed devices the access to ActiveSync. During this guide, we will create a new application registration in your Azure Tenant, assign required permission and roles and create a self-signed certificate for the authentication against Exchange Online. The public key of the certificate is intended to be uploaded to the Azure application and the private key is intended to be placed on the Silverback server. Further on we will connect to Exchange Online and execute several commands to get familiar with the PowerShell commands, before we will enable the Quarantine mode, if it is not already enabled. After that we will review the execution from a managed device from the Quarantine state of managed devices to the Allowed list.
Requirements
- Minimum Silverback Version 21.0 Update 3
- Silverback Server is able to communicate to outlook.office.com over TCP Port 5985/5986
- Access to Azure Active Directory
- Access to Silverback Server and Management Console
- If Silverback is running on Windows Server 2012 R2, ensure that PowerShell 5.0 is installed
- Enabled Organization Customization for Exchange Online
Supported Applications and Management Types
- iOS with native Mail client on user and device enrollment
- iPadOS with native Mail client on user and device enrollment
- Android with Gmail client in device owner mode
- Samsung Knox with Gmail client in device owner mode
- Windows 10 with Microsoft Mail on all management modes
Not supported applications
- Microsoft Outlook
- Samsung Mail
- macOS Mail
These applications does not grant access to interfere in Exchange ActiveSync Device ID
Azure Active Directory
- Start on your Azure Active Directory
- Open https://portal.azure.com
- Sign in with Administrator credentials
Register Application
- Navigate to Azure Active Directory
- Select App registrations
- Press + New registration
- Enter as Name e.g. Silverback Exchange Online Connection
- Verify that Accounts in this organizational directory only (Your Organization only - Single tenant) is selected.
- Ensure that Redirect URI is set to Web and press Register
Assign Permission
- After successful registration, the details page of your registration should be opened
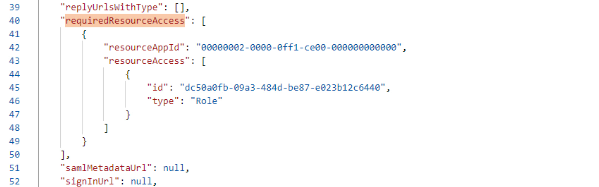
- Navigate to Manifest
- Locate in the Manifest, the requiredResourceAccess
- Replace your current resource AppID, id, and type with the following values
- resource AppID = 00000002-0000-0ff1-ce00-000000000000
- id: dc50a0fb-09a3-484d-be87-e023b12c6440
- type: Role
- Your Manifest should look like in the screenshot below
- Press Save
- Navigate to API Permissions
- Verify that the value Exchange.ManageAsApp is shown
- Press Grant admin consent for Your Organization
- Confirm with Yes
- Navigate to Overview and note down your Application ID, e.g. in Notepad++
- e.g. e9e621e9-cc90-4b48-a9d4-43ee7e6c4e4b
Generate a self-signed certificate
- Open PowerShell as an Administrator either on your local machine (cloud customers) or on your Silverback Server (on-premise customers)
- Adjust and run the following command to generate the certificate
$mycert = New-SelfSignedCertificate -DnsName "imagoverum.com" -CertStoreLocation "cert:\LocalMachine\My" -NotAfter (Get-Date).AddYears(1) -KeySpec KeyExchange
- Open certlm.msc, navigate to Personal > Certificates and review your created certificate
- Perform a double-click on your certificate
- Select Details and note down your certificate thumbprint, e.g. 502ca2f6f74bc5ea7b21b6a18182da8209a4f266
- Press OK
- Additional steps for On-Premise Customers only
- Perform a right click on your certificate
- Select All Tasks > Managed Private Keys
- Press Add and add the Network Service
- Uncheck Full Control and ensure that Read is allowed
Cloud Customers will upload later the certificate with the Silverback Management Console
Export Public Key
- Adjust and run the following command to export the certificate
$mycert | Export-PfxCertificate -FilePath C:\Certificates\ExchangeOnlineSilverback.pfx -Password $(ConvertTo-SecureString -String "Pa$$w0rd" -AsPlainText -Force)
- Open File Explorer and navigate to C:\Certificates to review the *.pfx file
- Adjust and run the following command to export the public key
$mycert | Export-Certificate -FilePath C:\Certificates\ExchangeOnlineSilverback.cer
- Review the exported *.cer file in the C:\Certificates location
- Additionally, you should have noted down now two custom values:
Application (client) ID: e9e621e9-cc90-4b48-a9d4-43ee7e6c4e4b
Thumbprint: 502ca2f6f74bc5ea7b21b6a18182da8209a4f266
Attach certificate to Azure AD application
- Navigate back to your Azure Active Directory
- Inside your App registration, navigate to Certificates & secrets
- Select Certificates
- Press Upload certificate
- Press Select a File
- Navigate to your exported public key ExchangeOnlineSilverback.cer
- Select the *.cer file and click open or perform a double click
- Press Add
Assign Role
For app-only authentication in Exchange Online, Microsoft currently support only Exchange Administrator as an applicable role and this might change in the future.
- Close the App registration view with clicking X on the upper right
- At your Azure Active Directory view, navigate to Roles and administrators
- Search for the Exchange Administrator role
- Press Exchange Administrator
- Press + Add assignments
- Under Select member(s), press No member selected to add a new member
- Search for your previously created App registration, e.g. Silverback Exchange Online Connection
- Select your App registration and press Select
- Enter a justification, e.g. Assign Roles for Silverback Exchange Protection
- Press Assign
Connect to Exchange Online
To connect to Exchange Online with Modern Authentication, the EXO V3 module needs to be installed on your Silverback Server. We recommend to perform the following tasks on your Silverback Server. For Cloud Customers, the EXO V3 module is pre-installed on your hosted Silverback Instance and we recommend to perform the test connection on one of your workstation where you generated the self-signed certificate, before we will later upload the required certificate to Silverback.
Install EXO V3 Module
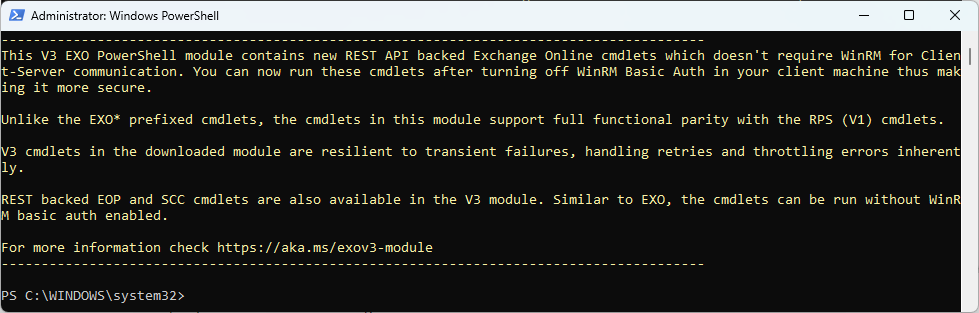
- Open an administrative PowerShell
- Run the following command
Install-Module -Name ExchangeOnlineManagement -RequiredVersion 3.4.0
You can run the command without the required version and install a probably available newer version, but ensure that you stay on version 3. Newer versions may also work, but we want to emphasize that we have verified Exchange protection with the 3.4.0 version.
- Confirm all prompts about NuGet Provider, Untrusted Repository etc.
- Wait until the Installation is finished
- Open File Explorer and review the installation (version) under C:\Program Files\WindowsPowerShell\Modules\ExchangeOnlineManagement (optional)
- Another option to review the installed version is to run the following command: Get-Module -ListAvailable -Name ExchangeOnlineManagement
Verify Connection
- Now run the following adjusted command
Connect-ExchangeOnline -CertificateThumbPrint "502ca2f6f74bc5ea7b21b6a18182da8209a4f266" -AppID "e9e621e9-cc90-4b48-a9d4-43ee7e6c4e4b" -Organization "imagoverum.onmicrosoft.com"
In the Connect-ExchangeOnline commands, be sure to use an .onmicrosoft.com domain in the Organization parameter value. Otherwise, you might encounter cryptic permission issues when you run commands in the app context.
- After a successful connection, additional cmdlets will be downloaded and it should look like this afterwards
- To check functionality adjust and run the following command
get-EXOMailbox -Identity "tim.tober@imagoverum.com"
Try Additional commands
- Check the following commands to get familiar with the handling
| Purpose | Command |
|---|---|
| Get the default access level, e.g. allow, block, quarantine |
Get-ActiveSyncOrganizationSettings | ft DefaultAccessLevel |
| Information about a mailbox, such as the size of the mailbox, the number of messages it contains, and the last time it was accessed |
Get-EXOMailboxStatistics -Identity username | fl |
| Retrieve the list of mobile devices configured to synchronize with a specified user's mailbox and return a list of statistics about the mobile devices. |
Get-EXOMobileDeviceStatistics -Mailbox username |
| Get a list of allowed and blocked device IDs and given Mailbox Policy |
Get-CASMailbox -Identity username | fl *ActiveSync* |
| Filter to Active Sync Allowed Devices |
Get-CASMailbox -Identity username | select {$_.ActiveSyncAllowedDeviceIDs} |
| Filter to Active Sync Blocked Devices |
Get-CASMailbox -Identity username | select {$_.ActiveSyncBlockedDeviceIDs} |
| Get the list of devices in your organization that have active Exchange ActiveSync partnerships |
Get-MobileDevice | select UserDisplayName,DeviceID,DeviceType,DeviceUserAgent,DeviceModel,Name |
| Get the list of devices in your organization that are currently quarantined |
Get-MobileDevice -Filter {DeviceAccessState -eq 'Quarantined'} |
| Get the list of devices for a specific mailbox or user |
Get-MobileDevice -Mailbox username -Filter {DeviceAccessState -eq 'Quarantined'} |
| Manually whitelist a device |
Set-CASMailbox -Identity username –ActiveSyncAllowedDeviceIDs DeviceID |
| To export any of the above commands into an Excel Document for reporting purposes, simply add the following to the end of any of the above commands to export it into a CSV file: |
| Export-CSV C:\file.csv |
Configure Exchange Protection
- Open your Silverback Management Console
- Login as an Administrator
- Navigate to Admin
- Navigate to Exchange Protection
- Enable Exchange Protection
- Select as Server Version Exchange Online
- Select as Auth. Mechanism Modern Authentication (certificate based)
- Enter your previously noted Applcation (client) ID, e.g. e9e621e9-cc90-4b48-a9d4-43ee7e6c4e4b
- Enter your Organization Name, e.g. imagoverum.onmicrosoft.com
- For On-Premise Customers, select your previously generated self signed certificate from the drop down list
- For Cloud Customers, press Upload and Install Certificate
- Select Choose File, locate and select your *.pfx file and press open
- Enter your Password for the *.pfx file, e.g. Pa$$w0rd
- Press OK
- Press Save and Confirm with Yes
Enable Quarantine Mode
If you are enabling this on a pre-existing production ActiveSync fleet, please be aware that all current devices connected via Exchange ActiveSync are automatically moved to quarantine after enabling the Quarantine mode. As Silverback is moving managed devices with their Exchange ActiveSync identifiers to the ActiveSyncAllowedDeviceIDs list for specific users when an Exchange ActiveSync profile will be installed on the device, Administrators can move all current managed Silverback devices separately to the Allowed List. Please refer to Exchange Protection Allow managed devices for additional information
- Navigate back to your administrative PowerShell session
- Enable the Quarantine Mode with the following command
Set-ActiveSyncOrganizationSettings -DefaultAccessLevel Quarantine -AdminMailRecipients tim.tober@imagoverum.com,vincent.valentine@imagoverum.com
- Review the Status Change with the following command
Get-ActiveSyncOrganizationSettings | ft DefaultAccessLevel
- Review all quarantined devices with the following command
Get-MobileDevice -Filter {DeviceAccessState -eq 'Quarantined'}
- In case the Quarantine is blocking a devices the following email notifications will be received:
- Administrators will receive a Notification Email Message
- All quarantined devices users will receive a Notification Email Message like the following
| Recipient | Administrators | Users | ||||||||||||||||||||||||||||||||||||||||||||||
|---|---|---|---|---|---|---|---|---|---|---|---|---|---|---|---|---|---|---|---|---|---|---|---|---|---|---|---|---|---|---|---|---|---|---|---|---|---|---|---|---|---|---|---|---|---|---|---|---|
| Subject | A device that belongs to Maria Miller (mmiller) has been quarantined. Exchange ActiveSync will be blocked until you take action. | Your device is temporarily blocked from synchronizing using Exchange ActiveSync until your administrator grants it access. | ||||||||||||||||||||||||||||||||||||||||||||||
| Message |
The Exchange ActiveSync service has quarantined the mobile device listed below. It won't be able to synchronize Exchange content until you take action. To perform an action for this mobile device, go to the following page in the Exchange Administration Center: https://outlook.office365.com/ecp/UsersGroups/EditMobileMailbox.aspx?id=cbc646cc-a767-4057-8360-155de50b978f&dtm=Isolation&Realm=m45dev.onmicrosoft.com&exsvurl=1 Information about the device that triggered this notice:
Sent at 2/20/2020 4:00:34 PM to tim.tober@imagoverum.com. |
This device is a unknown device and will be blocked until it will be Enrolled in the Mobile Device Management Solution Your device is temporarily blocked from accessing content via Exchange ActiveSync because the device has been quarantined. You don't need to take any action. Content will automatically be downloaded as soon as access is granted by your administrator. Information about your device:
Sent at 2/20/2020 4:00:34 PM to tim.tober@imagoverum.com. |
Performance Check
After configuring Exchange ActiveSync Access Settings with enabling quarantine, try the feature with devices.
Check for managed devices
- Enroll a device and assign an Exchange Active Profile
- Follow the configuration on your device as usual
- Check if you have access to emails, calendar and contacts
- Your newly enrolled device should now be allowed automatically
- Navigate back to your PowerShell and execute the following adjusted command
Get-CASMailbox -Identity username | fl *ActiveSync*
- The device should be part of the ActiveSyncAllowedDeviceIDs list
Check for restricted devices
- Use a different unenrolled device
- On the device, add your Exchange ActiveSync account manually
- For iOS and iPadOS devices,
- Open Settings
- Navigate to Passwords & Accounts
- Tab Add Account
- Select Microsoft Exchange
- Finish your configuration
- For Android and Samsung devices
- Open Gmail
- Tab on your current account
- Choose Add another account
- Select Exchange and Office 365
- Finish your configuration
- For iOS and iPadOS devices,
- Your unenrolled device should now be quarantined automatically
- Navigate back to your PowerShell and execute the following adjusted command
Get-MobileDevice -Mailbox username -Filter {DeviceAccessState -eq 'Quarantined'}
- Your device should be listed here
Additional Notes
- If your device will not get whitelisted, please check your Silverback Logs
- Also please review all previously made steps
- Check your security rule set
- Please also note the following
- Devices may download folder structure, but don't see any mails due to Quarantined Status
- Devices may also get blocked
- In this case the mail content will be completely empty or they can't establish a connection to ActiveSync at all
- You can at any time grant access to devices manually
- It might take a while until users will have access to their inbox, even if the device is already marked as allowed
- By executing a Delete Business Data or Factory Wipe action on managed devices, the Exchange ActiveSync Device ID will be moved to Blocked state