Car Tracking 1: Introduce Custom Control "Map"
Goal
The article demonstrates how in case of the use the Layout Designer Control Library can be extended with the new custom Control. Explains in practice what is Control Descriptor, and how this object can be used for configuring the appearance of the new Control in the Layout Designer toolbox.
Requirement
The article implements one of the parts of the "Car GPS Tracking" feature, which introduce the new control "Map". The control allows to displays multiple Markers on the map, and dynamically track their positions.
The control has to be available in the Layout Designer.
Implementation
To implement new control we going to follow the steps described in the article "Add New Control to Layout Designer"
Step 1: Find open-source "Map" AngularJS control
The Internet is full of free open-source controls, which could meet your requirements. The most popular resource for such control is GitHub.com. Besides, there are hundreds of vendors of the Control Libraries provides various powerful controls for AngularJs. For our case, we take the first reference to "Map" control for AngularJs which Google found (ng-map control) and try to embed it to Layout designer.
Step 2: Create new UUX Workspace
To store all the custom assets of the Application like JS Scripts, Images, CSS, the Solution Builder suggests to create a dedicated folder for your Project under "ApplicationFolder}\WM\workspaces", which are dynamically incorporated to UUX. More about concept please check "UUX Front-end Workspaces".
- In folder "WM\workspaces" create a new folder "FleetManagment"
- Copy the found control Javascript to just created folder
- Create "module.js", for registering new added AngularJS artifacts in the System
- Describe workspace in the "workspace.json" file
{
    description: "Fleet Managmeent Frontend Assets"
    resources: [
        "ng-map.min.js",
        "mx-map.js",
        "module.js"
    ]
}
Step 3: Implement a new AngularJS Directive
Very rarely the found 3-d Party component fits your need for 100%, usually, you need to adjust it for your own use case. To implement that we are creating our own AngularJS directive which wraps the original imported 3-d party component and supplement it with additional logic.
- In just created FleetManagement folder create a new file which keeps the implementation of the new customer Directive "mx-map.js"
- Add the reference to a new file in the index.htm
- Implement the new directive in "mx-map.js"
For more details on how to create directives using AngularJS framework please follow the link "Creating Custom Directives".
The code below implements an AngularJS Directive "mx-map" with 4 parameters:
center - GPS coordinates of the Map center on initialization;
zoom - default scaling of the map;
points - array of objects which describes Markers;
loaded - output flag signaling the Map control is loaded
(function () {
    MxMapCtrl.$inject = ['$scope', '$timeout', 'NgMap'];

    function MxMapCtrl($scope, $timeout, NgMap) {

        var vm = this;

        vm.$onInit = function () {
            vm.loaded = true;
            vm.markers = [];
            if (!vm.center) {
                navigator.geolocation.getCurrentPosition(function (position) {
                    vm.center = '[' + position.coords.latitude +
                        ',' + position.coords.longitude + ']';
                });
            }


            $scope.$watchCollection('vm.points', function (points) {
                if (Array.isArray(points)) {

                    vm.markers.forEach(function (marker) {
                        marker.setMap(null);
                    });
                    vm.markers = [];

                    NgMap.getMap().then(function (map) {

                        points.forEach(function (point) {
                            var latLng = new google.maps.LatLng(point.Lat, point.Lng);
                            var marker = new google.maps.Marker({position: latLng, map: map, title: point.Title});
                            vm.markers.push(marker);
                        });

                    });
                }
            });
        }
    }

    angular.module('mx.map').component('mxMap', {
        controller: MxMapCtrl,
        controllerAs: 'vm',
        bindings: {
            center: '@',
            zoom: '@',
            points: '<?',
            loaded: '=?'
        },
        template: '<div map-lazy-load="https://maps.google.com/maps/api/js" map-lazy-load-params=""><ng-map center="{{vm.center}}" zoom="{{vm.zoom}}"></ng-map></div>'
    });
})();
Step 4: Create Control Descriptor "Map"
Once the reference to new Frontend assets added to index.html, the UUX application automatically loads these resources, and they already can be used in UUX. To let the Layout Designer know about the control, the control has to be described in the Control Descriptor object, which defines the appearance of the control in Layout Designer Toolbox, and how on run-time this control be rendered to end-user HTML.
- Open Administration, "Control Descriptors" management area, and click "Add Control Descriptor"
- Define the Control Descriptor properties as described on the picture
- Save the Dialog
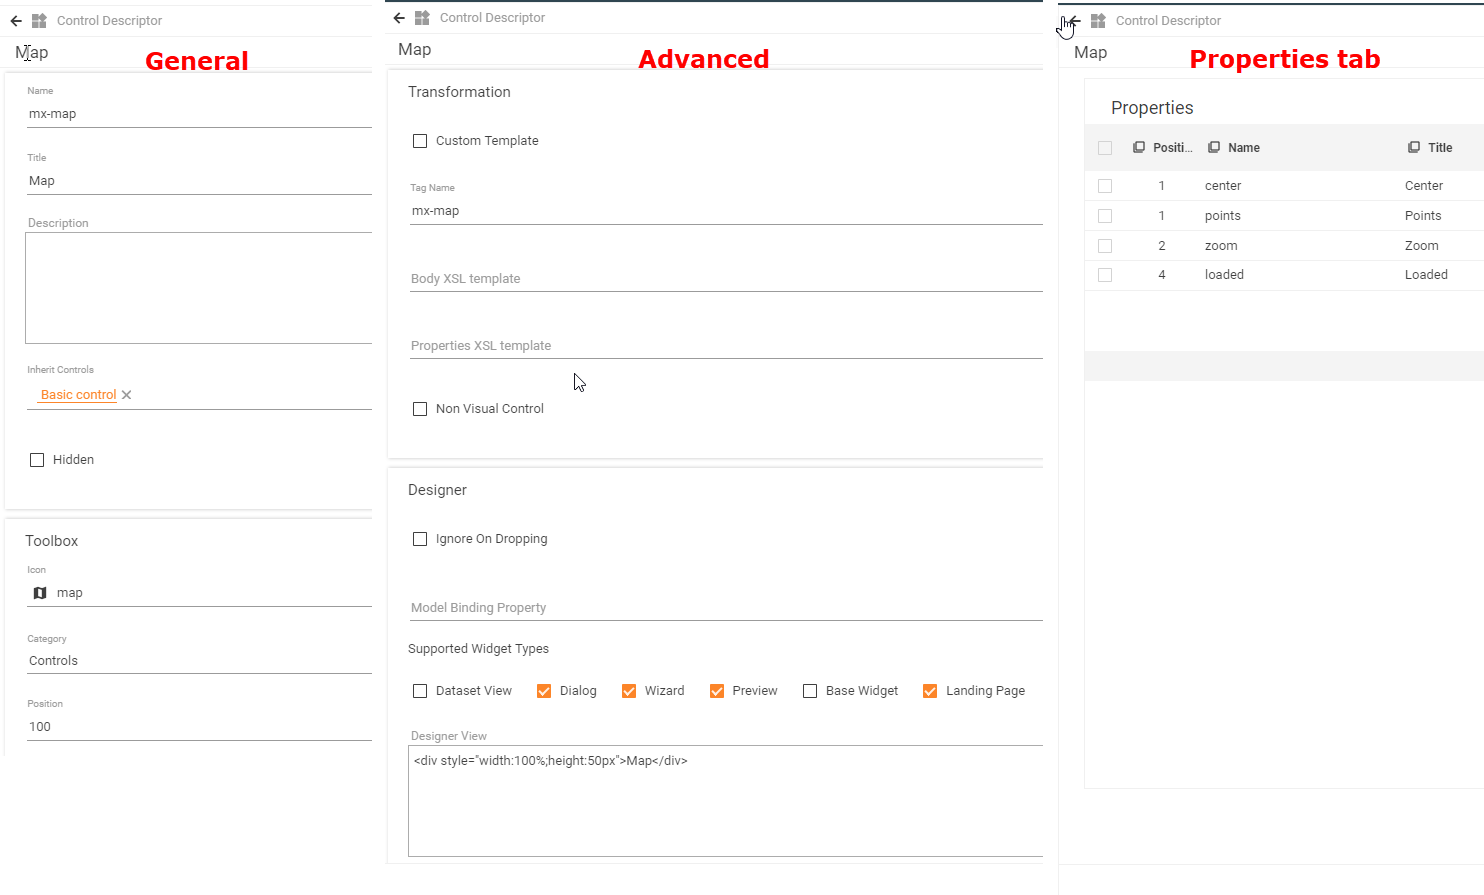
Step 4: Provide valid Google API Key
Using the Google Geolocation Service required valid API Key. To obtain the key use the official Google instructions https://developers.google.com/maps/documentation/javascript/get-api-key
Step 5: Check control in Layout Designer
Once the Control Descriptor is created the control is displayed in Layout Designer Toolbox, and can be drag-and-dropped on designing canvas.