Front-End Workspaces
Overview
The article explains what Workspaces are and how they are used for constructing the Matrix42 applications.
Front-End Workspaces management is available from 9.1.3 release version.
Workspace
The Workspace is a special module (package) of the Application that keeps a set of various front-end resources (like JavaScript libraries, CSS, images, etc.) required for building User Interfaces in the Matrix42 platform. Usually, Workspaces play the role of a "sandbox" and keep all necessary assets required for building business applications.
Principles
The Workspace is just a set of files, located in the specific place of the Solution Builder Front-End application. The SolutionBuilder automatically detects all present Workspaces in a specified location and dynamically loads the Matrix42 applications. This architecture allows you to easily integrate custom assets (front-end resources) in Matrix42 which stay in place after the Product Updates.
The Workspace is just a subfolder, under the system File Folder "<ApplicationFolder>/wm/workspaces" in the SolutionBuilder Front-End application. By default, the "workspaces" folder already keeps the standard Workspaces required for building standard Matrix42 applications.
As far as many parties could contribute to the "Workspaces" folder, it is recommended to avoid simple names for Workspace folders to prevent conflicts of usage of the same name by different parties. Therefore, please use the following pattern when you name your workspace "<CompanyName>_WorspaceName". E.g. "Imagoverum_FleetManagement".
The structure of the Workspace is described in the file workspace.json which is placed in the Workspace root folder /wm/workspaces/<workspaceName>/workspace.json. The file has the following format:
{
    "description": "Brief description of the Workspace purpose",
    "resources": [
        "module.js",
        "mycustomWs.js",
        "CSS\mycustomWs.css"
    ]
}
description:optional. Keeps brief information about the Workspace;resources:the array of relative paths. Represents the list and the order of the front-end assets to be loaded to the application. If an asset (JS or CSS) is present in the Workspace folder but not referenced in the "resources", it will not be loaded automatically.
On application start the System searches for all workspaces presented in the wm/workspaces folder with the file workspase.json within, and loads one by one the front-end assets (files) specified in theresourcesproperty.
How to Register Custom Workspace
- Create a new folder under
<ApplicationFolder>/wm/workspaceswith the name matching the pattern "<CompanyName>_WorspaceName"
You can use WorkspaceTemplate for an easy start. - Add the Frontend resources required for your project to the created Workspace folder.
- Register your AngularJS artifacts in the SolutionBuilder.
If the new workspace introduces a new AngularJS artifact, like AngularJS Directive, Factory, or Service, it needs to be properly registered in the AngularJS module. For such cases, it is recommended to introduce a dedicated AngularJS Module for each Workspace. For that, download "module.js" file and edit it. See also, Angular.js documentation.
It is important that the module name, which is commented on in the example below, is unique within the entire Workpsces folder. To make sure that the module is unique, use the same pattern as suggested for the workspaces folder name: "<CompanyName>_ModuleName"(function (w) { 'use strict'; w.mx = w.mx || {}; w.mx.workspacesConfig = w.mx.workspacesConfig || {}; w.mx.workspacesConfig.modules = w.mx.workspacesConfig.modules || {}; w.mx.workspacesConfig.modules.add = w.mx.workspacesConfig.modules.add || function (name, config) { w.mx.workspacesConfig.modules [name] = config; }; w.mx.workspacesConfig.modules.add('ImagoVerum_FlagIcons' , { // modify the module name according to the pattern <CompanyName>_ModuleName name: 'ImagoVerum_FlagIcons', // modify the module name according to the pattern <CompanyName>_ModuleName config: ['$mdIconProvider', function ($mdIconProvider) { $mdIconProvider.iconSet ('flag-icons', 'workspaces/ImagoVerum_FlagIcons/FlagIcons.svg'); // path to the custom workspace w.mx = w.mx || {}; w.mx.components = w.mx.components || {}; w.mx.components.Icons = w.mx.components.Icons || {}; w.mx.components.Icons.unshift ({ // the unshift option places the custom icons set before the standard system icons 'id': 'flag-icons', 'name': 'Flag Icons', 'icons': [ { 'SVG': true, 'id': 'flag-icons:icon-abkhazia', 'name': 'abkhazia', 'keywords': ['flag', 'abkhazia'] }, { 'SVG': true, 'id': 'flag-icons:icon-afghanistan', 'name': 'afghanistan', 'keywords': ['flag', 'afghanistan'] }, { 'SVG': true, 'id': 'flag-icons:icon-austria', 'name': 'austria', 'keywords': ['flag', 'austria'] }, {...Put the edited file in the Workspace folder.If the same module names are used in different Workspaces, the modules will not be loaded correctly.
- Describe the Workspace in the
workspace.jsonfile
Create the text fileworkspace.jsonin the Workspace folder and in the propertyresourceslist the workspace files which need to be loaded to the UUX application on start. - Restart IIS or at least recycle Application Pool "m42svc". See also, Restart DWP Web Application.
Examples
The sections provide samples of Workspace usage.
Introduce a new Control in Layout Designer
In most cases, the Workspace is used for introducing a new AngularJS Directive which afterward appears in the Layout Designer Toolbox. For more details see Car Tracking 1: Introduce Custom Control "Map"
Extend Icons Library
A few control in Solution Builder, like Icon or Image Picker, allows displaying an SVG icon on a layout. As far as SVG icons are not a file and cannot be just copied to some folder, as to represent itself just CSS class described in CSS file, it is not easy to extend the default Icon library with new images. The example provides an example of how to achieve that using the Frontend Workspaces.
{
    "description": "Add new SVG icons to Library",
    "resources": [ "customIcons.js"]
}
To install and try the example:
- Download "ImagoVerum_CustomIcons.zip" and extract it to the Workspaces folder ("<ApplicationFolder>/wm/workspaces" ).
- Restart IIS or at least recycle Application Pool "m42svc". See Restart DWP Web Application page.
- Open Icon library both in the UUX (e.g. Control Descriptor dialog) or in Layout Designer (e.g. Layout Container properties)
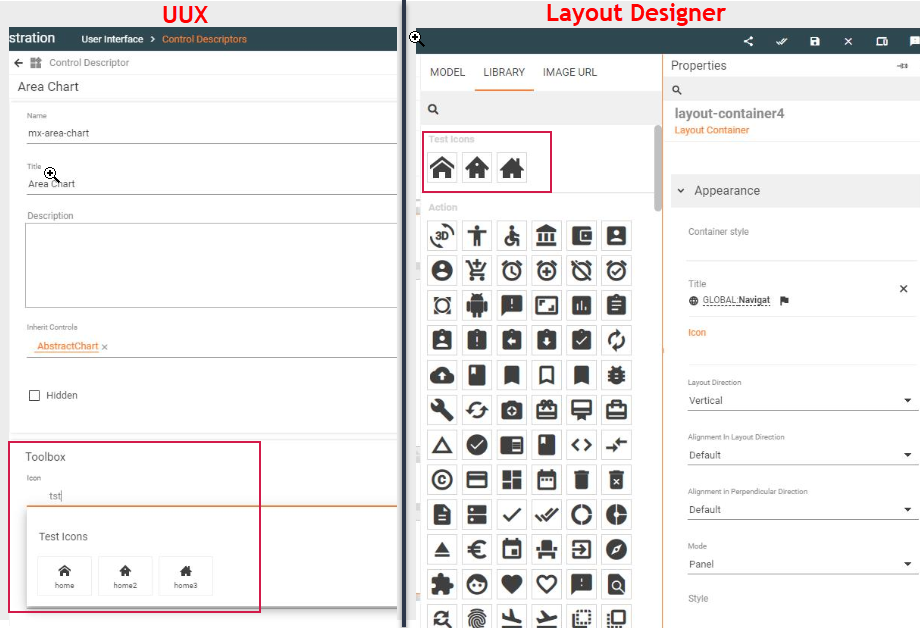
If you want to return the icon via the calculated fields, the complete name in the JavaScript expression is needed.
The complete name is stored in the id property of the registered custom module.js file:
}, {
                    'SVG': true,
                    'id': 'flag-icons:icon-austria',  // use this value for the calculated field
                    'name': 'austria',
                    'keywords': ['flag', 'austria']
                }, {...
Calculated property in the Layout Designer for such an example might look as follows
![]()
Adjusting UUX Appearance
Sometimes the situation requires deep customization of the UUX appearance which cannot be implemented just by Theme configuration. In such cases, the related standard CSS styles could be redefined in the Custom UUX Workspace.
The example shows how to introduce the Dialog buttons hover effect. Download the CustomButton workspace, and extract it to wm/workspaces folder.
CSS Variables
Starting from ESMP v.12.0.2,
CSS variables are a good way to define the colors of the design. Instead of copy and paste the same colors over and over again, place them in variables.
The advantages of using CSS variables are:
- colors in the variables are automatically adjusted when the Theme is changed or when the users apply Enhanced Color Contrast mode
- makes the code easier to read and more understandable
- makes it much easier to change the color values
The following variables are supported and used in the color palette of the Theme:
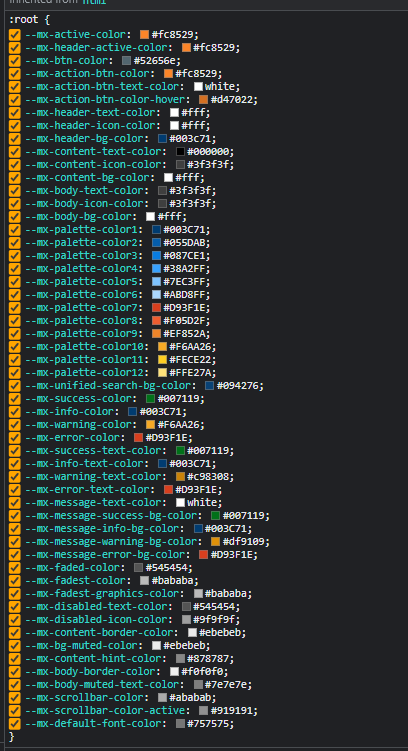
It is recommended to use variables, for instance, in the Workspaces or Extensions, not only to simplify the code maintainability, but also because when using these variables the Workspace is automatically adjusted to the current application Theme and the Enhanced Color Contrast mode.