Generic Data Import Export
Introduction
Generic Data Import Export (further GDIE) is a component that simplifies data import from external sources of different structure into Matrix42 Software Asset and Service Management. GDIE performs tasks similar to MSSQL Server DTS packages but with much higher level of abstraction. The key idea is that even consultant or advanced user can create GDIE rules and execute data import. Configuration is performed in Matrix42 Software Asset and Service Management through a wizard driven UI. Also GDIE offers monitoring services and extended logging information.
Components interaction
GDIE consists of the following parts:
- Import sequence – a set of rules that completely defines data import. Each sequence represents an object of the “GDIEImportType” SPS type.
- Import log - describes each execution of the import sequence. Each log entry represents an object of the “GDIEImportLogType” SPS type.
- Staging classes (tables) - contain intermediate import results. Each production class that acts as a target for data import has appropriate staging "twin". Staging classes are located in the production database and start with the "ST-" prefix.
- GDIE engine - background engine that executes data import according to the sequence rules.
- Data layer staging classes - a set of classes that contain low level import logic (namely, "update4u.SPS.DataLayer.Staging" namespace).
- GDIE import wizard - UI component that helps user to create the import sequence.
- Logging stored procedures - a set of procedures for logging and collecting statistics (namely, "usp_GDIE_CollectImportStatistics", "usp_GDIE_CollectMatchStatistics", "usp_GDIE_CollectRows").
Common GDIE workflow is displayed on the following diagram:
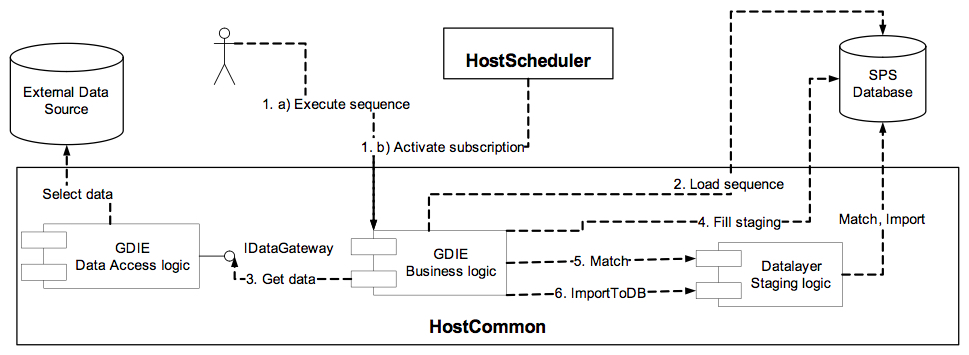
- Data import is usually initiated in two ways:
- Manually by the user through some UI.
- By the schedule engine in case an import sequence is scheduled.
- GDIE business logic component loads specified sequence from the database, parses and validates it.
- According to the sequence definition GDIE Data Access logic component connects to the external data source. In case of file-server database, source file(s) are preliminary copied to the temporary folder.
- Data from external data source is read row by row. Each source row is transformed according to the mapping rules and inserted in staging table(s). As you see from the diagram, this step is executed by passing Data Layer because of the performance reasons.
- After staging tables are filled, Data Layer performs matching against existing data. Depending on the match results data will be updated, inserted or deleted.
- After matching occurred, Data Layer validates staging data and performs the import based on matched results.
In next paragraphs we will consider some of these steps in more detail.
Import wizard
The import sequence contains all required settings to execute data import.
The main article on how to create an import sequence is Create an Import Definition page.
Import wizard helps in sequence creation. You can access the import wizard via the toolbar Create New Import Definition action from Administration → Integration → Import.
During configuration, you will pass through the following steps:
Step 1: Destination Type Definition
Select the type of the object that you want to import.
Step 2: Data Source Definition
Specify the data source details here. Depending on your choice of the data source type, the page will display the data source specific UI.
Internally, all supported data sources fall into three categories:
- client-server database;
- single file database (file-server database that contains all tables in one file);
- catalog database (file-server database that keeps each table in separate file). For catalog database you will always be able to specify several files, for single file database - only one file.
Currently, the following types of data sources are supported:
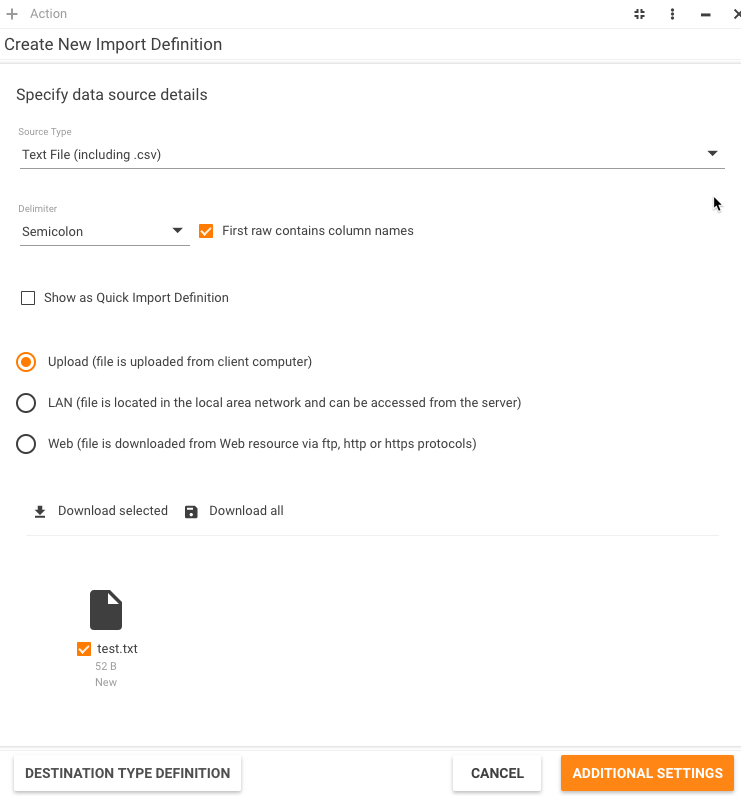
- Text File (including .csv).
You should specify columns delimiter and whether first row contains column headers or data (see picture above). Internally, "Microsoft.Jet.OLEDB.4.0" provider is used. It has some drawback limitations:- custom delimiter should be only one symbol long;
- additional "Schema.ini" file is required to specify most of the database settings, so it is dynamically created each time;
- source files should have certain extensions, specified in "HKLM\Software\Microsoft\Jet\4.0\Engines\Text\DisabledExtensions" registry key. Usually, they are as follows: txt, csv, tab, asc, htm, html;
- only "Unicode" and "ANSI" file encodings are supported; it doesn't recognize "UTF-8" and "Big-endian unicode".
- MSSQL Server (client-server database).
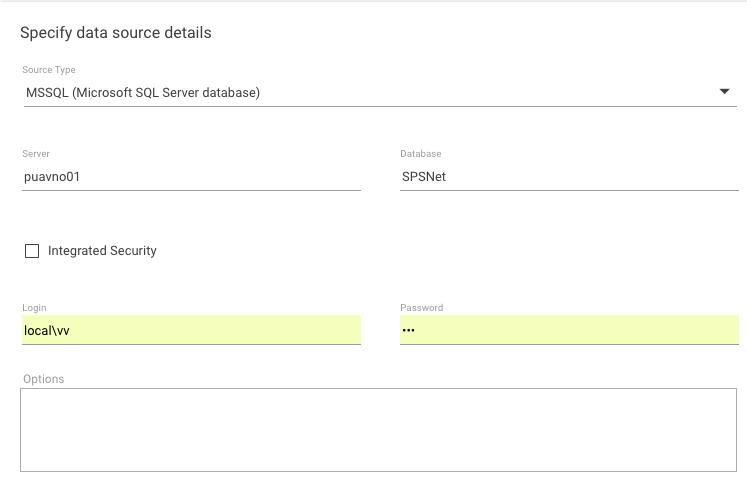
Besides general settings, you can specify additional connection options. They are passed to ".NET Framework Data Provider for SQL Server" without modifications. The "Password" and "Other options" values are stored in encrypted state. You can specify either Login and Password or select the "Integrated Security" checkbox instead. If the "Integrated Security" checkbox is selected, the already existing logged in service account entered during the Matrix42 setup is used. - XML file (single file database). You can specify only one file because it's considered as a database. This file should follow specific format that will be discussed later. Internally, "System.Xml.XmlTextReader" class is used for processing.
- Excel file (single file database). Excel 97-2003 (Microsoft Excel file *.xls) or Excel (Microsoft Excel file *.xlsx). You can specify only one file because it's considered as a database (each worksheet is considered as a table). Password protected workbooks aren't supported. Internally, "Microsoft.Jet.OLEDB.4.0" provider is used.
- Generic OLEDB (client-server database). This data source means any OLEDB database that you can connect to using connection string only. It's passed to ".NET Framework Data Provider for OLE DB" without modifications. The "Connection string" value is stored in encrypted state. As you see, you can connect to Excel file, for example, using both "Excel" and "OLEDB" data sources. The difference is that in first scenario you will use files pre-load mechanism described below, and in second one you will directly connect to the file.
Files Preload Mechanism
Both "catalog" and "single file" databases use files preload mechanism. The only difference is that in the first case you can specify several files and only one file in the second case. Both use the same file selection dialog:
As you see, you can specify three types of location:
- Upload - file is uploaded from client computer and saved in the temporary folder. In this case "Login" and "Password" fields are not available. You can drag and drop the file onto the DROP HERE placeholder, or click the placeholder and use the dialog that appears to locate and upload the file. As you understand, you should manually upload the file on each execution, there's no sense to schedule such import sequence. Standard html control <input type="file"> is used for upload. The maximum allowable file size is defined by the "maxRequestLength" attribute of the <httpRuntime> element of the "machine.config" file. Default value is about 4MB.
- LAN - file is copied from network or local location to the temporary folder. The file location should be directly accessible from the server. You must specify network path (e.g. "\\Puavno01\Share\Test3.csv") or local path, if Web server is running on your computer (e.g. "C:\Dev\Test\Test3.csv") in the File Path field.
Remember that ASP.NET process usually runs under account with limited rights, so usually you should specify some credentials to access the location (the "Login" and "Password" fields, "password" value is stored in encrypted state). On sequence execution, these credentials will also be used by the hosting windows service (see "Components interaction" section of this article).
Internally, impersonation and "System.IO.File.Copy" is used. Also, remember that if you specify incorrect password, specified login could be blocked after some amount of unsuccessful logons.
- Web - file is downloaded from the specified location and saved in the temporary folder. Currently, "ftp", "http", and "https" protocols are supported. Credentials can also be specified. Internally, "System.Web.WebRequest" is used.
When you click "Additional Settings" on the "Data source definition" page, all "LAN" files are copied and "Web" files are downloaded. The "Upload" files are processed earlier.
Temporary folder location depends on running process. When you configure import sequence with the wizard, then "C:\Documents and Settings\<CompName>\ASPNET\Local Settings\Temp" is used. When sequence is executed, then "C:\Windows\Temp" is used. All temporary folders will be deleted if running process terminates correctly.
Step 3: Additional Settings
Specify culture context of your data here. The culture context affects dates, decimal numbers, and localized strings processing. It is important to specify the culture of source data, especially for text data sources, so that GDIE could correctly convert string data into appropriate data type. For example, string "05/15/2006 1:23 PM" is a correct date for the "en" culture but invalid in the "de" one. By default, current UI culture is used.
Step 4: Table Source Definition
After you have connected to the data source you should specify which tables you want to import. In most cases you should only define one source table.
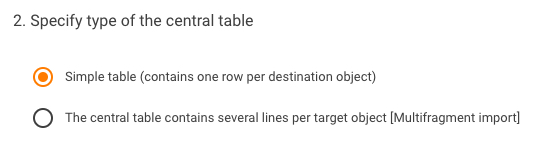
Defining Simple Table
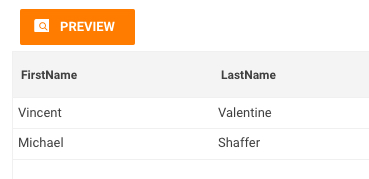
By default, the system will automatically select first table from your data source. In the simplest scenario, you can simply click "Mapping Rule Settings" to proceed to the next step. If you want to preview your data first, click PREVIEW.
When we say "simple" table, we mean that it contains one row per destination object. For example, if we are importing users, then one row contains information about one user. This fact is reflected by the "Simple table" radio-button option.
Defining Complex Table
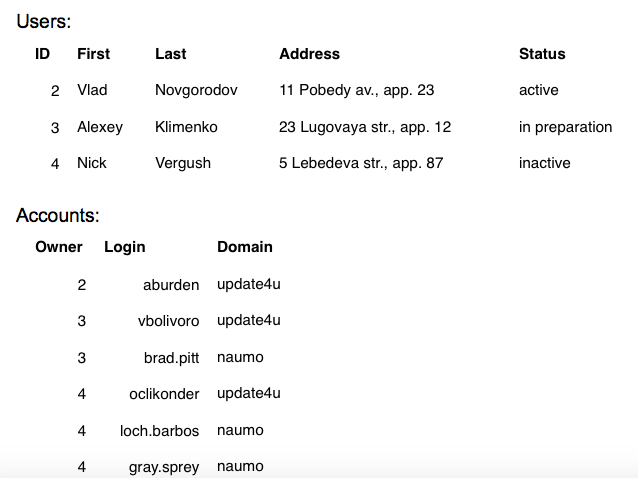
Sometimes you have to import more complex data. Imagine that you have tables "Users" and "Accounts". Table "Accounts" has column "Owner" that contains ID of the appropriate user (foreign key). Thus each user can have several accounts. Below is sample data:
In relational databases, such data is usually stored in different tables, but when it comes to importing files, they are often combined in one file. Below is the example of such file:
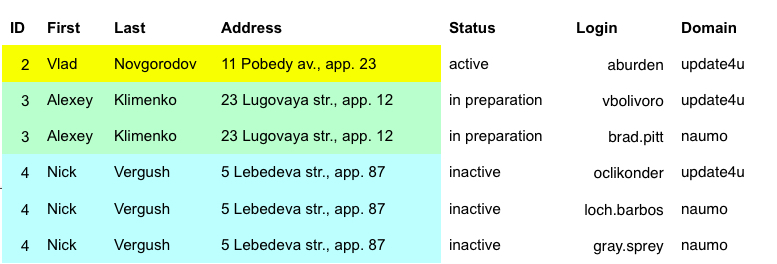
As you see, some data from the first table is duplicated: the file contains more than one row per user. That's what we call "complex" table. To import such data we have to know which fields uniquely identify a user. In our example it can be "First + Last".
To import such kind of data through GDIE you have to select the other, "The central table contains several lines per target object [Multifragment import]" radio-button, option:
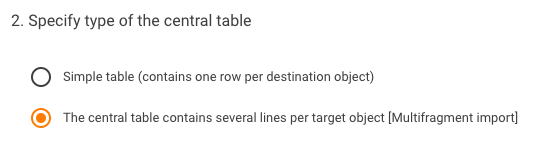
There is no need to specify explicitly which fields identify an object: GDIE automatically assumes these are the fields that take part in type's matching criteria (about matching criteria see below).
Practically, complex data sources are possible in two cases:
- when we import objects along with their multifragments (Computer + Hard disks)
- when we import objects along with their 1->N, N->M relations (User + Accounts).
GDIE supports both scenarios.
Table Definition Dialog
Table definition dialog for all data source types (except XML) is shown below.
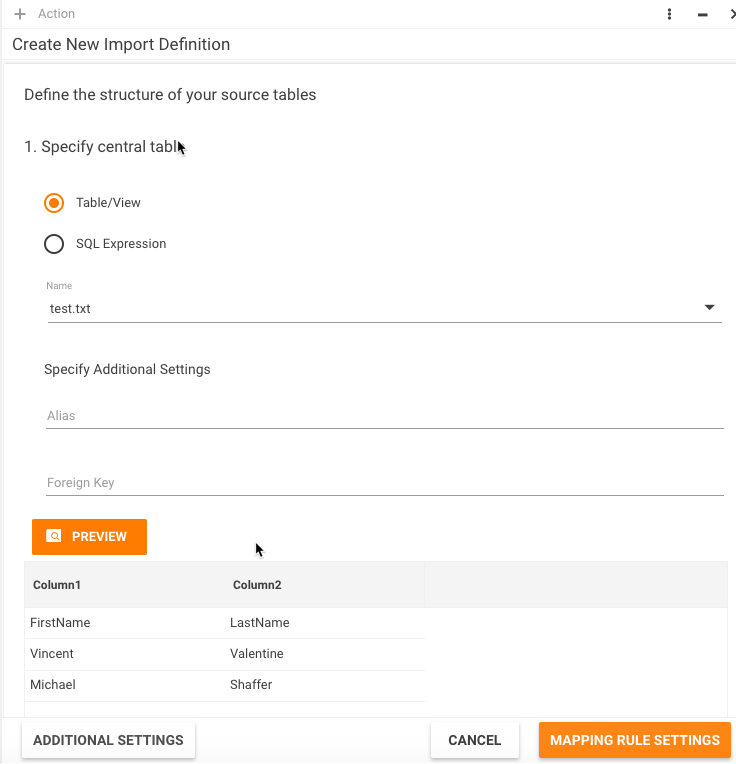
Here you should select table name from dropdown list or type any valid SQL expression. Actual content of the dropdown list and query syntax depend on the data source type:
- Delimited text files:
- dropdown list contains the list of files defined at "Data source definition" step
- you can enter any SQL expression supported by the provider. For example, you can join several files (see "Microsoft.Jet.OLEDB.4.0" provider documentation for exact syntax).
- MSSQL Server:
- dropdown contains a list of all tables and views
- you can enter any data returning TSQL expression (e.g. stored procedure call "exec dbo.usp_GetValidUsers 'Kiev'").
- Excel file:
- dropdown list contains a list of all worksheets
- you can enter any SQL expression supported by the provider. For example, you can join several worksheets (see "Microsoft.Jet.OLEDB.4.0" provider documentation for exact syntax).
- Generic OLEDB:
- dropdown list content and SQL expression syntax depend on actual data source.
For XML data source the table definition dialog looks slightly different:
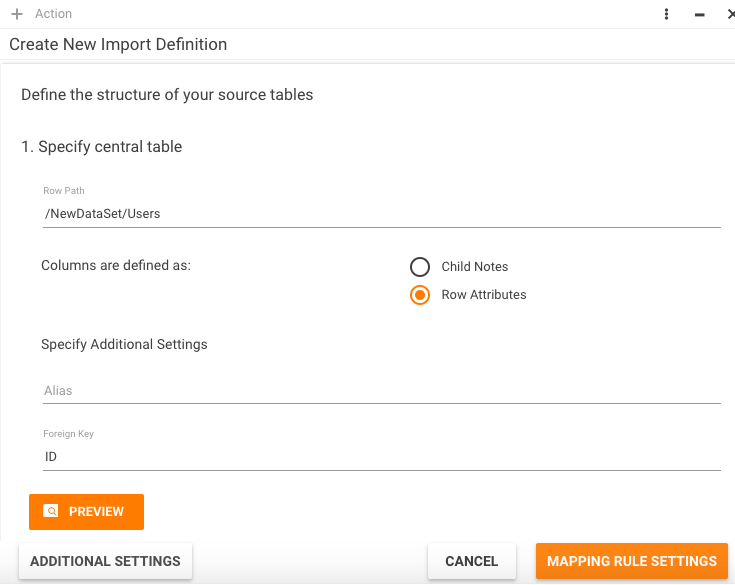
Here you should enter a valid XPath expression that identifies data row in xml file and specify whether columns are defined as row child nodes or row attributes. See next chapter for xml sample files.
There are several "advanced" fields in this dialog that are common to all data sources:
- "Alias" - here you can specify optional alias for your source table or query. It will be shown during mapping rules definition and is useful for queries or when table name is too long.
- "Primary key/Foreign key" - only used when specifying several source tables. Enter a list of columns names, separated by comma, that compose table primary key (for central table) or foreign key (for child tables). You can simply click on the appropriate column header at the preview grid.
Preview grid contains first 100 rows from your table/query.
XML Data Source Samples
Below are two samples of valid xml files that contain the same data. They only differ in how columns are defined:
- attribute centric:
<?xml version="1.0" standalone="yes"?>
<NewDataSet>
    <update4u>
        <Users ID="2" First="Vlad" Last="Novgorodov" Address="11 Pobedy av., app. 23" Status="active"/>
        <Users ID="3" First="Alexey" Last="Klimenko" Address="23 Lugovaya str., app. 12" Status="in preparation"/>
        <Users ID="4" First="Nick" Last="Vergush" Address="5 Lebedeva str., app. 87" Status="inactive"/>
    </update4u>
</NewDataSet>
2. element centric:
<?xml version="1.0" standalone="yes"?>
<NewDataSet>
    <update4u>
        <Users>
            <ID>2</ID>
            <First>Vlad</First>
            <Last>Novgorodov</Last>
            <Address>11 Pobedy av., app. 23</Address>
            <Status>active</Status>
        </Users>
        <Users>
            <ID>3</ID>
            <First>Alexey</First>
            <Last>Klimenko</Last>
            <Address>23 Lugovaya str., app. 12</Address>
            <Status>in preparation</Status>
        </Users>
        <Users>
            <ID>4</ID>
            <First>Nick</First>
            <Last>Vergush</Last>
            <Address>5 Lebedeva str., app. 87</Address>
            <Status>inactive</Status>
        </Users>
    </update4u>
</NewDataSet>
There's no need for row nodes to follow one by one. Next sample is still valid and produces the same result:
<?xml version="1.0" standalone="yes"?>
<NewDataSet>
    <update4u>
        <Users ID="2" First="Vlad" Last="Novgorodov" Address="11 Pobedy av., app. 23" Status="active"/>
    </update4u>
    <OtherData Number="3445" Locked="true"/>
    <update4u>
        <Users ID="3" First="Alexey" Last="Klimenko" Address="23 Lugovaya str., app. 12" Status="in preparation"/>
        <Users ID="4" First="Nick" Last="Vergush" Address="5 Lebedeva str., app. 87" Status="inactive"/>
    </update4u>
</NewDataSet>
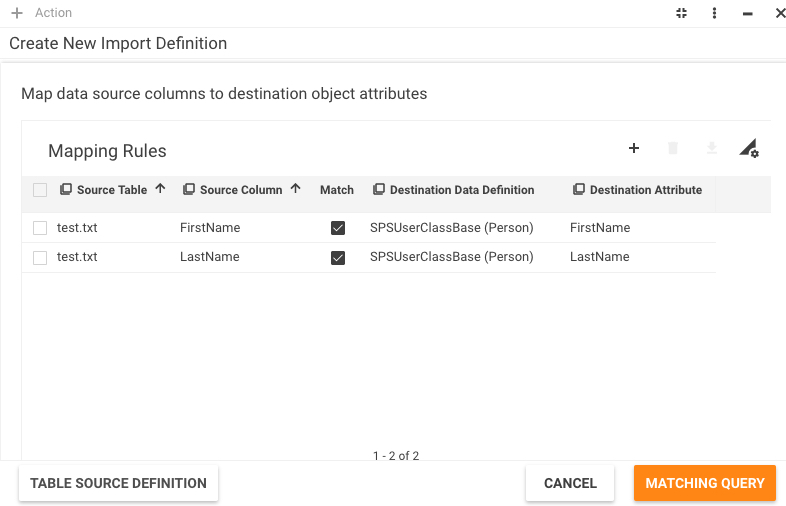
Step 5: Mapping Rules Settings
Mapping rules define transformations between source columns and destination attributes. They also contain matching criteria that define how to match source data against existing one.
Below is the screenshot for our example with Users:
To add mapping rules you will use the detailed window:
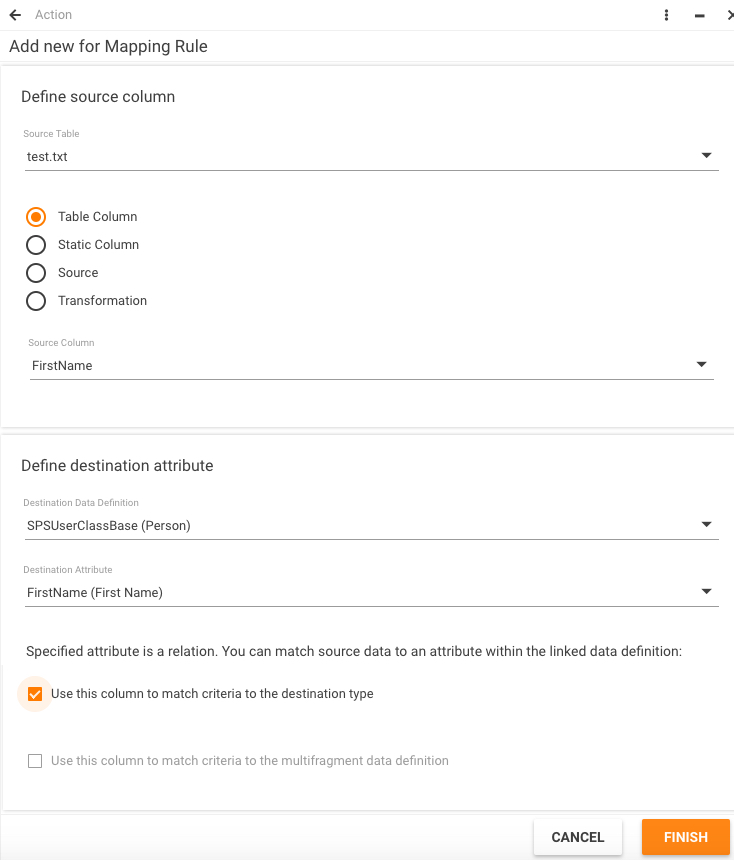
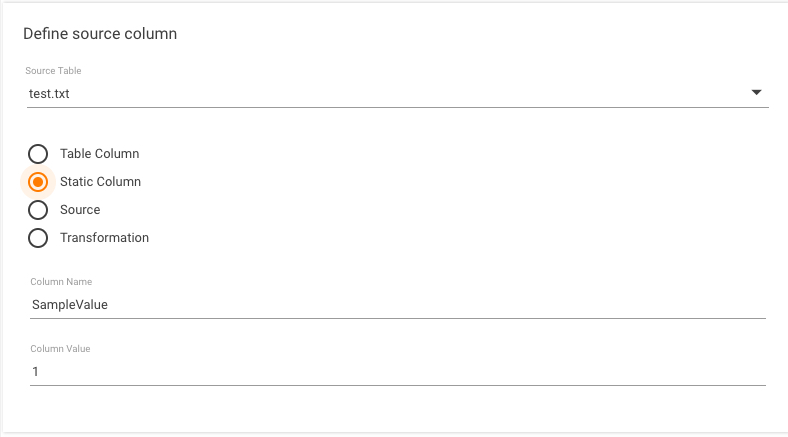
Detailed window changes its view depending on the selected radio button - Table Column, Static Column, Source, or Transformation - but will generally contain three sections: source column, destination attribute, and matching options.
Source Columns Definition
Select a source table from the dropdown (tables list was defined on previous step; if "Alias" was specified it will be shown).
Select one of the radio buttons - Table Column, Static Column, Source, or Transformation. The view of the detailed window changes its view depending on the selected option.
Select the "Source" radio button to be able to add an additional mapping of type Source, which you will need to do if your source has an attribute which is not present in your schema (see Example 1).
Select the "Transformation" radio button to be able to specify an ASQL Transformation Expression for the destination attribute.
Select the "Static Column" radio button to add a "static" value. It is similar to specifying "SELECT *, '1' as SampleValue" in your source query.
If the "Table Column" or "Source" radio button is selected, select a source column from the drop-down list. The list of columns is obtained by executing the schema query against the source table.
Destination Attributes Definition
Select destination data definition from dropdown (it will contain all classes of the destination type). In case of multifragment class you will see the "[multi]" postfix.
Select destination attribute from dropdown (it will contain all simple attributes and relations of the selected class). In case of relation you will see the "[relation]" postfix.
Once you've selected the "relation" attribute additional settings should be specified. As you understand, relation is just a reference to the row of the related table. You can't populate it directly (its value is Guid). But you can match your source value against the value of some "simple" attribute (usually "string" data type) in the related class.

So you will see the related class name (just for information) and have to select some related attribute from dropdown (it will contain only simple attributes of the related class).
If you need more complex match you can enter ASQL expression - just use the "Production" keyword to refer the related class (the screenshots above will produce identical matching criteria, of course it's the simplest expression). The ASQL expression you've entered will be validated using DataLayer methods.
GDIE requires data type of this expression to be "string" (implementation feature). If it's not - then GDIE will internally add "CAST" operator to convert it to string. So normally you shouldn't care about data type. Just ensure that data type of your expression is not one of the following: binary, image, ntext, virtual relation.
Matching Options Definition
There are three types of matching criteria:
- relation - used to populate relation attributes (discussed in previous section);
- type - used to match the whole object;
- multifragment class - used to match multifragments within the contained object.
Type's matching criteria must always be present. Just select the appropriate checkbox to include the rule in matching criteria (it's only available if source table is the central one and destination class is not multifragment).
Multifragment class' matching criteria must be present only if at least one attribute of this class is mapped. Just fill the appropriate checkbox (it's only available if destination class is multifragment).
All checked rules will compose the final matching criteria.
Imagine that such rules are selected as type's matching criteria:
source column "First" is mapped to destination attribute "FirstName";
source column "Last" is mapped to destination attribute "LastName".
Then final criteria will look something like that ("st" is alias for staging and "pr" is alias for production tables):
where st.First = pr.FirstName and st.Last = pr.LastName
Mapping Rules Limitations
One source table can be mapped to several destination classes but you can't map several source tables to one destination class.
One source column can be mapped to several destination attributes but you can't map several source columns to one destination attribute.
Only central table columns can take part in type's matching criteria.
Match Criteria to Destination Type
Select the "Use this column to match criteria to the destination type" checkbox available at the bottom of the dialog page when the "Table Column" or "Transformation" radio button is selected

to have the system automatically generate a condition for the matching (which you can modify or expand by adding an ASQL Expression or creating a complex condition using Groups) at the next, Matching Query, step of the wizard.

Step 6: Matching Query
If you select the "Use this column to match criteria to the destination type" checkbox (located at the bottom of the Add New Mapping Rule dialog) for a column (e.g. FirstName), the system will automatically generate a condition for the matching, for example,
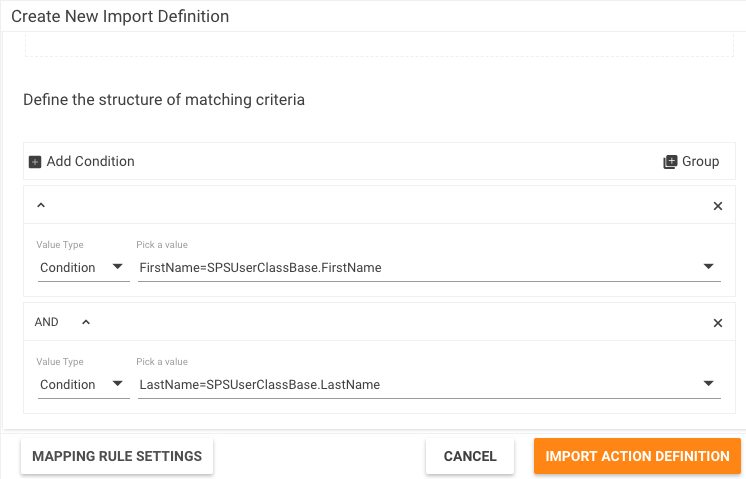
which you can modify or expand by adding an ASQL Expression or creating a complex condition using Groups) here, at the Matching Query step of the wizard, if needed.
In our example, we selected the above mentioned checkbox for two columns, FirstName and LastName. As a result, the Matching Query automatically generated two conditions combined with AND (see the above screenshot). In our example, FirsttName in staging is now mapped to the FirstName in production, and LastName in staging is now mapped to the LastName in production. If you don't have any special wishes about matching, you normally keep the automatically generated conditions without any changes. If, however, you need more complex conditions, you can change the automatically generated ones a)by using ASQL Expressions (for which you need certain knowledge about the internals of the system) and b)by using Groups.
If you have conditions that are combined with OR at the highest level, the logic is the following:
- The system tries to match everything against the first condition.
- Then then system goes to the next condition and tries to match the rows that were not matched in the first condition.
- If we still have rows that are not matched, we take the next condition.
Transformation Logic
We import data from our source to a staging area in the database. Sometimes, however, sources are not in the shape that you can use in our system; they have to be changed. For this, you use a transform. Transformation simply takes the data in the staging area, runs some ASQL Expressions to change it, so you can match it to something in your production system. The steps are:
- Import everything to the staging area.
- Apply the transform to the staging area so it will generate new content in the staging area; the content will be determined by this ASQL Expression.
- When the transform is done, then it does the matching, and then it does the import, following which it imports the result of this ASQL Expression.
Examples of ASQL Expressions
Example 1
CASE WHEN userAccountControl & 2 > 0 THEN 2002 ELSE 2001 END
We want to determine the state of an account that we import. The state is stored in the AccountClassBase.
userAccountControl is a field you get from Active Directory but we have no field userAccountControl in our system. We must extract somehow from this userAccountControl that is coming from the Active Directory information about whether this account is active or inactive. So we use this ASQL Expression. userAccountControl is a flag field. If flag # 2 is set, then our user is active, otherwise, it is inactive.
Example 2
@LastSyncDate
Example 3
CASE WHEN LEN (displayName) > 0 THEN displayName ELSE CASE WHEN LEN (en) > 0 THEN en END
Example 4
CASE WHEN userPrincipalName is NULL THEN samAccountName ELSE SubString (userPrincipalName,0, PATINDEX (%@%; userPnicipalName)) END
Step 7: Import Action Definition
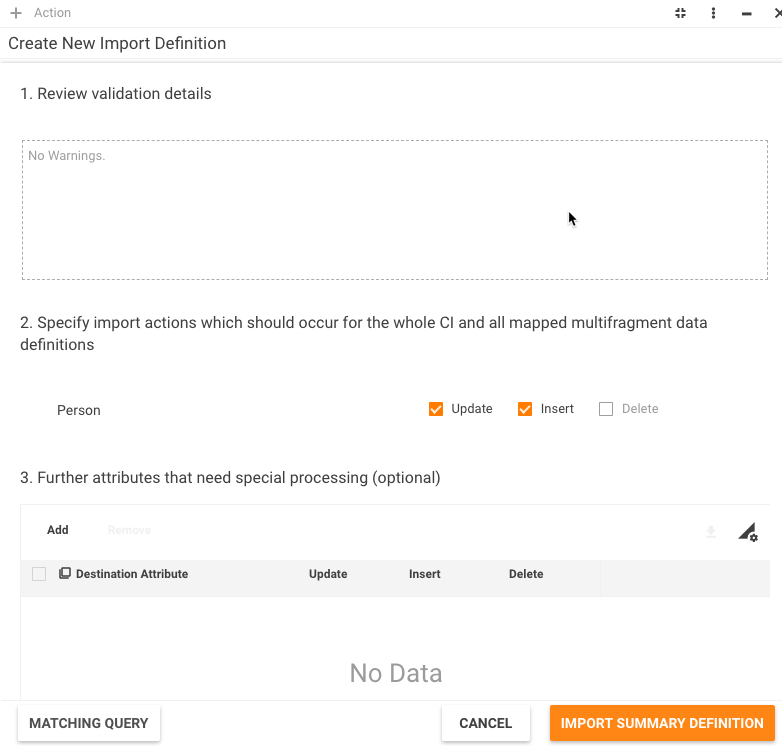
Validation Rules
When you leave the Matching Query page, all the mapping rules are validated. If any warnings present, they will be shown at this page in the "Review validation details" textbox.
Validation means the following checks:
- If class has mandatory attribute without default value and this attribute wasn't mapped then such class can't be inserted.
- If mandatory class can't be inserted then the whole object can't be inserted.
For example, hadn't we mapped the "LastName" attribute we would see the following warning:
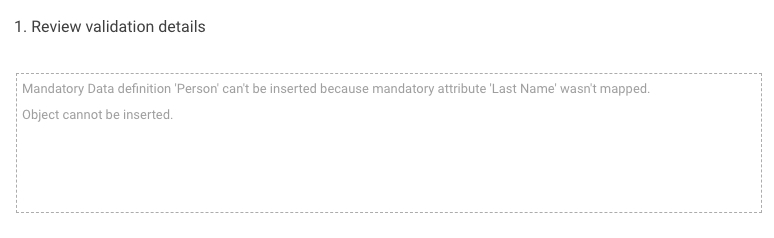
Such warning doesn't prevent sequence from execution but available actions are limited now.
Grouping Complex Table
The dropdown "Select destination data definition/relation which corresponds to one row in the source table" is shown only if you selected "The central table contains several lines per target object [Multifragment import]" option at the table definition step.
When a table contains more than one row per destination object, this can be because information about multifragment class or 1->N (N->M) relation presents in the table. Thus we can say that each row in this table corresponds to one row in the appropriate data definition/relation. And this data definition/relation you have to select from the dropdown.
In our sample file we have more than one row per user. This is because accounts information presents there. Thus each row in the file corresponds to one account and we select "User.Accounts" relation.
During a complex table processing GDIE internally groups records by the type's matching criteria. It means that it stores final matching criteria for each row in a dictionary. If it finds another row with the same criteria it considers it's the same object. GDIE ignores all data in such row except fields mapped to the selected multifragment class/relation (in our example it will be two fields - "Account" and "Domain" - mapped to the "User.Accounts" relation). So only these fields are inserted/updated (in case of multifragments) or used to update a relation.
There's a special option "any mapped multifragment data definition" in this dropdown. If you choose it then all fields mapped to a multifragment class will be processed in a duplicate row.
If you haven't mapped any multifgrament classes but use complex table then duplicate rows will be skipped simply.
Available Actions
Here you can adjust exact actions (insert, update) that GDIE will perform.
In the list of available actions you will always see the "type" entry (that means actions for the whole type) and all mapped multifragment data definitions. You can specify required actions separately for each multifragment data definition (with some limitations).
- Update - specify, whether you want to update matched records. It's checked by default.
- Insert - specify, whether you want to insert not matched records or skip them.
You can't check this option for the "type" if "Object insert is impossible" warning is present in validation details.
You can't check this option for the "data definition" if "class can't be inserted" warning is present in validation details.
If you check this option for the "type" you must check this option for all mandatory data definitions.
Special Attributes
You can also adjust actions on the attribute level. If you want special processing for some attributes, just specify them in the appropriate grid. Only mapped attributes will be shown.
For each attribute you can select one of the following actions:
- Insert only - attribute's value can only be inserted (when a row is inserted) and is never updated,
- Update only - attribute's value can only be updated (source value is ignored when a row is inserted)
- Skip - attribute's value is neither inserted nor updated (it can be useful if you only use it for matching)
- Any action - the same as if you don't specify an attribute at all.
Step 8: Import Summary Definition
Here you can see the summary information about your sequence, Data Source Type and Destination Type.
You must enter the name for your sequence - it will be saved when you click the Save action. If you configure existing sequence then the Copy the import definition checkbox is available. Just check it and enter new name - on "Save" the sequence copy will be created with the name specified. The Description field is optional.
Sequence Execution
When you go to the last page you can:
- run sequence as a whole: just click the Execute button,
- run sequence step by step,
- close the wizard by clicking the Close action (you can run the sequence later because it's saved already).
If you choose to run sequence immediately you will see dialog similar to this:
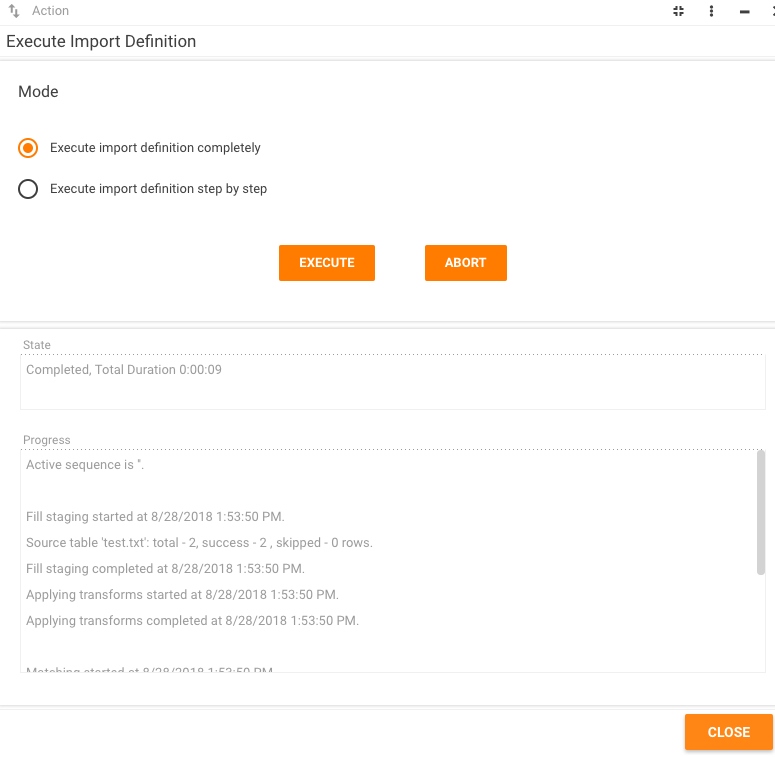
Current state of the import is displayed in the State textbox.
You can abort the execution at any time by clicking the "Abort" action.
Summary information about import is displayed in the Progress textbox.
Data import consists of three major steps (see "Components interaction" chapter):
- populate staging tables;
- match records;
- import records.
When clicking the Execute button, you simply execute them one by one. But you can also execute them separately if you select the Execute import definition step by step radio button.
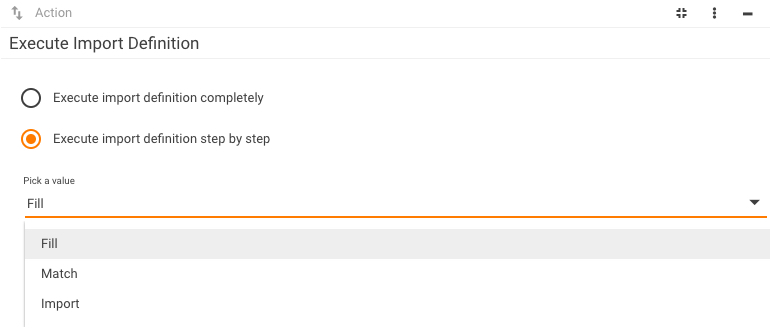
Note that when you run sequence step by step, the progress is displayed separately for each step, not for the whole sequence execution.
Possible results are:
- full success - import completed without any warnings
- partial success - import completed with warnings (e.g. some records were skipped, some relations didn't match etc.)
- failure - import failed. It means none of the records were imported.
After import has completed click Close action to close the wizard.
Below are some technical details about import steps.
Fill Step
You can execute the Fill step any number of times: if some action is running nothing will occur, otherwise new execution will start. When you execute the Fill step following actions take place:
- Sequence is always executed in "GDIE import" background engine. On first request "update4u.SPS.Engines.Workers.GDIE.IGDIEImportWorker" worker is initialized on client side. In case the engine is unavailable you will get remoting exception: "No connection could be made because the target machine actively refused it".
- Each sequence execution requests an exclusive lock, therefore only one sequence is executing at a time. Internally, lock is based on static engine's variable so "GDIE Import" engine must have only one instance (run only on one computer).
If another sequence is currently being executed, you will get the exception: "Another import sequence <sequence name> is executed concurrently …" You can wait until its completion or even abort it (use "View active" command from the "Sequence list" search page).
When no sequence is being executed anymore, you will get the lock. Lock is released in the following cases:
- somebody manually aborts it;
- you manually abort it (using the "Abort" button);
- exception is raised during execution;
- last step ("import records") has successfully completed;
- you click the Close button.
As you see, lock is not released if you simply close the wizard or intermediate step ("fill" or "match records") has completed. So please, always use the Close button to close the wizard (also some cleanup code is running there). - Preparation steps (files preload, mapping rules validation etc) are executed by the engine. You already executed these steps during sequence creation but you should understand that configuration process is completely separated from the execution - all that you pass to the engine is the ID of the stored import sequence.
- Staging schema is created. Its destination type (e.g. "User") is imported first time then all staging tables should be created. It can take a long time (about a minute, depends on type's "size"). On subsequent imports staging schema is just validated (new attributes could be added etc.) so it runs very fast.
- Staging tables are cleaned up. Data is deleted from all staging tables, not only belonging to the destination type.
- All detailed logs for the sequence are cleaned up. Import log contains two parts: summary and details. The last one contains all failed rows and can be very huge. That's why detailed log is stored only for the last sequence execution.
- Meta information for staging classes is populated. This information is used during the "import" phase to decide which classes and attributes should be updated / inserted.
- Staging tables are populated. Source tables are processed one by one (central table first), row by row. Each row is parsed according to the mapping rules and final "insert" statement is prepared. "Insert" statement can affect several staging tables depending on the type's structure.
When central table is processed we generate ObjectID value for each row as new Guid. When child tables are processed we need to access this ObjectID somehow. The fastest way to do it is using internal hashtable:
- when central table is processed its PK value is stored to the hashtable as a key and ObjectID as a value. If such key is already contained in the hashtable, then such row is skipped and logged with "Duplicate PK" description;
- when child table is processed its FK value is searched in the hashtable. If key is found then stored value is used as ObjectID, otherwise such row is skipped and logged with "Missing FK" description.
Similar situation when processing complex table (it can contain several rows per object). Type's matching criteria is used as PK: if such key already exists it means that we've already processed this object so only multifragment part is inserted. Otherwise the whole object is inserted. As a result, records in complex table can present in any order - we will internally group them by the object anyway.
While source tables are processed the "Execution statistics" field will show summary results for each table:
- total - total number of the rows processed;
- success - number of the rows that were successfully inserted in staging tables;
- skipped - number of the rows that were skipped (usually because source value isn't compatible with the destination attribute data type). You can find such records in the corresponding import log. If at least one source value generates exception then the whole record is skipped. If at least one record was skipped then import result will never be "Full success" ("Partial import" at best).
Match Records Steps
You can run the "match records" step only once, directly after successful completion of the "Fill" step. When you run "match records" step following actions take place:
Staging data is matched against the production one using matching criteria built. Matching occurs in the following order:
- type match;
- multifragment classes match (it depends on type match because multifragments are only matched within containing objects);
- relations match.
Matching criteria is simply passed to the datalayer's staging classes that expose three separate methods: Match, InsertMatch, DeleteMatch for Update, Insert, Delete actions appropriately. If user hasn't requested some action (see "Actions definition" paragraph) then no match occurs for that action.
While type (data definition, relation) is processed match statistics is collected for it. It's done using the "usp_GDIE_CollectMatchStatistics" stored procedure. The "Progress" textbox displays the collected statistics:
- total - total number of the records in the staging table;
- distinct - number of the records that have distinct match with production data;
- ambiguous - number of the records that have ambiguous match with the production data. Ambiguous match occurs when:
1) one staging record matches to several production records;
2) several staging records match to one production record (however it's allowed for "N to 1" or "N to M" relations, e.g. relation to pickup data definition).
- none - number of the records that have no match with production data.
Import Records Step
You can run "import records" step only once, directly after successful completion of the "match records" step. When you run "import records" step following actions take place:
- Data layer's staging classes perform validation of the match results and staging data. All invalid records are excluded from the import (special mark is used).
- Import statistics is collected for the type, multifragment data definitions and relations. It's done using the "usp_GDIE_CollectImportStatistics" stored procedure. The "Execution statistics" field displays the collected statistics:
- total - total number of the records in the staging table;
- updated - number of the records that will be updated;
- inserted - number of the records that will be inserted (makes no sense for relations);
- deleted - number of the production records that will be deleted (currently for multifragment classes only);
- skipped - number of the records that will be skipped (such records will usually present in appropriate import log). - All records that will be skipped are logged to the appropriate import log. It's done using the "usp_GDIE_CollectRows" stored procedure. If at least one record was skipped then import result will never be "Full success" ("Partial import" at best).
- Data layer's staging classes perform data import.
- Execution lock is released, import log is closed.
Wizard Notes
Internally, wizard classes are stored in the session between postbacks. So if session timeout expires (e.g. when no UI actions occur too long, usually 20 minutes), you can get the following exception: "Session timeout expired. You need to reopen the wizard".
Please always use Close button to close the wizard once you've reached the last page - some cleanup code is executed there and execution lock is released. Of course, if you simply close the wizard while the sequence is executing nothing terrible will occur - the execution will continue and finish without your interaction.
Import Logs
Each sequence execution generates a new log entry of the "GDIEImportLogType" type. This type consists of two classes:
- "GDIEImportLogClassBase" - contains summary execution information;
- "GDIEImportLogClassBaseItem" - contains all failed rows with errors description.
Each log entry belongs to some sequence. Only last sequence log contains information about failed rows - all detailed logs are cleaned up on each sequence execution. That is done because the number of the failed rows can be huge.
Of course, summary information is preserved for each execution.
You can see all execution logs through "Administration -> Integration -> Import -> Import Log Files" search page. They are sorted by the execution time in descending order. Notice that when you delete a sequence all its logs are also deleted.
Structure of Staging Tables
Basic Structure
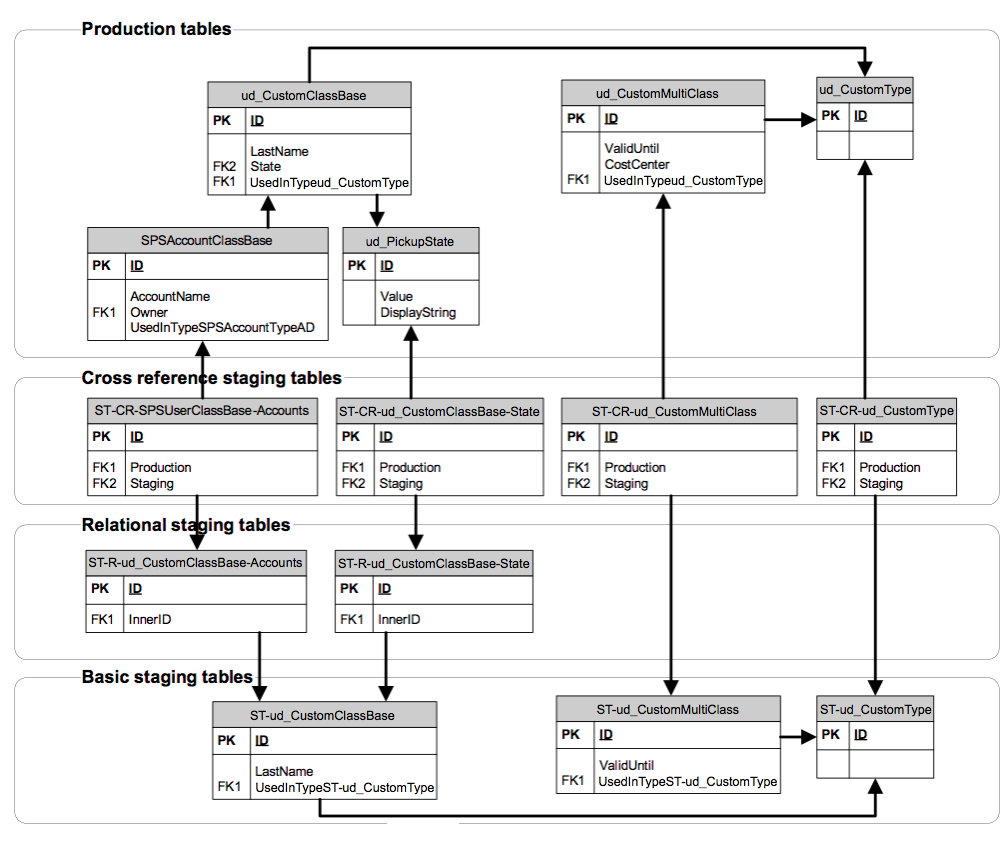
Let's review staging tables' structure by the example of ud_CustomType. For simplicity sake, we'll take only a few classes and attributes:
1) ud_CustomClassBase - single class of ud_CustomType. Attributes:
- LastName - simple type attribute;
- State - physical relation attribute ("N to 1" relation to pickup class ud_PickupState);
- Accounts - virtual relation attribute ("1 to N" relation to the class SPSAccountClassBase, not shown on the diagram, corresponds to the physical attribute "SPSAccountClassBase.Owner".
2) ud_CustomMultiClass - multifragment class of ud_CustomType. Attributes:
- ValidUntil - simple type attribute;
- CostCenter - physical relation attribute ("N to 1" relation to the class SPSCostCenterClassBase).
When staging tables are created, the following rules are enforced:
1) For each production class new table is created with identical structure except relation attributes. Its name is built as "ST-" + production class name. This group of staging tables is called "basic".
In our example we have following pairs:
- "ud_CustomType" and "ST-ud_CustomType" tables;
- "ud_CustomClassBase" and "ST-ud_CustomClassBase" tables;
- "ud_CustomMultiClass" and "ST-ud_CustomMultiClass" tables.
During the fill step, basic tables are populated with the source data according to mapping rules.
2) For each relation attribute (whether physical or virtual) new table is created with the foreign key field ("InnerID") that refers to the basic staging table. Its name is built as "ST-R-" + production class name + "-" + relation attribute name. This group of staging tables is called "relational".
In our example, we have the following pairs:
- "ud_CustomClassBase.State" physical attribute and "ST-R-ud_CustomClassBase-State" table;
- "ud_CustomClassBase.Accounts" virtual attribute and "ST-R-ud_CustomClassBase-Accounts" table;
- "ud_CustomMultiClass.CostCenter" physical attribute is similar to the "State" one so we won't show staging table for it.
Relation attributes were detached to the separate tables because they need separate matching. In first GDIE implementation for one record in basic table several records could present in relational one (in case of "1 to N" relation). But current implementation doesn't allow this so actual relation between "basic" and "relational" tables is "1 to 1".
During the FIll step, the "InnerID" field populated with the ID of the basic table's record.
3) For each staging table that should be matched (relational table, type and multifragment class basic table) new table is created with two predefined foreign key fields:
- "Production" that refers to the appropriate production table;
- "Staging" that refers to the appropriate staging table.
Its name is built by adding "-CR-" suffix. This group of staging tables is called "cross reference".
In our example we have following pairs:
- "ST-CR-ud_CustomType" refers to "ud_CustomType" and "ST-ud_CustomType" tables;
- "ST-CR-ud_CustomMultiClass" refers to "ud_CustomMultiClass" and "ST-ud_CustomMultiClass" tables;
- "ST-CR-ud_CustomClassBase-State" refers to "ud_PickupState" and "ST-R-ud_CustomClassBase-State" tables;
- "ST-CR-ud_CustomClassBase-Accounts" refers to "SPSAccountClassBase" and "ST-R-ud_CustomClassBase-Accounts" tables.
During the "match records" step, cross reference tables are populated with the matching results. Depending on the type of matching results are as follows:
- "update match" - "production" and "staging" fields are populated with the pairs of IDs that have met matching criteria;
- "insert match" - "staging" field is populated with the staging IDs that haven't met matching criteria, "production" is null;
- "delete match" - "production" field is populated with the production IDs that should be deleted, "staging" is null.
Results for all type of matching present in cross tables simultaneously. To distinguish required action additional field "Import-Action" is present. Possible values are:
- 0 - ignore the record;
- 1 - update;
- 2 - insert;
- 3 - delete.
One notice: for relations "Import-Action" should be set to 2 (insert) to perform update operation.
During the "import records" step, all records are validated and in case of any errors additional field "Import-Check" is populated with the error code. Of course, records with error code should be excluded from the import. Resulting action depends on the value of the "Import-Action" field.
Logging Extensions
To support extended logging, special fields were added to the staging tables. All basic staging tables will contain such fields:
- "ST_RowID" - ID of the source row that was used to populate the table (as you remember one destination class can be populated only from one source table);
- "ST_RowNumber" - ordinal position of the source row;
- "ST_RowValue" - concatenated values of the mapped fields of source row.
The first field, "ST_RowID", is populated in each mapped table. Other fields are populated using more refined scenario to avoid storing redundant data:
- if source table is the simple central then row details are contained in the type's staging table;
- if source table is the complex central then row details are contained in the first mapped multifragment class' table (because it will always have rows number equal to the total number of source rows but the type's table can have less);
- if source table is the child then row details are contained in the first mapped class' table.
Using this information we can easily link all staging errors to the source row and log them along with source data.
Another set of additional fields is added to simplify statistics collecting. They serve as some kind of intermediate results and are used by the logging stored procedures. These fields are: "ST_ResMatch", "ST_ResAction", "ST_ResError".
Import Engines
As you know import sequence is always executed in background engine. To initiate and control the execution you should use engine workers.
GDIE Import Worker
This worker implements "IGDIEImportWorker" interface and supposes methods for executing the sequence (whether as whole or step by step) and monitoring execution progress.
To execute your sequence as whole just use "ImportResult RunSequence (Guid sequenceID)" method. In case no exceptions were raised you will get the result as "ImportResult" enumeration.
To execute your sequence step by step use two methods:
- first call "LoadSequence (Guid sequenceID)" method that will initiate your sequence;
- then call "ImportResult RunStep(ImportStep step)" method to execute single step or "ImportResult RunSteps(ImportStep fromStep, ImportStep toStep)" method to execute several steps at a time. You can call these methods any number of times.
The result will be only returned if the last step was "Import". You should also remember about execution lock between steps: once you executed some step the exclusive lock occurs and nobody will be able to run another sequence (but your lock can be aborted). So avoid long pauses between steps. The only exception is when you executed the last step ("Import") - in this case lock is automatically released.
This worker is not shared one so you can work with it like with the instance member.
If you call these methods asynchronously you will be able to get execution progress using the "GetProgress" method or abort it using the "Abort" one.
Please call the "Dispose" method when you don't need the instance anymore to correctly release the resources.
GDIE Manager Worker
This worker implements "IGDIEManagerWorker" interface and supposes methods for observing current execution and aborting it if required. This worker is a shared one.
As you remember, only one sequence can be executed at a time so worker's method requires no parameters - they always affect active sequence.