Create an Import Definition
Overview
Adding an import definition requires that you fill out several consecutive dialogs to configure the import rules.
To create a new import definition:
- Start Matrix42 Enterprise Service Management Platform and click the Administration application.
- In the navigation area, click Integration → Import → Import Definitions.
- Click Create New Import Definition to open an input wizard and fill out the required data as described below.

The table below lists these dialogs and provides a brief overview of the actions to perform at each of the steps:
| # | Step | Description |
|---|---|---|
| 1 | Type definition | specify the data import destination object (Configuration Item) |
| 2 | Data source type | provide information necessary to reach the import data source |
| 3 | Additional settings | culture context settings (language and time zone) |
| 4 | Source table definition |
configuring input data source structure for import and interpreting input data as a relational database table(s):
|
| 5 | Mapping rule definition | setting matching rules for source and destination data |
| 6 | Import action definition | select actions to be run by the import on the target configuration item |
| 7 | Import definition summary | check basic information on the created import definition |
| 8 | Import definition execution | run the import definition |
Type Definition
Select the type of the object that you want to import. You can only import objects of one type at a time. The structure of the type (the list of all contained Data Definitions, also known as classes or tables. and their cardinality) is shown below to help you with type selection.
- Destination Type: choose the configuration item where you want to import the data;
- Show Detailed Information: select this checkbox to display Data Definitions that constitute the selected configuration item.

Data Source Type
This page is used for establishing the connection to the source of the data being imported. Select the type of data source from the suggested list:
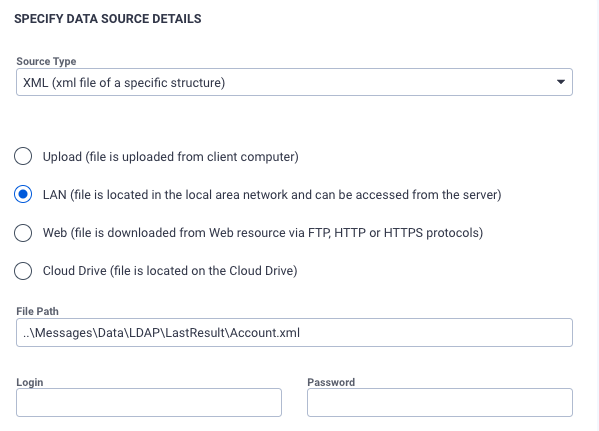
- XML (XML file of a specific structure);
- OLEDB (generic OLE DB data source);
- Text File (including .csv);
- MS SQL (Microsoft SQL Server database);
- Excel 97-2003 (Microsoft Excel file *.xls);
- Excel (Microsoft Excel file *.xlsx).
The data source details page has different sets of fields depending on the data source type that has been selected in the previous step.
XML (in a Defined Format) and Excel (Microsoft Excel File)

Source type: click the dropdown list to choose an XML file or an MS Excel file as a data source. Each worksheet in an MS Excel file is considered as a single table.
The options for specifying the file location are described in the Source File Location Settings section of this article.
It is possible to use any version of Excel, but the result file should be in one of the following supported workbook formats:
- Excel 5.0/95 Workbook
- Excel 97-2003 Workbook
- Excel Workbook
- For .xlsx, Excel 2007 or higher
Password-protected workbooks are not supported.
OLEDB (generic OLE DB data source)

- Connection String: For OLEDB data source you should specify a valid connection string. With this, you can access a wide range of possible databases provided that the respective provider/driver is available on the Matrix42 Enterprise Service Management Platform server.
Refer to this website for information about connection string format and further examples.
If the system used an OLEDB driver for the data source that supports only 32-bit Windows systems it has to be updated to support 64-bit Windows systems. If the driver is outdated such import will fail.
Text File (including .csv)
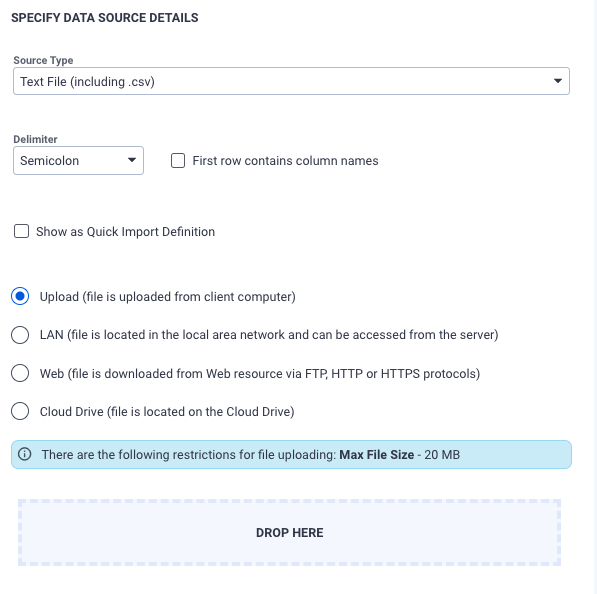
- Delimiter: you can select between several predefined column delimiters or specify a custom one by clicking the Other option. The length of the custom delimiter should not exceed one symbol.
- The first row contains column names: specify whether the first row contains column headers or data.
- Show as Quick Import Definition: checkbox is not available for all source types of the import definition. The data that you import usually comes from a file containing a table that should follow the rules of the respective import definition. To simplify import actions, you can use a predefined file for every import procedure of a specific type. You only need to enter your data in the file. Compared with normal data input in the Matrix42 Enterprise Service Management Platform user interface, this is much faster because you only have to enter your data in the predefined file and then import the file.
The options for specifying the file location are described in the Source File Location Settings section of this article.
The following data extensions are supported:
- .txt
- .csv
- .tab
- .asc
The following character sets are supported:
- Unicode
- ANSI
The UTF-8 and Big Endian Unicode character sets are not supported.
MS SQL (Microsoft SQL Server database)
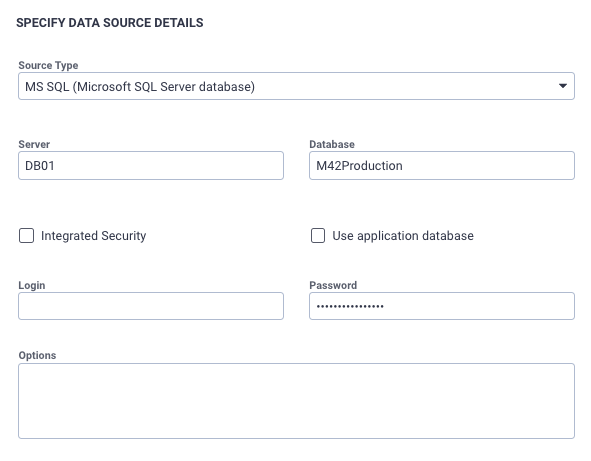
- Server: name of the Microsoft SQL server;
- Database: name of the Microsoft SQL database;
- Integrated Security: select this checkbox to access the server by using Windows authentication;
- Login, Password: user name and password under which you log on to the Microsoft SQL server unless the Integrated Security checkbox is selected. This information is encrypted and saved;
- Other Options: besides general settings, you can specify additional connection options. They are passed on to ".NET Framework Data Provider for SQL Server" without modifications. This information is encrypted and saved.
- Use application database (in ESMP v.11.0.2 and newer): allows using the application's SQL database as an import data source. Available options:
- disabled (default): fill out Server, Database, and other fields as described above to connect to the necessary Microsoft SQL database.
- enabled: application's SQL database is used as a data source for the configured import. Other fields become disabled and no other extra credentials are required
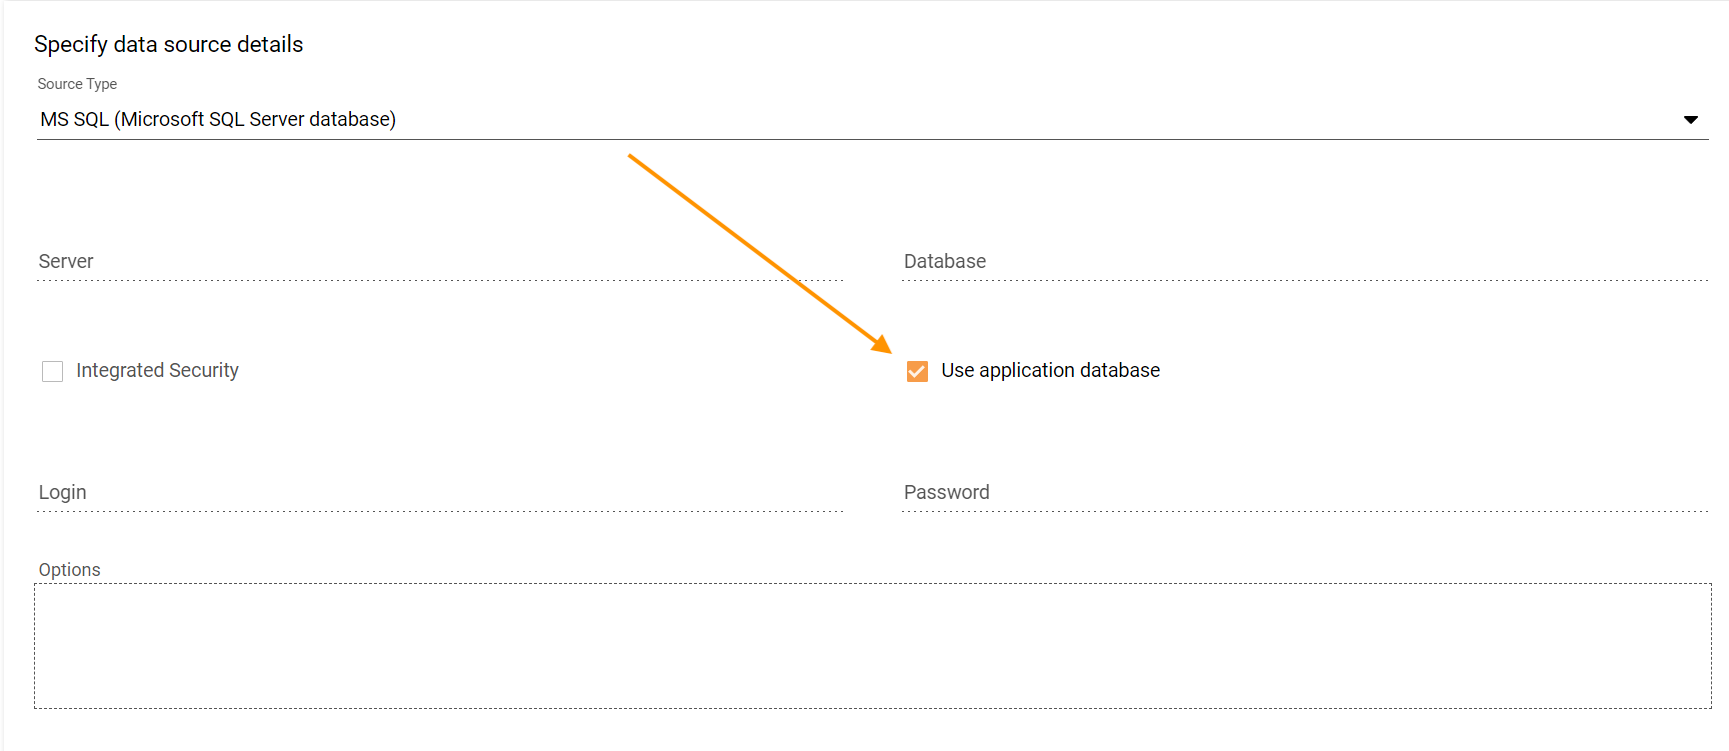
Example of the MS SQL import source type with enabled Use application database option
Source File Location Settings
The location of the text, MS Excel, and XML files are specified by using a separate dialog that has the following options:
- Upload: select this option if the file is located locally on a computer. Drag&drop the necessary file on the "Drop here" area of the page or click the "Drop here" block to browse and specify the path to the file manually;
- LAN: select this option if the file from the Matrix42 Enterprise Service Management Platform server is accessible locally or in a network. Manually enter the File Path in the corresponding field;
- Web: select this option if the file is located on a Web server and specify the File URL location.
- Cloud Drive: file is located on the Cloud Drive option is available if you have pre-configured Service Connections.
Login/Password fields are available if either LAN or Web option is selected as the location type. Enter the user name and password for accessing the network resource (optional).
Additional settings
At this step, you can modify culture context settings. By default, current UI culture is used.

Culture context settings are necessary for all types of data sources. It is important to specify the culture of the source data, especially for text data sources, so that the import definition can correctly convert the string data into the appropriate data type.
- Language settings are pre-defined by default according to the current language settings of the user profile. Click the drop-down list to choose from available options. The selected language is important if the imported Excel file contains country-specific data such as dates, number formats, or currencies.
- Time Zone: select the time zone that corresponds to the date in the data source.
Example: The string 05/15/2025 1:23 PM is the correct date for the EN culture, but invalid for the DE culture. It is also important to specify the time zone of date/time values in the import definition in order to store these values adjusted to the Coordinated Universal Time and to correctly show them later in the dialogs.
Source Table Definition
At this step, you should define which table(s) should be imported. As a rule, it is one simple table, but you can define more specific settings if necessary. You can also specify a list of parameters that should be considered during the import:
- Specify Central Table
- Specify Type of the Central Table
- Specify Child Tables (if required)
- Specify Parameters

Specify central table
By default, the system will automatically select the first table from your data source.
- Table/View: select this option to import data that can be retrieved as a table and specify the source for the data:
- Name: select a table name from the drop-down list. The actual content of the drop-down list depends on the data source type. For instance, each spreadsheet of an Excel file is suggested in the list as a stand-alone table.
- SQL Expression: a valid SQL expression that may have particularities depending on the selected for import data source type:

Starting with v.12.1.1 the SQL Expression option is no longer available for Source Types Text (including .CSV) and Excel files, use ASQL expression instead. See also, Adjusting Import Definitions to Replace Deprecated Source Filtering Method.
- MS SQL data source: enter a transact-SQL expression that is supported by your version of MS SQL Server. For information about examples and exact syntax, see the Transact-SQL Reference.
- OLEDB data source: you can enter any valid Jet-SQL expression that is supported by Microsoft.Jet.OLEDB.4.0 provider;
The version of SQL created by Microsoft is called Jet SQL and it is the database engine behind Microsoft's Access.
Jet SQL has certain limitations compared to the other versions of SQL. In general, Jet SQL is not designed to manage a database, but rather, it is used to retrieve information from a database. To cite two limitations, Jet SQL, by itself, cannot create a database and cannot manage security.
XML data source type has other central table settings and requires only a Row Path which is a valid XPath expression that identifies the data row in the XML file and specifies whether columns are defined as row child nodes or row attributes:
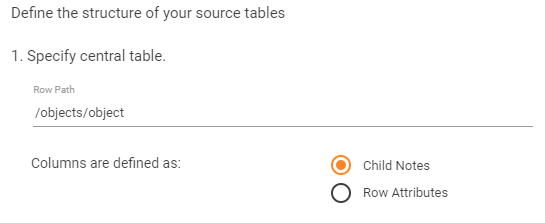
Invalid XPath expression: predicates embedded in square brackets or other types of data filtering in XPath expression are not supported.
For the following example files, the Row Path would be the same:/NewDataSet/Computers/Computer
Example file for child nodes containing data:
<?xml version="1.0" standalone="yes"?>
<NewDataSet>
    <Computers>
        <Computer>
            <Name>LCM-NB01</Name>
            <PrincipalUser>Vincent</ PrincipalUser >
            <Status>710</Status>
        </Computer>
        <Computer>
            <Name>LCM-NB02</Name>
            <PrincipalUser>Mike</ PrincipalUser >
            <Status>710</Status>
        </Computer>
    </Computers>
</NewDataSet>
Example file for row attributes containing data:
<?xml version="1.0" standalone="yes"?>
<NewDataSet>
    <Computers>
        <Computer Name="LCM-NB01" PrincipalUser="Vincent" Status="710"/>
        <Computer Name="LCM-NB02" PrincipalUser="Mike" Status="710"/>
    </Computers>
</NewDataSet>
Specify Additional Settings: the following fields are common to all data sources:
- Alias: here you can specify an optional alias for your source table or query. It will be shown during the mapping rules definition and is useful for queries or when a table name is too long.
- Foreign Key: used only when specifying several source tables. Enter a list of column names, separated by a comma, that compose the primary key for the central table or foreign key for child tables. Alternatively, you can just click the appropriate column header on the preview grid.
- Preview: The data preview grid displays the first 100 rows from your source object
Сentral table type
The central table of a data source can belong to one of two types.
Simple table
Choose this option to import a simple table through the import definition. It means that the table contains one row per destination object.

Example: if we are importing computers, then one row contains information about one computer:

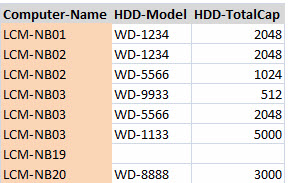
Complex table data type
Choose "The central table containing several lines per target object" option to import complex table data. Child tables are not available for this option:

Example: there are two tables, Computers and Hard Disks, and each computer can have several hard disks. In relational databases, such data is usually stored in different tables, but when it comes to importing files, the data is combined in one file. In this case, the file contains more than one row per computer. That is what we call a complex table. To import such data, we should know which fields uniquely identify a computer. For example, it can be Computer-Name:

There is no need to specify explicitly which fields identify an object: the objects are identified by matching criteria which are specified at the mapping rule definition stage.
In practice, complex data sources are possible in two cases:
- When we import objects together with their multi-fragments (Computer + Hard disks).
- When we import objects together with their 1->N, N->M relations (User + Accounts).
GDIE supports both scenarios.
When objects are imported with their relations to other objects, the import processes only relations to those objects that already exist in Matrix42 Enterprise Service Management Platform. The import adds only records of the configuration item that is specified as the destination object.
Child tables (optional)
- Specify child tables (if required): if you choose the Simple table option, then an additional grid becomes available. Use this grid to specify any number of child tables. When you click the Add button, the source object details dialog for a child table opens. Set the foreign key for the child table and make sure that the primary key is specified for the central table. These fields link the central and child tables together.
Example: The structure that is described above is represented by two separate files or we connect directly to a relational database. The import definition allows you to specify several source tables.
It requires that you should have one "central" table that contains one row per object and any number of "child" tables that are related to the primary key of the central table:
Specify parameters
At this step, you can introduce certain parameters for this import definition. Parameters allow you to modify values of fields (columns) of the imported objects.
When parameters are added, you will be able to use them for establishing mapping rules for this import definition:
- If an import definition contains parameters, each time when you run the Execute Import Definition action the system will prompt you to enter the actual values for these parameters.
- If an import definition is run within a workflow by the Execute GDI Sequence workflow activity, the import definition should receive the required parameters from this workflow.
When an import is executed, it uses the entered values of parameters to transform the initial values that have been imported.
Use the Specify parameters grid to add a new parameter:

- Name: enter the arbitrary name without spaces;
- Type: select the type of value this parameter can take.
It is required that parameter values are entered each time when the import definition is run.
Mapping Rule Definition
Mapping rules define transformations of source columns into destination attributes. They also contain matching criteria for identifying the source data against the existing data:

- Source Table: name or alias of the source table as previously defined;
- Source Column: Column name of the source table;
- Match: The selected checkbox signifies that a source column is used for matching. By comparing values in this column with the values of the specified destination attribute, the system detects whether the data that is being imported already exists or whether new configuration items are being created. You can use more than one column for matching. As a rule, all source columns with the selected Match checkbox are used for the resulting matching query;
- Destination Data Definition: Name of the destination data definition, to which the source column should be mapped;
- Destination Attribute: Name of the destination attribute to which the source column should be mapped;
- Relation Match: If the destination attribute is a reference to an attribute of a different data definition (the data definition that is not included in the selected configuration item), this column specifies the related attribute.
Add a new mapping rule or double-click the existing one to open the mapping rule details dialog for this rule. Those rules that have been selected as matching criteria are automatically added to the resulting matching query by using the AND operator. However, you can also open the query builder and edit the conditions that have been added automatically.
Mapping Rule Details
The mapping rule details dialog changes its appearance and a set of configurable fields depending on the source column type. In general, the mapping rule dialog allows you to specify the following information:
- Define the source column;
- Define the destination attribute;
- Specify the relation settings (optional, for multi-fragment data definition import only);
- Define if these columns are used as matching criteria for the imported data;
Mapping Rules for Table Columns
The following properties are available for the Table Column column type:
| Field |
Define source column |
Example |
|
Source Table |
choose the source table from the drop-down list. The list of tables was defined at the previous step. If Alias was specified, it will be shown.
|
 |
| Column Type | select the Table Column option | |
| Source Column | select the source column from the drop-down list | |
Define destination attribute |
||
| Destination Data Definition |
choose the data definition from the drop-down list, which contains all data definitions of the specified configuration item. The [Multi] postfix indicates a multi-fragment data definition. |
|
| Destination Attribute |
choose the attribute from the drop-down list, which contains all attributes of the data definition selected at the previous step. If an attribute is a reference to another data definition, you will see the [Relation] postfix and cardinality of the corresponding relation. Reference attributes have additional relational settings. |
|
Define matching options |
||
|
Additionally, modify the check-box values for specifying columns matching options. There are two types of matching criteria:
Initially, all mapping rules with the selected matching option will be added to the resulting matching query. However, you can customize the query in the query builder dialog. |
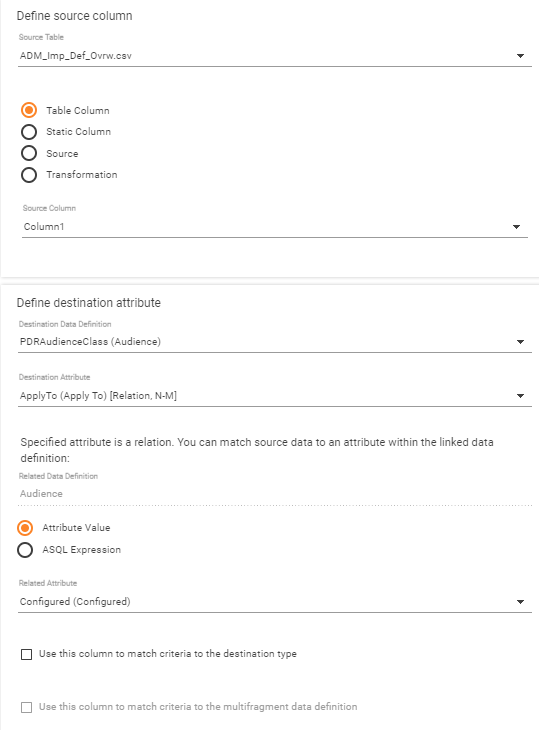
Destination Attribute: relation settings
If the Destination Attribute is a Relation, you should specify additional settings. A relation is only a reference to the row of the related table. You cannot populate it directly because its value is a Guid. However, you can match your source value against the value of some simple attribute (typically the String data type) in the related data definition.
- Related Data Definition: the field is non-editable and displays a name of the related data definition;
- Match Type: choose Attribute value or ASQL Expression option.
- Related Attribute: this field is available if the Attribute Value option is selected in the Match Type field. You can choose from the simple attributes (not relations) of the related data definition.
- Match expression: this field is available for the ASQL Expression option selected in the Match Type field. When entering an ASQL expression use the "Production" keyword to refer to the related data definition. GDIE requires the data type of this expression to be String (implementation feature). If it is not, then GDIE will internally add the CAST operator to convert it to String. You only need to ensure that the data type of your expression is not one of the following: Binary, Image, Text, or Virtual relation.
Mapping Rules for Static Column
Define source column section has the following configurable properties:
- Source Table: choose the source table from the drop-down list. The list of tables was defined at the previous step. If Alias was specified, it will be shown.
- Column Type: choose the Static Column option.
- Column Name: enter the column name that will be displayed in the mapping rule definition dialog.
- Column Value: enter the static value that will be passed to the destination attribute. This value will be the same for all imported objects.
Define destination attribute properties are the same as described above.
Mapping Rules for Source
This option of a mapping rule is used in conjunction with the transformation option. Matrix42 Enterprise Service Management Platform cannot transform values directly in a source table. Therefore, it creates a staging table and imports all source data into this table. By adding a mapping rule for the Source column type, you will only add a corresponding column to the staging table. The column will not be mapped to any destination attribute, but it can be further used in a transformation mapping rule.
- Define source column section settings:
- Source Table: select the source table from the drop-down list. The list of tables was defined at the previous step. If Alias was specified, it will be shown;
- Column Type: select the Source option;
- Source Column: select the source column from the drop-down list.
- Define destination attribute:
- Target Column Name: manually enter a name for the target column;
- Column Type: select the column data type;
- Column Length: the field is editable for certain column types. Enter the integer number to set the column length;
- Column Scale: if it is a decimal number column, you can set the number of digits after the decimal point;
- Column Precision: if it is a decimal number column, you can set the total quantity of digits.
Mapping Rules for Transformations
The transformation mapping rule allows you to modify values that are being imported into the system and extract data from an attribute that houses numerous properties.
- Define source column section settings:
- Source Table: select the source table from the drop-down list. The list of tables was defined at the previous step. If Alias was specified, it will be shown;
- Column Type: select the Transformation option.
- Define destination attribute:
- Transform Expression: specify an ASQL expression. It can use those source columns for which a mapping rule of the Source type has been specified. You can also reference parameters if the import definition has any.
Example: the transformation expression uses the user Account Control column. Initially, this column is an attribute from Active Directory. It has been previously mapped to a column in the staging table by using the Source mapping rule. The ASQL expression also contains parameters that have been added for the import definition. When a user executes the import definition, they enter values for the parameters. The expression then uses these values and the value of the user Account Control attribute to insert a certain resulting value into the destination attribute in Matrix42 Enterprise Service Management Platform.
Limitations of Mapping Rules
- One source table can be mapped to several destination data definitions, but you cannot map several source tables to one destination data definition.
- One source column can be mapped to several destination attributes, but you cannot map several source columns to one destination attribute.
Matching query and Query builder
In the mapping rule definition dialog, when all source columns have been mapped to destination attributes, you can customize the resulting query that will be used to match source objects with destination objects. Click Query Builder to open the query builder dialog.

As usual, when the dialog opens, it already contains some matching criteria. For a newly created import definition, they are combined by the AND operator. These are mapping rules that have either Use this column to match criteria to the destination type or Use this column to match criteria to the multifragment data definition checkbox selected. However, you can remove all criteria from the query builder and specify a more complex and precise query.
- AND/OR: select the logical operator if you have two or more matching criteria;
- Add Expression: click the button to add a new field where you can specify an ASQL expression as matching criteria;
- Add Condition: click the button to add a drop-down field where you will be able to choose from the added mapping rules. The field will contain only those mapping rules that have the matching criteria checkbox selected;
- Add Group: click the Group button to add a new group of conditions and a logical operator that will connect them. This group will be added into the upper-level group of conditions;
- Remove Group: click the button to delete the specific group of conditions and expressions that are connected by the operator;
- OK/Cancel: click OK to save the matching criteria or Cancel to leave the criteria unchanged.
Import Action Definition
This step allows specifying import actions that should occur:

Review validation details
When you leave the Mapping Rule Definition page, all mapping rules are validated. If any warnings appear, they will be shown in the Review validation details text box:
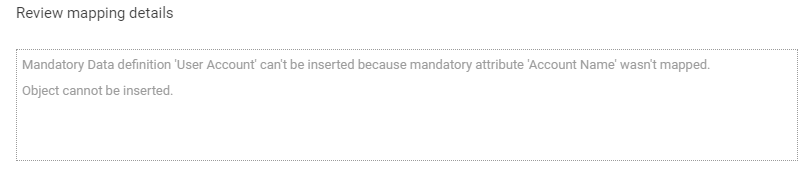
Validation includes the following checks:
- If the class has a mandatory attribute without a default value and this attribute is not mapped, then such class cannot be inserted.
- If the mandatory class cannot be inserted, then the entire object cannot be inserted.
Such warnings do not prevent the definition from execution, but the available actions become limited.
Select destination data definition/relation, which corresponds to one row in the source table
The drop-down list is shown only if you have selected the Multifragment Import option when choosing the source table type.
The complex table contains more than one row per destination object. It means that the information about multifragment class or the 1->N (N->M) relation exists in the table. Thus we can say that each row in this table corresponds to one row in the appropriate class/relation. This class/relation should be selected from the drop-down list.
Example: A table has more than one row per computer because it also contains the hard disk information. Thus each row in the file corresponds to one hard disk, and we select the Hard Disk multi-fragment.
When an import definition processes a complex table, it identifies records by using the resulting matching query. If it finds another row with the same criteria, it considers it to be the same object. In this case, the import definition ignores all data in such row, except fields that are mapped to the selected multifragment class/relation. In our example, it will be two fields, Model and Total Capacity, that are mapped to the Hard Disk multifragment:

There is also the Any Mapped Multifragment Class option in this drop-down list. If you choose it, then all fields that are mapped to a multi-fragment class will be processed in a duplicate row.
If you have not mapped any multi-fragment classes, but use a complex table, then the duplicate rows will be skipped.
Specify import actions, which should occur for the entire CI and all mapped multifragment data definitions
Here you can customize the exact actions that the import definition can perform. The list contains records for the main configuration item and all mapped multi-fragment classes. You can specify the required actions separately for each multi-fragment class (with some limitations).
- Update: specify whether you want to update the matched records;
- Insert: specify whether you want to insert the non-matched records or skip them:
- You cannot check this option for the main CI if the Object insert is impossible warning appears in validation details;
- You cannot check this option for the multi-fragment class if the Class cannot be inserted warning appears in validation details;
- If you select this option for the main CI, you should select this option for all mandatory multi-fragment classes;
- Delete: specify whether you want to delete Matrix42 Enterprise Service Management Platform records that do not exist in the source data. It is prohibited for the main CI. For multi-fragment classes, only records within the matched objects will be deleted.
Attributes that need special processing (optional)
You can also adjust actions on the attribute level. If you want special processing for some attributes, specify them in the appropriate grid. Only the mapped attributes will be shown.
For each attribute, you can select one of the following actions:
- Insert Only: an attribute's value can be only inserted (when a row is inserted) and is never updated;
- Update Only: an attribute's value can be only updated (the source value is ignored when a row is inserted);
- Skip: an attribute's value is neither inserted nor updated (useful if you use it only for matching);
- Any Action: the same as if you did not specify an attribute at all.
Import Definition Summary
Here you can see overview information about your definition:

- Summary of the import definition: the source and destination details of the import definition;
- Name: enter or edit the name of the import definition. It is saved when you click Next;
- Description: additional description of the import definition;
- Copy the import definition: the checkbox is available if you customize an existing definition. After you click Save, a copy of the definition with the specified name is created;
- Save: saves the import definition or creates a copy of the import definition.
Import Definition Execution
This dialog is the last step in creating and running an import definition. It is also shown when you click the Execute Import Definition action.
Execute import definition completely
- Parameters: if this import definition contains parameters, it is required that you enter parameter values for the definition to be executed. The type of value should match the parameter value type.
- Select Option: select the Execute import definition completely option to run the import definition without intermediate steps;
- Execute: click the button to run the import definition;
- Abort: you can interrupt the execution at any time by clicking Abort;
- Result Preview:
- State: when the import is completed, you will see the result in the text box, e.g.: "Completed, Total Duration 0:00:04".
- Progress: detailed information about the import execution and processed data statistics.
Executed import definition example:

Executing the Import Definition Step by Step
If you select the Execute import definition step by step mode, you will be able to execute the import gradually. This option is recommended because it displays the individual steps and any errors that occur.
- Fill: populating the staging tables in the Matrix42 Enterprise Service Management Platform database with the raw data from the data source;
- Match: matching the data in the Matrix42 Enterprise Service Management Platform tables with the new data that is imported to the staging tables;
- Import: actual import of the new data into the productive tables of Matrix42 Enterprise Service Management Platform.
When you run the definition step by step, the progress is displayed separately for each step, not for the entire definition execution.