Universal STS/SAML2 for all WM applications
Overview
Matrix42 Workspace Management 8.1.2 supports identity federation with SAML 2.0 (Security Assertion Markup Language 2.0). This feature enables federated single sign-on (SSO) – session and user authentication service that permits a user to use one set of login credentials to access multiple applications like Matrix42 Workspace Management, Matrix42 MyWorkspace, Matrix42 MarketPlace.
To use universal STS/SAML2 authentication you need to configure:
- The trust relationship between Matrix42 MyWorkspace and your Service Provider (e.g. Matrix42 Workspace Management Administration);
- Enable the Secure Token Service(STS) via Configuration/Setup Wizard.
Configuring MyWorkspace application for SSO
- Go to https://myworkspace.matrix42.com/ and sign in with your Matrix42 administrator account.
- Go to “Applications” and add new “Custom Saml2 Service Provider” application:
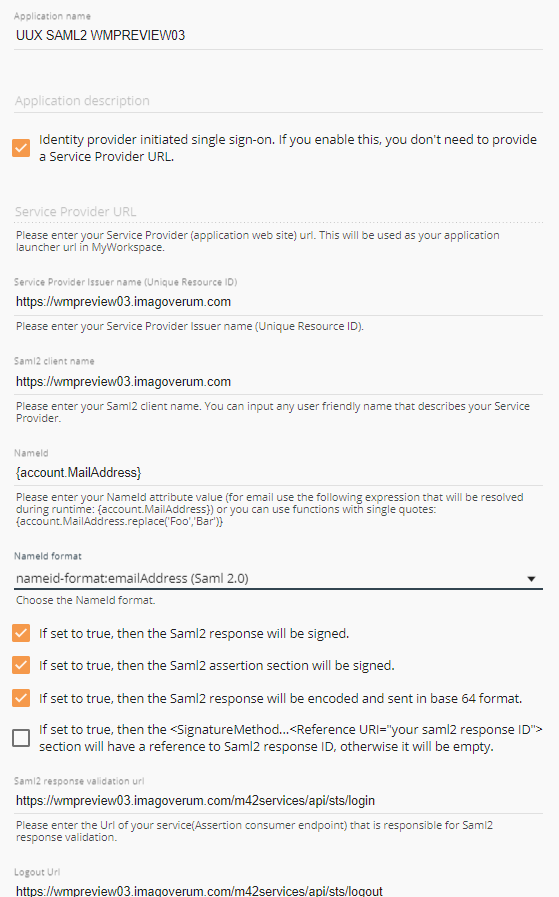
- Enter Application name;
- Enter Service Provider URL;
- Enter Service Provider Issuer name;
- Enter Saml2 client name;
- Set the NameId format to the nameid-format:emailAddress (Saml 2.0)
- Check “If set to true, then the Saml2 response will be signed.”
- Check “If set to true, then the Saml2 assertion section will be signed.”
- Check the “If set to true, then the Saml2 response will be encoded and sent in base 64 format” checkbox.
- Set the Saml2 response validation url to the https://[EnterYourServerDomainName]/m42services/api/sts/login
- Set the Logout Url to the:
https:// [EnterYourServerDomainName]/m42services/api/sts/logout - Choose the algorithm to be used to sign your Saml2 response. Select SHA256 and save the application.
- Now you should be able to download The Integration Guide.
Identity Provider enabled login
You can launch an application directly from MyWorkspace. You have to uncheck "Identity provider initiated single sign-on" and provide as the service provider URL the "SingleSignOnService location" from the Integration Guide.
In the background, the system will initiate an IdP initiated SAML2 flow and will send a SAML2 reply to the SAML2 response validation URL.
Configuring login page to support different login methods
In the Administrative area of the Matrix42 Workspace Management you are allowed to:
- Enable single sign-on
- Enable browser credentials
- Enable SAML2
ACS URL value
For any Identity Provider (Azure, Google, Okta, etc.) when configuring SAML2 apply the following settings for Assertion Consumer Service (ACS) URL depending on your Matrix42 version:
- 9.1.3 or lower:
https://<discoveryHostName>/m42services/authorize/login - 10.0.0 or greater:
https://<discoveryHostName>/m42services/api/sts/login - 10.1.0 or greater requires ACS URL value with the following configuration:
10.1.0 ESMP release version has an additional checkbox that allows supporting one of the 2 possible types of the ACS URL value.
In Administration → Global System Settings → Secure Token Service configure the Use new Redirect URL (/m42services/api/sts/login) checkbox option as suggested below:- Disabled (default): the system supports SAML2 configuration that has ACS URL value specified on the identity provider service as
https://<discoveryHostName>/m42services/authorize/login - Enabled: if you have set the ACS URL value on the identity provider service to
https://<discoveryHostName>/m42services/api/sts/loginselect the checkbox.

The default value of the Use new Redirect URL (/m42services/api/sts/login) checkbox option
- Disabled (default): the system supports SAML2 configuration that has ACS URL value specified on the identity provider service as
You can find your discoveryHostName value in the SPS.config file.
Configuring SAML2 Authentication
To enable SAML2 authentication you should specify:
On the SAML2 Identity provider side:
- Set the SAMLl2 response validation URL or Reply URL depending on your Matrix42 version. For more details, see ACS URL value section of this page.
- Set the Logout Url to:
https://<discoveryHostName>/m42services/api/sts/logout - Choose the algorithm to be used to sign your Saml2 response. SHA256 should be specified.
On the Service Store side:
- SAML2 Login Button Title: it will be visible on the “Sign In” page.
- SAML2 Identity Provider ID: use the same as it was specified in the SAML2 identity provider side application for the “Service Provider URL” field (for MyWorkspace this is normally https://accounts.matrix42.com).
- Service Provider Issuer Name: use the same as it was specified in the SAML2 identity provider side application for the “Service Provider Issuer name (Unique Resource ID)” field.
- SingleSignOn/Out URI Endpoints: use the ones that are provided by the identity provider (for MyWorkspace you can find them under Integration guide).
- Identity Provider Certificate Key: use the x509 Certificate Key provided by your SAML2 provider (in case of MyWorkspace you can use one from the Integration guide).
- SAML2 Name Id Policy: your SAML2 provider will provide you with a Name Id after login, the SAML2 specification allows different kinds of the Name ID. Some providers expect that an application asks for a specific kind in the initial request; here you can set this policy for the Name Id field.
- "Allow Create"value for SAML2 NameID Policy: In the initial SAML2 request an "AllowCreate" attribute for the Name Id can be set. Different providers expect different settings or not providing this attribute at all.
- Sign SAML2 "Login"/"Login out" request to Saml2 provider (for ESMP v. 12.0.2 and higher): instructs to sign the login/logout request with the certificate, it is required by some Identity Providers (like Okta or Keycloak). If the signing of the login/logout request is activated, the public certificate needs to be uploaded to the Identity Provider for further description of received messages. Use the "DOWNLOAD (.cer file)" button to obtain the public certificate.
tiphere - Disable logout from Saml2 provider: If the user logs out of the application, you can specify whether you want to keep your session with your SAML2 provider or also send a logout request to your SAML2 provider.
The System uses the Web Server private SSL certificate.
Sign SAML2 "Login" request option is available starting ESMP v.12.0.2.
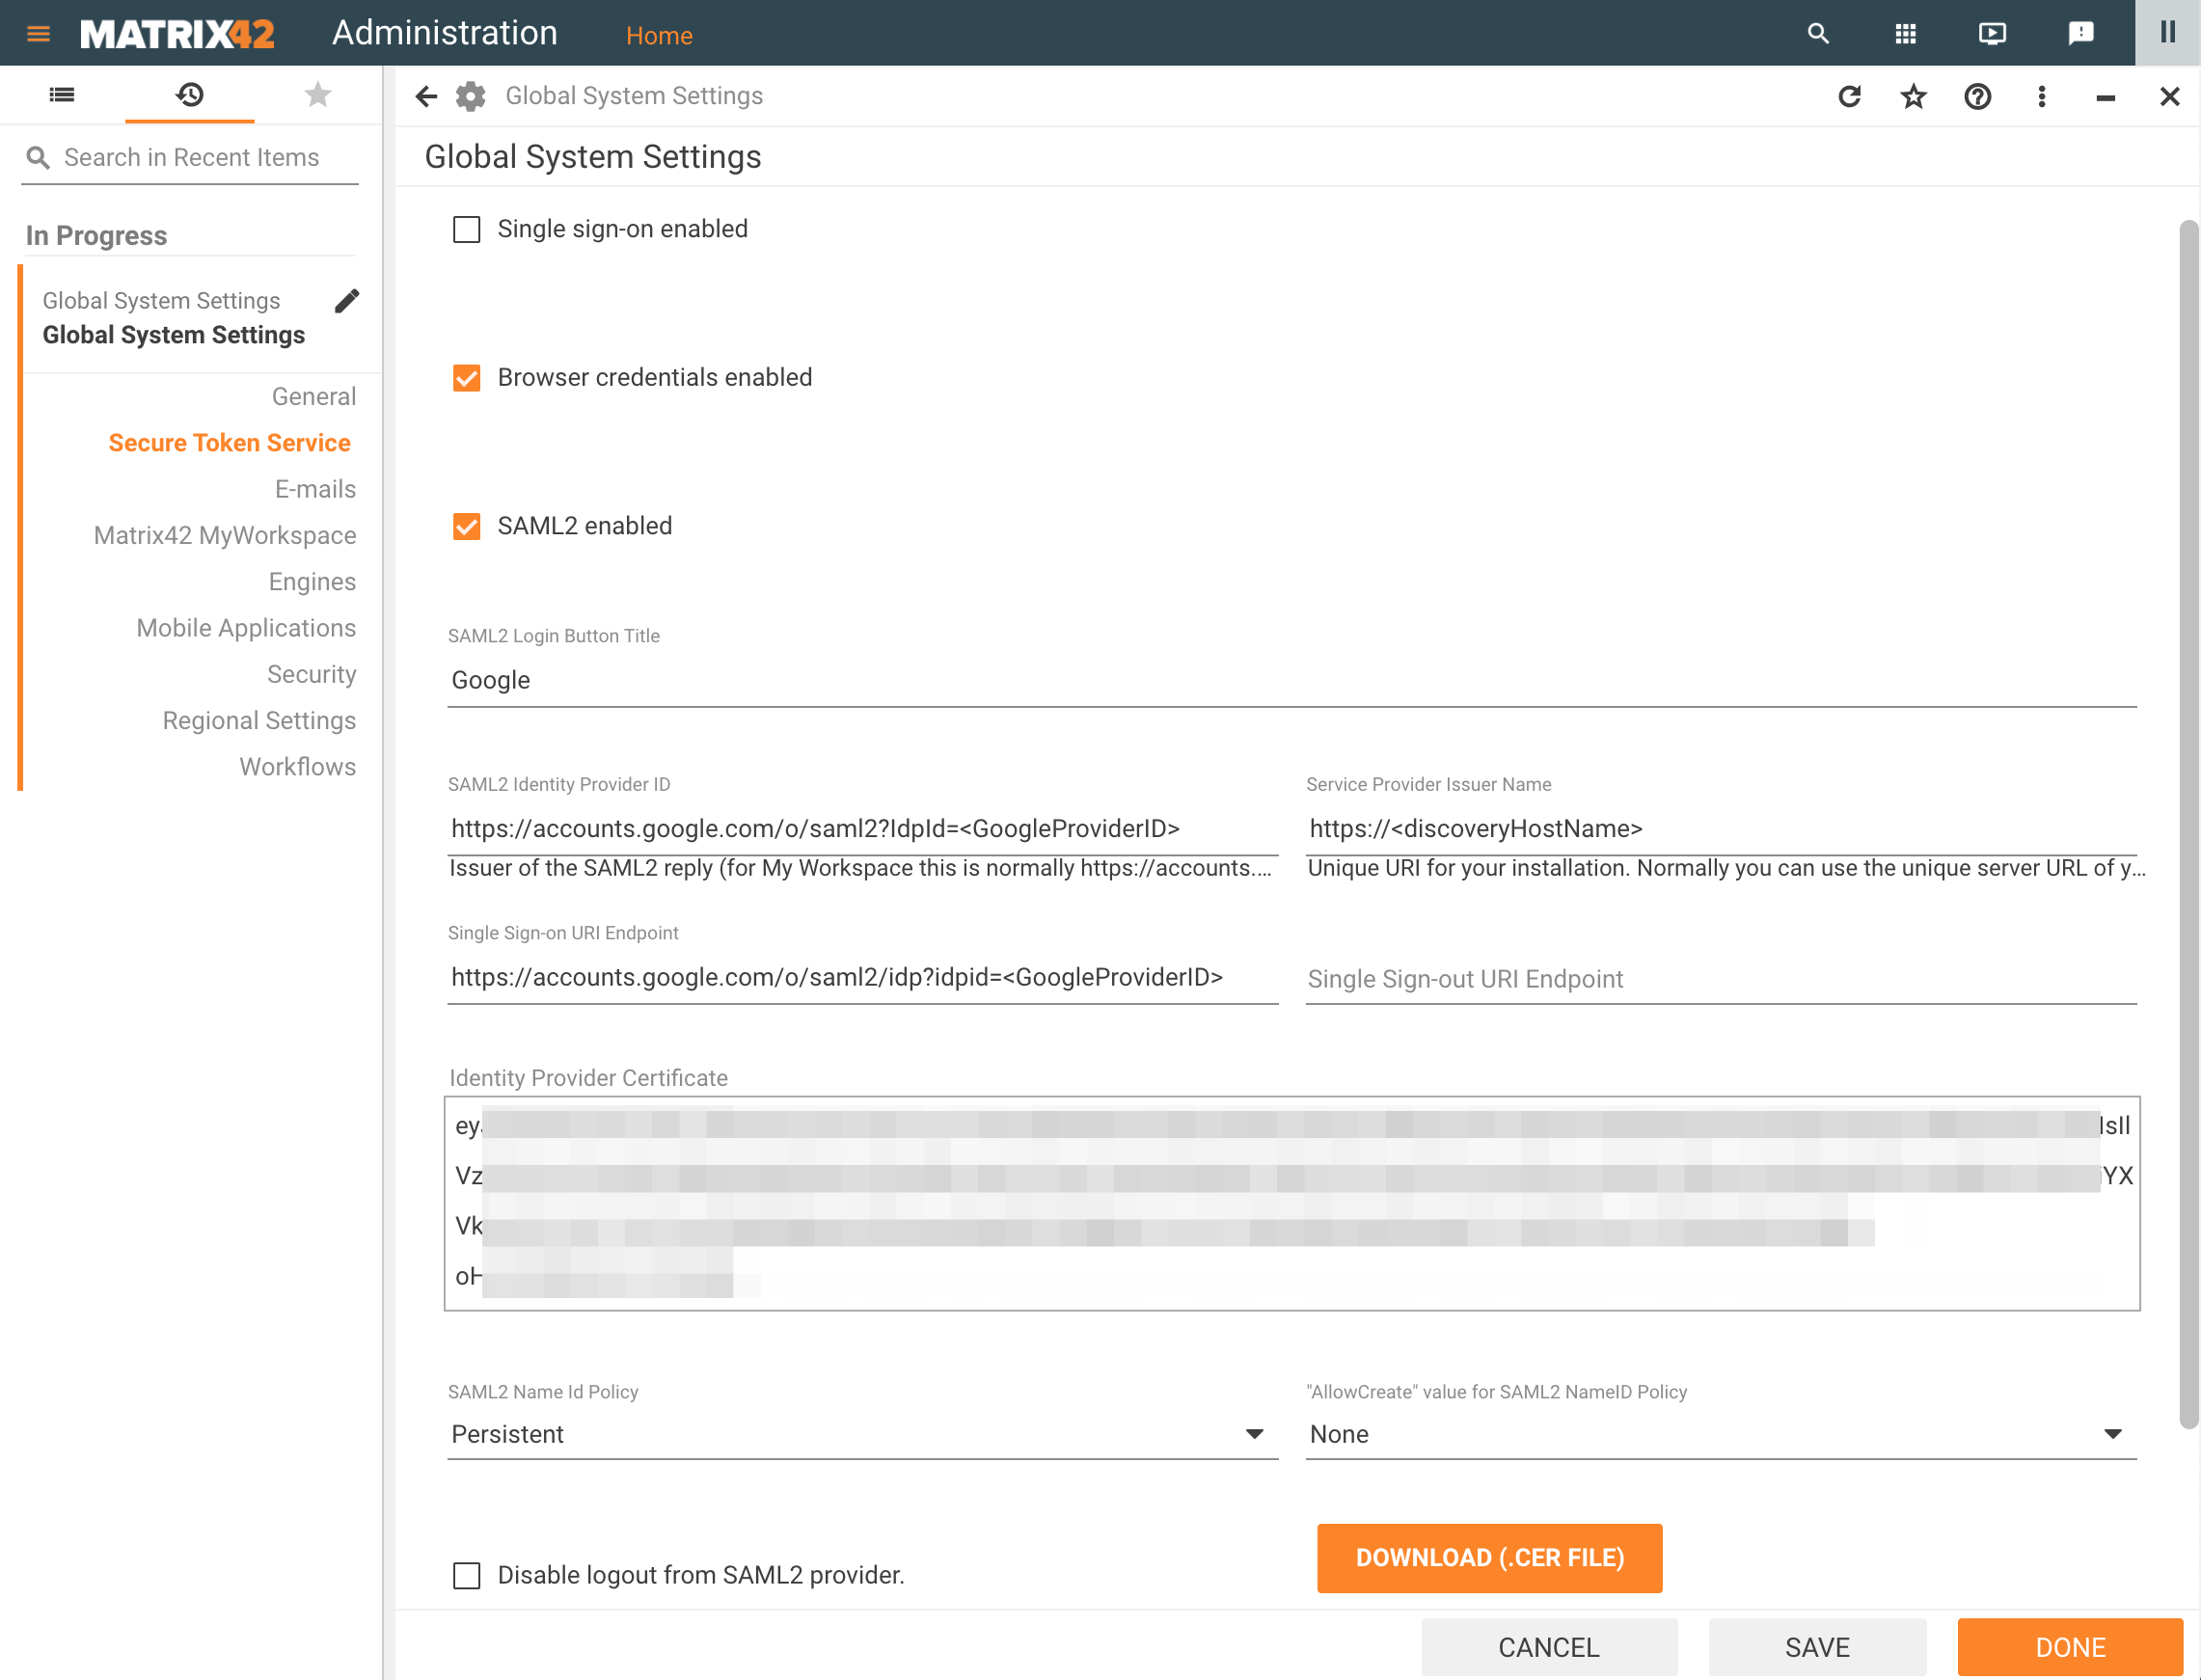
In the image below, you can see an example of how to configure SAML2 on the service store side in case Myworkspace.matrix42.com is used as the SAML2 identity provider:
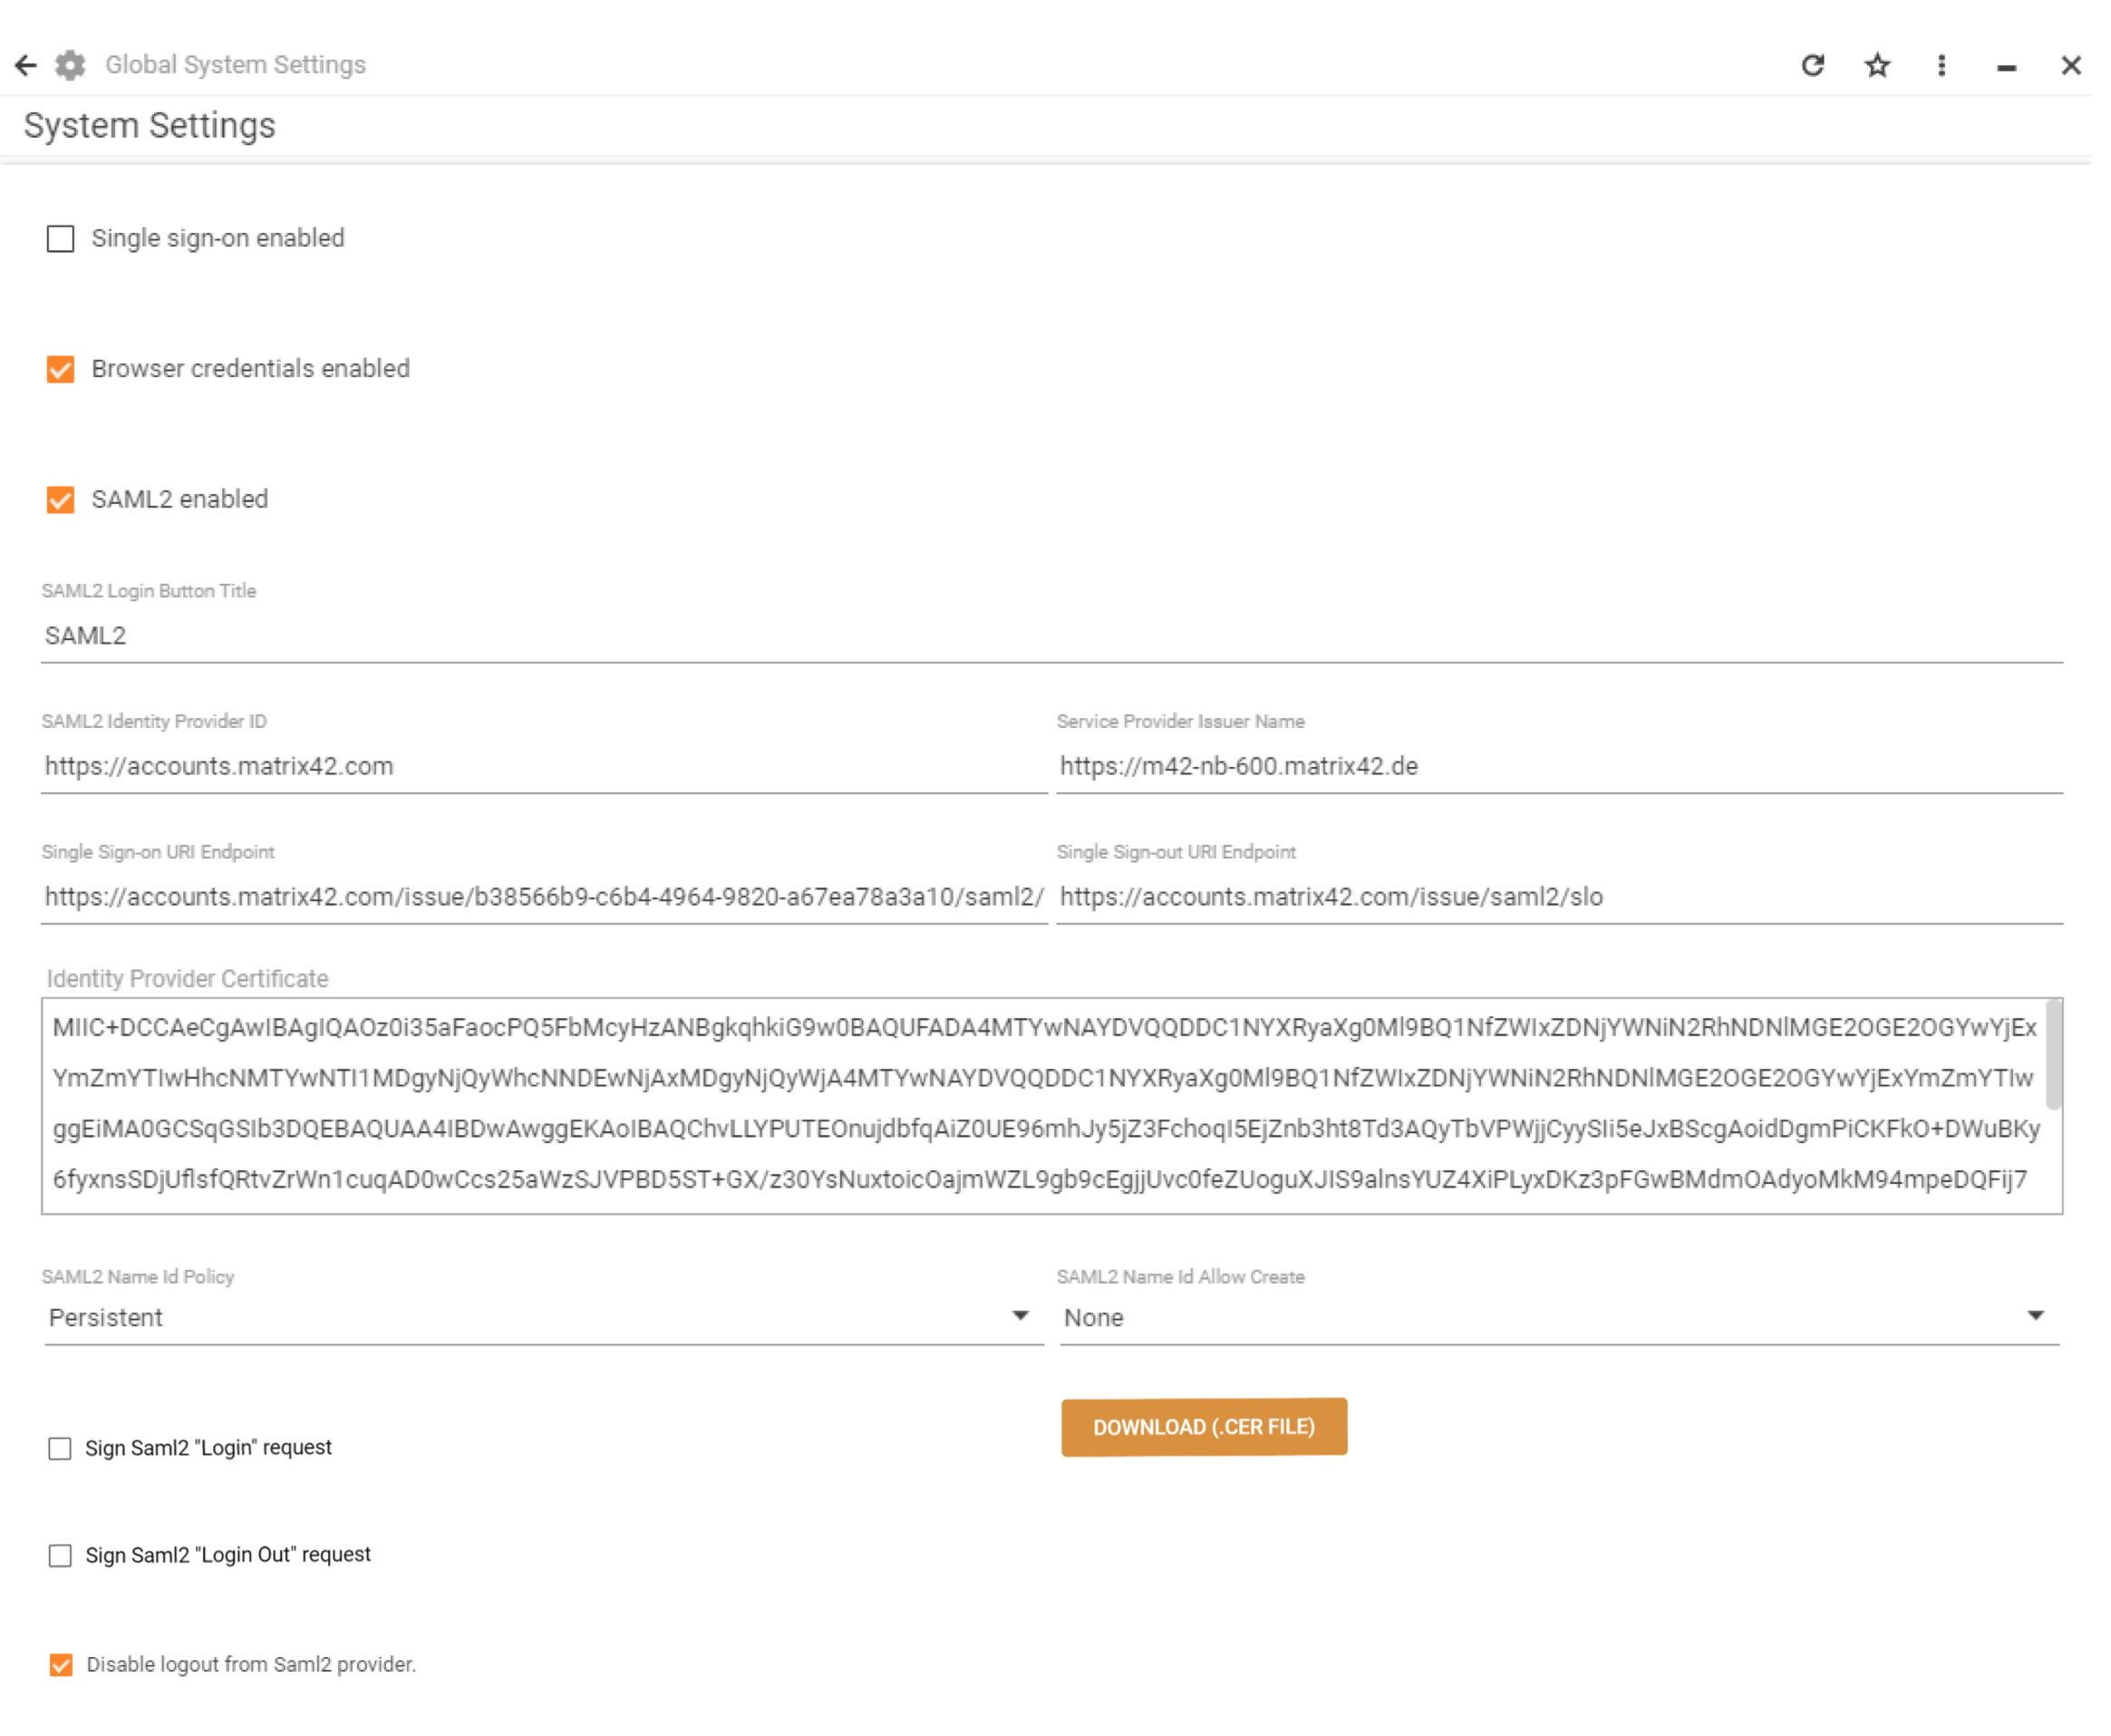
The Single Sign On Uri Endpoint can be copied from the Metadata .xml document. To download it open the MyWorkspace Integration Guide for the created application and follow the link from Step 2.
Bypass Automatic Login
It may happen that for some reason your SAML2 authentication no longer works. In case of Single sign-on enabled, you now have the issue that you are no longer able to enter the application to change your configuration, maybe to update the certificate. In this case you can force the system to show you the login page to make it possible to login with a non SAML2 account. You have to add the predefined parameter "ForceLoginPage" to your url, like this: https://myhost.mydomain.com/wm?ForceLoginPage
Examples
Okta
The example describes how the Okta Identity Provider can be configured for authentication.
Configure Matrix42 App on Okta side
- Go to Okta Admin console and create a new Application for Matrix42 website;
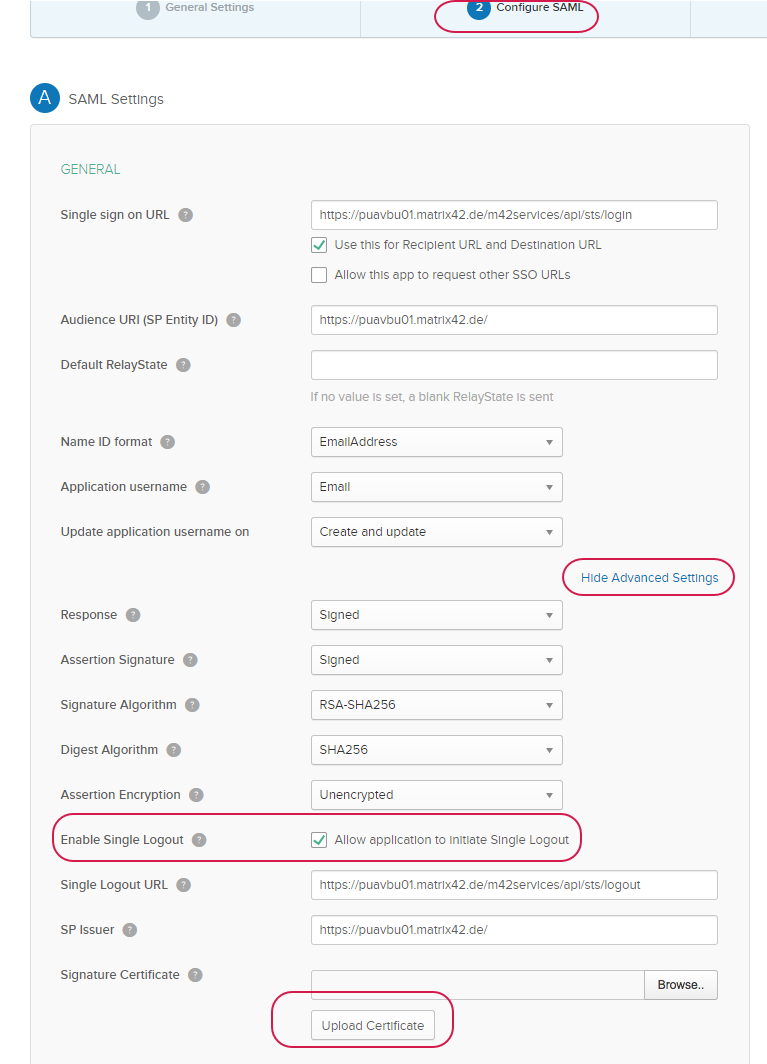
- Choose "Web" as platform and "SAML 2.0" as sign-on method;
- Enter an app name in General Settings;
- Configure SAML settings.
Okta integration with Matrix42 requires the "Enable Single Logout" activation, and defining the Signature Certificate. To obtain the Signature Certificate open the Matrix42 UUX console Administration Settings / page Secure Token Service, and click button "DOWNLOAD (.cer file)"
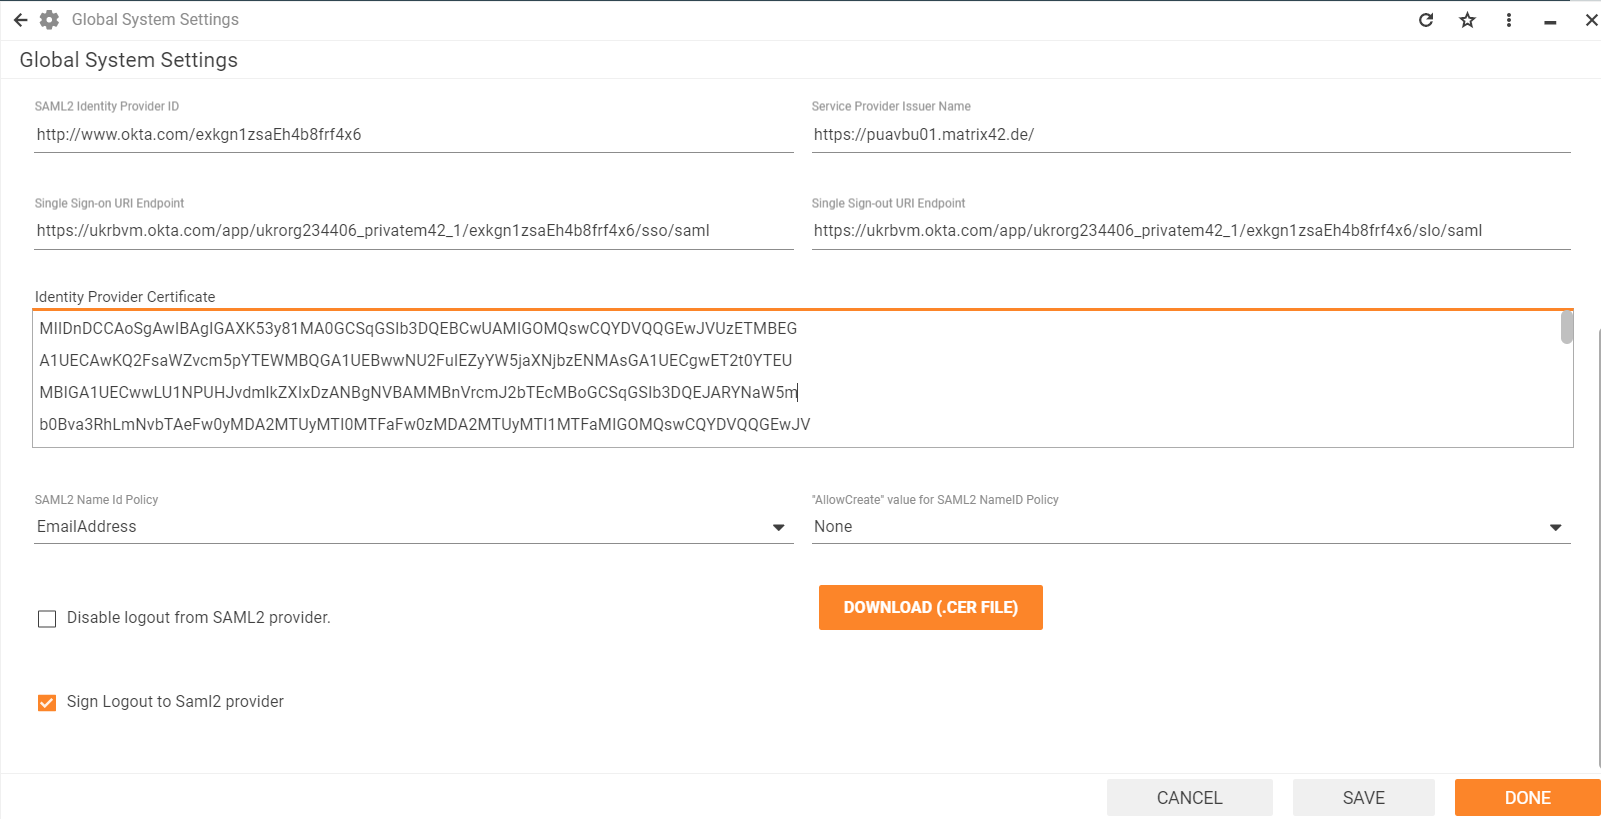
Configuring Okta in Matrix42
For Okta integration the checkbox "Sign Logout to Saml2 provider" has to be set.
Keycloak
Configure Matrix42 Client on Keycloak side
Go to Keycloak admin console and create a new Client for Matrix42 website:
- In the Admin interface, select Clients → Clients list → Create client;
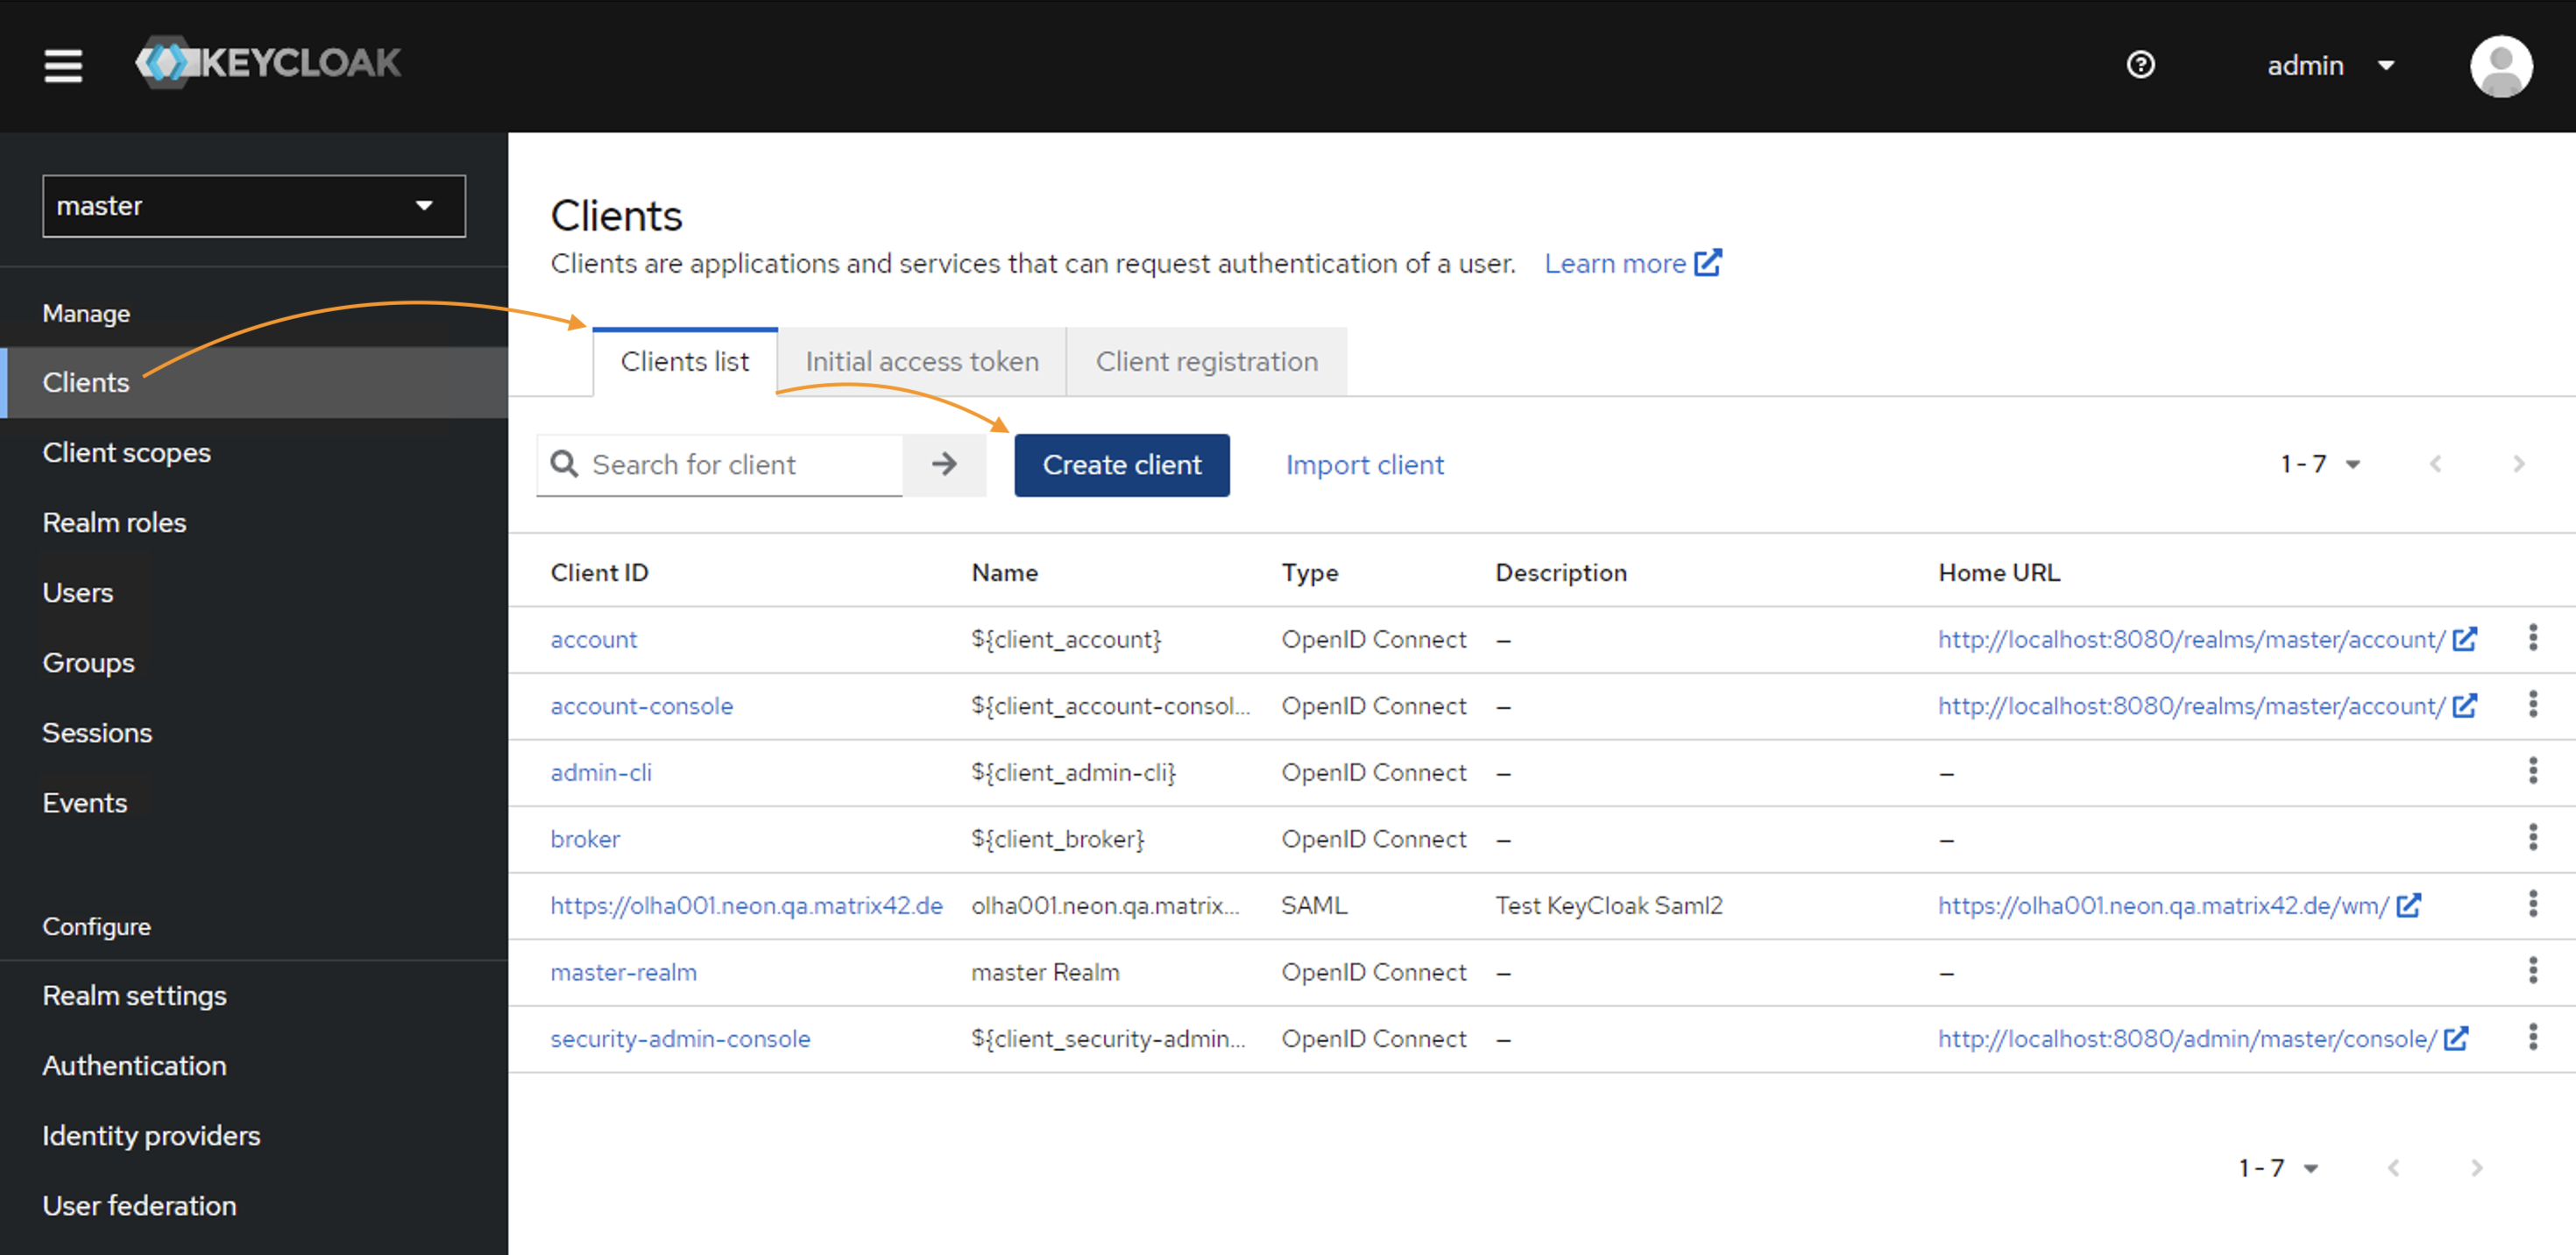
- In the General Settings, fill out the following fields:
- Client type: choose SAML
- Client ID: enter the domain name, for example,
https://<discoveryHostName>You can find your
discoveryHostNamevalue in the SPS.config file. - Name: use the
<discoveryHostName> - Description: optional
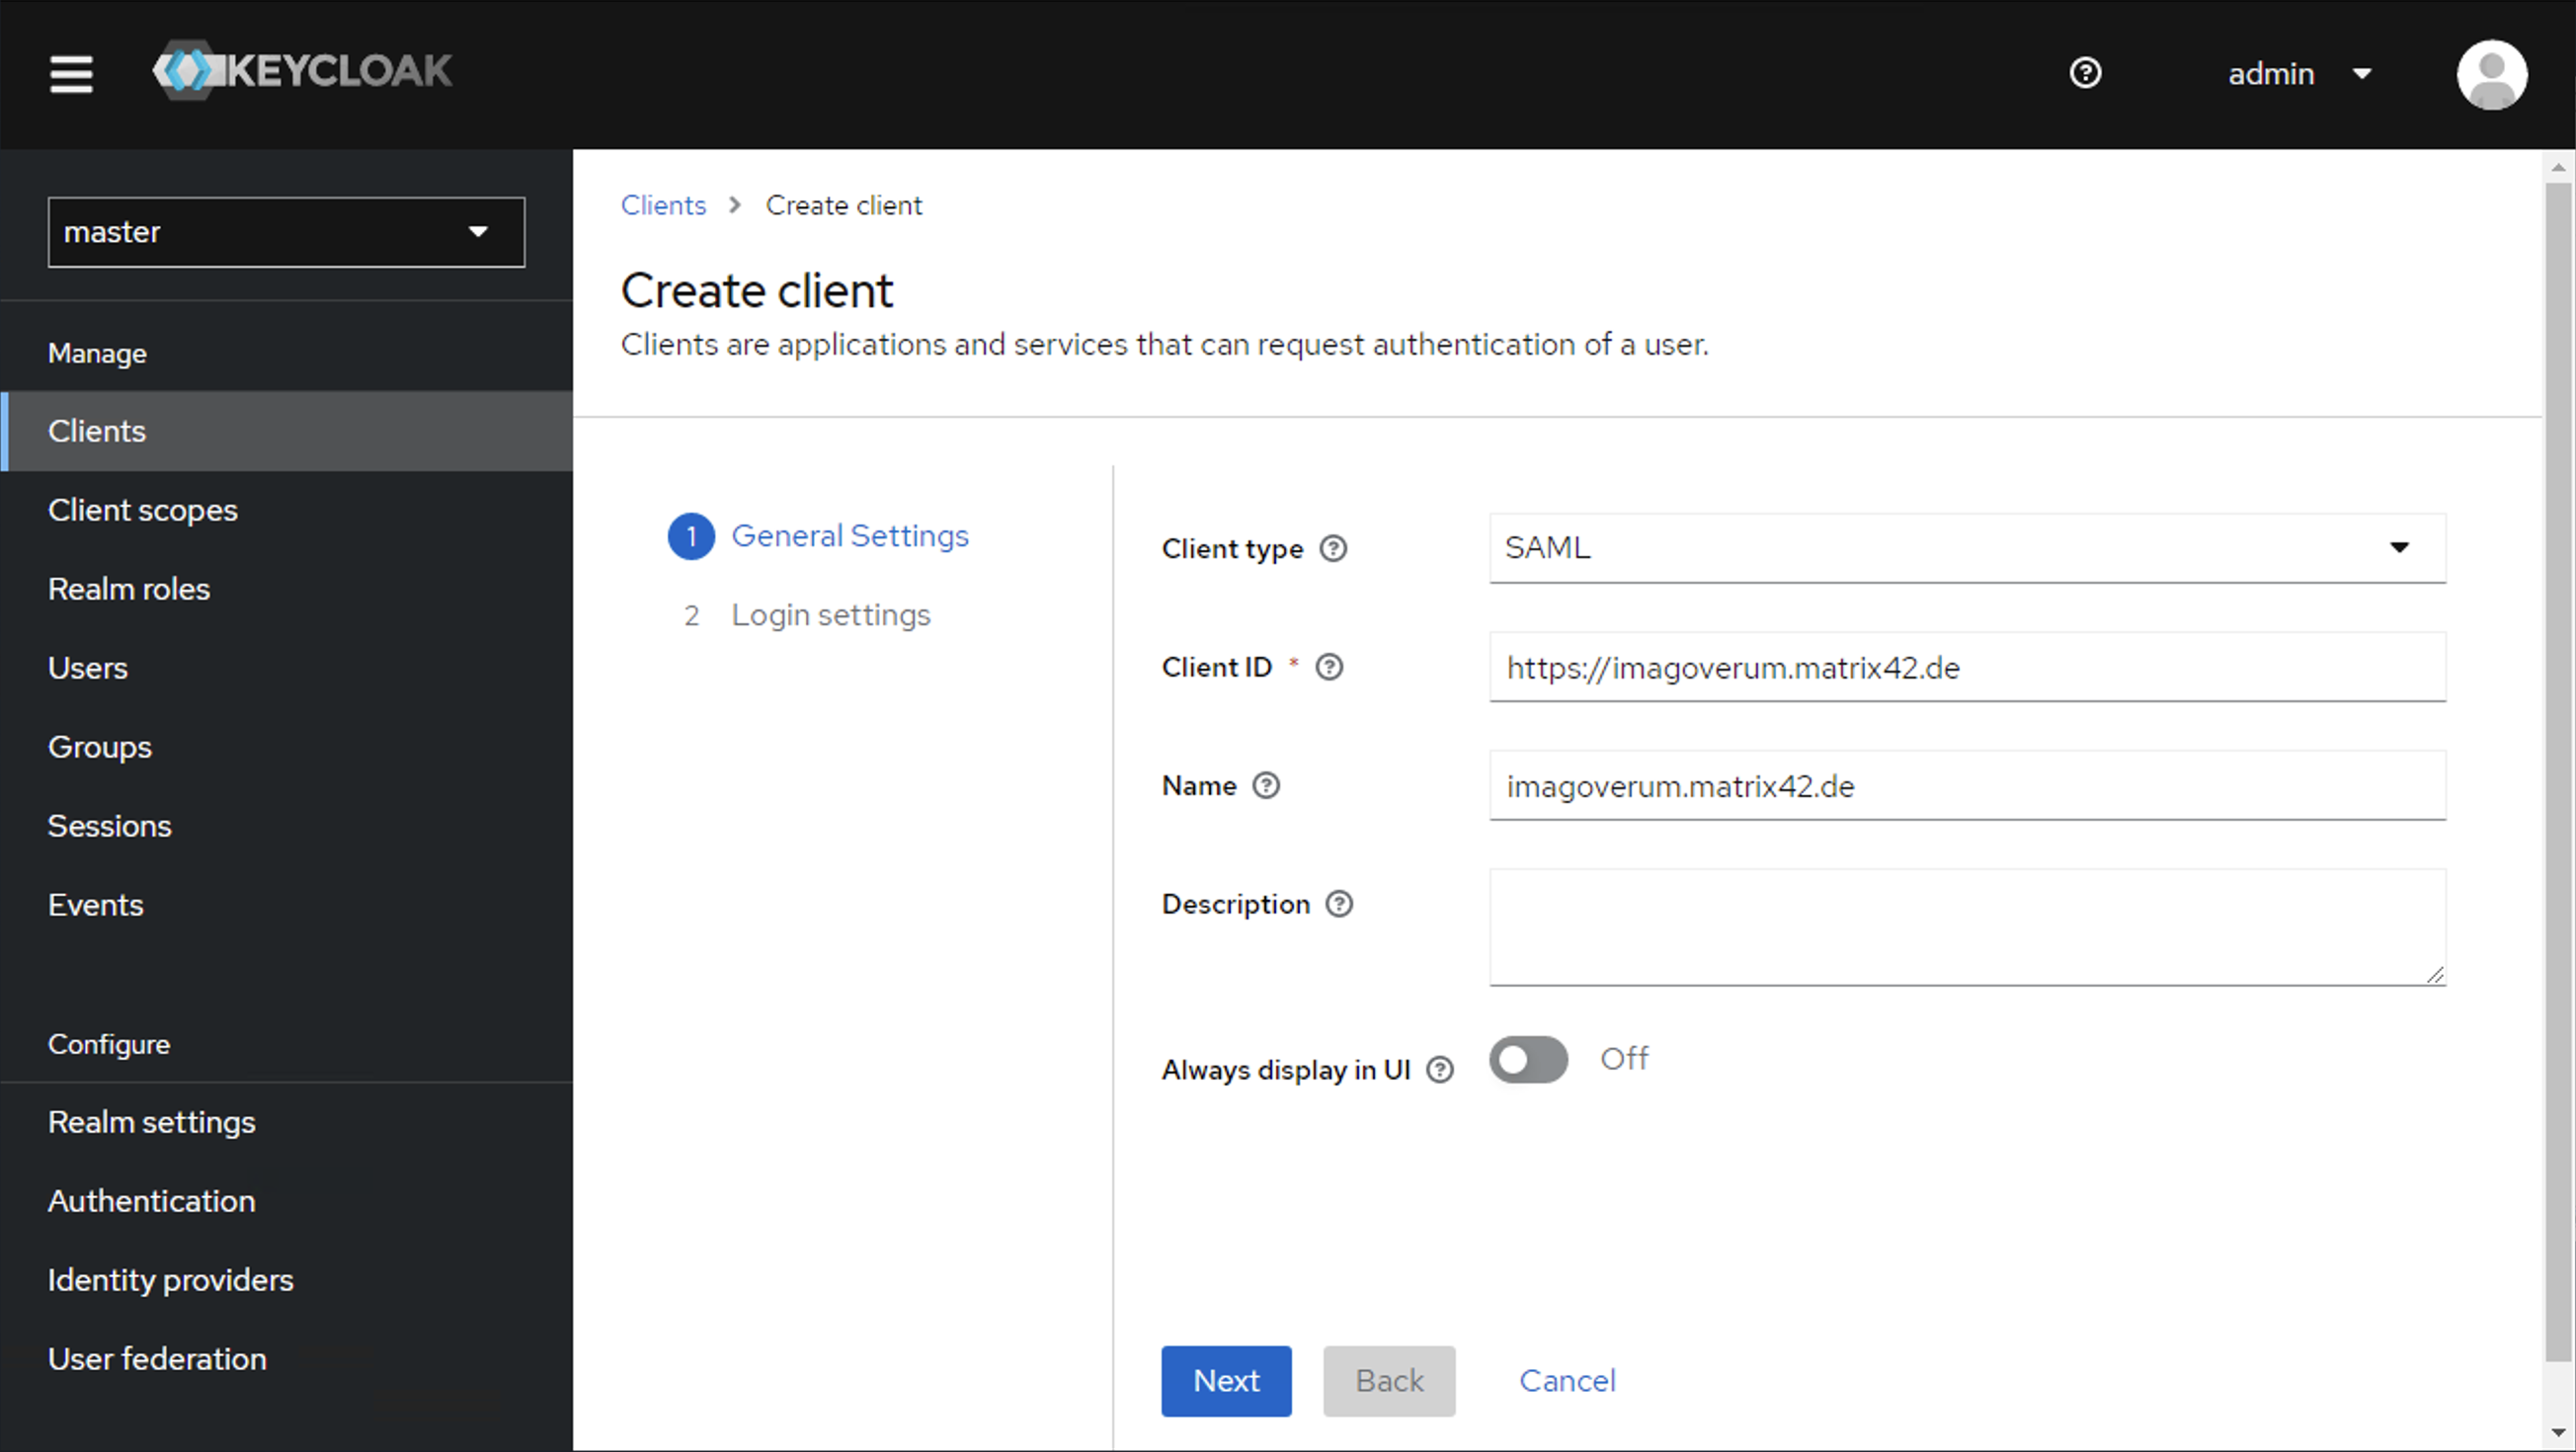
Click Next to proceed.
- From the Login settings area, you will need the following data for Keycloak IdP configuration in Matrix42:
- Root URL:
https://<discoveryHostName> - Home URL:
https://<discoveryHostName>/wm/ - Valid redirect URIs: modify and add both of the following examples
https://<discoveryHostName>.matrix42.de/m42services/authorize/loginhttps://<discoveryHostName>matrix42.de/wm/externalAuth/exchange
- Valid post logout redirect URIs:
https://<discoveryHostName>.matrix42.de/m42services/authorize/logout
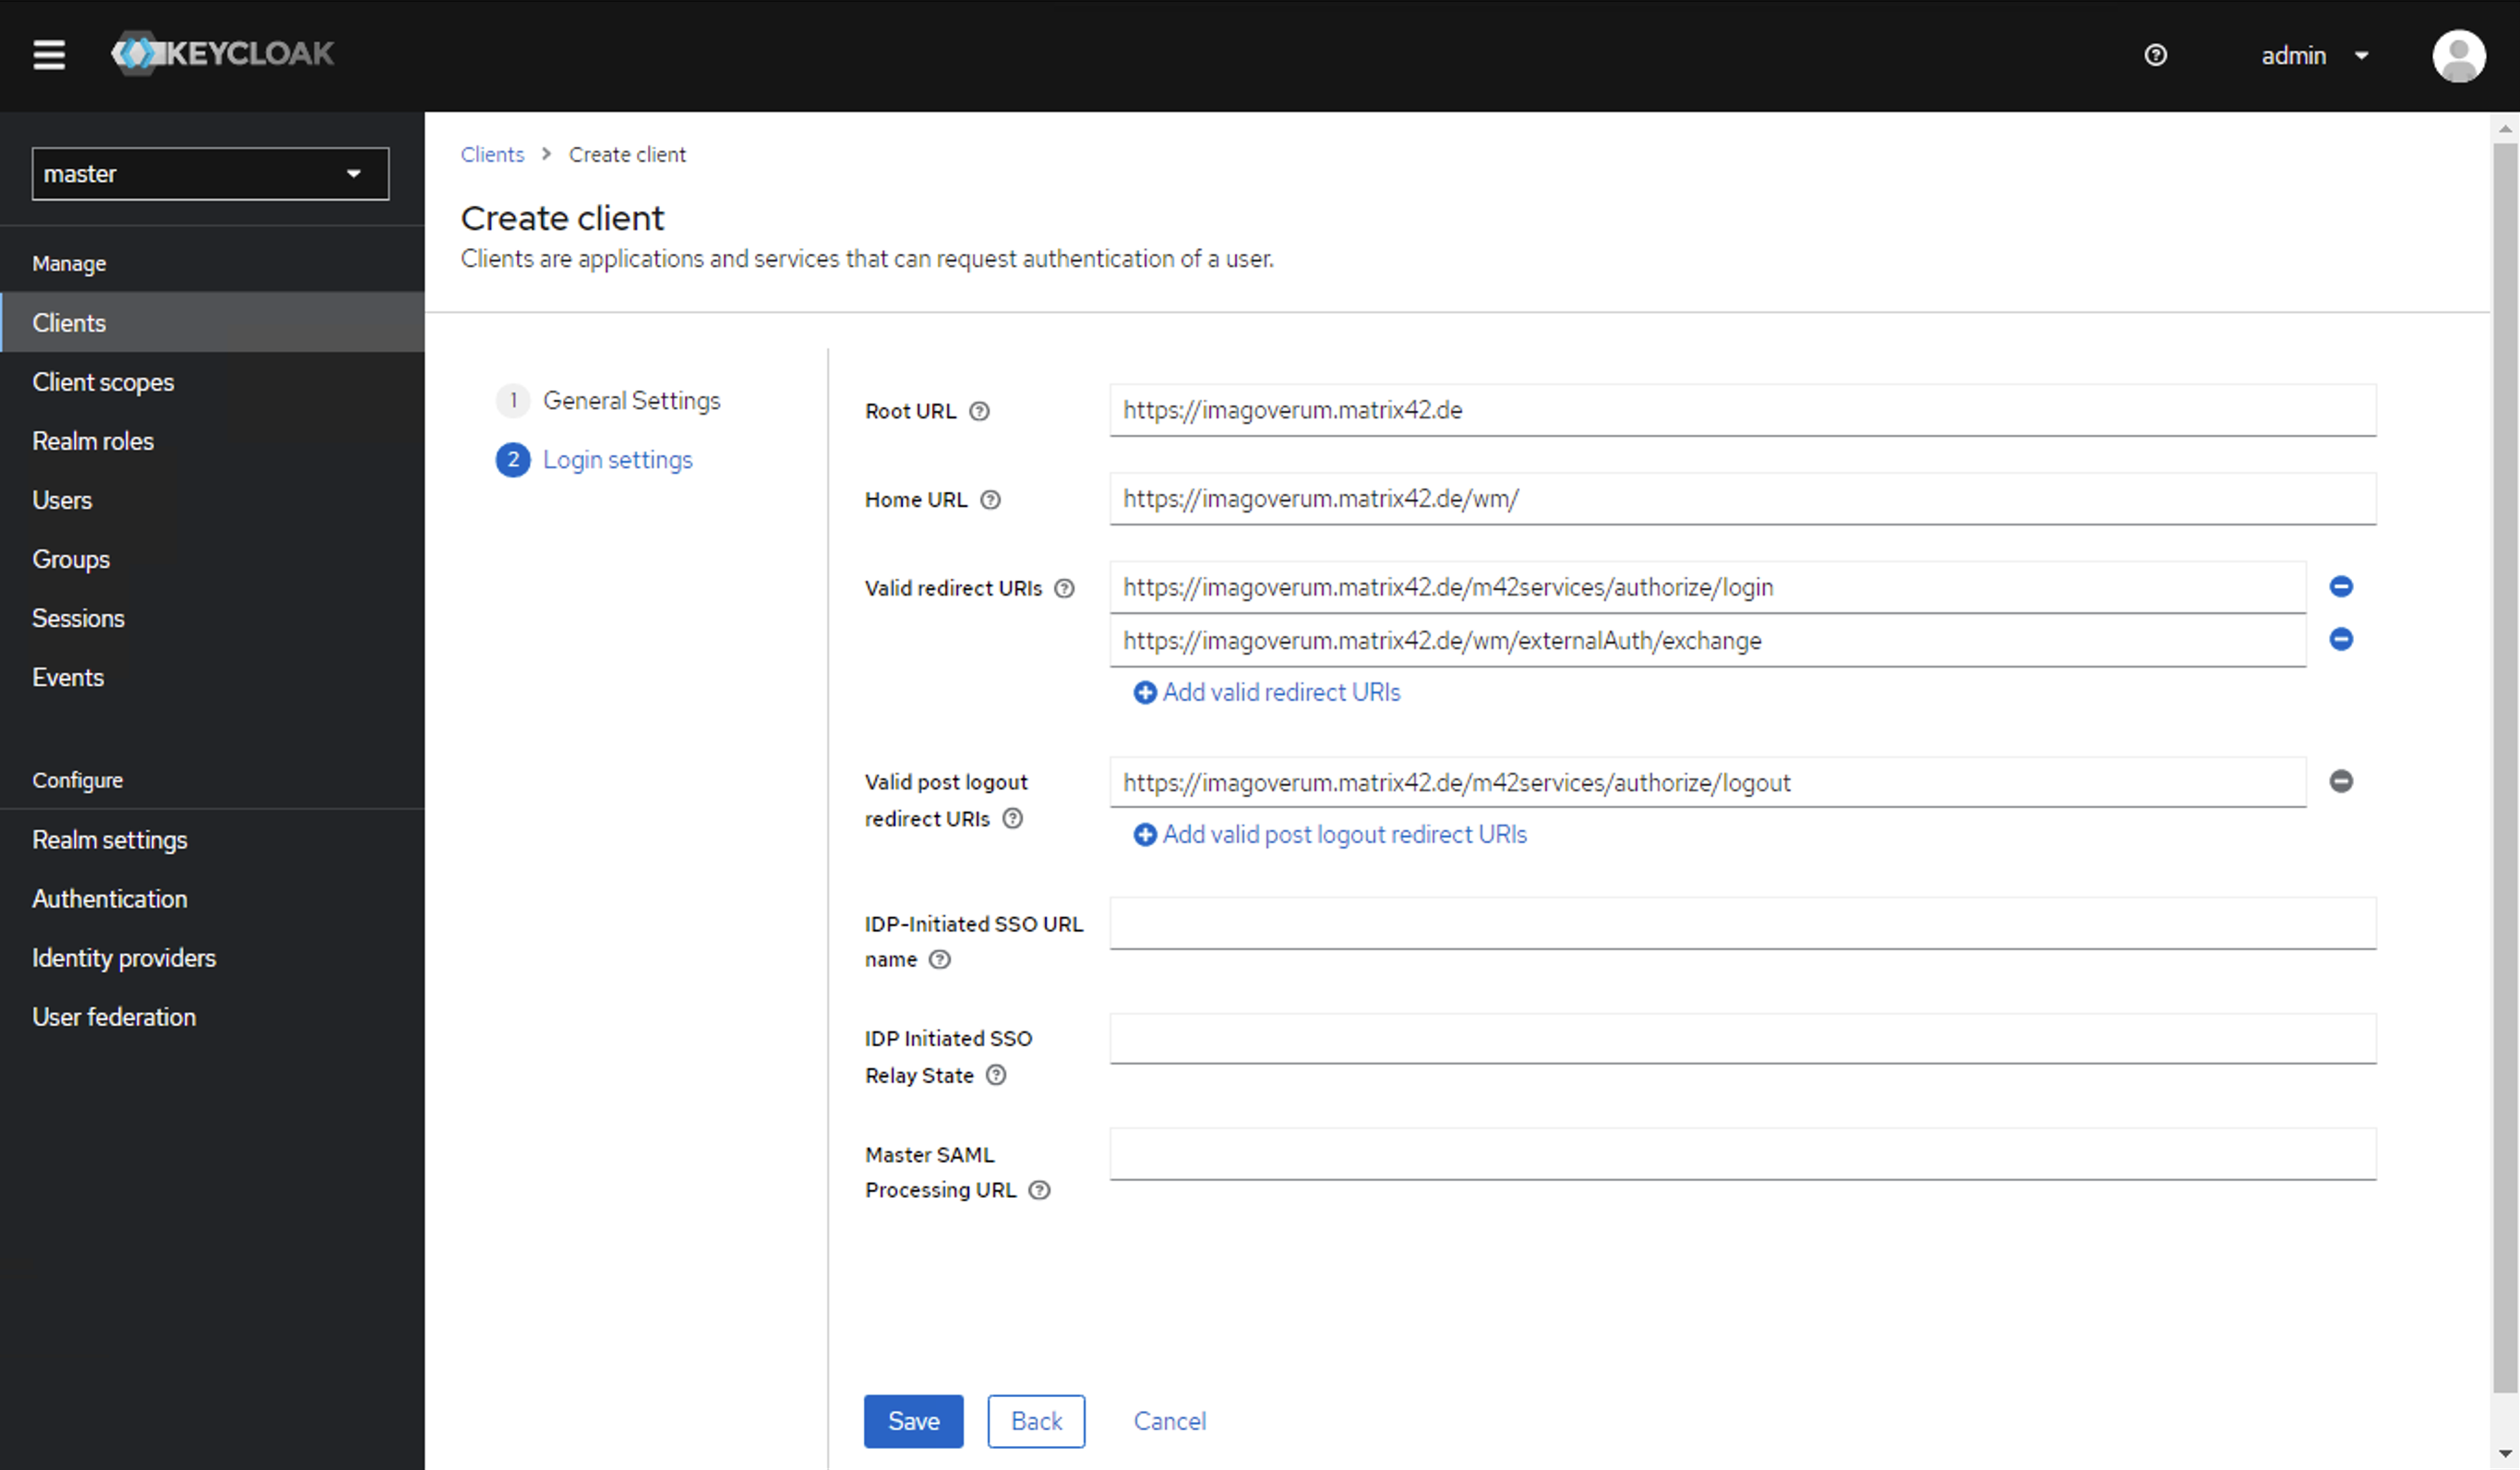
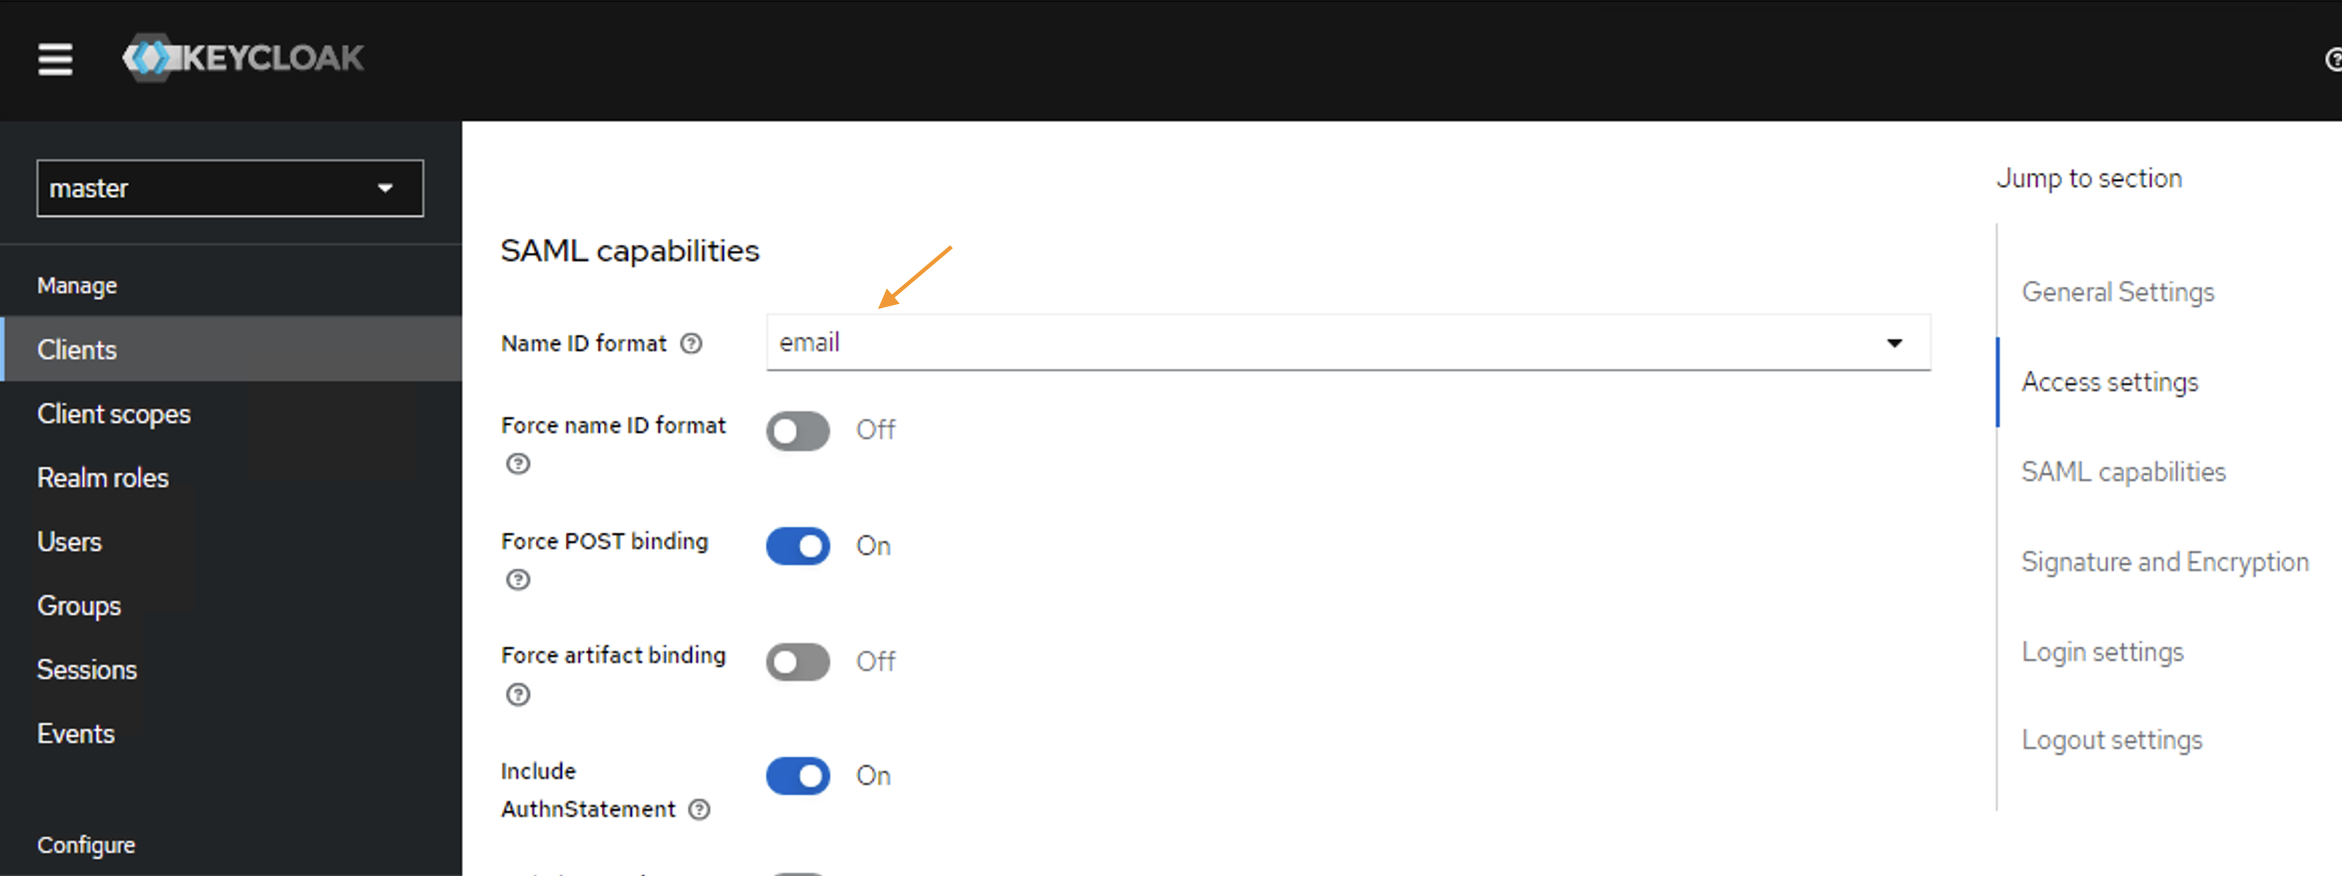
Click Save to create the Client.
Right after you will be redirected to the Client Settings tab. - Scroll down to the SAML Capabilities section and set the Name ID format to email:
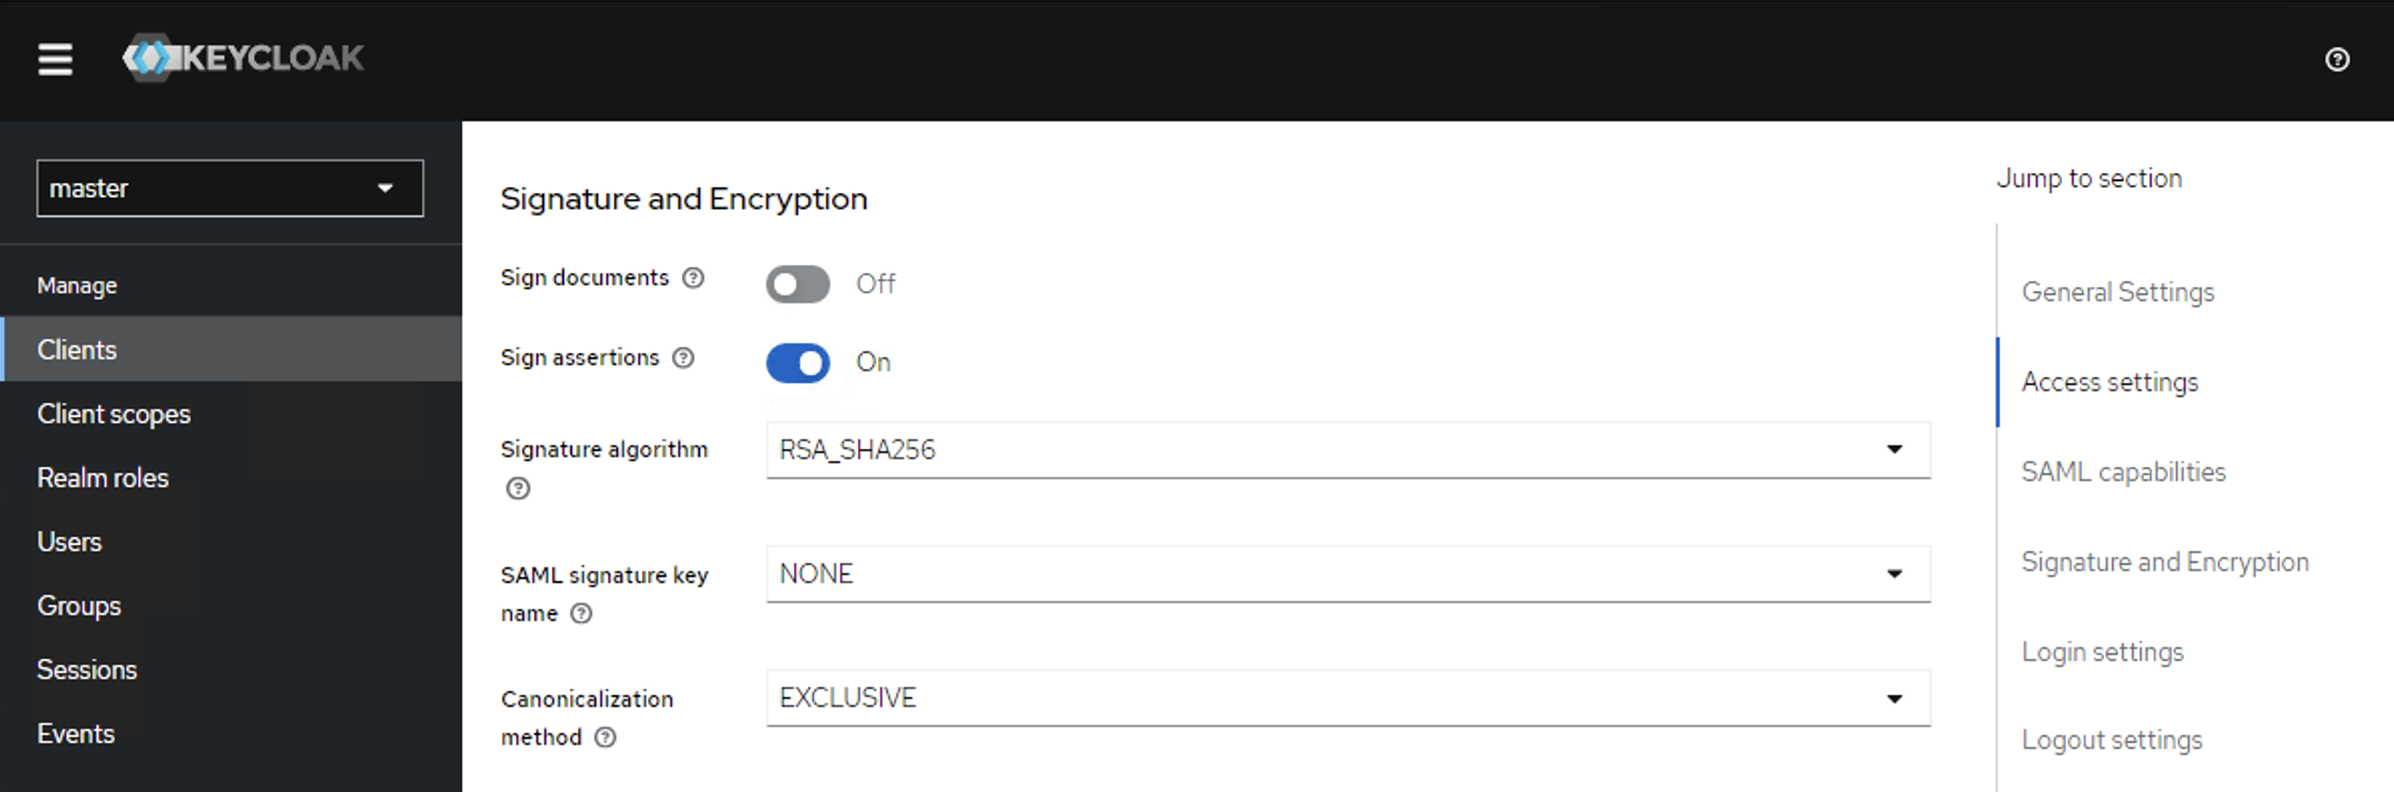
- Below on this page, in the Signature and Encryption section set:
- Sign documents: Off
- Sign assertions: On
- Root URL:
- Proceed to the Realm Settings → General → SAML 2.0 Identity Provider Metadata:
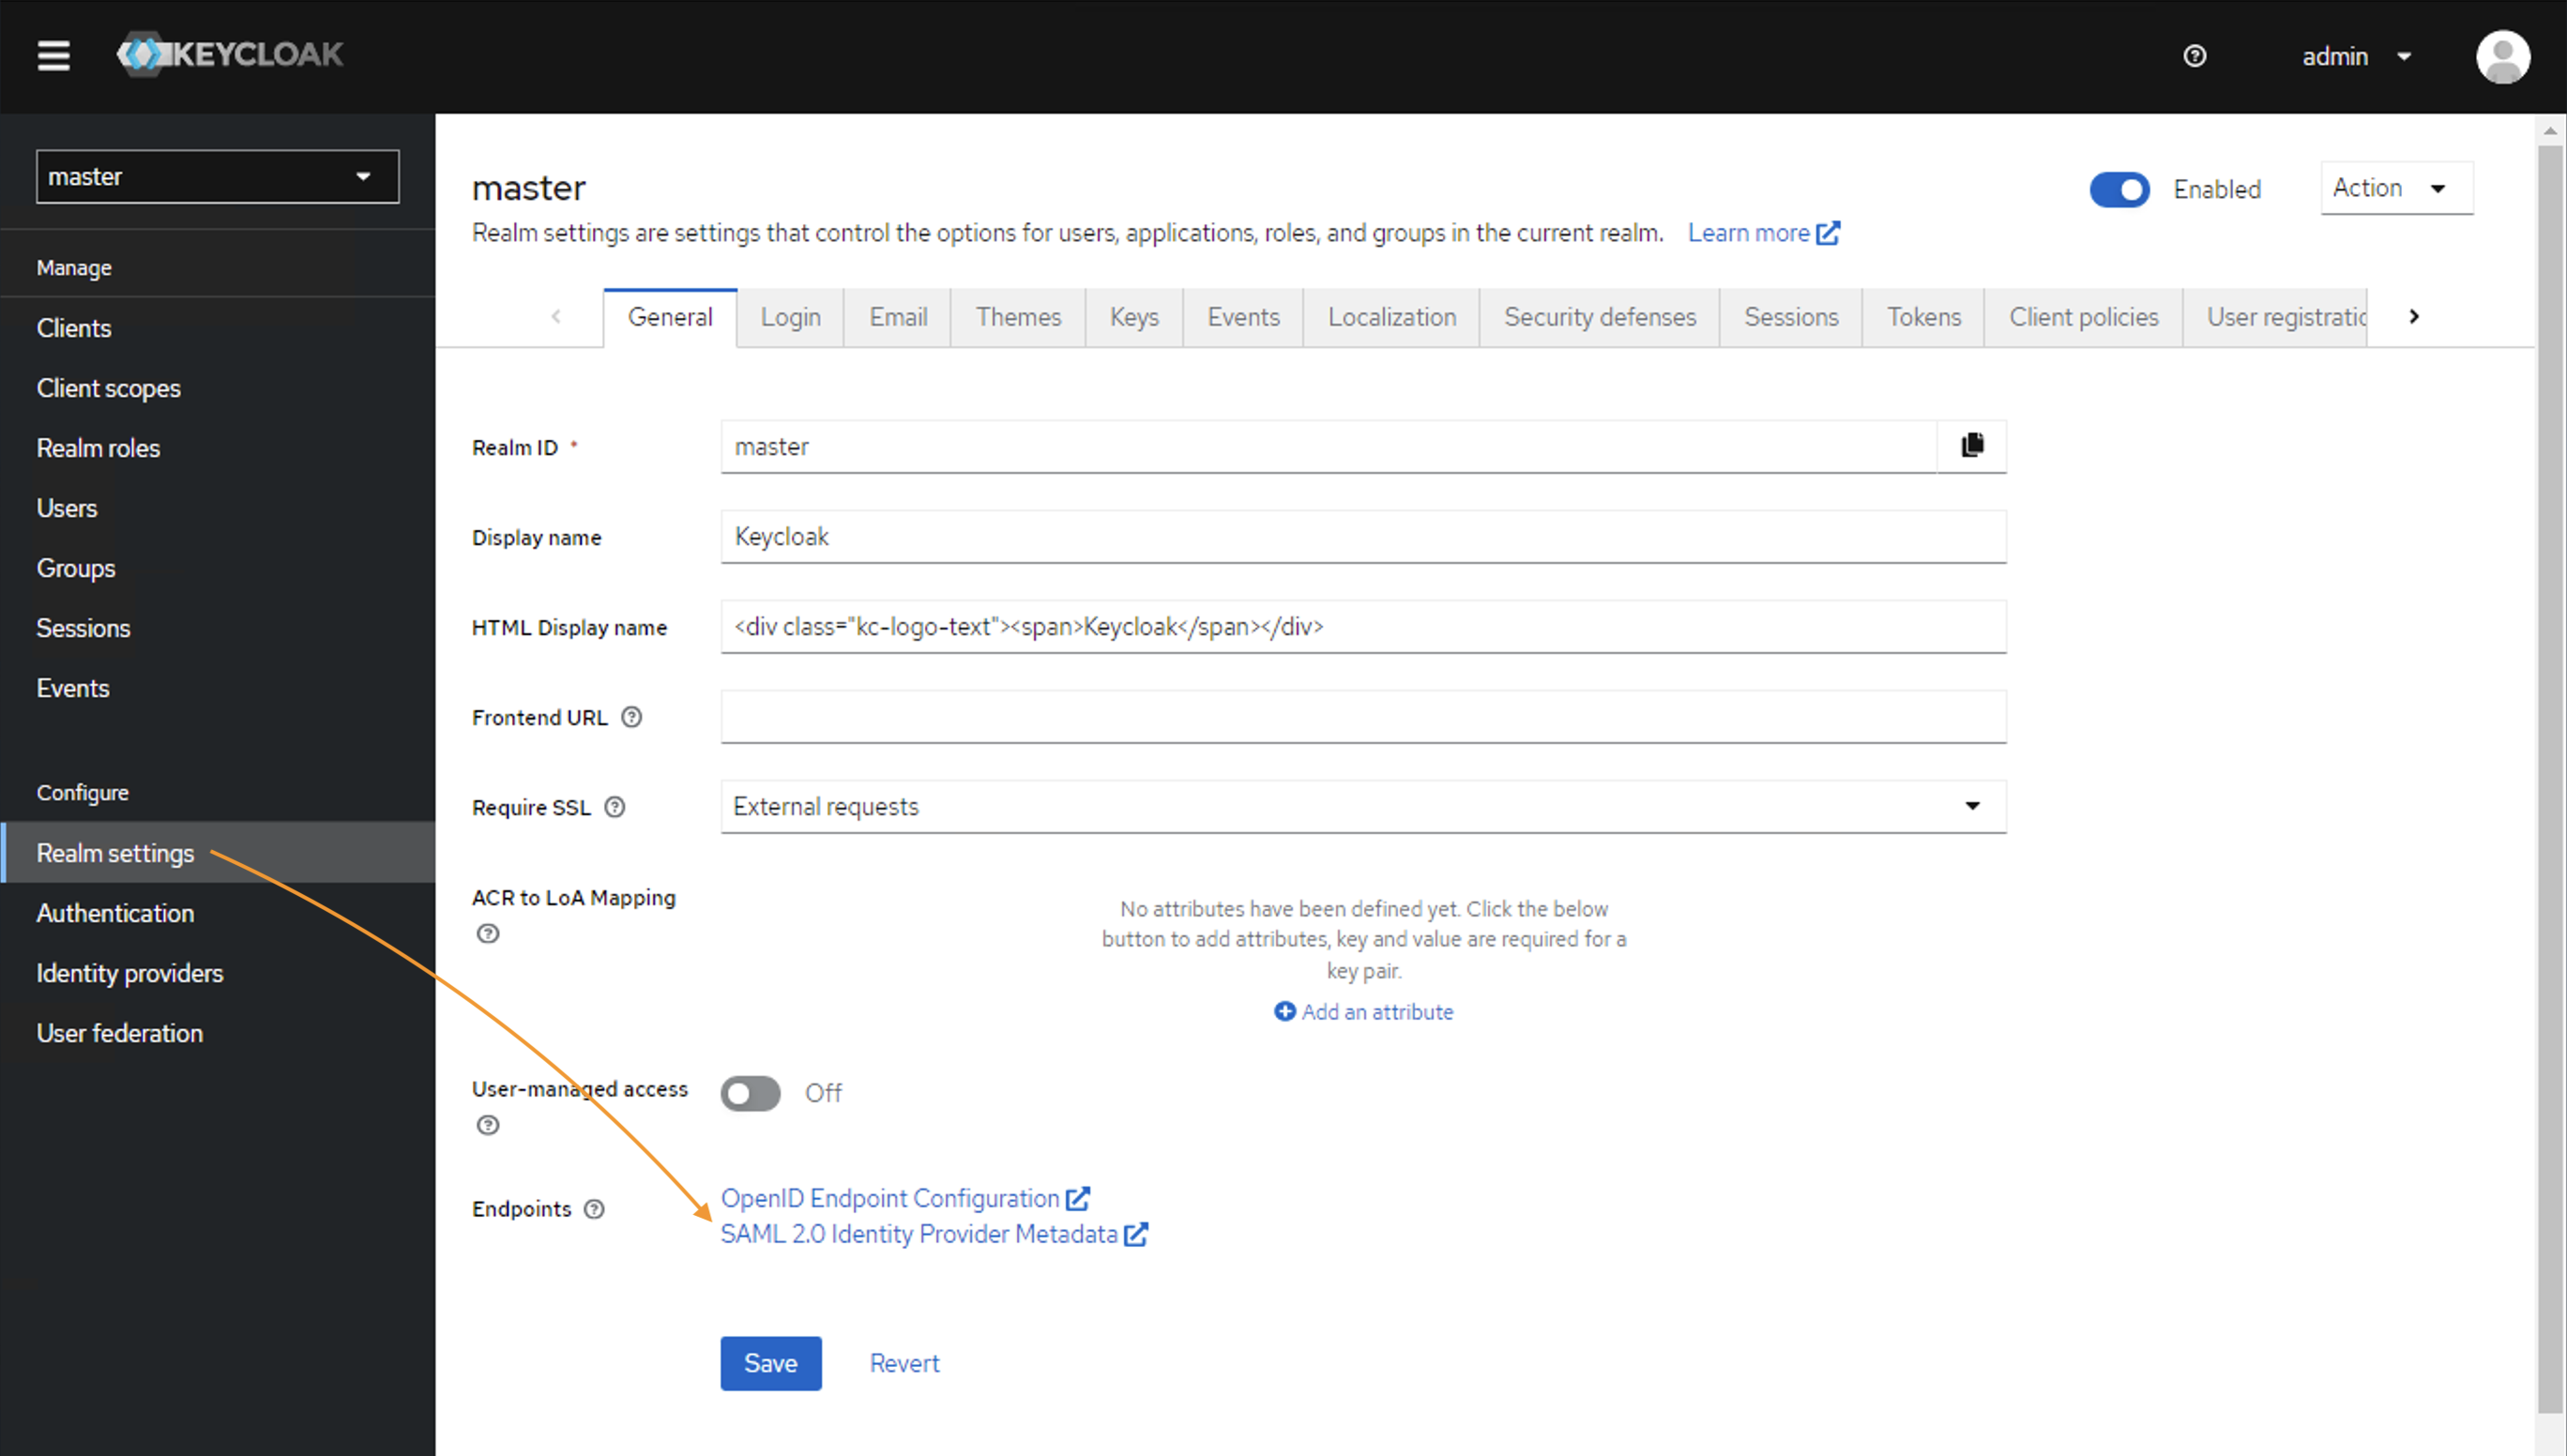
You will need this data from this step for Keycloak IdP configuration in Matrix42.
Configuring Keycloak in Matrix42
For Keycloak integration, open Administration application → Settings → Secure Token Service.
- Set the SAML2 enabled checkbox
- Provide the SAML2 Login Button Title
- Service Provider Issuer Name is the same as set in the Keycloak Client ID. Make sure that these values are identical.
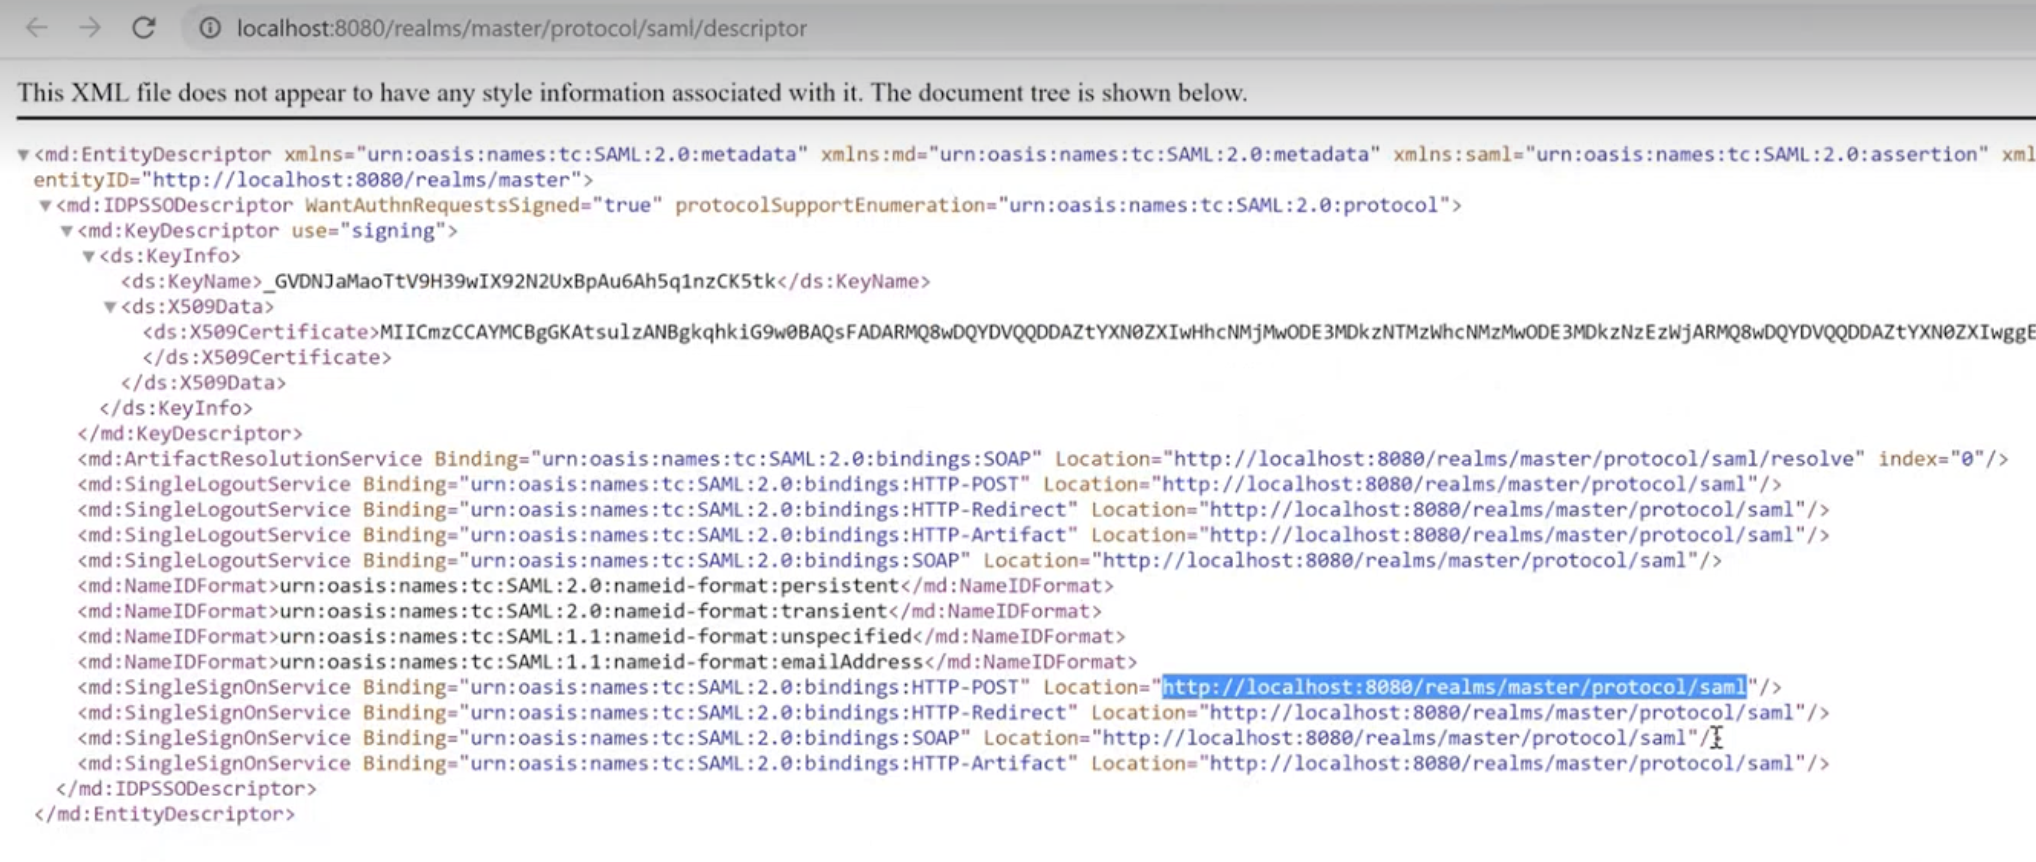
- Fill out the fields with the necessary credentials from the Keycloak Client Realm settings → SAML 2.0 Identity Provider Metadata:
| Matrix42 settings & corresponding fields | SAML 2.0 Identity Provider Metadata |
| Single Sign-on URI Endpoint |
Use the same value for both fields from the
|
| Single Sign-out URI Endpoint | |
| Identity Provider Certificate | Value from the <ds:X509Certificate> in the SAML 2.0 Identity Provider Metadata file |
5. Set SAML2 Name Id Policy according to the Keycloak Client settings (see Name ID format configuration in the SAML Capabilities section), in this configuration it is EmailAddress.
6. Enable the Sign Saml2 "Login" request property:
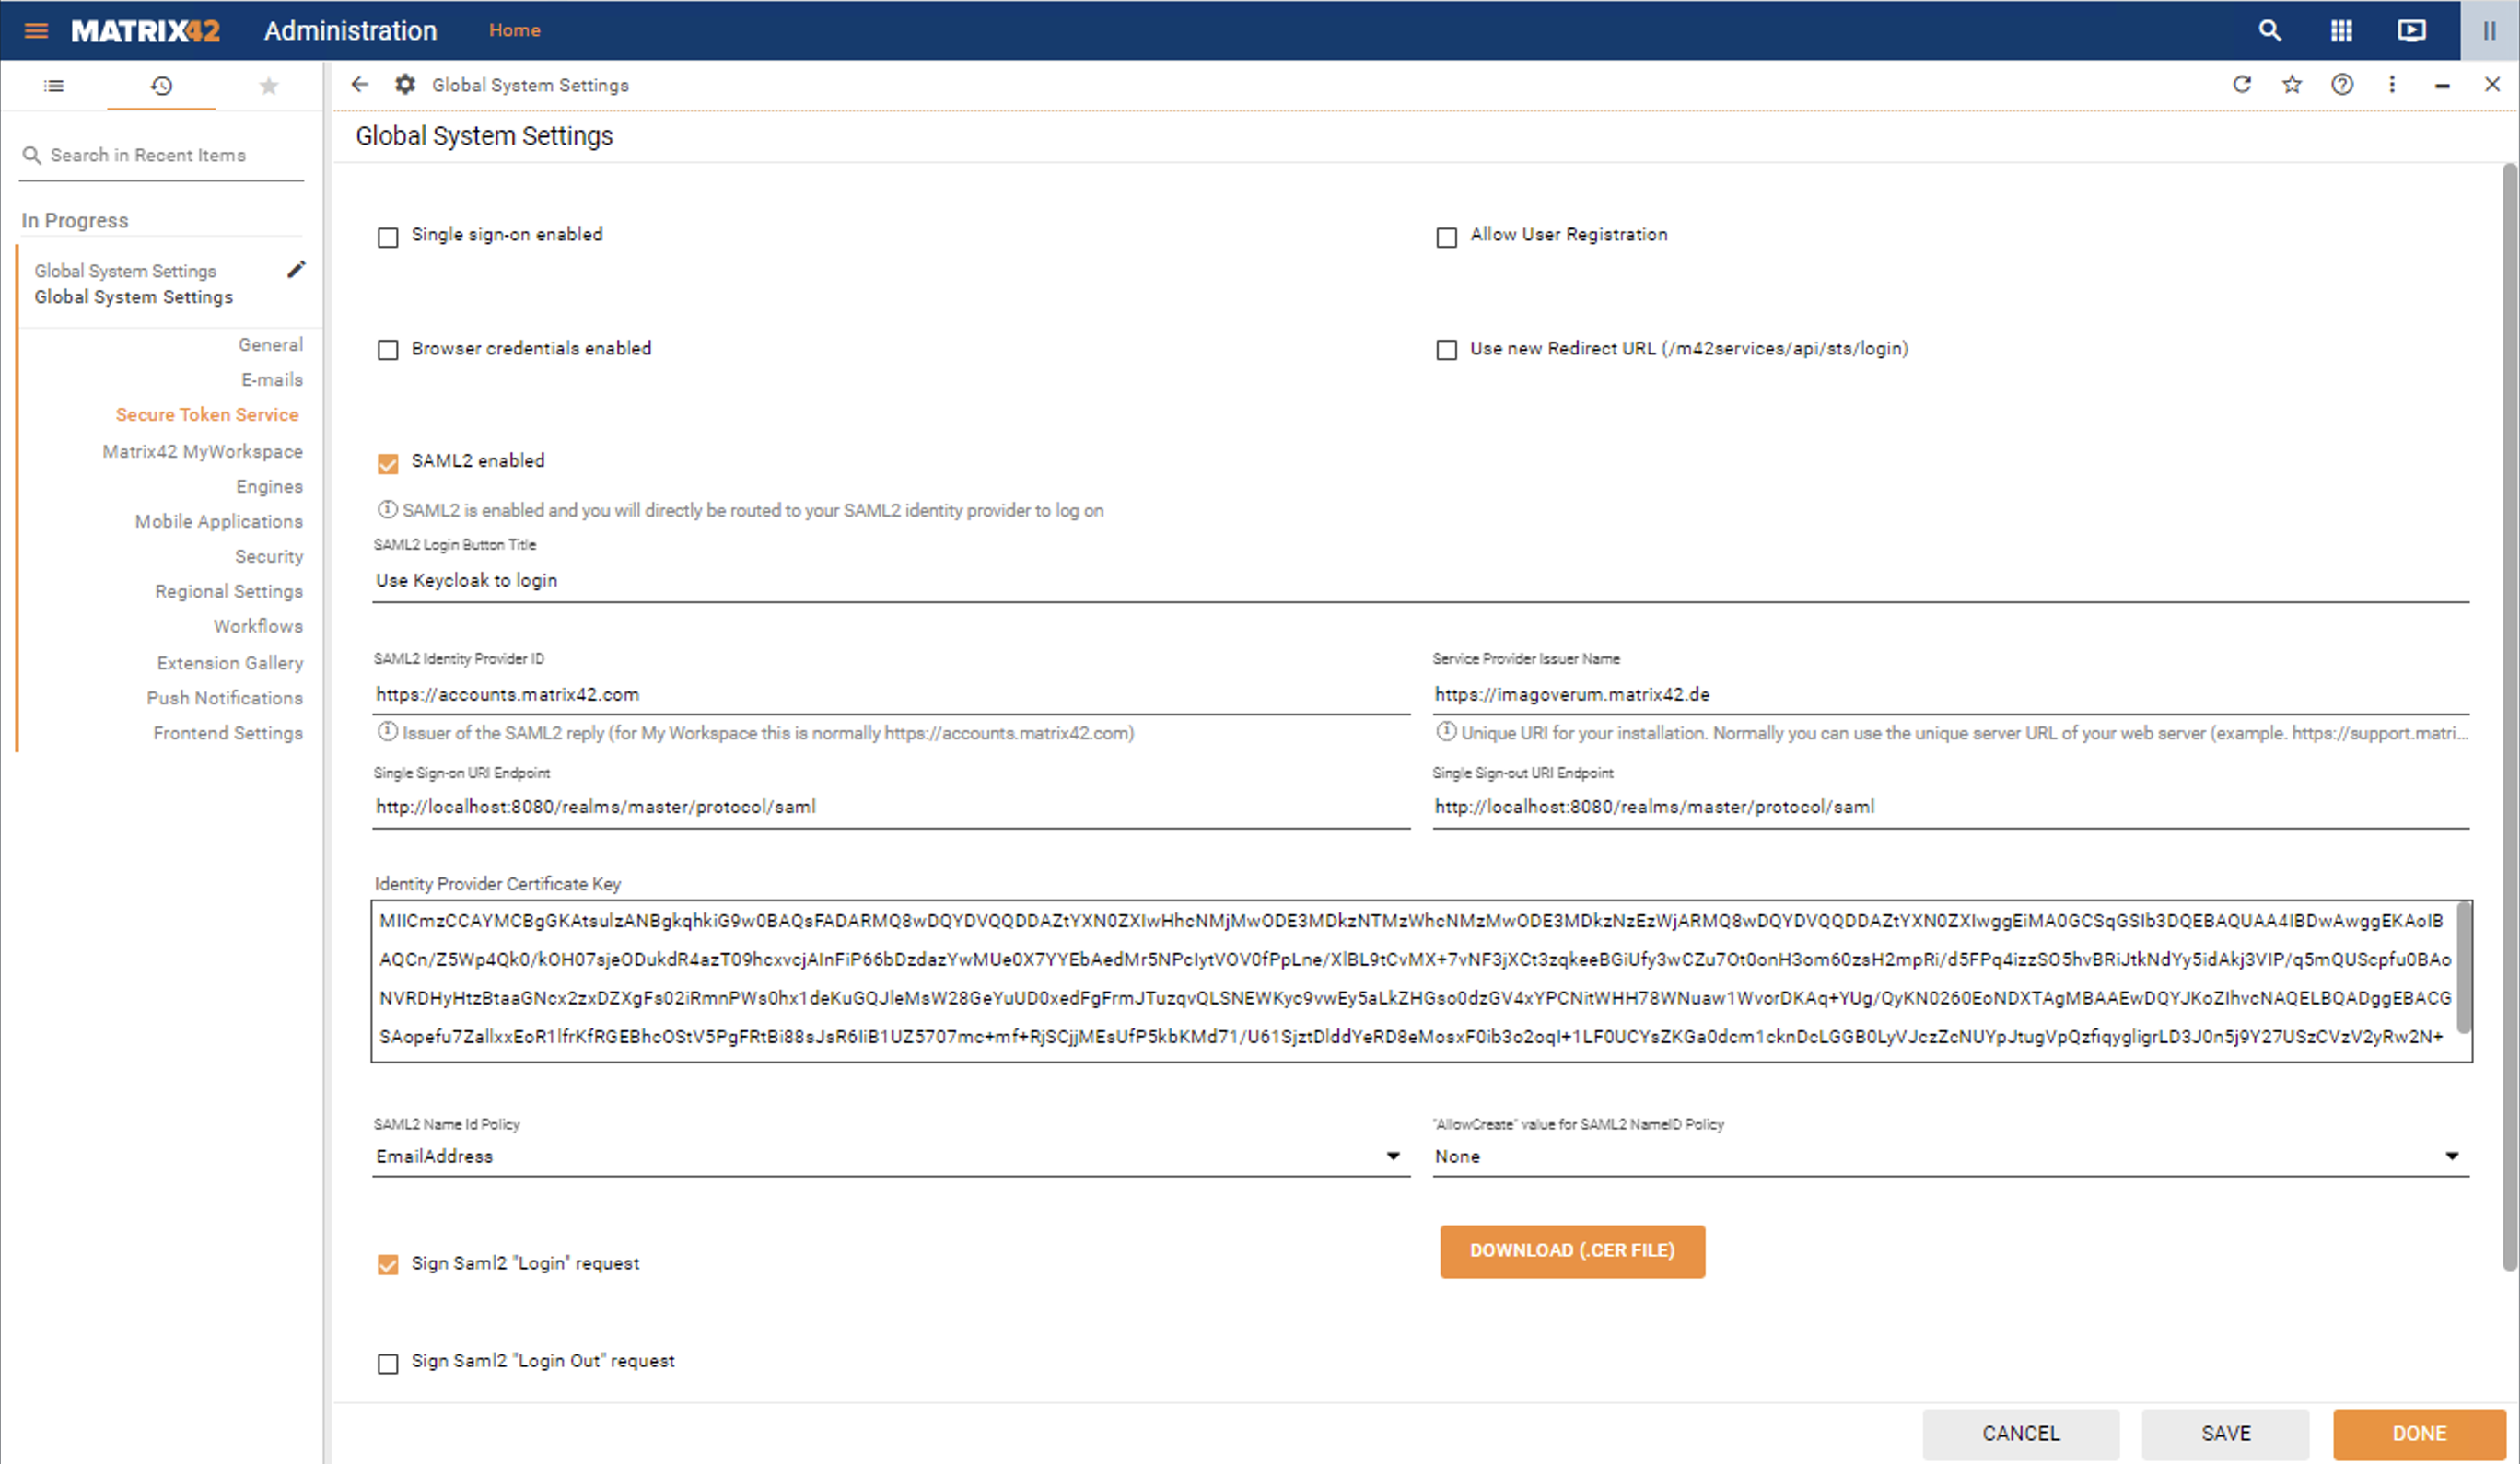
7. Click on the Download (.CER file) button and click Done to apply changes.
Go back to the Keycloak Client configuration.
Import certificate to the Keycloak Client
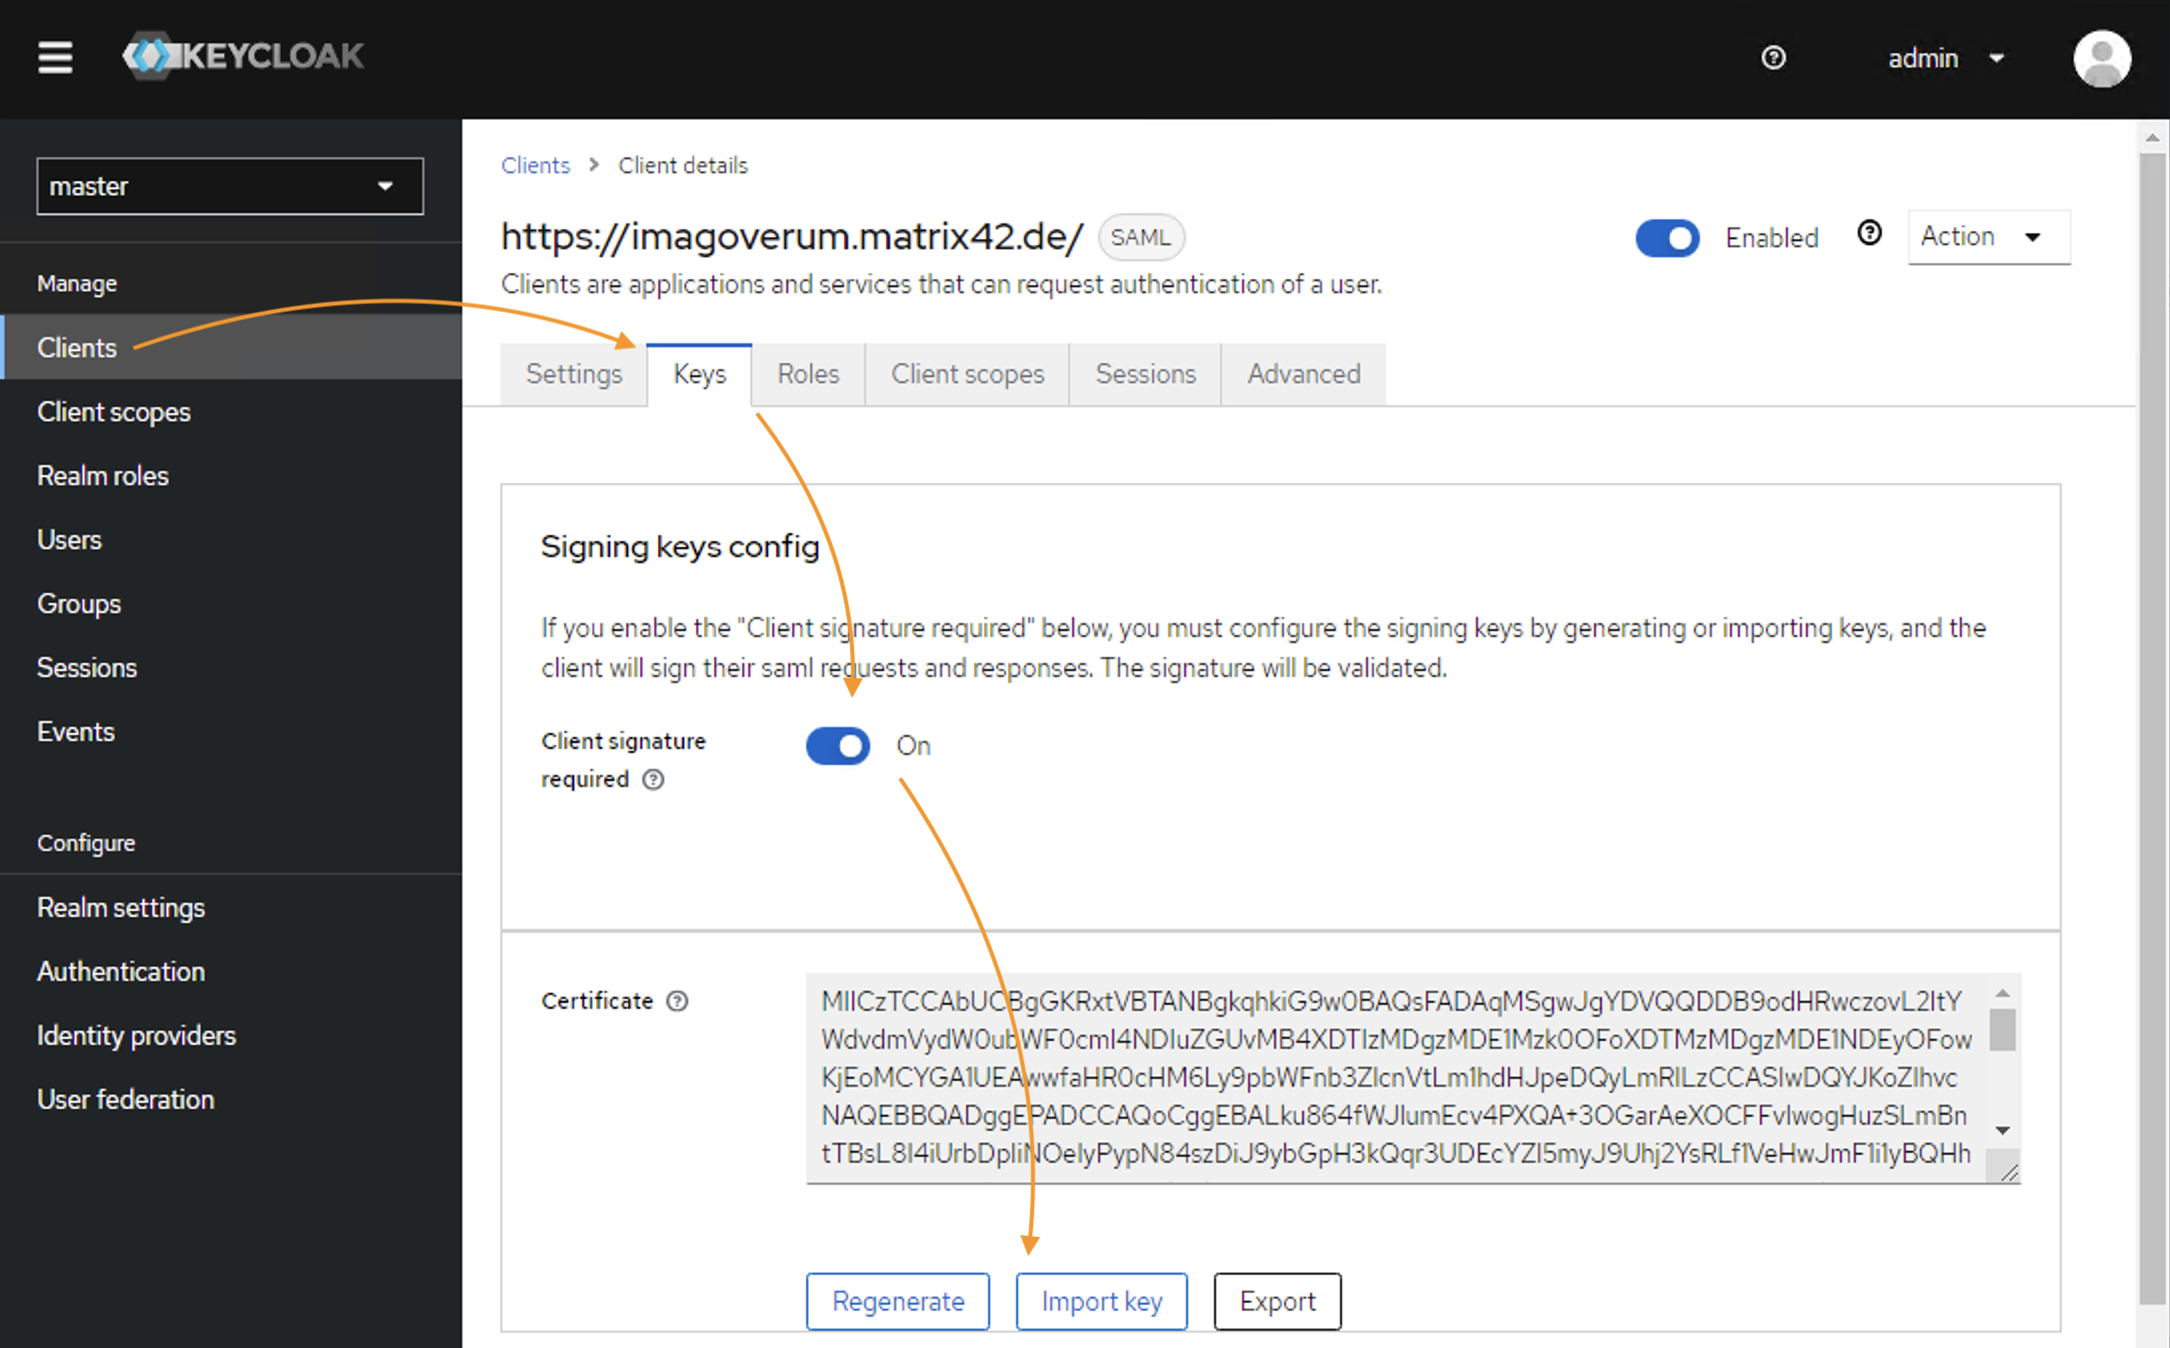
Go back to the Keycloak administrator interface and select Clients → click on the Client ID that is used for integration with Matrix42 → go to the Keys tab.
- In the Signing keys config section, set Client signature required to On;
- Certificate: click the Import Key option
- In the Import key window,
- Archive format: select Certificate PEM, according to the Matrix42 downloaded certificate extension;
- Import file: click Browse and upload the certificate previously downloaded from the Matrix42 SAML2 configuration page
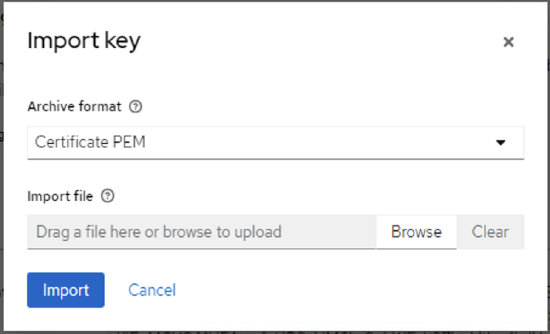
- Click Import
- Go to the Settings tab and click Save.
The integration is completed.
Useful links:
The example describes how the Google Identity Provider can be configured for authentication.
Configure Matrix42 App on Google side
Go to Google Admin console and create a new application for Matrix42 website:
- In the Admin interface, select Apps → SAML Apps → Add new → Setup my own custom App;
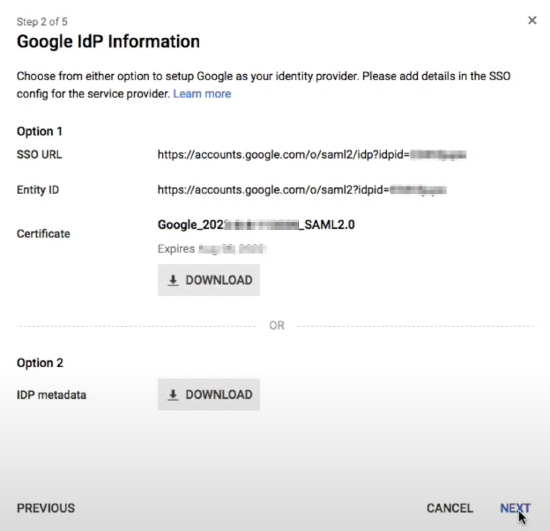
- You will need the following data from this step for Google IdP configuration in Matrix42:
- SSO URL: use this value for Single Sign-on URI Enpoint field in Matrix42 Secure Token Service configuration;
- Entity ID: use this value for SAML2 Identity Provider ID field;
- Certificate: use the key value from the downloaded file for Identity Provider Certificate field;
- Provide basic information for your Custom App: Application Name, optional Description, and upload logo;
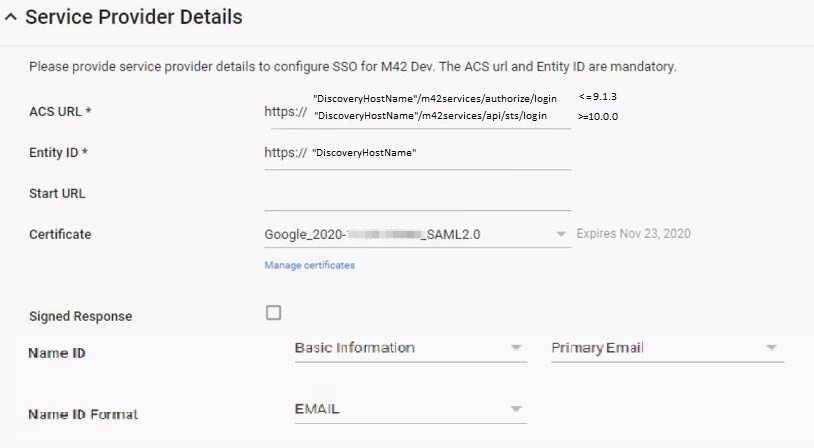
- Specify the Service Provider Details:
- ACS URL value depends on your Matrix42 version. For more details, see ACS URL value section of this page.
- Entity ID:
https://<discoveryHostName>
You can find your discoveryHostName value in the SPS.config file.
Save the App settings and proceed to Matrix42 configuration.
Configuring Google IdP in Matrix42
For Google integration, open Administration application → Settings → Secure Token Service.
Set the SAML2 enabled checkbox and fill out the fields with necessary credentials from the second step of the Google IdP configuration:
| Matrix42 settings & corresponding fields | Google IdP SAML Apps settings |
| Single Sign-on URI Endpoint | SSO URL |
| SAML2 Identity Provider ID | Entity ID |
| Identity Provider Certificate | Certificate file |
If the Single Sign-out URI Endpoint is not defined, please set the "Disable logout from SAML2 provider" checkbox.