Migration to EgoSecure Data Protection SaaS
|
ID: 19080701
Languages: EN, DE
Components: EgoSecure Console, EgoSecure Agents
Operating system: Windows
|
Migrating to EgoSecure Data Protection SaaS
You have the option to migrate from the on-premise EgoSecure Data Protection solution to the cloud-based EgoSecure Data Protection SaaS solution. In order to do integrate your existing configuration into the EgoSecure Data Protection SaaS environment, first you need to export your existing database so that Matrix42 ccan import your data. Afterwards you assign the new server to the Agents via the EgoSecure Console.
Be aware that the Supervisor account in your existing EgoSecure configuration will no longer be available after migration! To ensure access to EgoSecure after migration, create the required Super Administrator accounts for your company's administrators under Administration | Super Administrator - Tools | Administrators & scopes.
As an alternative to migration, the Matrix42 AG offers a new configuration of EgoSecure Data Protection SaaS. This service can be booked via Remote Assistance Package. For further information ask your sales contact at Matrix42 AG or your Matrix42 partner.
Exporting the database using SQL Management Studio
- In Microsoft SQL Server Management Studio, in in the Object Explorer, right-click your database and select Tasks | Generate Scripts...
⇒ The dialog Generate and publish scripts opens. - Click Next.
- Ensure that the option Script entire database and all database objects is active, and click Next.
- Under File name, click the button to specify the location to which to export the database.
- Click Advanced.
⇒ The dialog Advanced Scripting Options opens. - Make the following settings:
- Under Script for Server Version, select the correct version of your server.
- Set Script Triggers, Script Indexes and Script Primary Keys to True.
- Set Types of data to script to Schema and Data.
- Click OK to close the dialog. Click Next until the dialog Save or Publish Scripts appears.
⇒ The SQL script of your database is generated in the specified location. - Click Finish.
- Send the generated SQL script of your database to Matrix42 AG support staff.
⇒ Matrix42 AG imports your database to your new EgoSecure Data Protection SaaS environment so that you can keep your current EgoSecure configuration. Matrix42 will perform any previously discussed changes to your configuration to ensure you can use EgoSecure Data Protection SaaS impeccably.
Not that any changes to the configuration as well as recordings during the process of database migration will not be stored in the database.
Assigning the new server via MSI package
- Import the Console certificate for the current Window user. Instructions
- Start the EgoSecure Management Console and select the Console certificate using the key icon in the field Server.
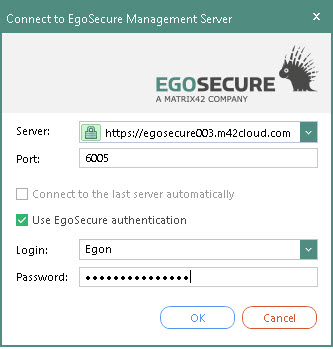
⇒ The lock icon in the Server field becomes green. - Enter the connection details of your new EgoSecure Data Protection SaaS server and connect to the Console.
- Under Installation | EgoSecure agents | Create MSI package, generate a new MSI package.
- Go to Administration | Clients | Client settings and under Globally defined settings | Polling, activate the option Enable polling mode.
- Under Computer management | Settings, select a computer from the directory service structure or Default rights (computer).
- Under Client settings tab, click Enable radio button to have agents always work in the polling mode,or select Auto to let polling mode be enabled automatically by the server if needed.
- Download the newly generated MSI package to your local system.
- Copy the MSI package to the MSI directory of your infrastructure's old server.
- Open your old EgoSecure Server's Console, and under Installation | EgoSecure agents | Install/Update, click Install/Update.
⇒ The old server distributes the new server's information to the clients. The clients are assigned to the new server.