Configuring Microsoft Entra ID / Microsoft 365 integration with ESMP: Advanced Settings
Overview
Matrix42 Enterprise Service Management Platform provides a simple way to configure Microsoft Entra ID / Microsoft 365 integration and extended login configuration.
The configuration consists of two parts that include the configuration of the Azure portal and a new Microsoft Entra ID / Microsoft 365 connection in your ESMP instance.
Start your integration with Configuring Microsoft Entra ID / Microsoft 365 integration with ESMP page and refer to this article for advanced settings.
Prerequisites
-
ESMP subscription is activated on your environment
-
You have Administrator access to ESMP and Azure Portal
-
Microsoft Entra ID exists
Azure Portal Configuration
This section shows how to add and register an application in Microsoft Azure Portal and configure authentication. The configuration must be made with at least Application Administrator role. More details about the built-in Microsoft Entra ID roles you can find here.
New application configuration
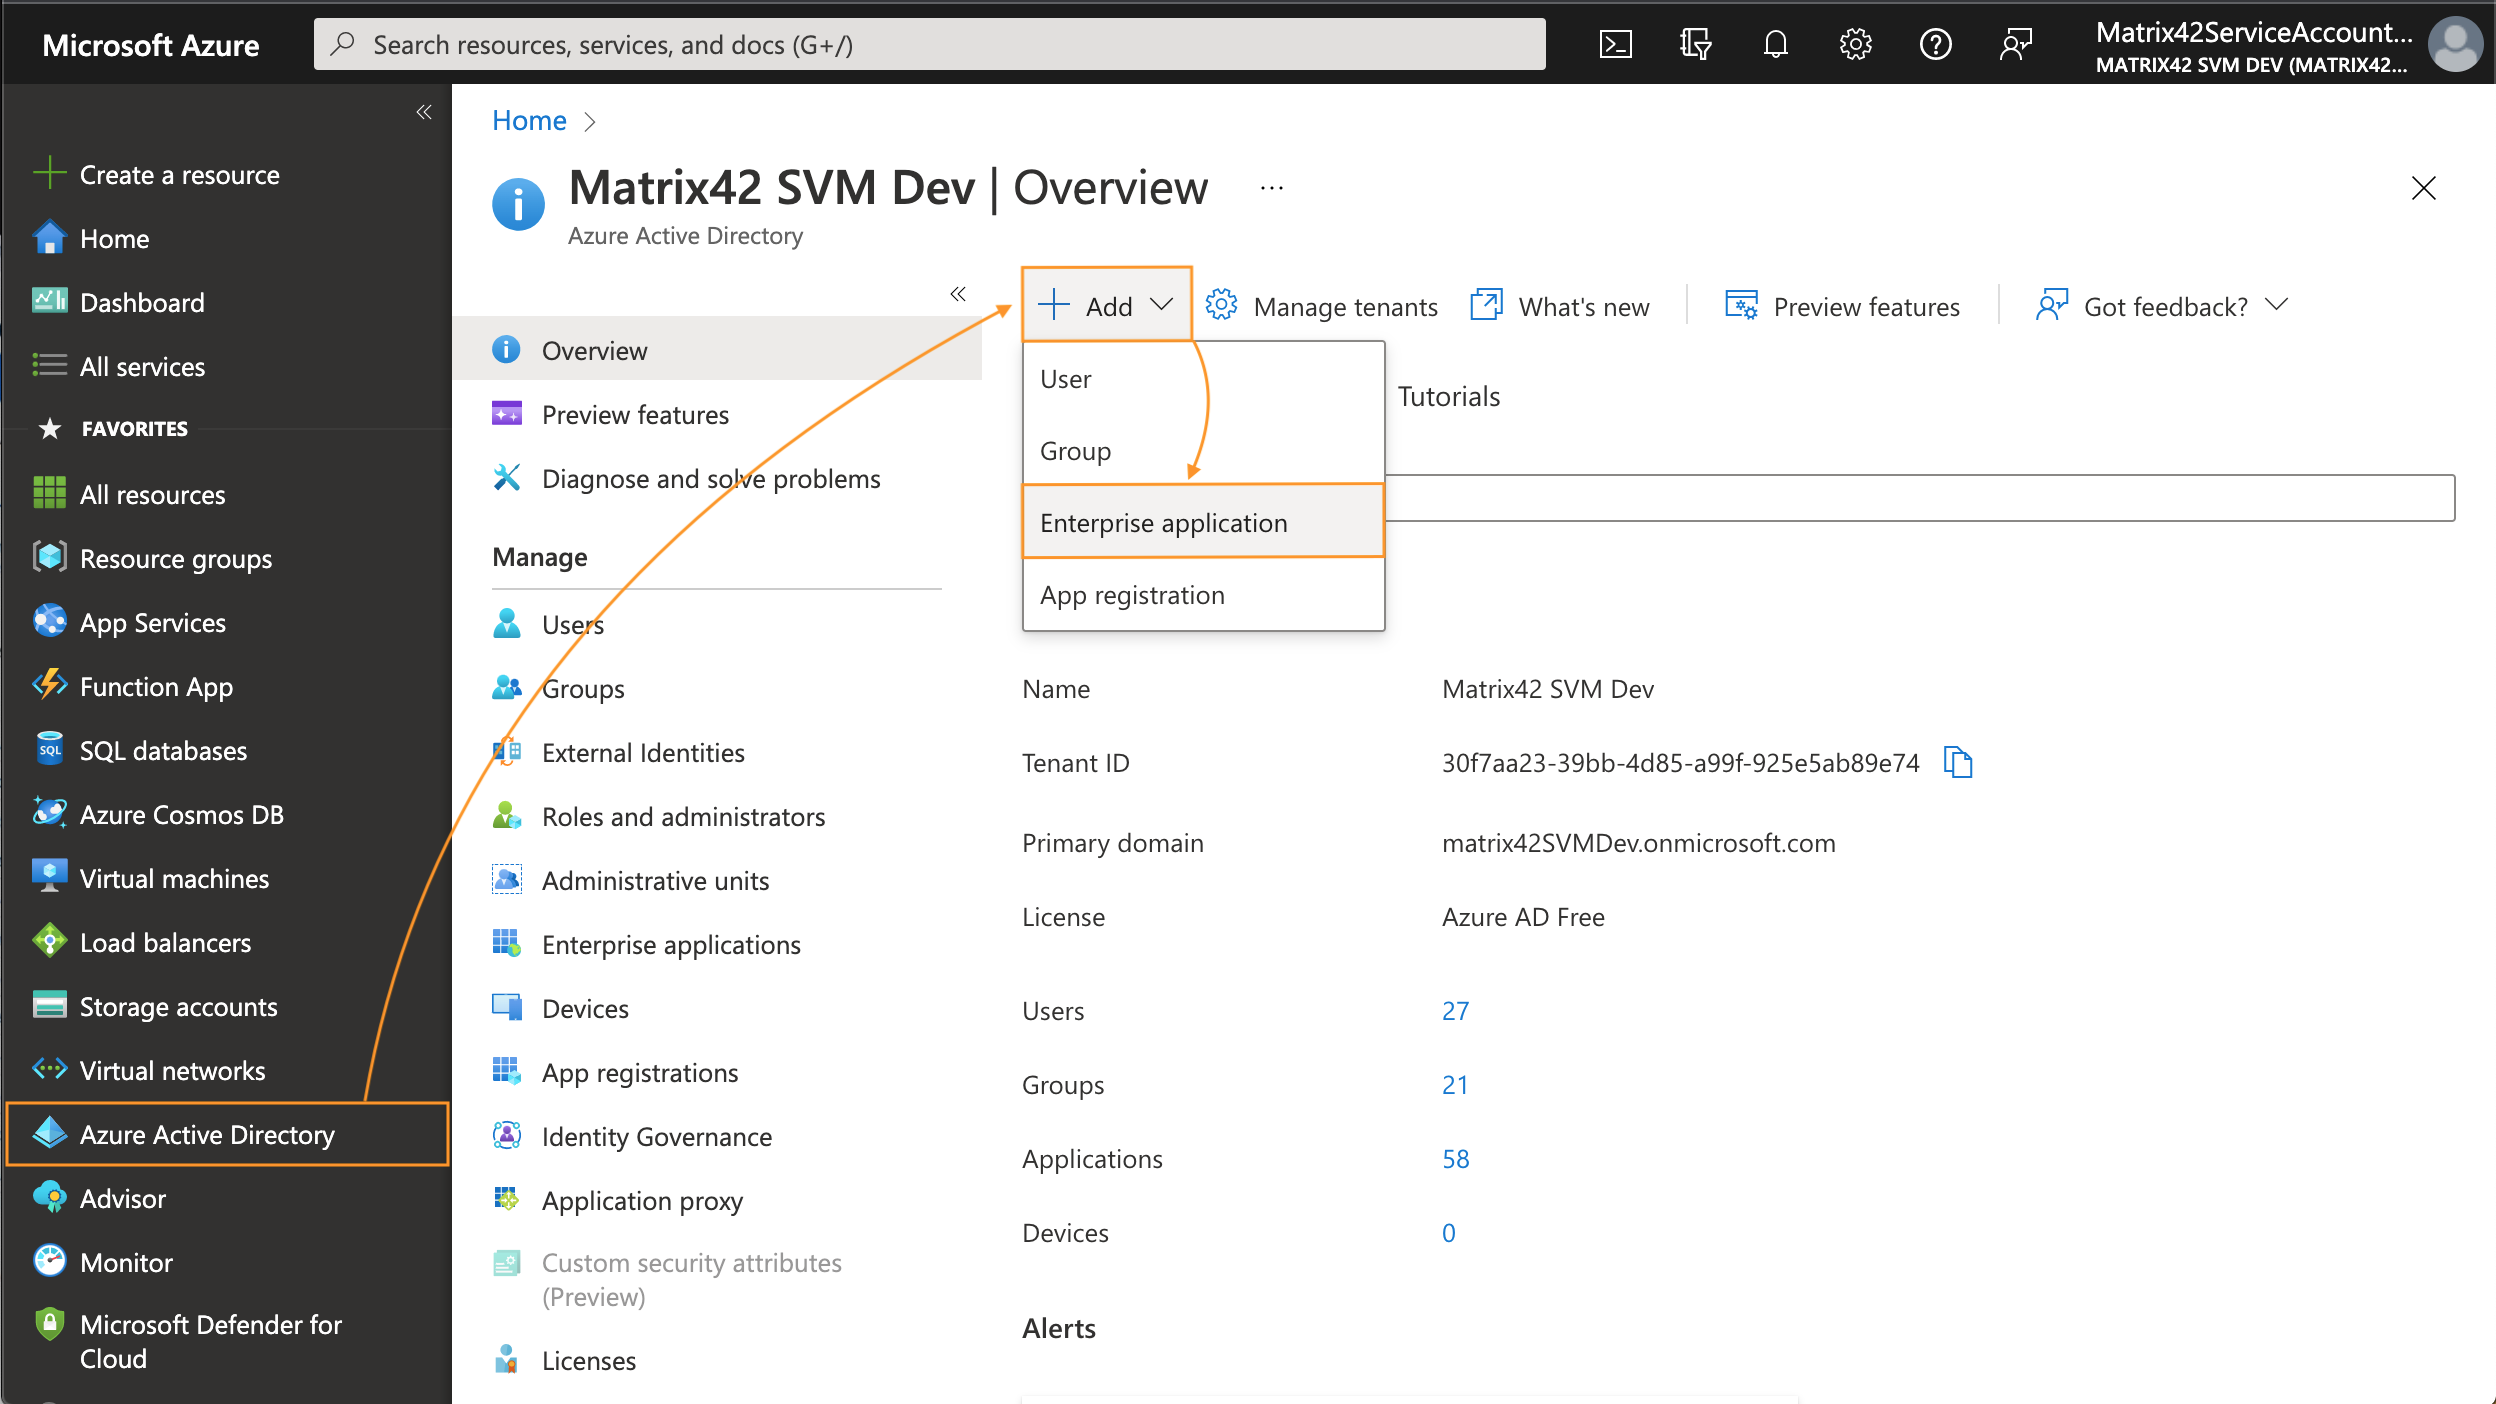
Log in to the appropriate Azure Portal tenant with at least an Application Administrator user role (https://portal.azure.com).
Enterprise applications: Add New Application
- In Azure portal, navigate to Microsoft Entra ID → Add new Enterprise application:
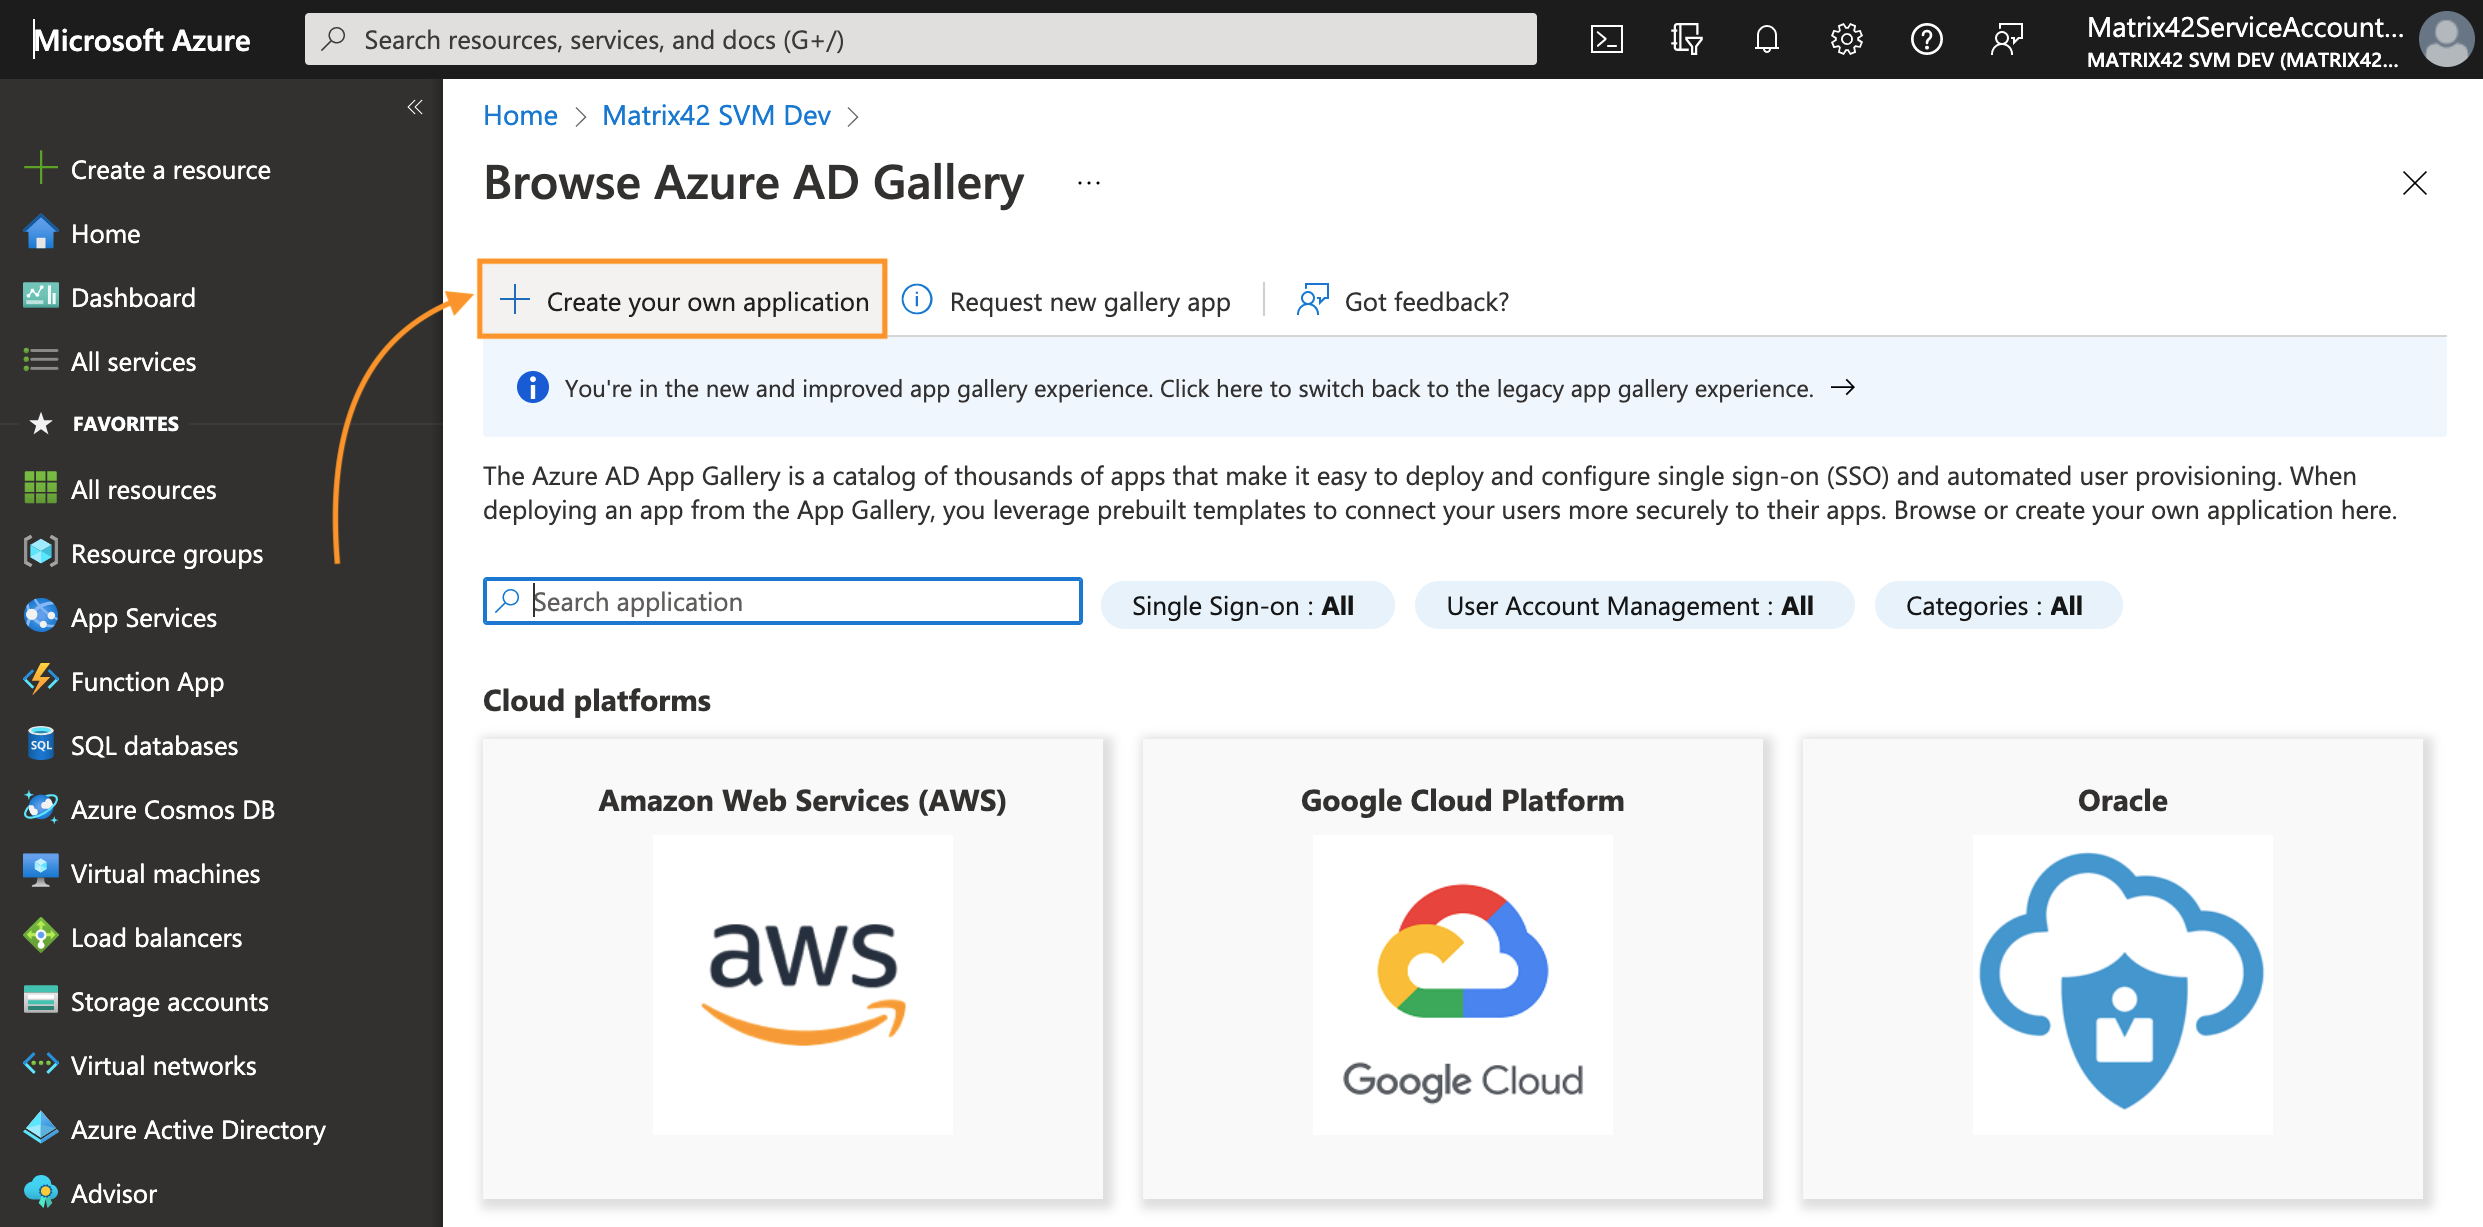
- Click on the Create your own application button:
-
Enter the display Name for your new Non-gallery application and click Create:
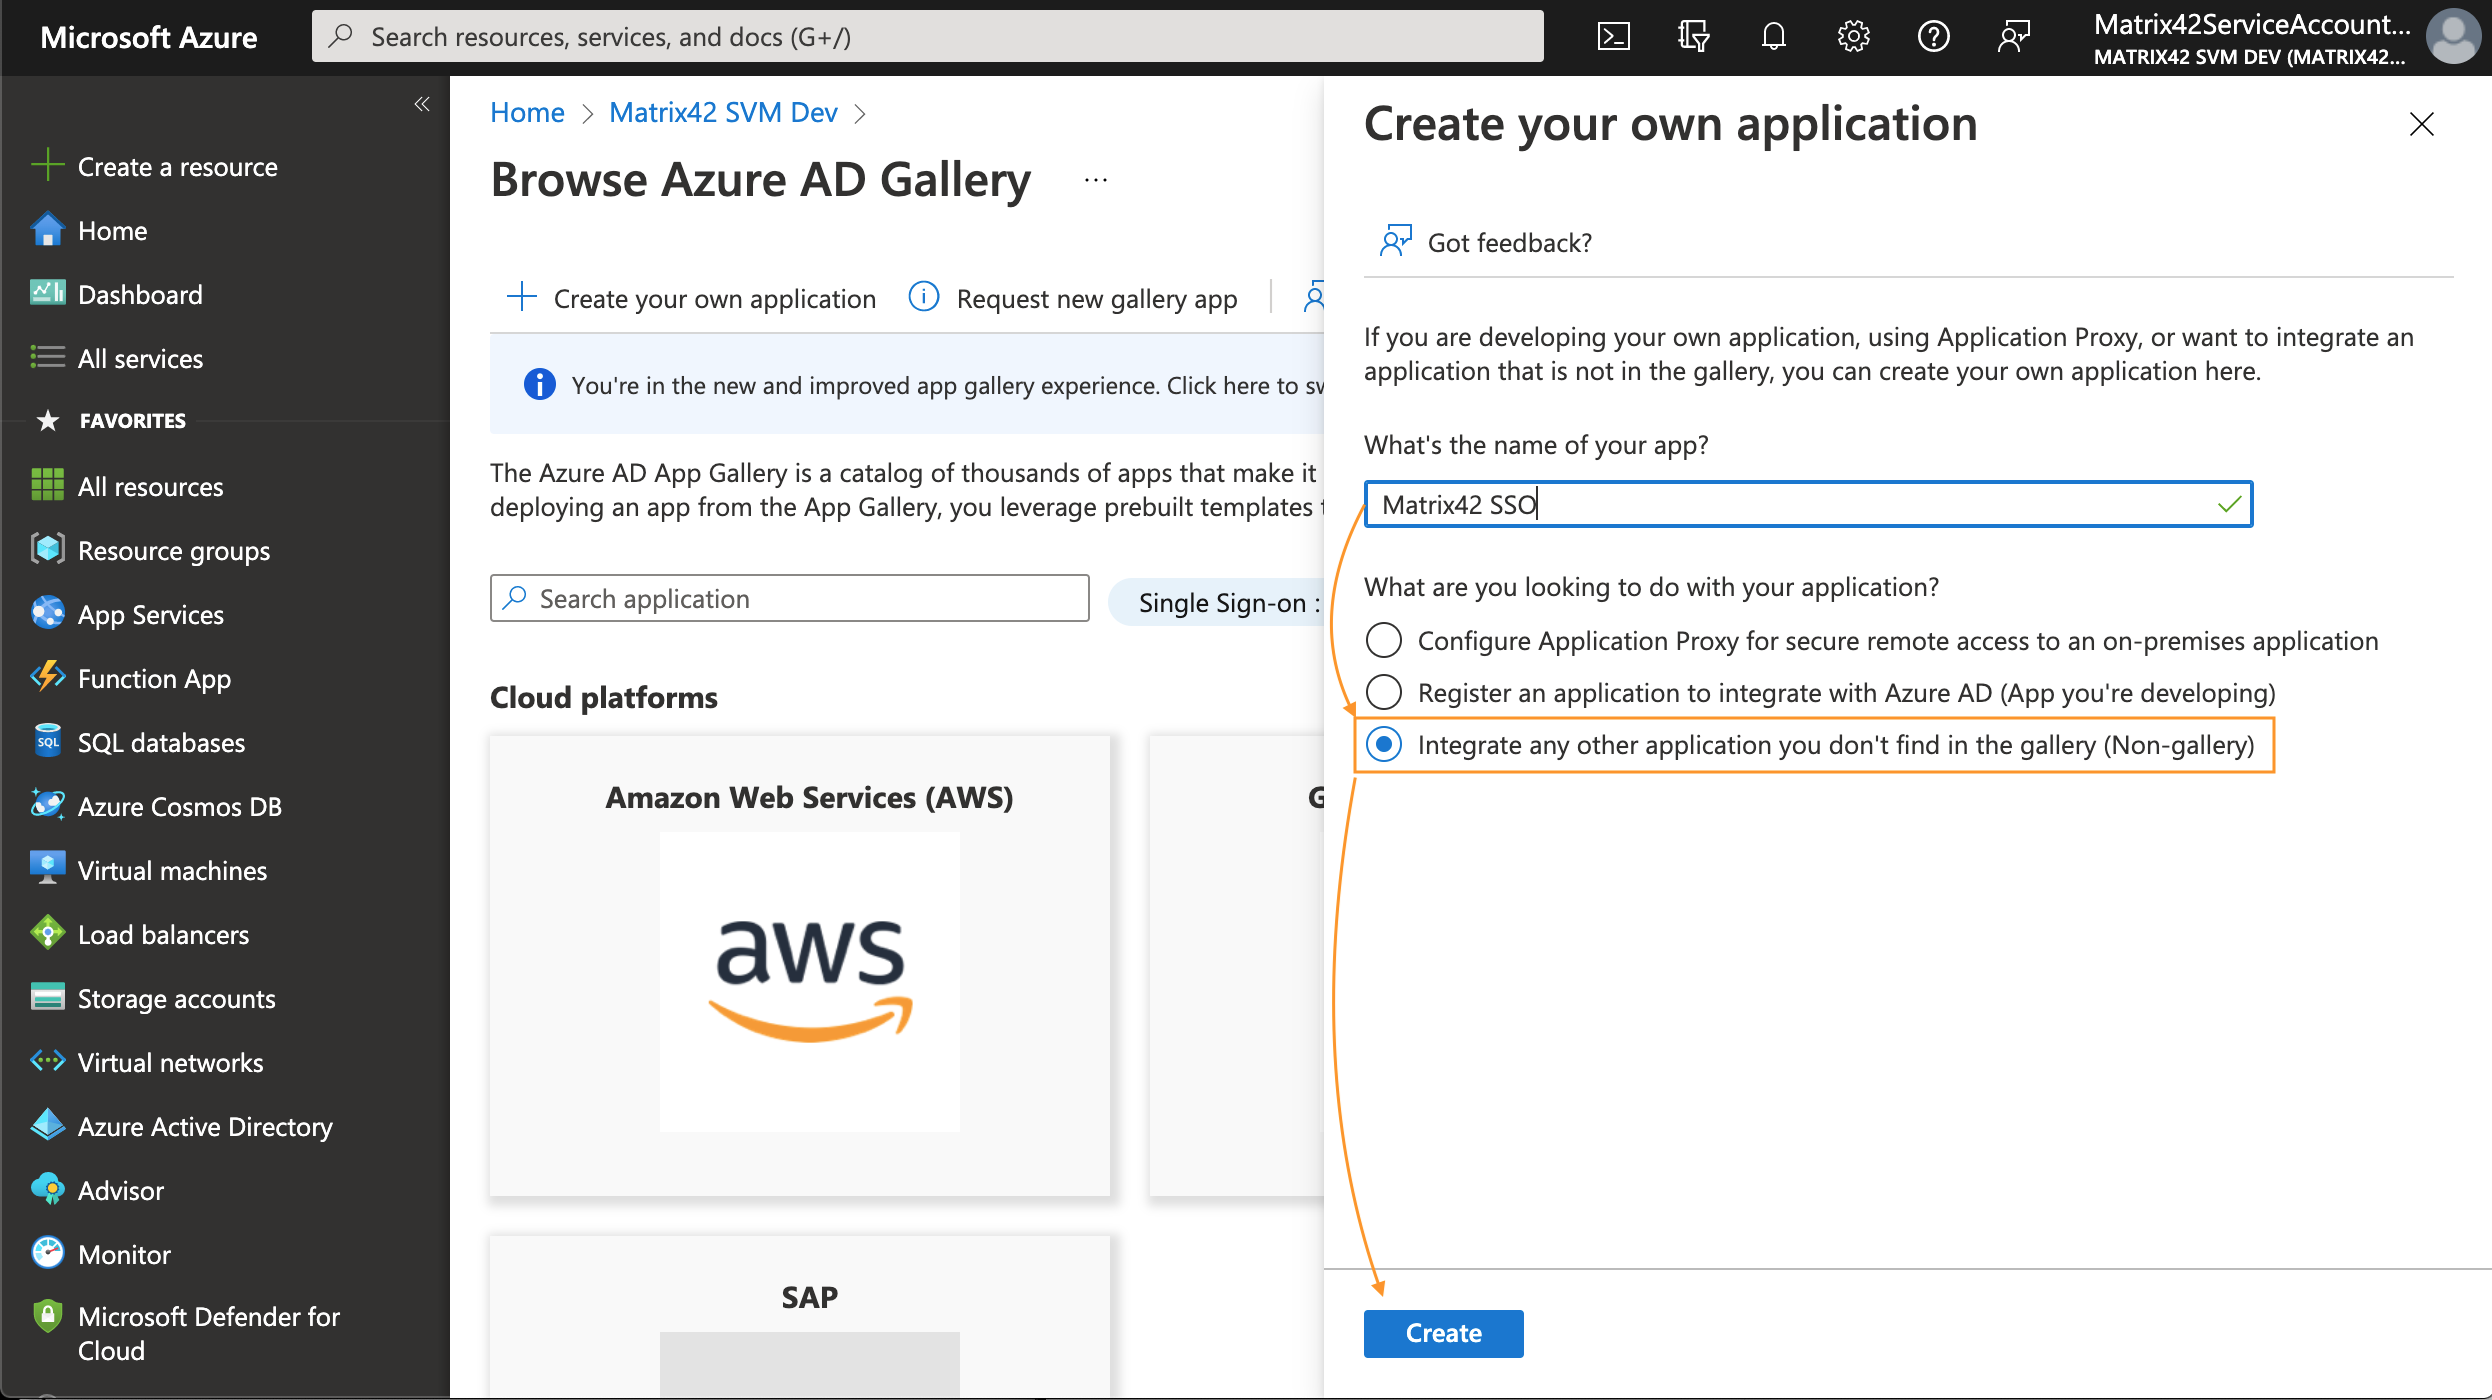
This application will be used to integrate SAML2 authentication on the Azure side.
Set up SAML-based single sign-on
-
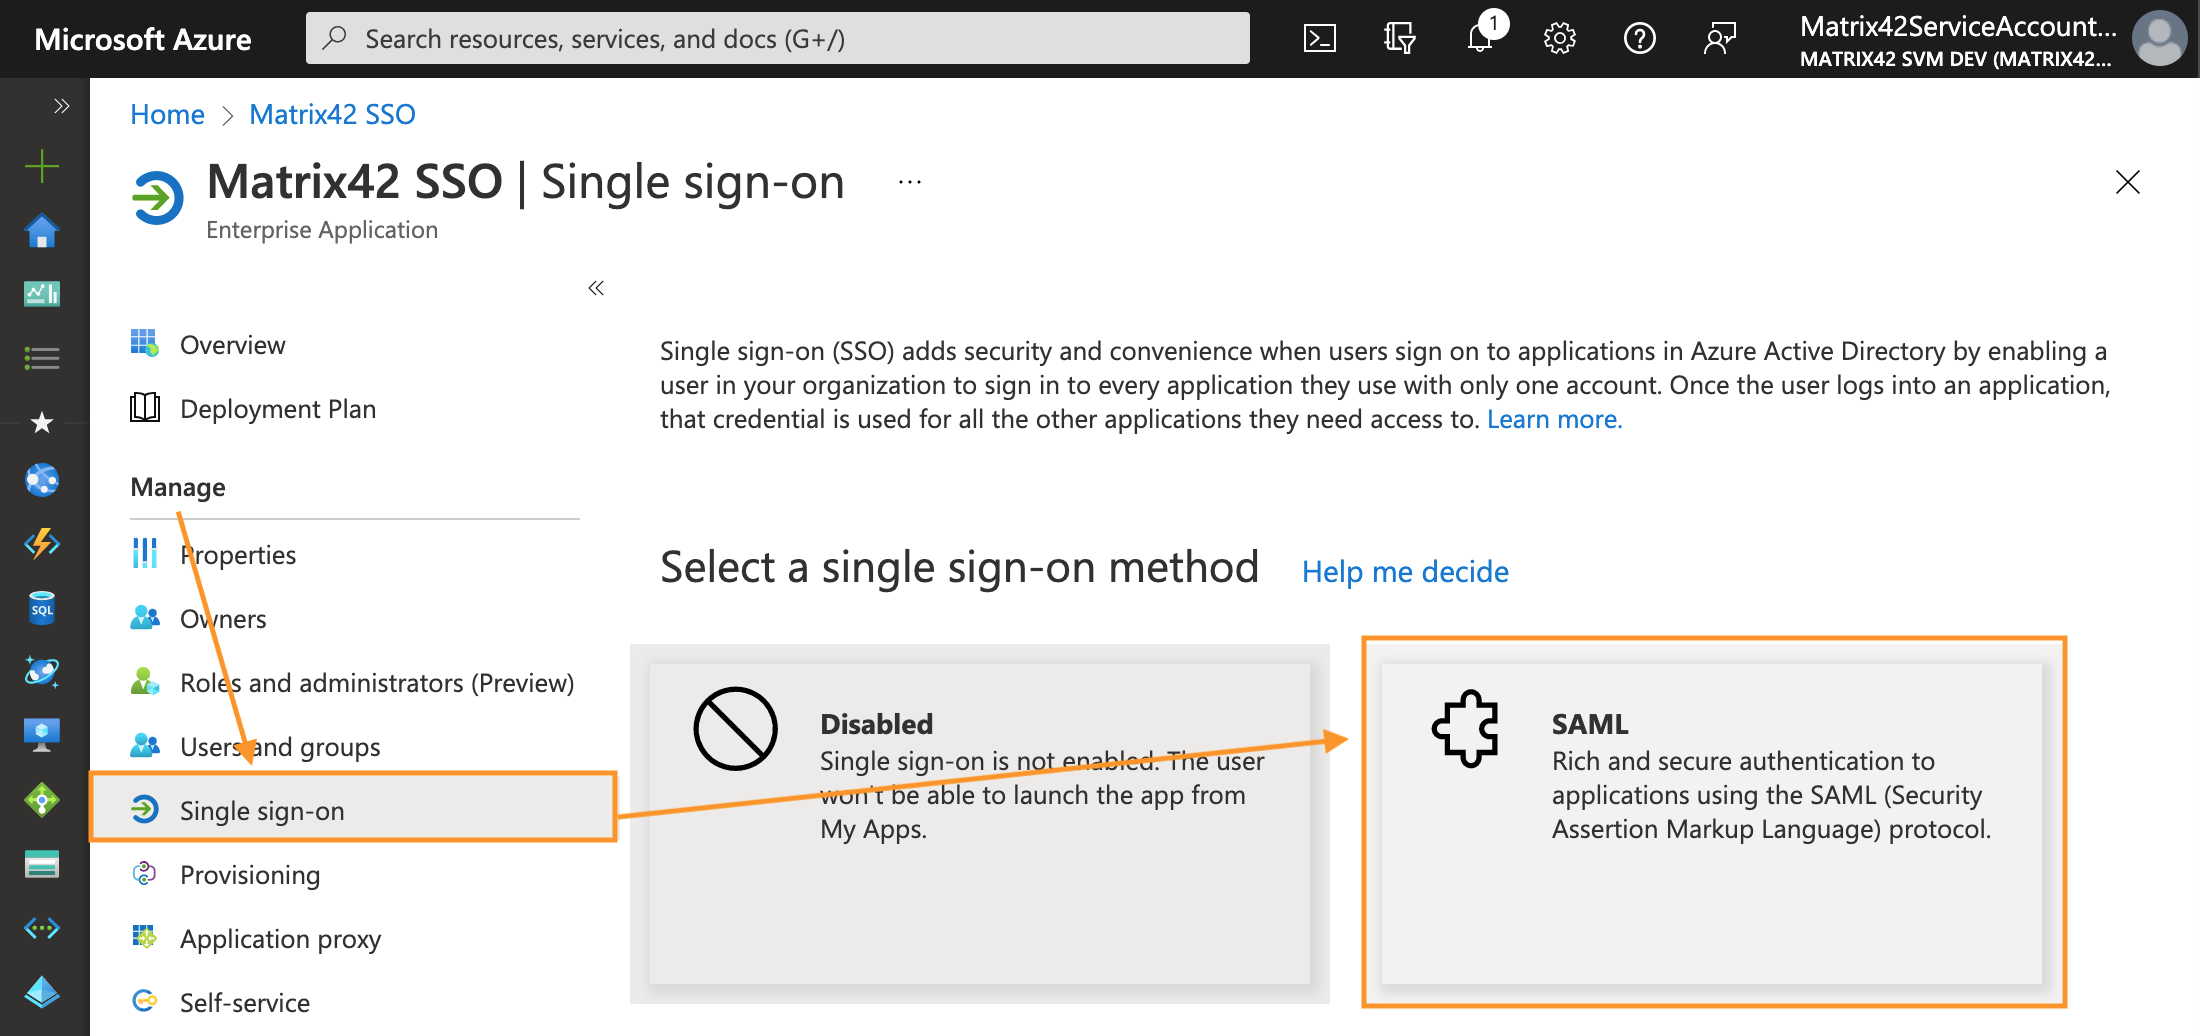
Upon creating an application, navigate to the Manage section → Single sign-on → select SAML single sign-on method:
-
On the Single sign-on page Set up Single Sign-On with SAML, in Basic SAML Configuration section, click Edit:

This section requires the following information about your ESMP application endpoints:-
Identifier (Entity ID): remove the default-suggested option and in the new field provide the hostname of your ESMP application, for instance
https://<discoveryHostName> -
Reply URL (Assertion Consumer Service URL): modify the following URL and add your ESMP application hostname, for example:
https://<discoveryHostName>/M42Services/api/sts/login
In some cases, the value depends on your Matrix42 system version. For more details, see Universal STS/SAML2 for all WM applications: ACS URL value section. -
Sign on URL: the URL where the user will be redirected after sign-on, modify and add your ESMP application host name in the following example:
https://<discoveryHostName>/wm -
Logout URL: modify the following URL and add your ESMP application hostname
https://<discoveryHostName>/M42Services/api/sts/logout
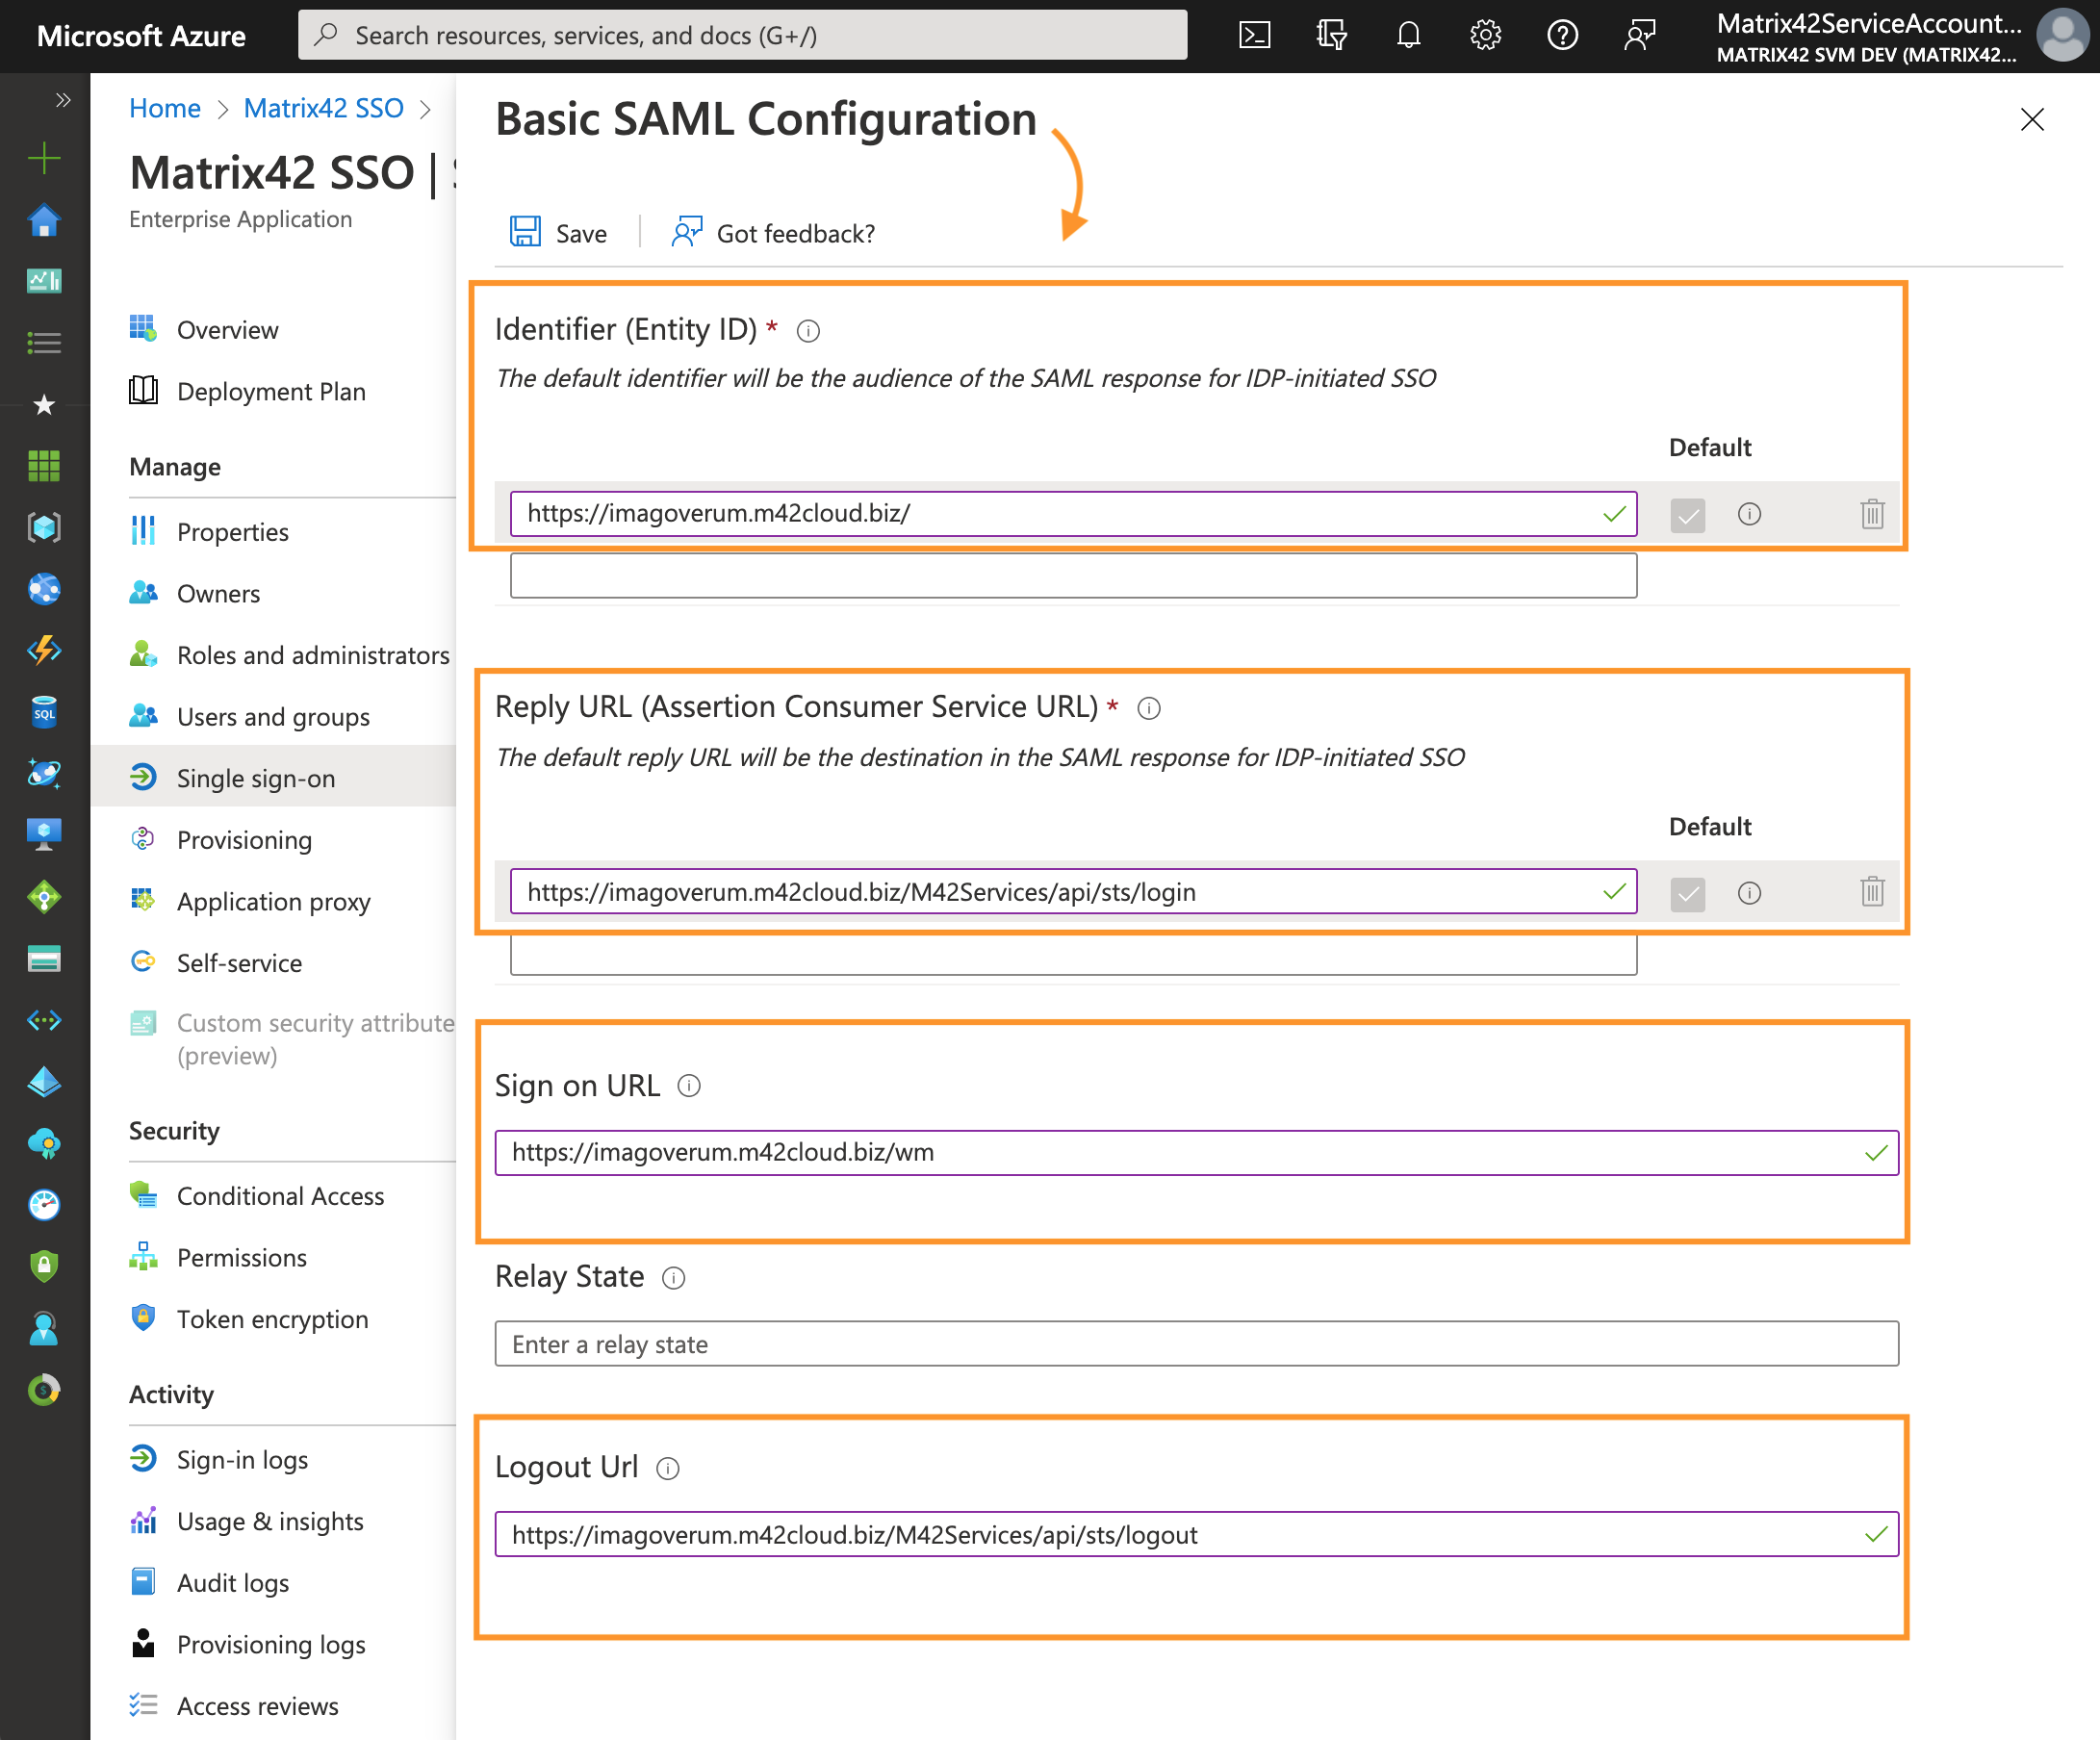
Basic SAML Configuration example for a ESMP application with <discoveryHostName> imagoverum.m42cloud.bizYou can find your
discoveryHostNamevalue in the SPS.config file.
-
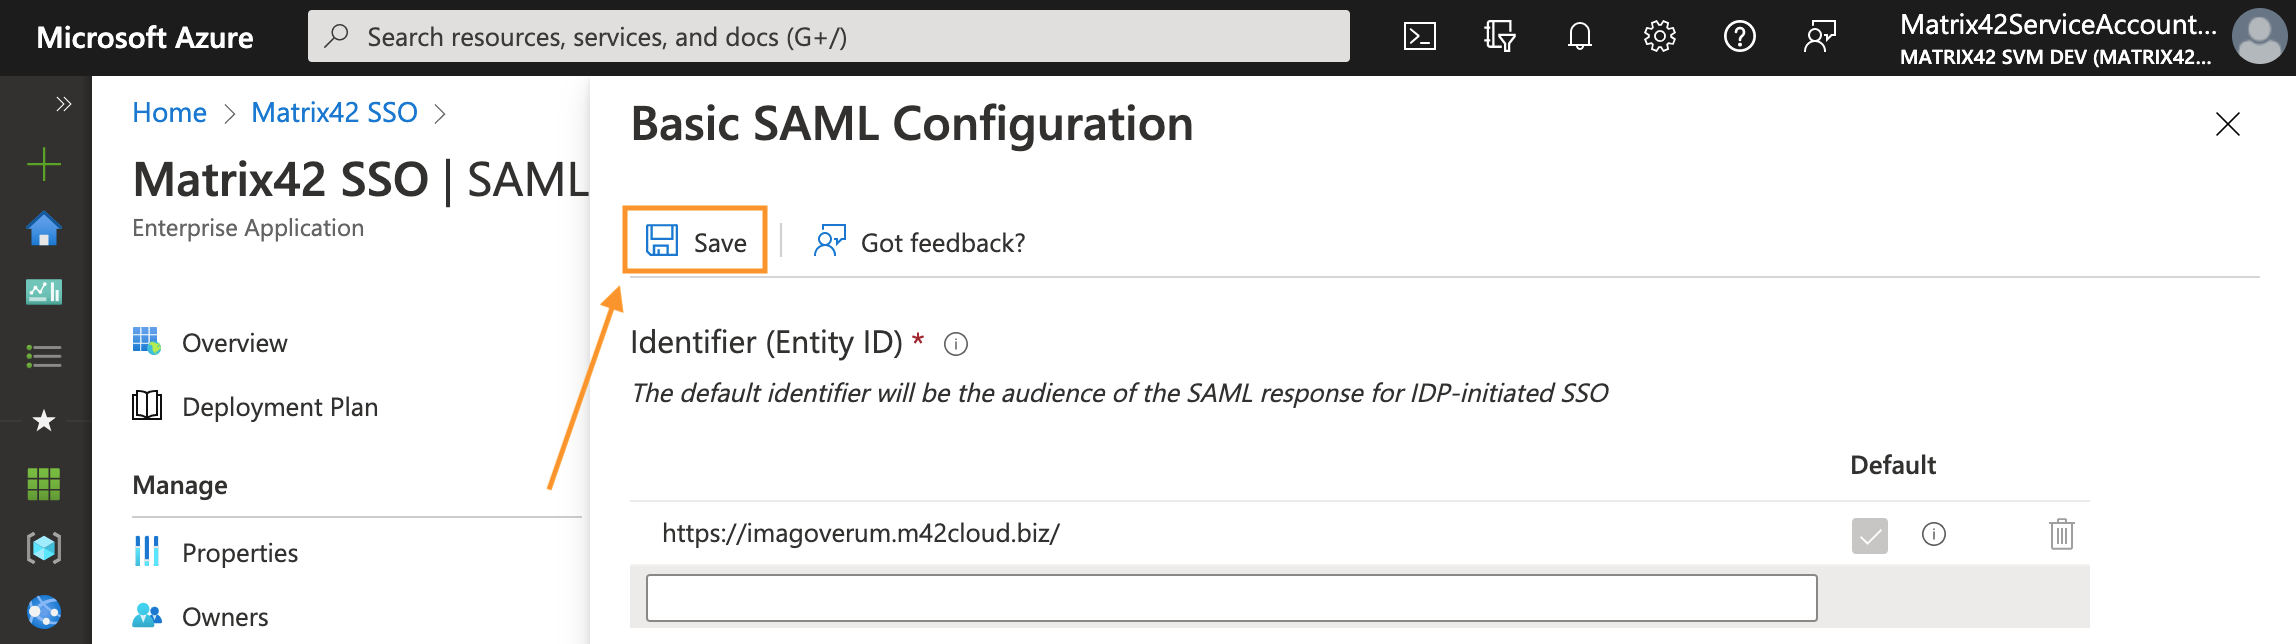
- Save the configuration:
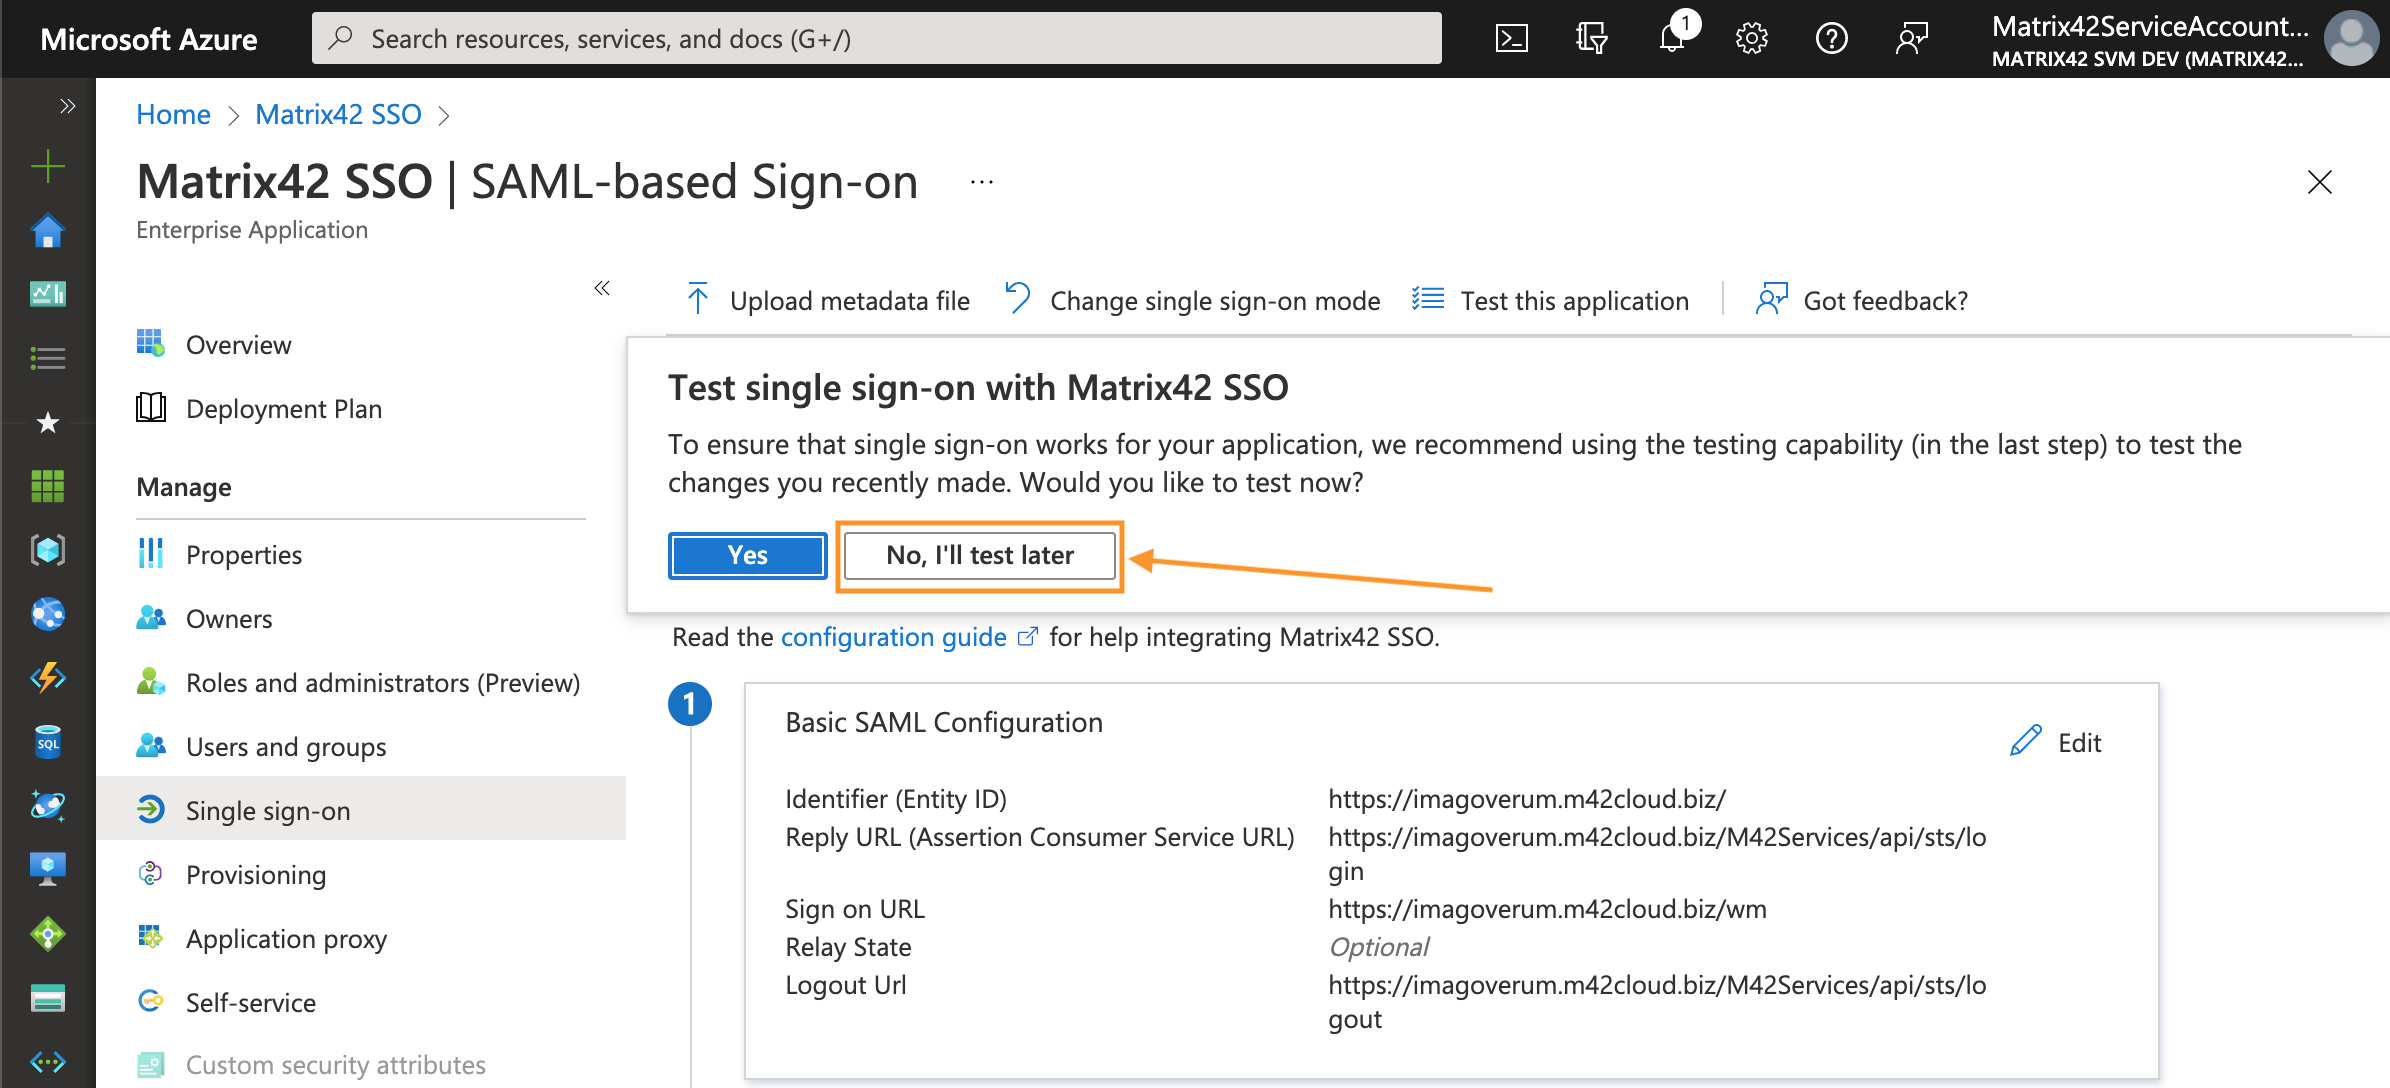
- Skip the test configuration message:
Attributes & Claims configuration
- On the Single sign-on page Set up Single Sign-On with SAML, scroll down to Attributes & Claims section, and click Edit:
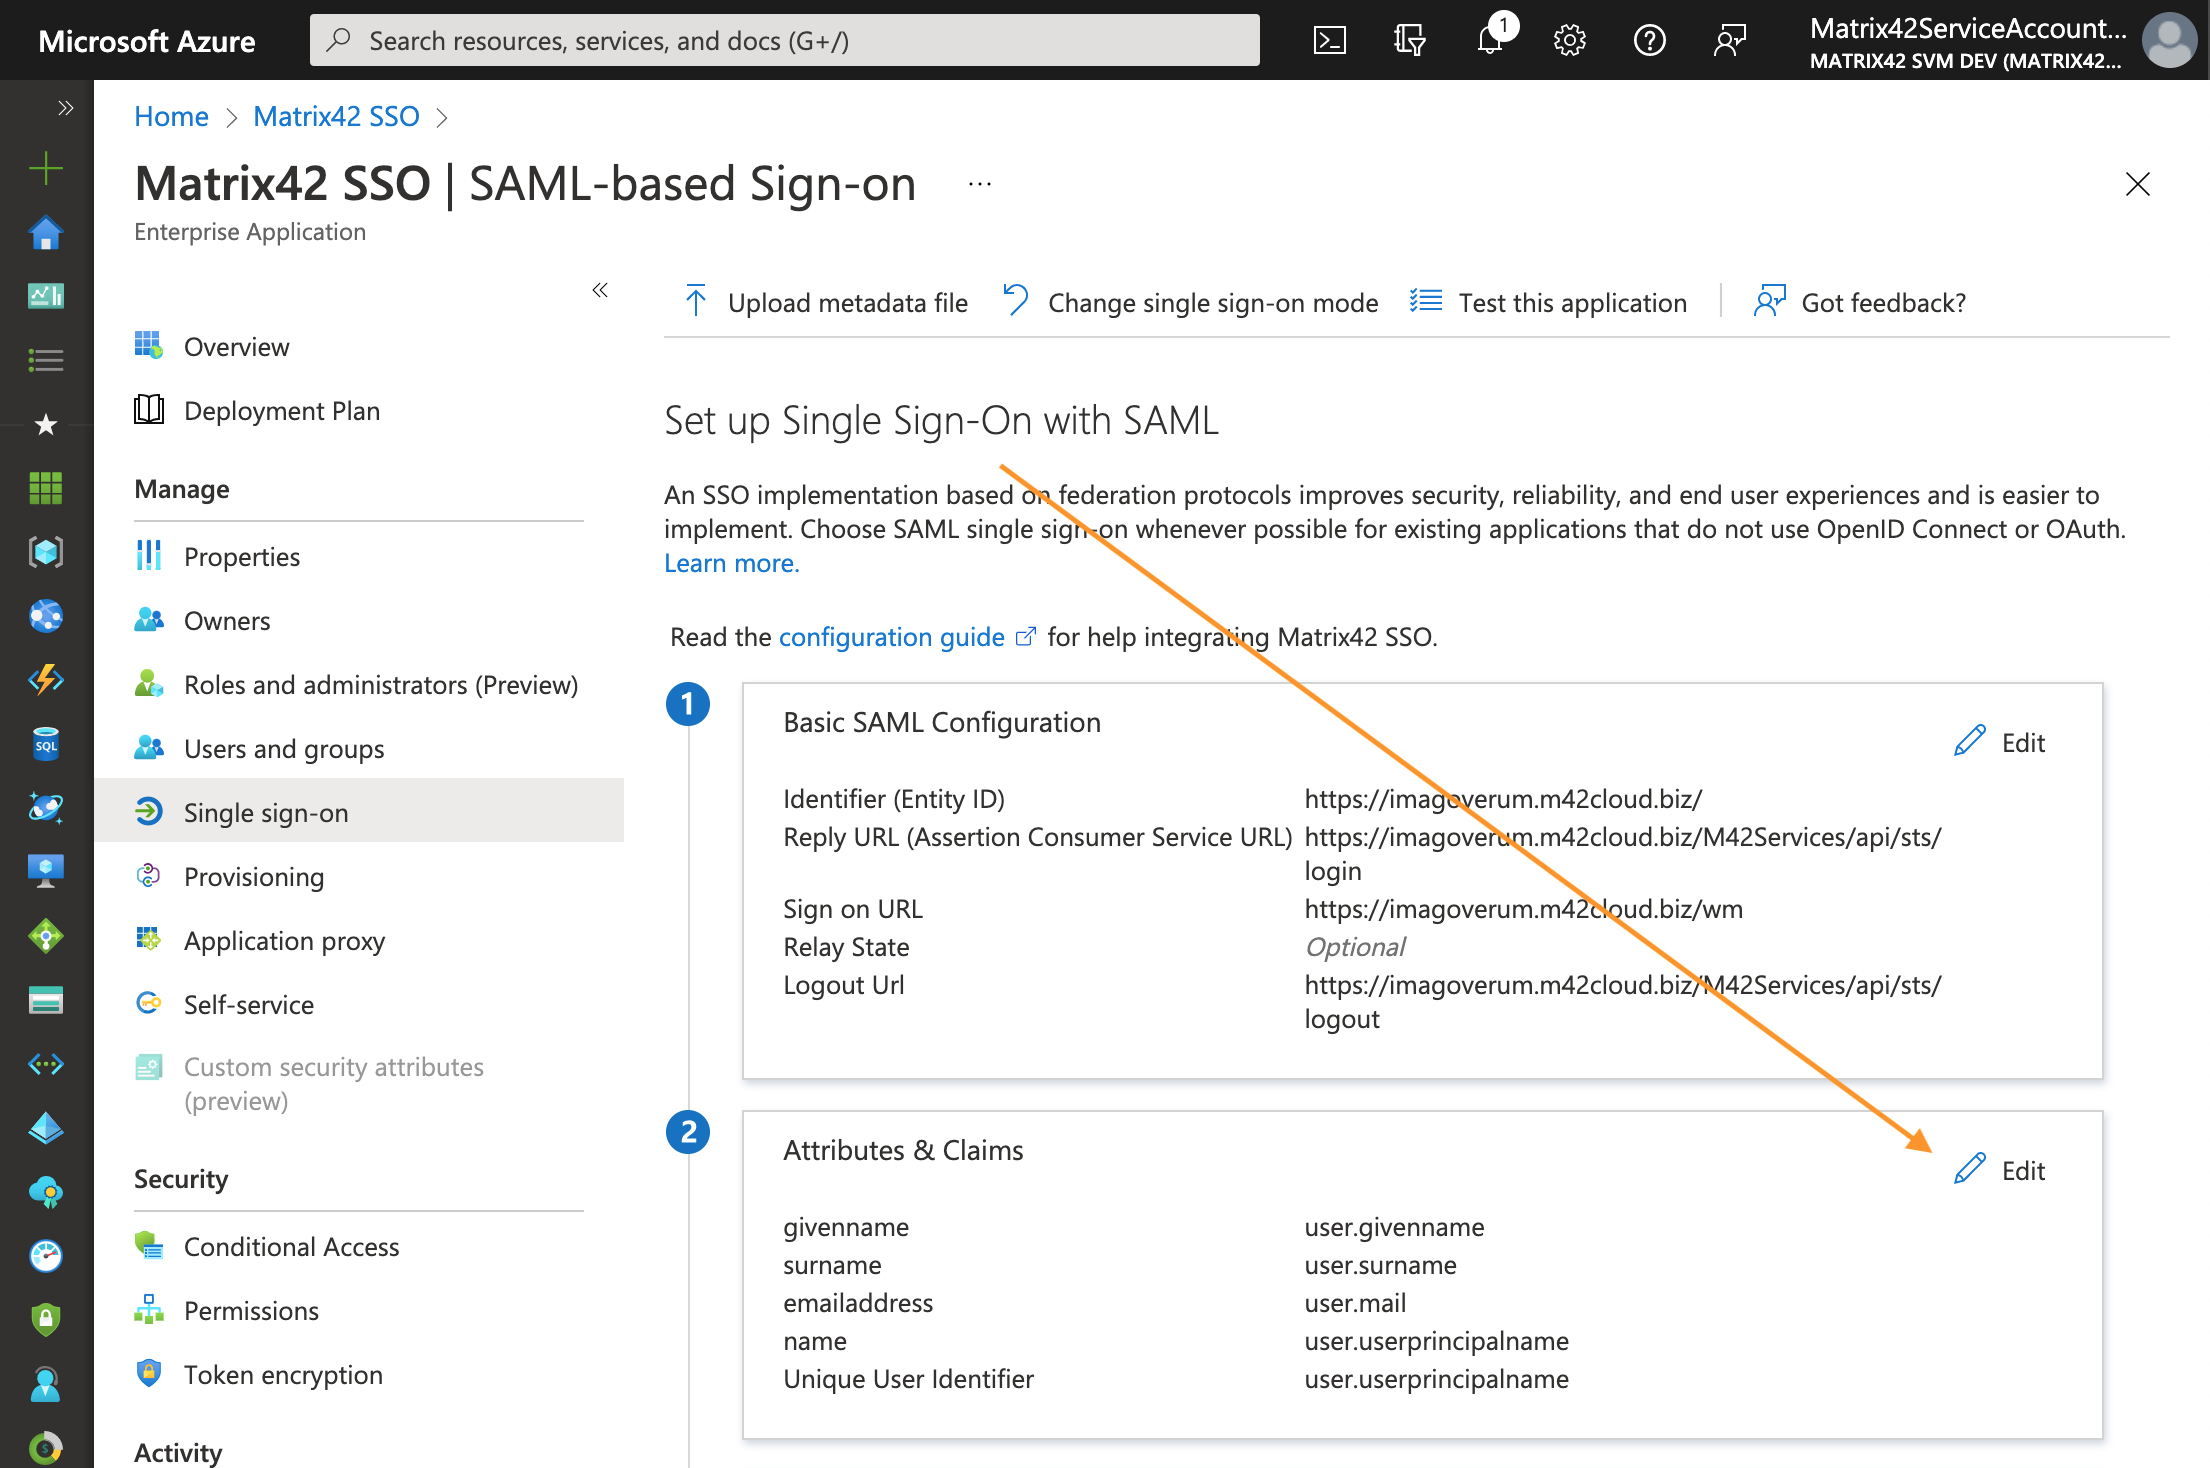
- In the Required claim section, click on the Unique User Identifier (Name ID) to edit properties:
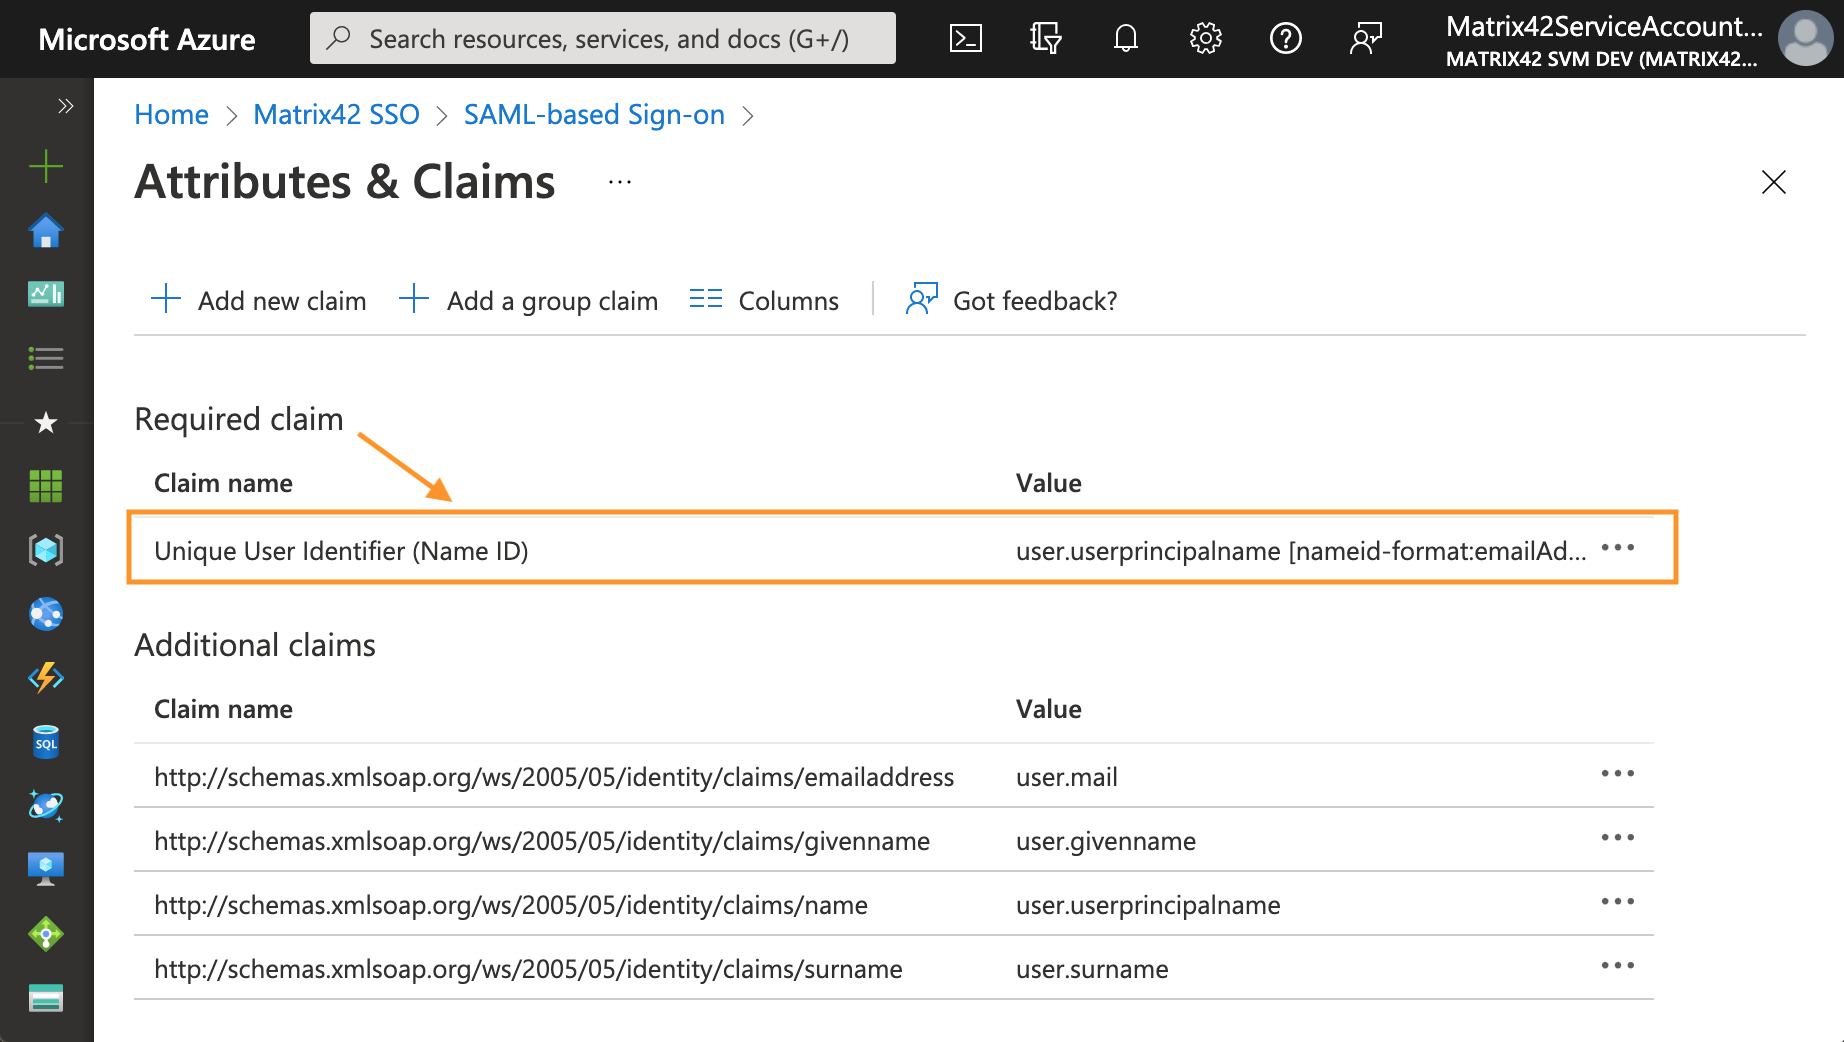
- Change the Source attribute to user.mail as a source attribute for the claim. Thus the matching between ESMP and Microsoft Entra ID will be done via user email address:
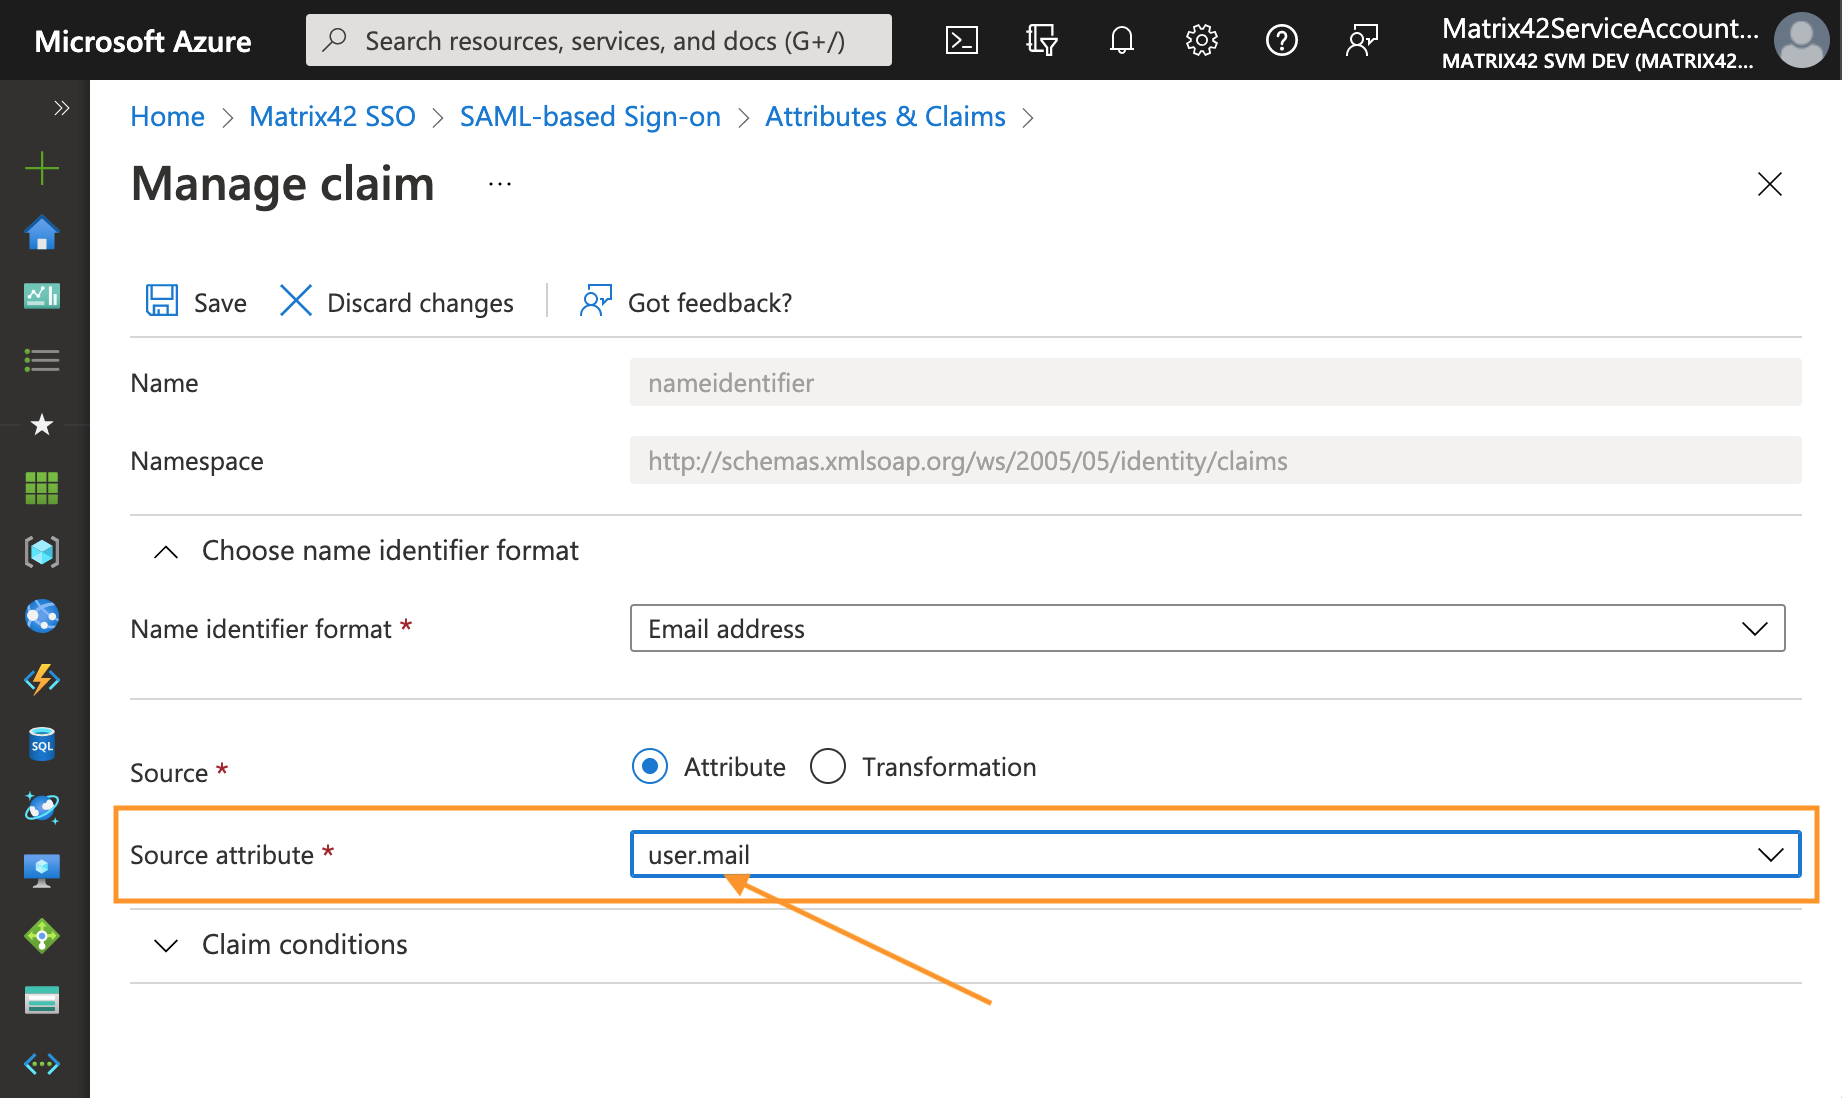
- Click Save and close the Attributes & Claims configuration.
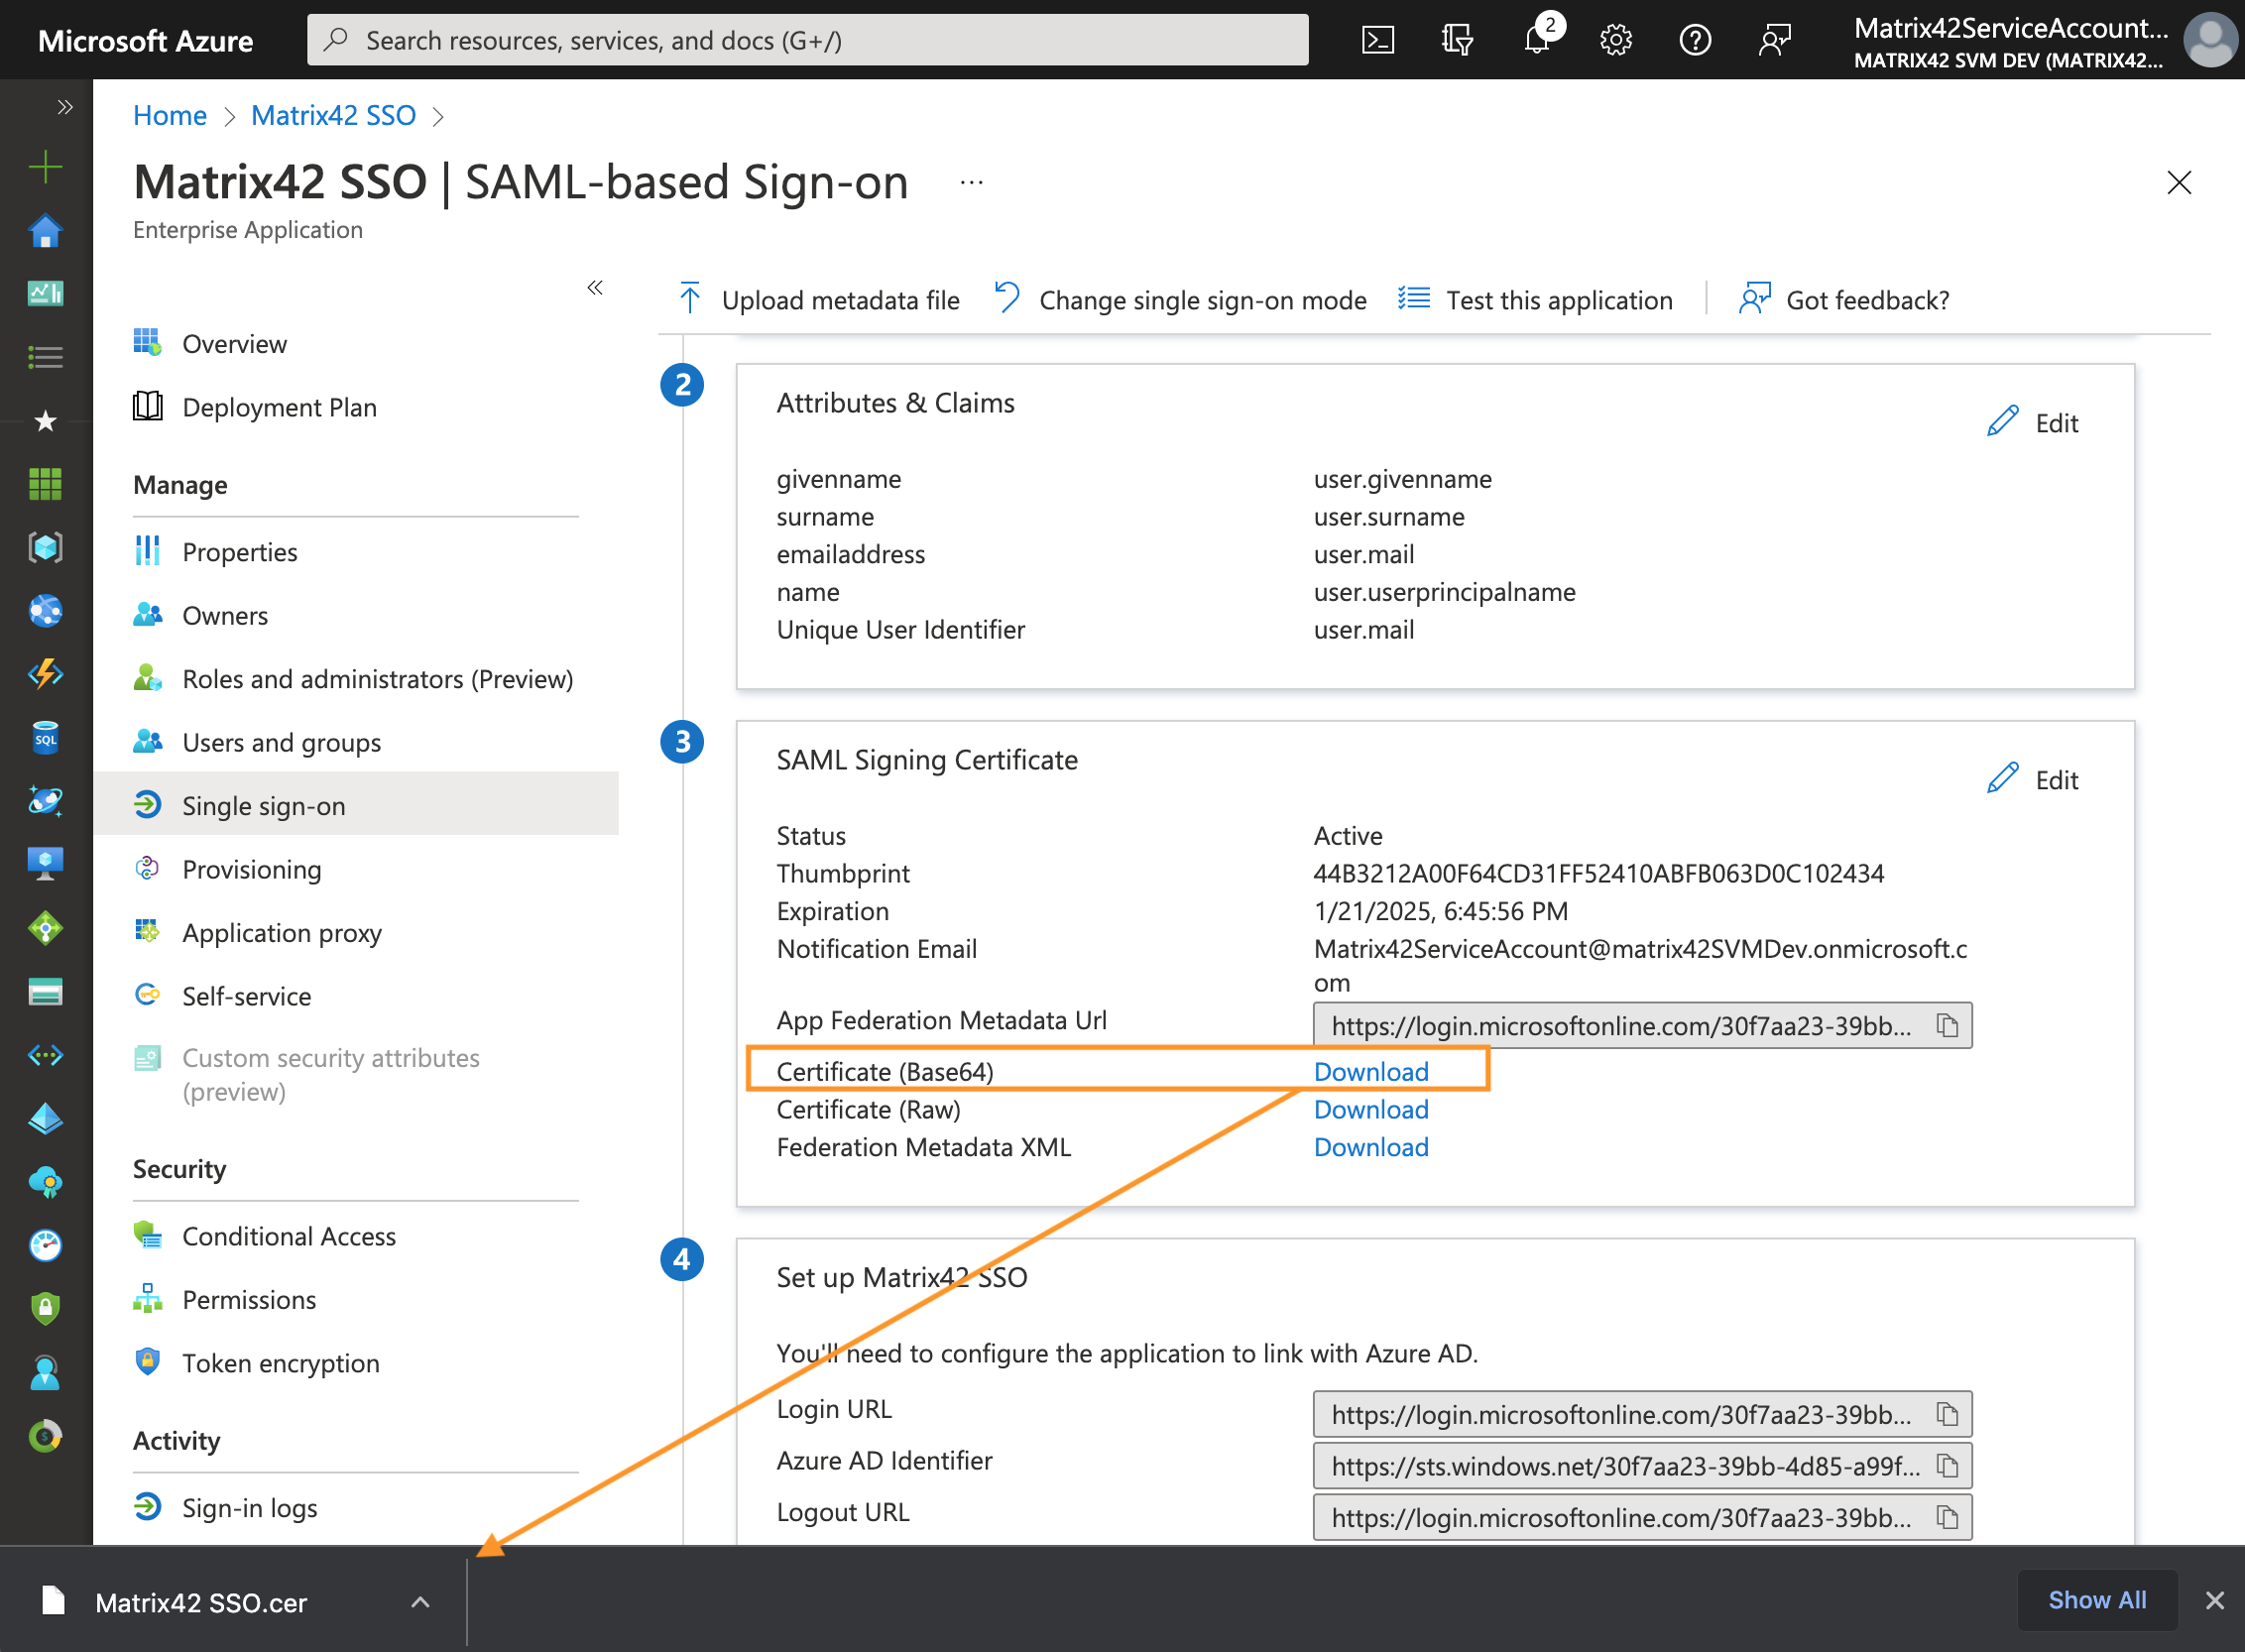
SAML Signing certificate
- On the Single sign-on page Set up Single Sign-On with SAML, scroll down to SAML Signing Certificate section, and click the download link next to Certificate (base64) field:
- On the Single sign-on page Set up Single Sign-On with SAML, scroll down to Set up your application SSO section and store URLs to the identity provider and sign-on/sign-out endpoints:
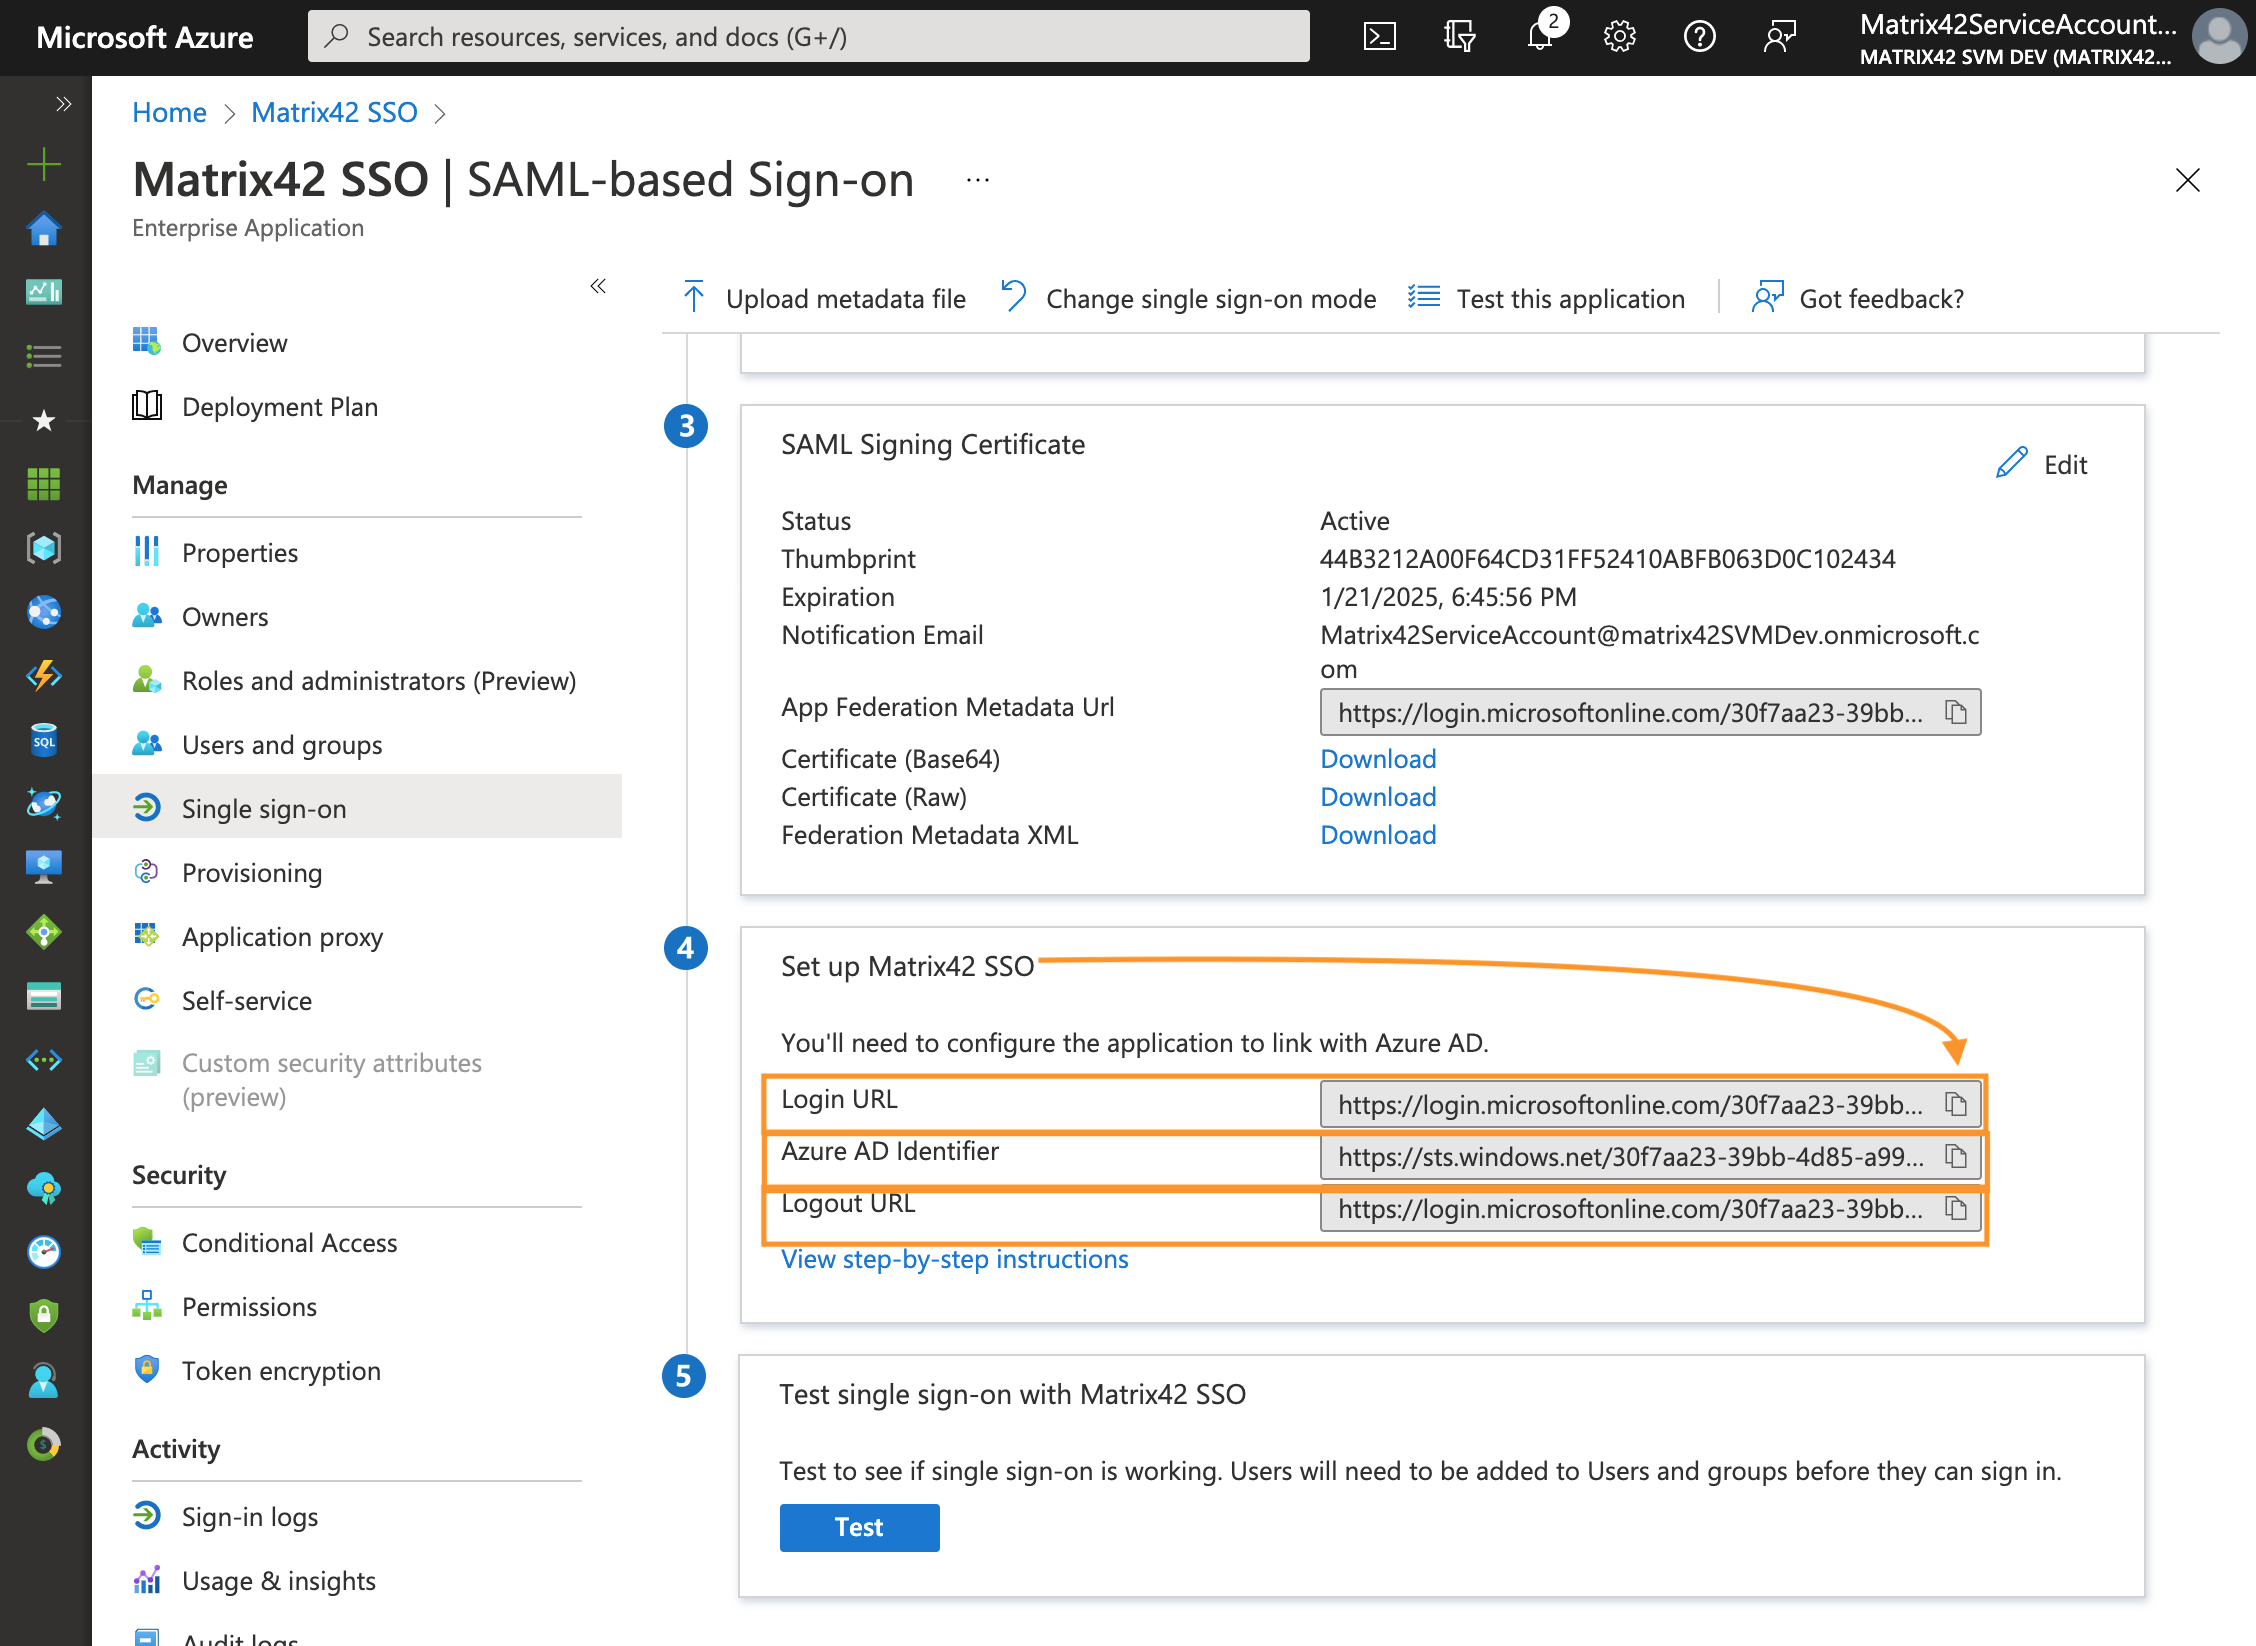
These URLs need to be defined in Enterprise Service Management Platform configuration. Azure portal and ESMP application fields values match as follows:
| Azure Portal | ESMP settings & corresponding fields |
|---|---|
| Microsoft Entra ID Identifier | SAML2 Identity Provider ID |
| Login URL | Single Sign-on URI Endpoint |
| Logout URL | ESMP: Single Sign-out URI Endpoint |
These values will be used later for Login Configuration in ESMP, see Login Configuration section of this page.
Properties: Assignment required configuration
Skip this step if your Microsoft Entra ID integration does not require Single Sign-On and integration is used for data import only.
- Navigate to the Manage section → Properties → disable User assignment by choosing "No" option:

- Click Save.
App registrations
Proceed according to your Microsoft Entra ID integration scenario:
- Microsoft Entra ID integration with import and login: on Azure portal, in All applications tab, search for your previously created Enterprise application by the display name and click on it to open the Overview page and continue with API permissions configuration step;
- Microsoft Entra ID integration with import only: create a new application registration as suggested in the next chapter.
New Application
You don't need to create a new application if you have already created an Enterprise application as described here, and configured SAML Single sign-on. Just search for your application and continue with API permissions configuration step.
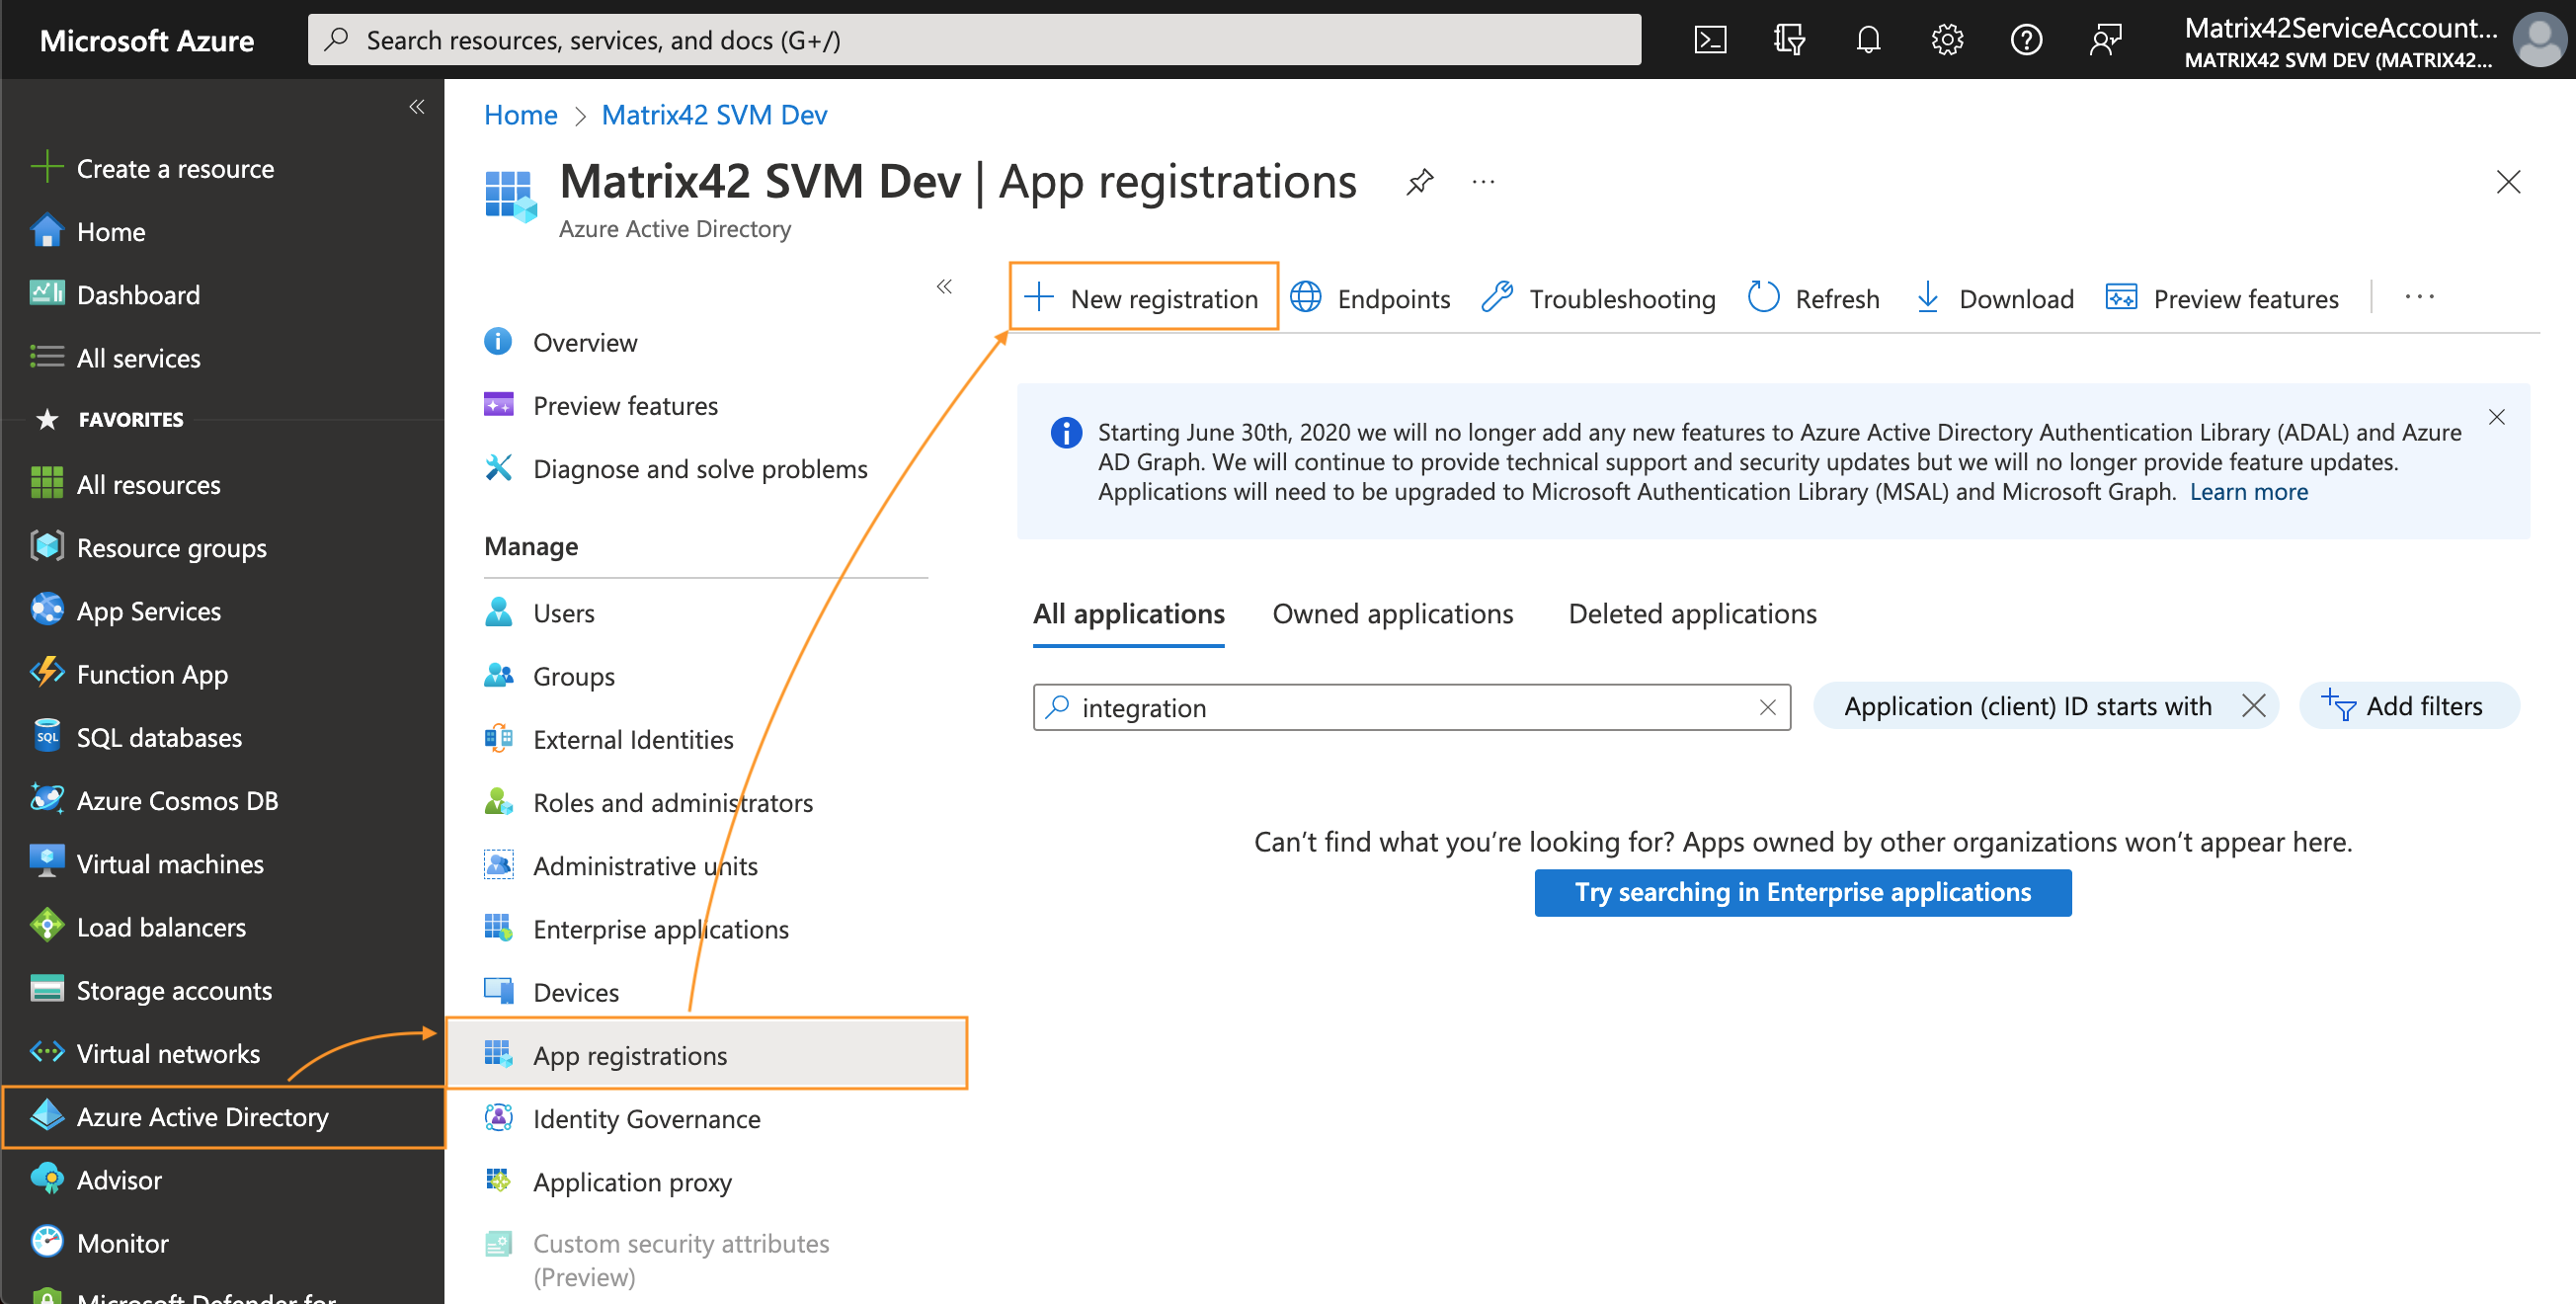
- In Azure portal, navigate to Microsoft Entra ID App registrations → New registration:
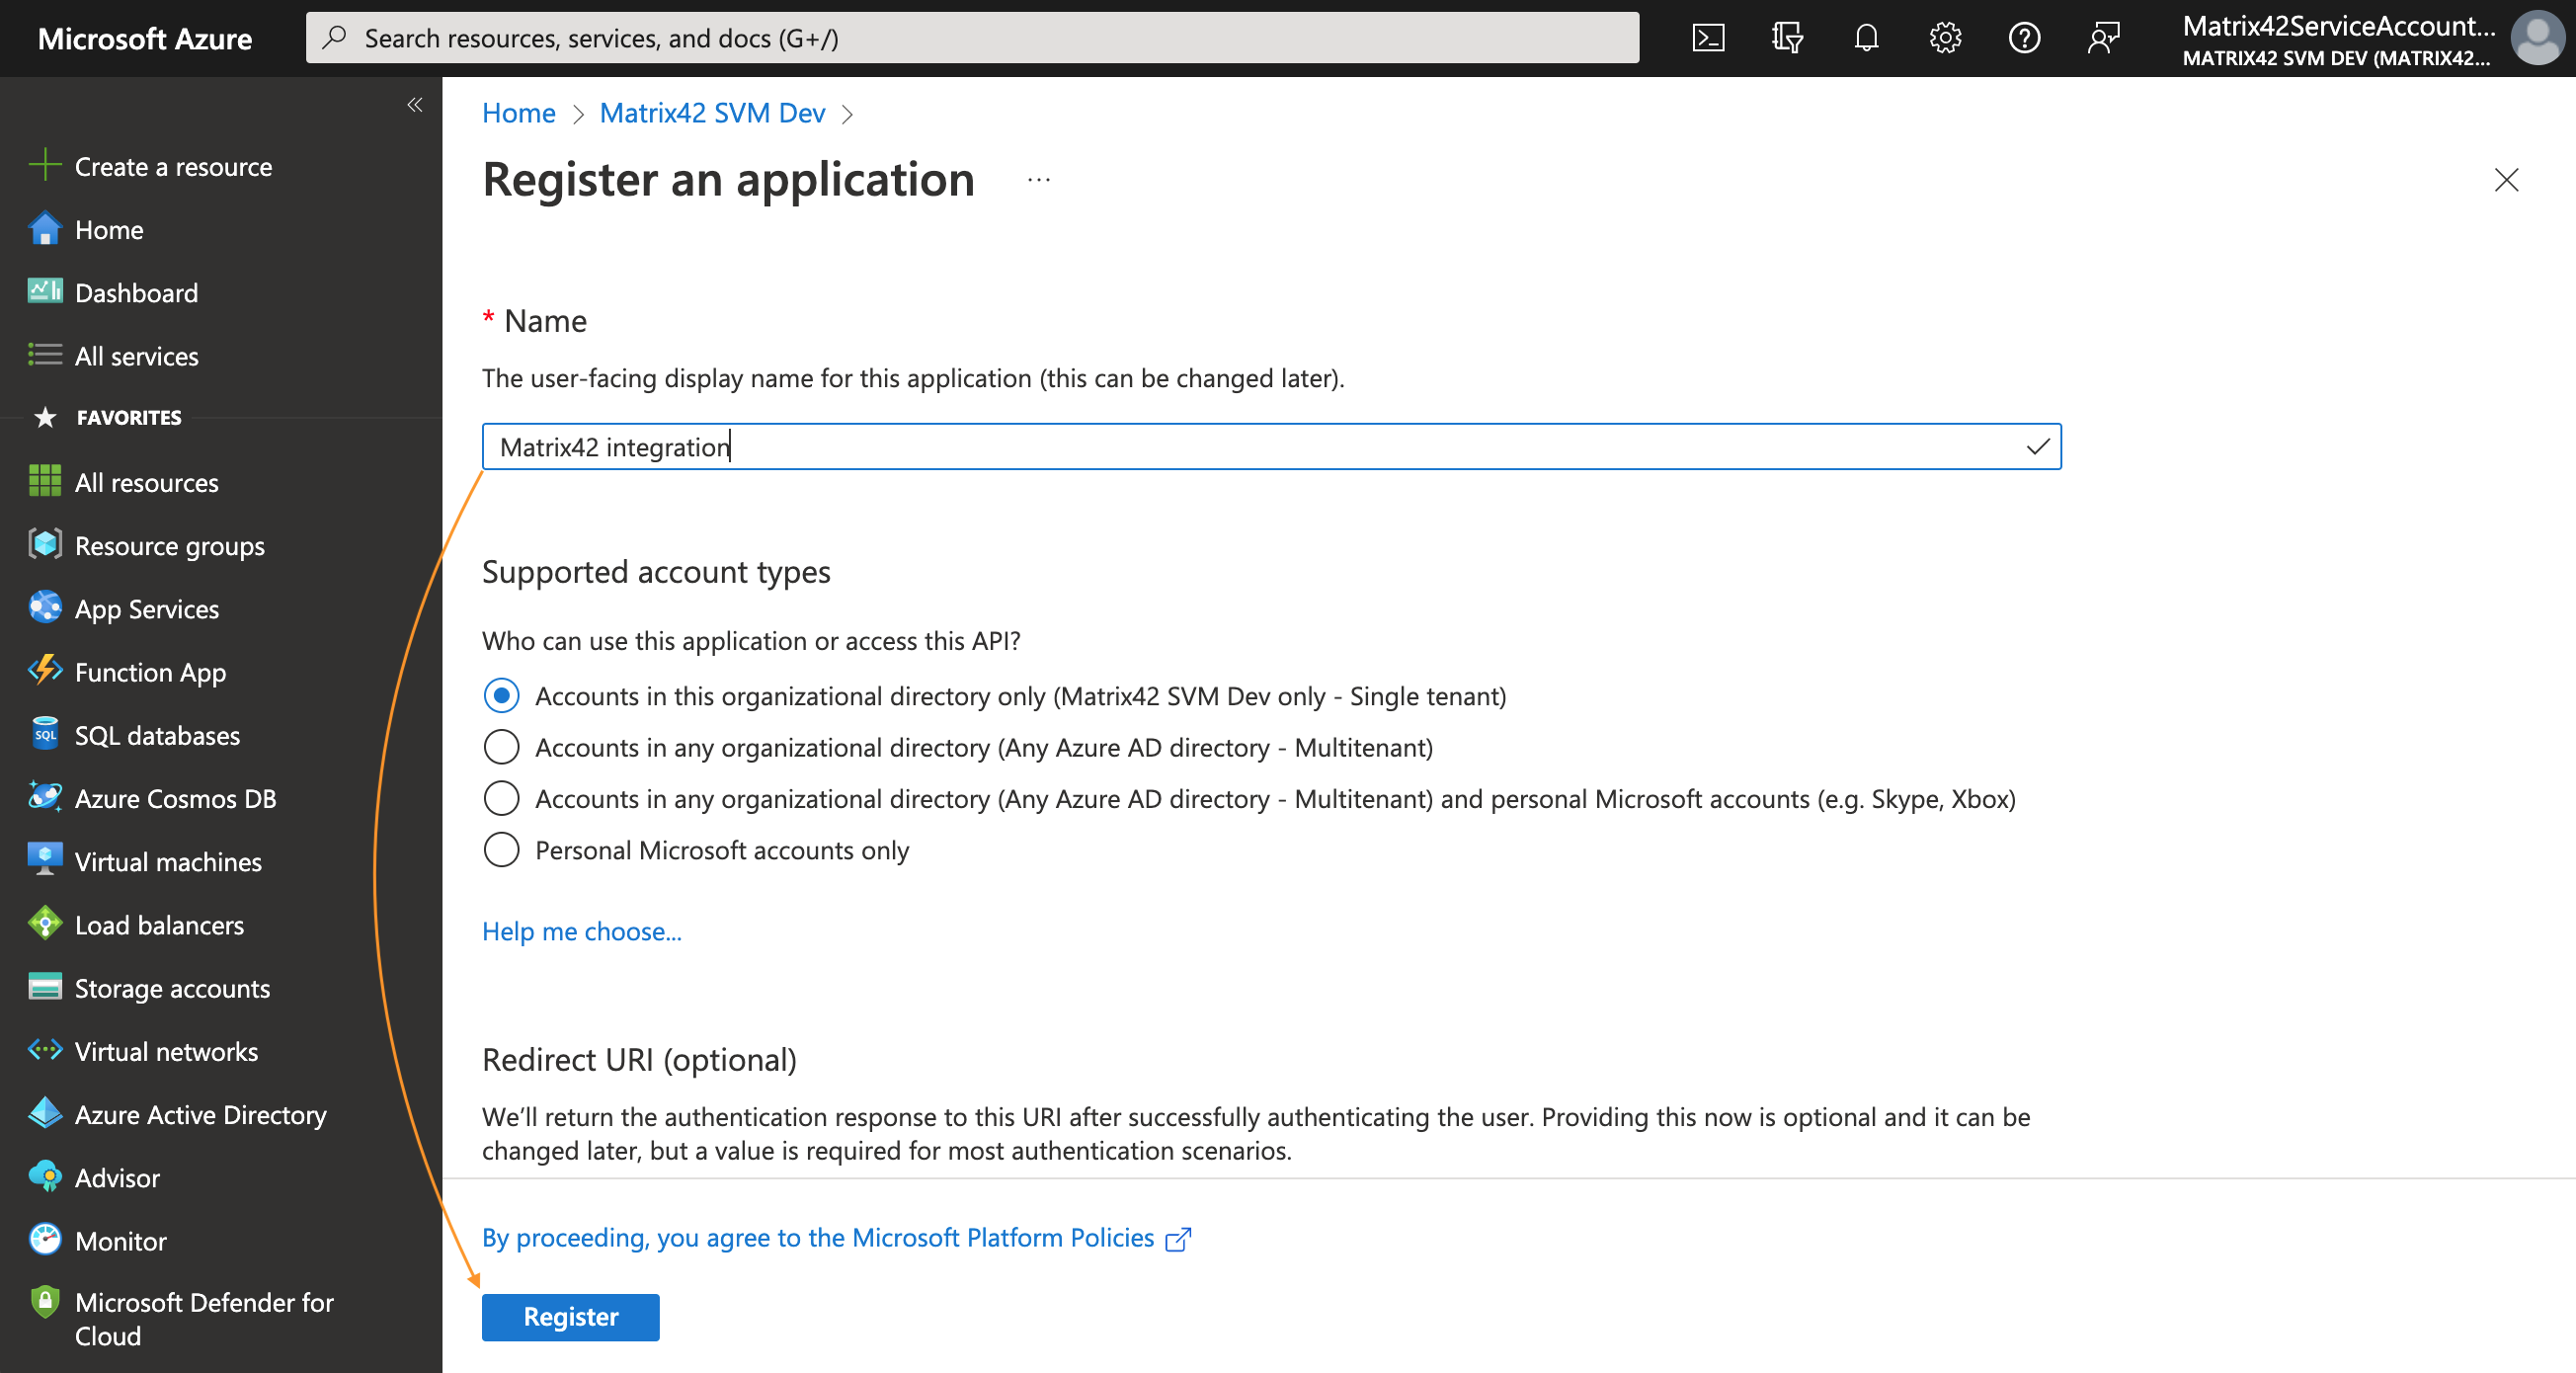
- Provide a display Name for your application, use the default option for the Supported account types and click Register:
-
To set the Redirect URI, select a Web platform option. Modify the Redirect URI according to the example:
https://{hostname}/wm/externalAuth/redirect.html
API permissions
To add permission(s) to access resource API from your client:
- In Azure portal, navigate to Microsoft Entra ID → App registrations;
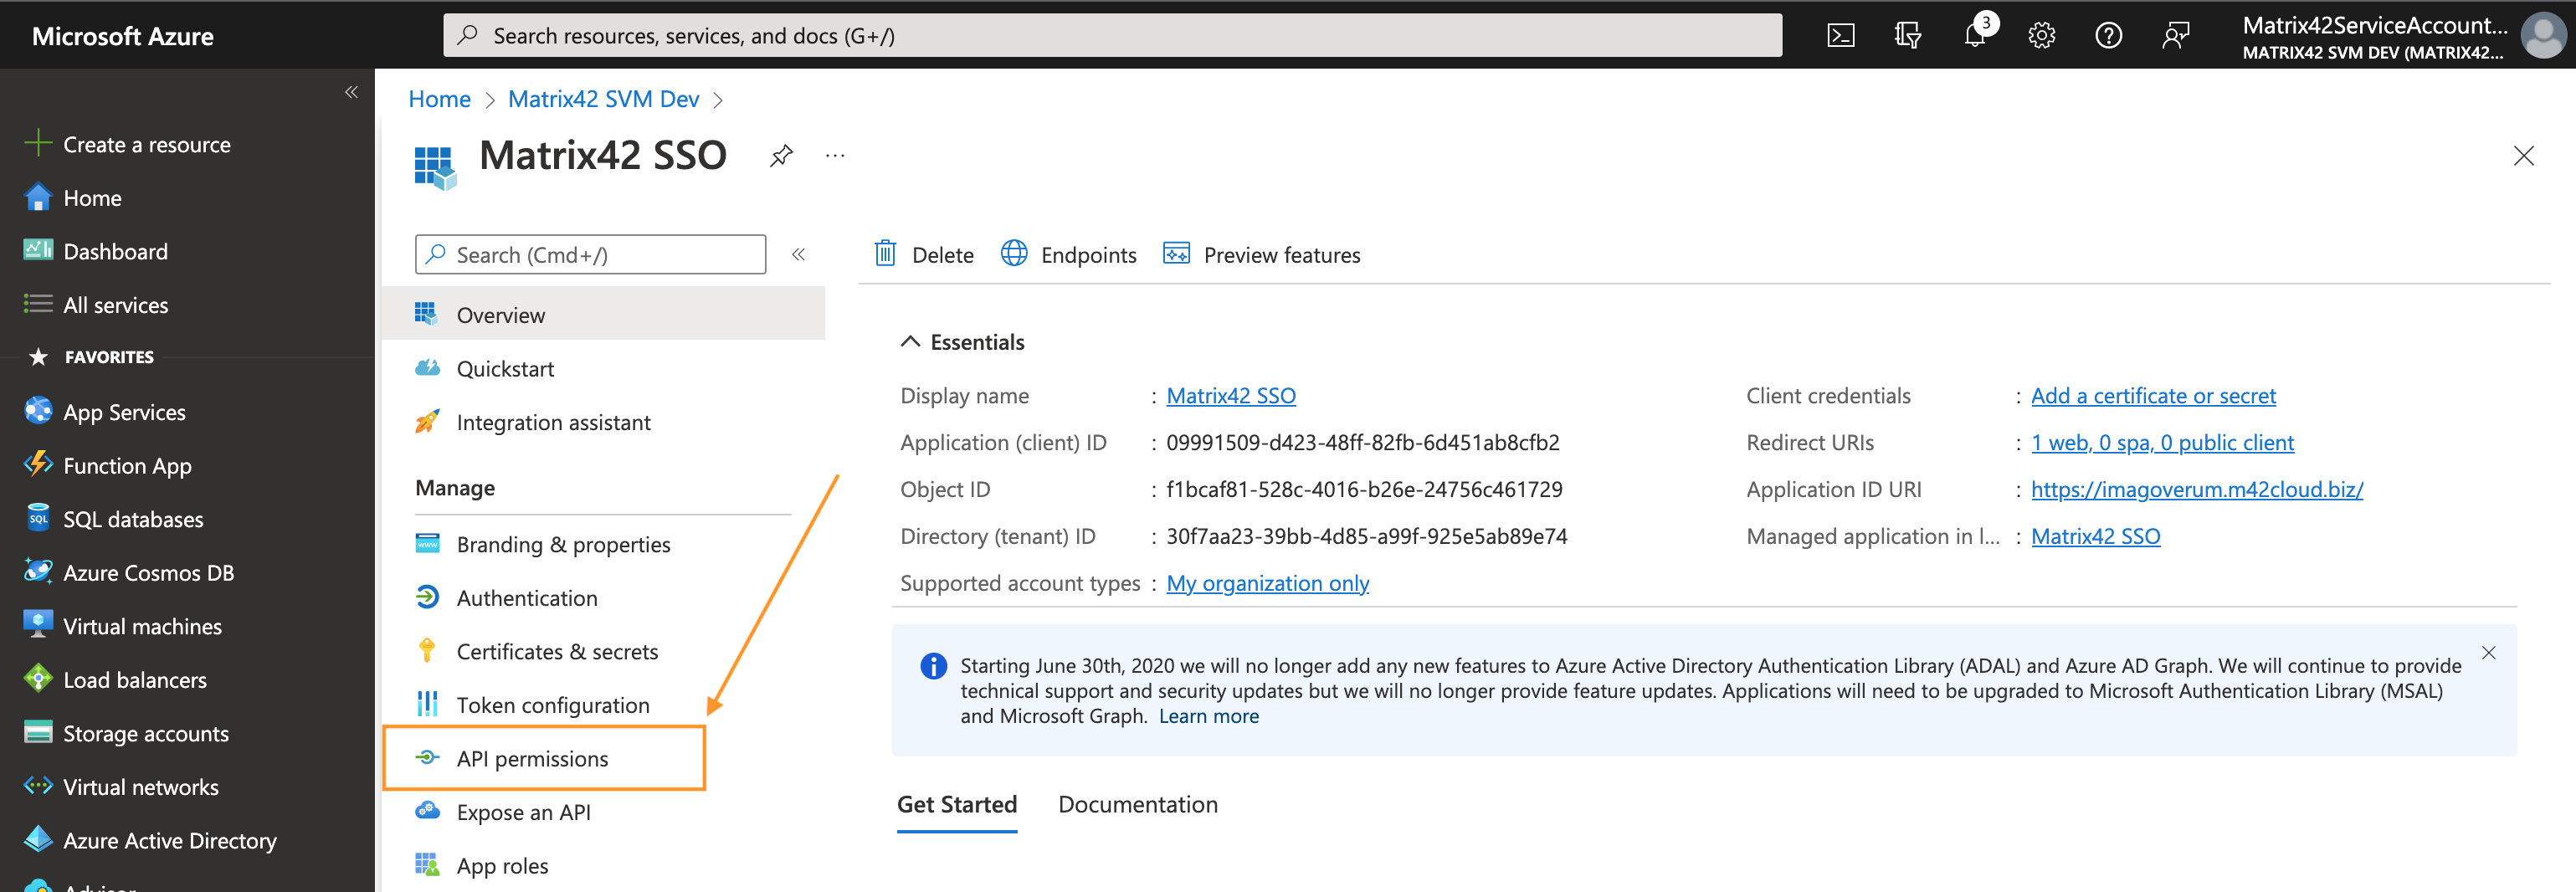
- In All applications tab, search for your application by the display name and click on it to open the Overview page:

- From the app's Overview page, select API permissions:
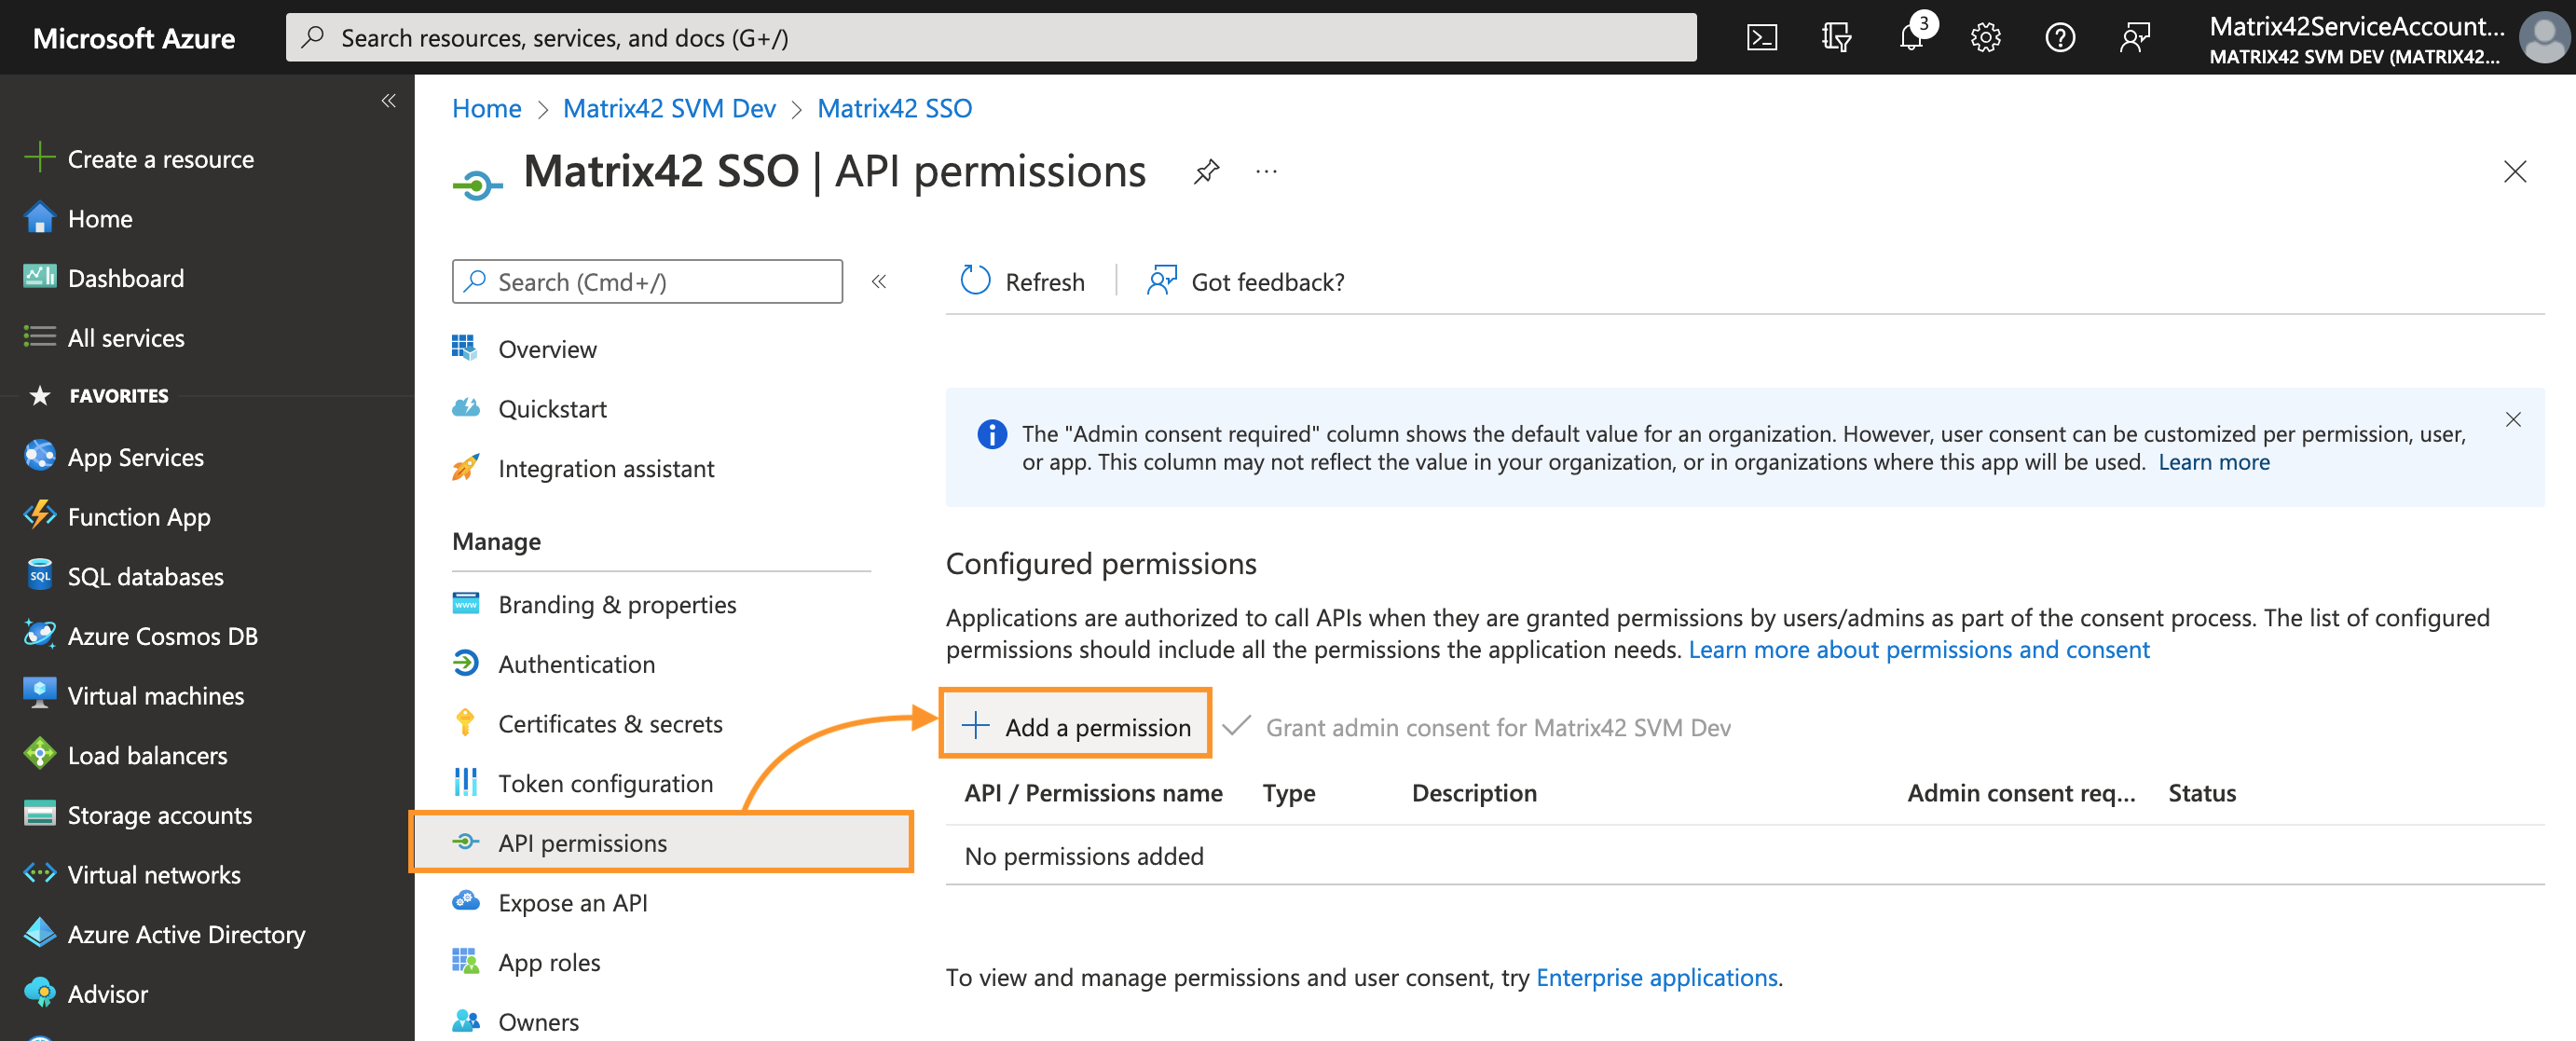
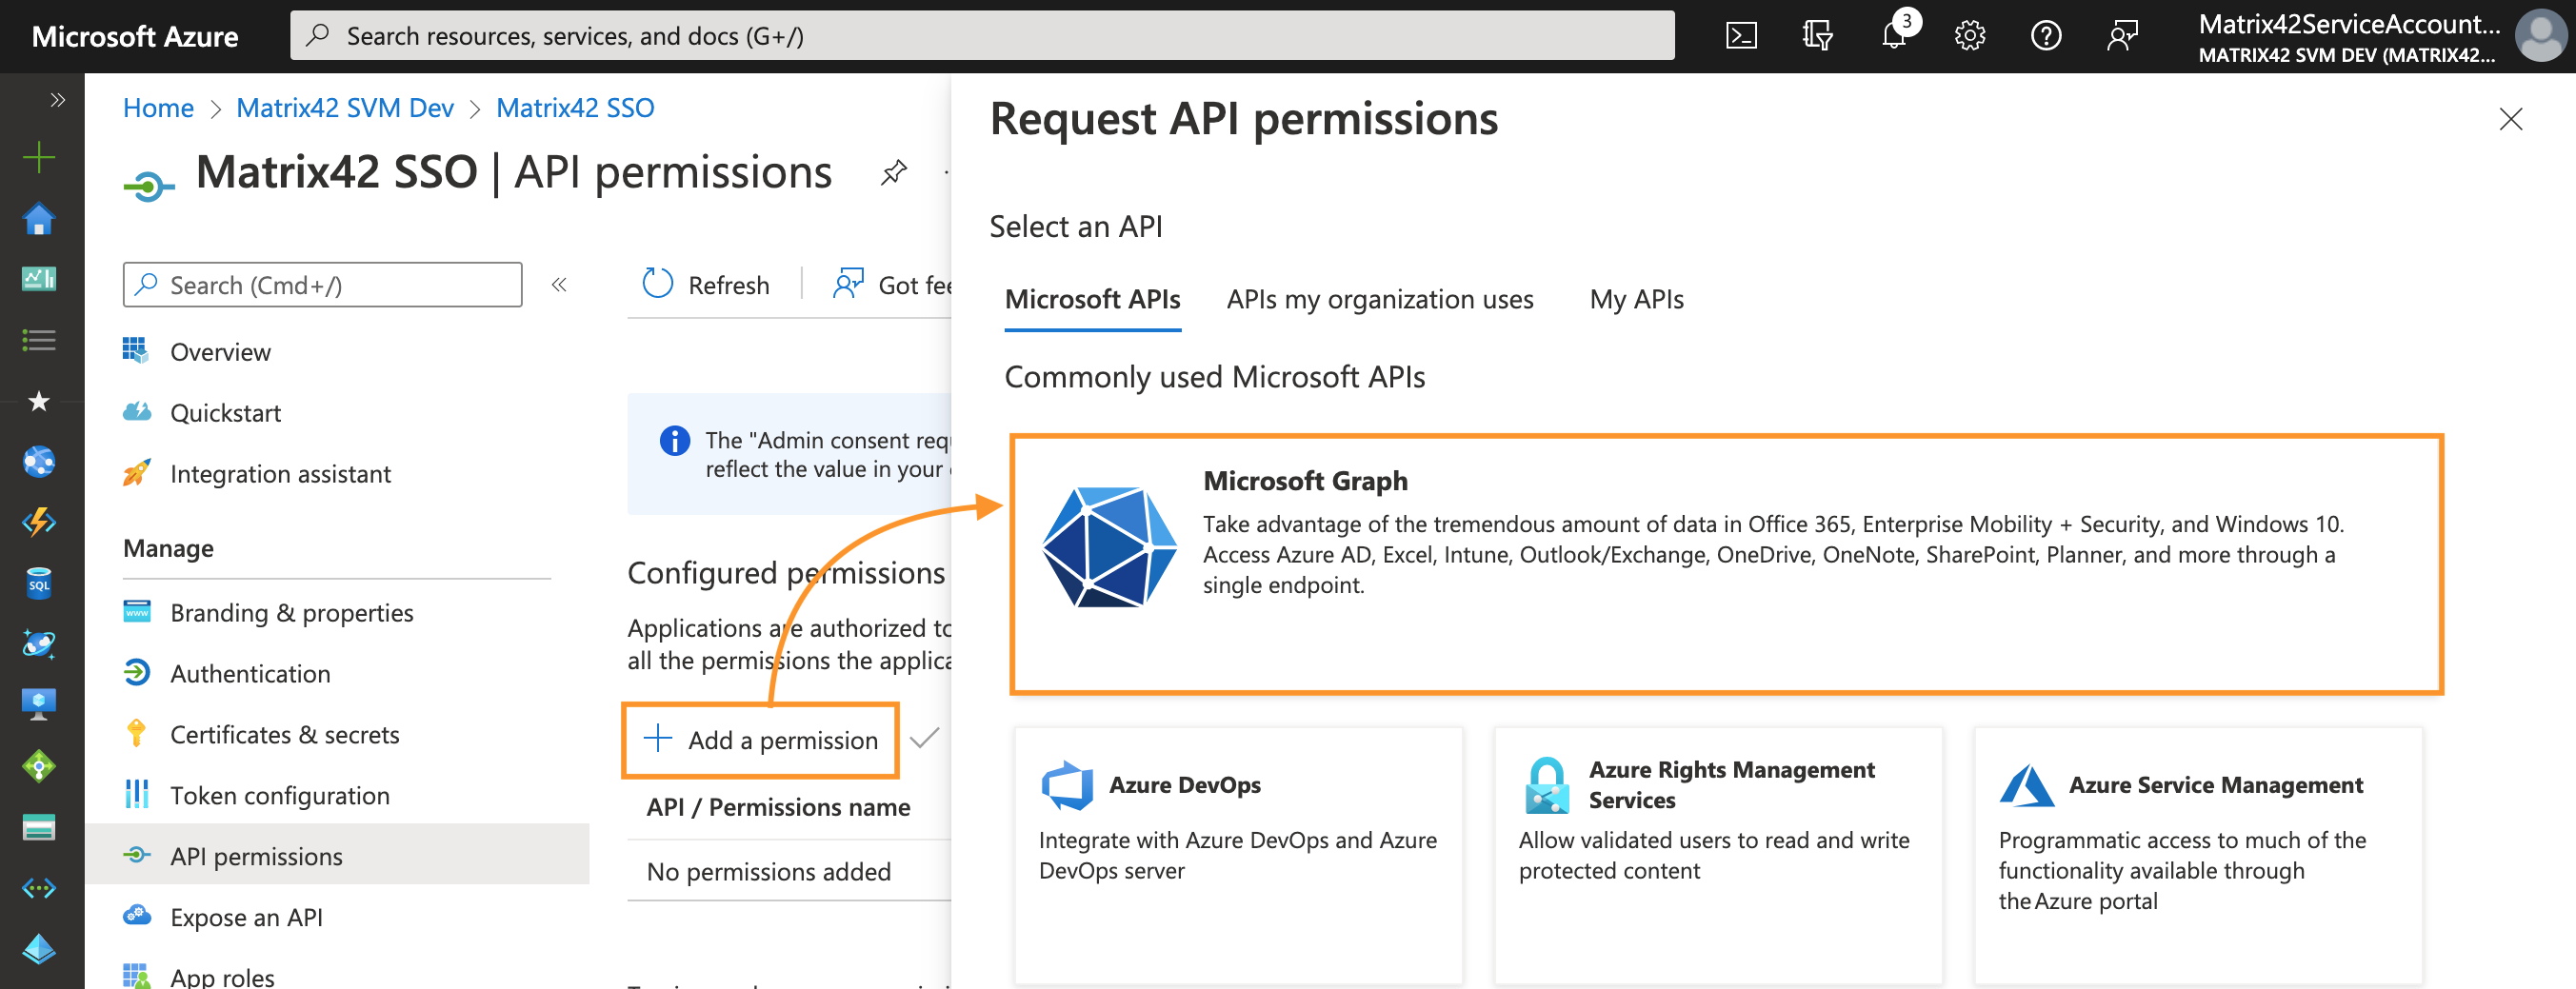
- Click + Add a permission button:
- On the Request API permissions panel, select Microsoft Graph:
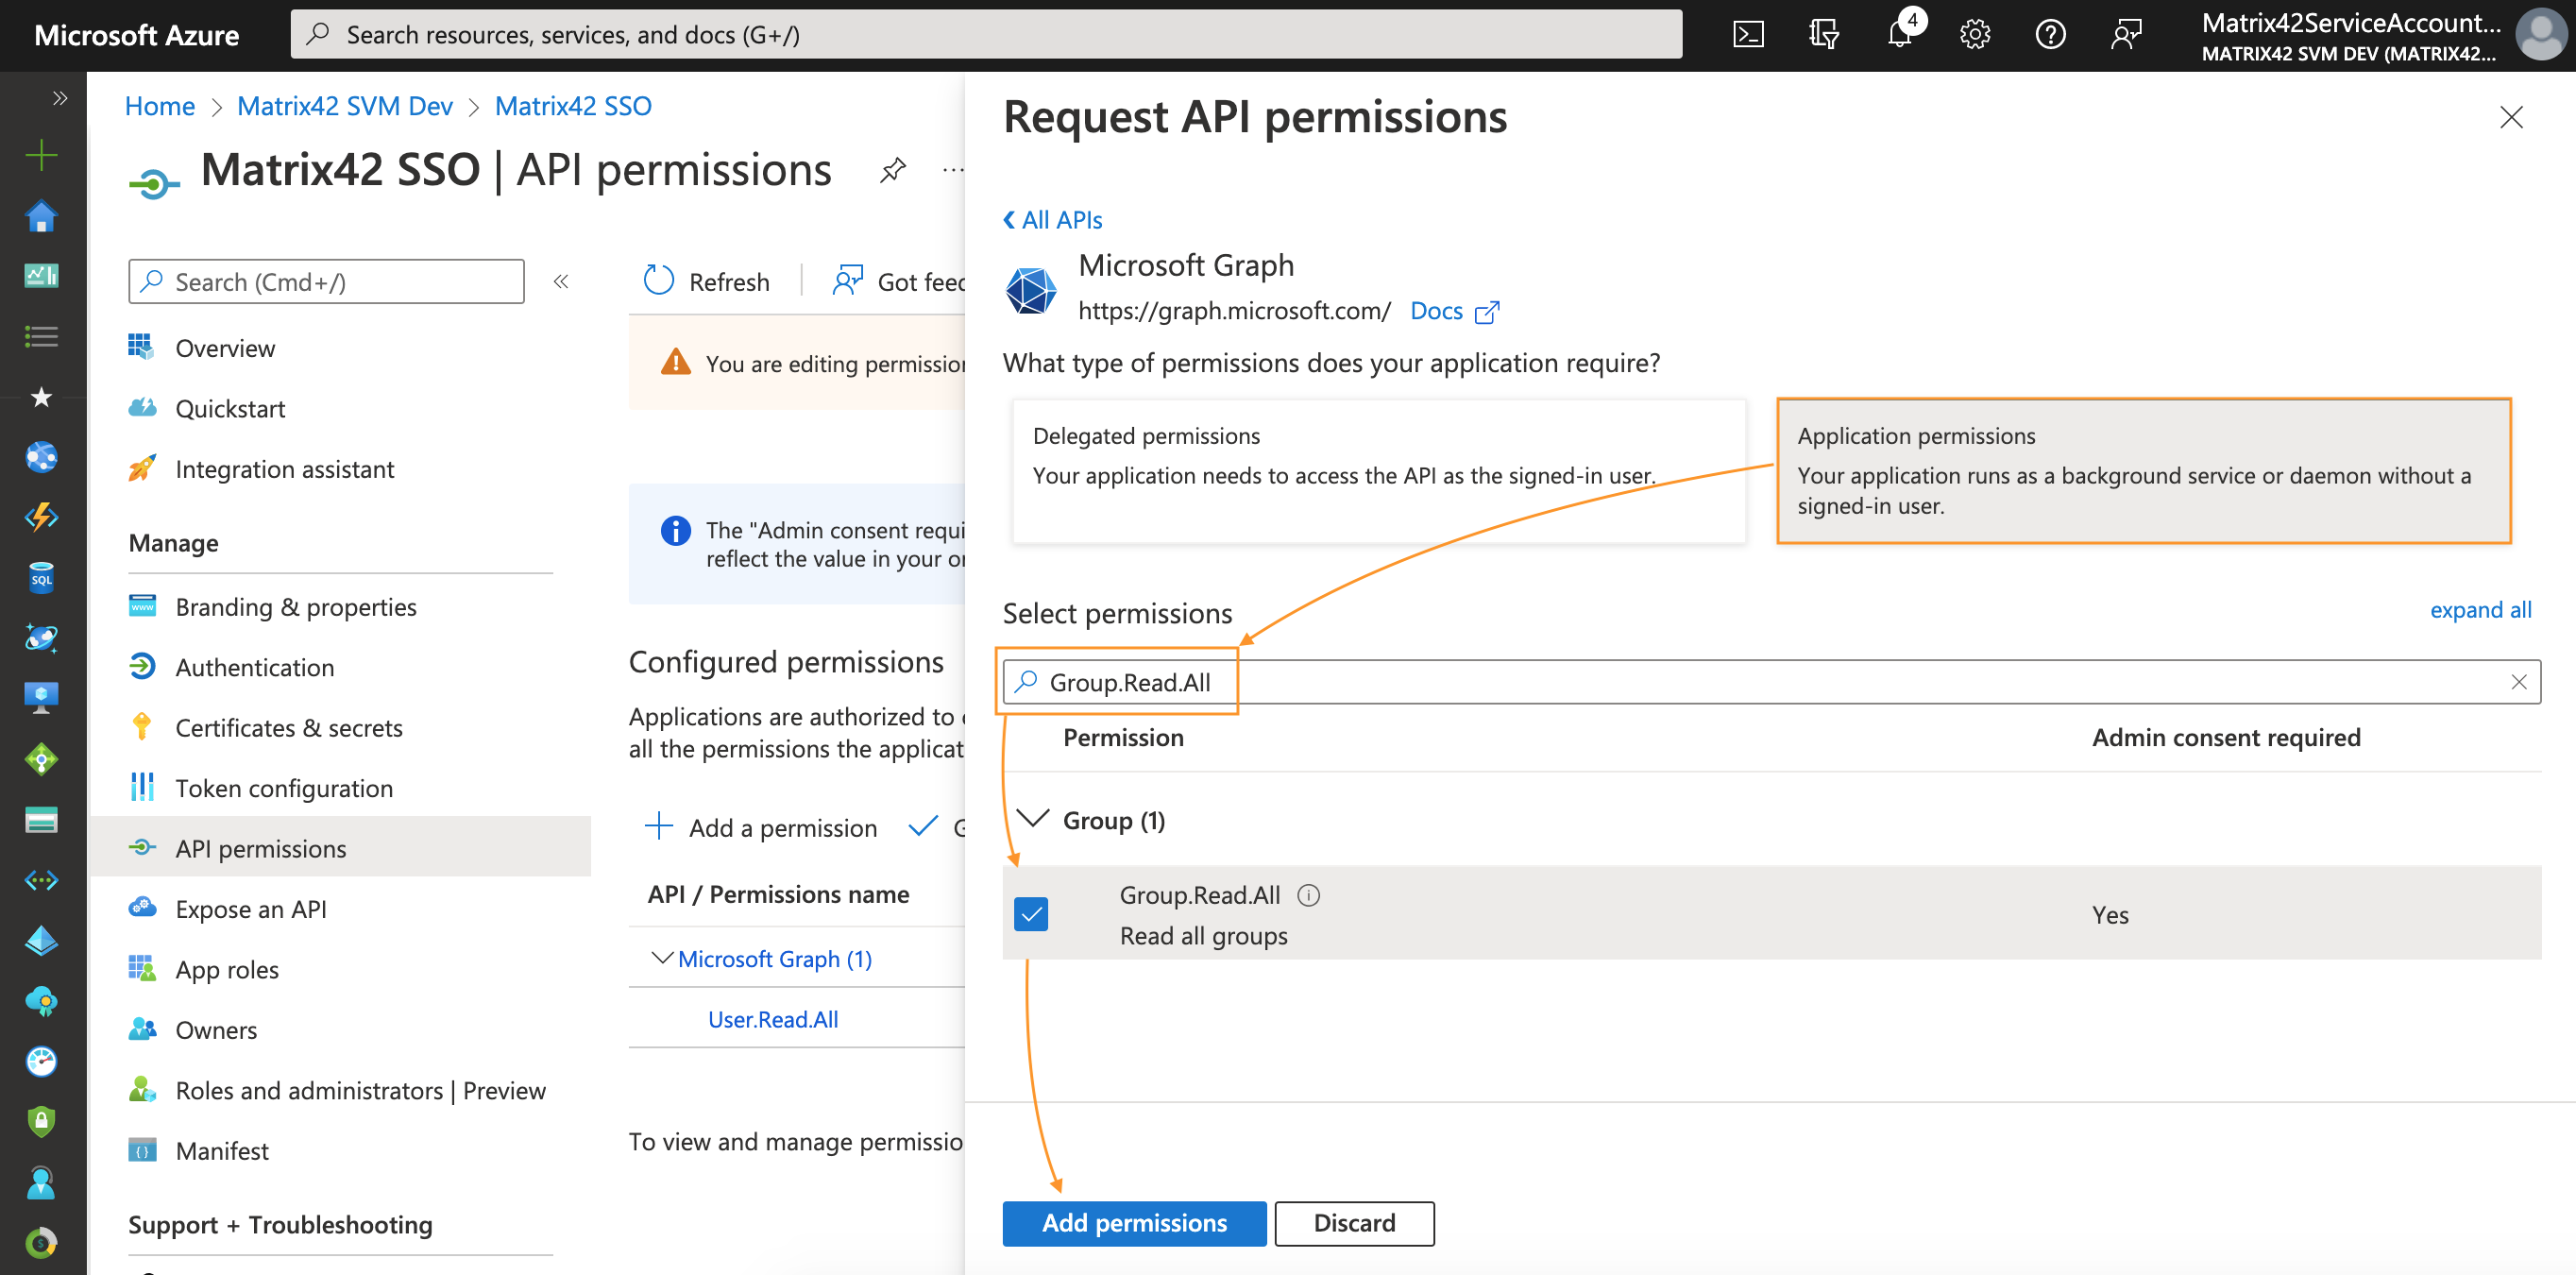
- Select the type of permissions used by the application to access Azure:
- Application permissions: the application runs as a background or daemon without a signed-in user. Ideally fits for background services like Microsoft Entra ID Import.
- Delegated permissions: all the requests from the integrated application (Matrix42 Microsoft Entra ID Import) are executed under specific signed-in user.
Please make sure to pick the correspondent Application Permission type when setup the Authorization options in your ESMP instance. For details, see Authorization options section of this page.
- In the Select permissions search box type User.Read.All → select the permission checkbox → click Add permissions at the bottom of the page:

- Similarly, add permissions for Group: in the Select permissions search box type Group.Read.All → select the permission checkbox → click Add permissions at the bottom of the page:
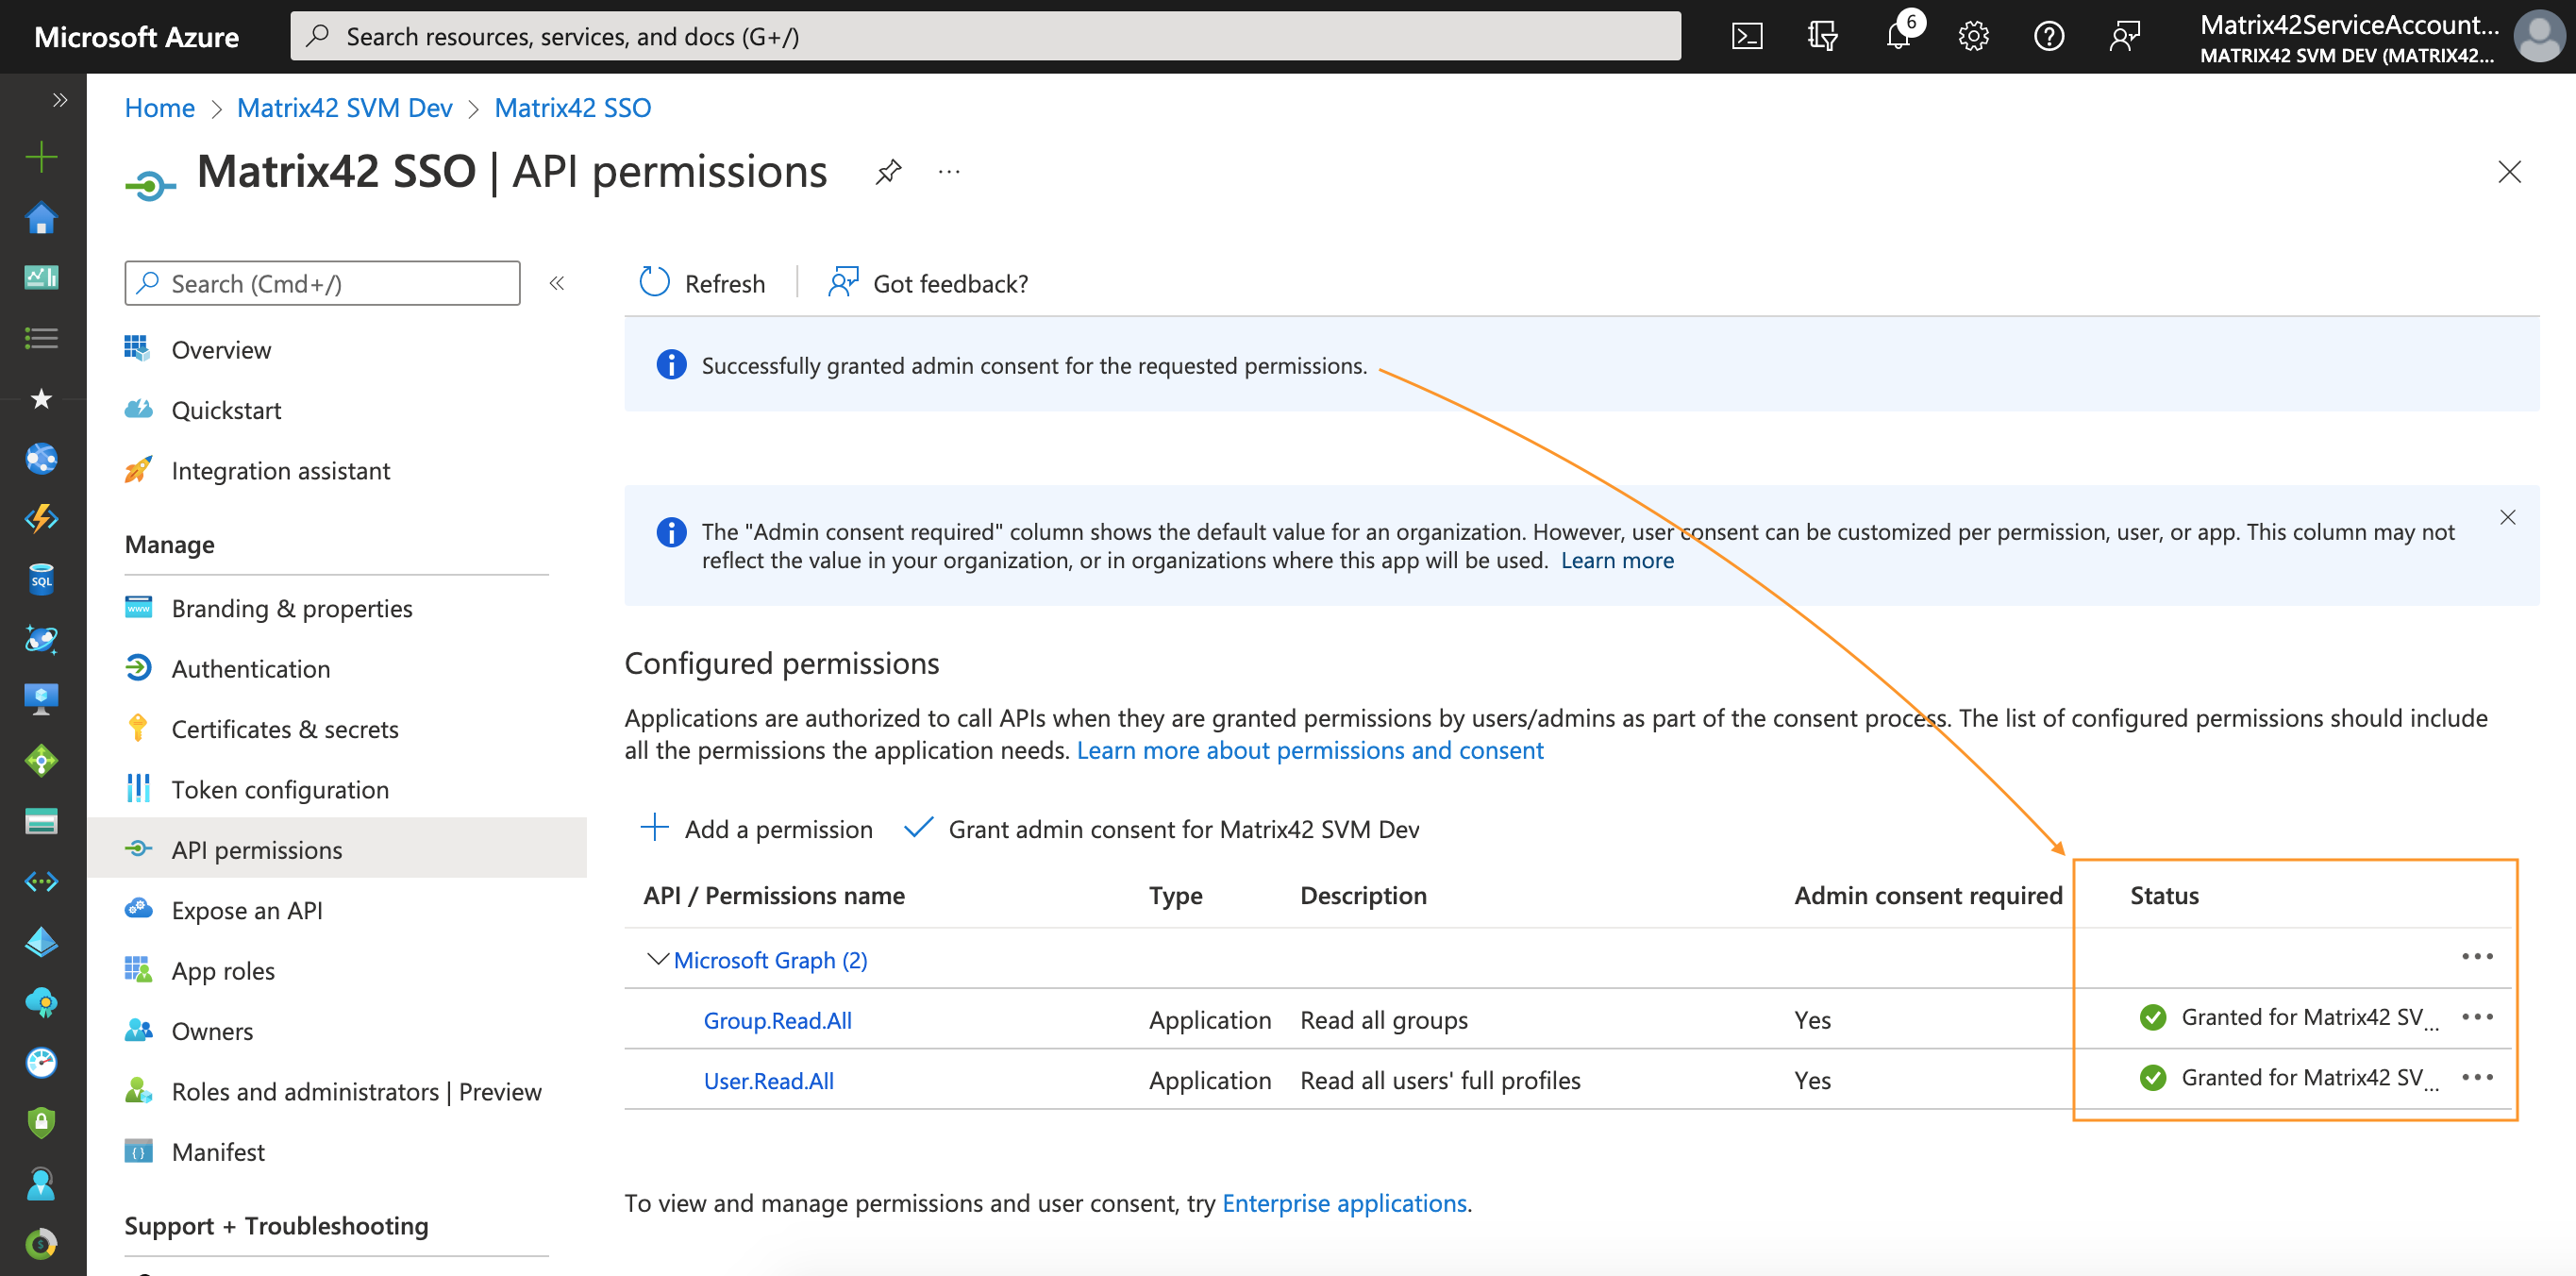
- You will return to the API permissions page, where the permissions have been saved and added to the table.
To get Global Administrator consent on selected Permissions, click Grant admin consent for your tenant and confirm:
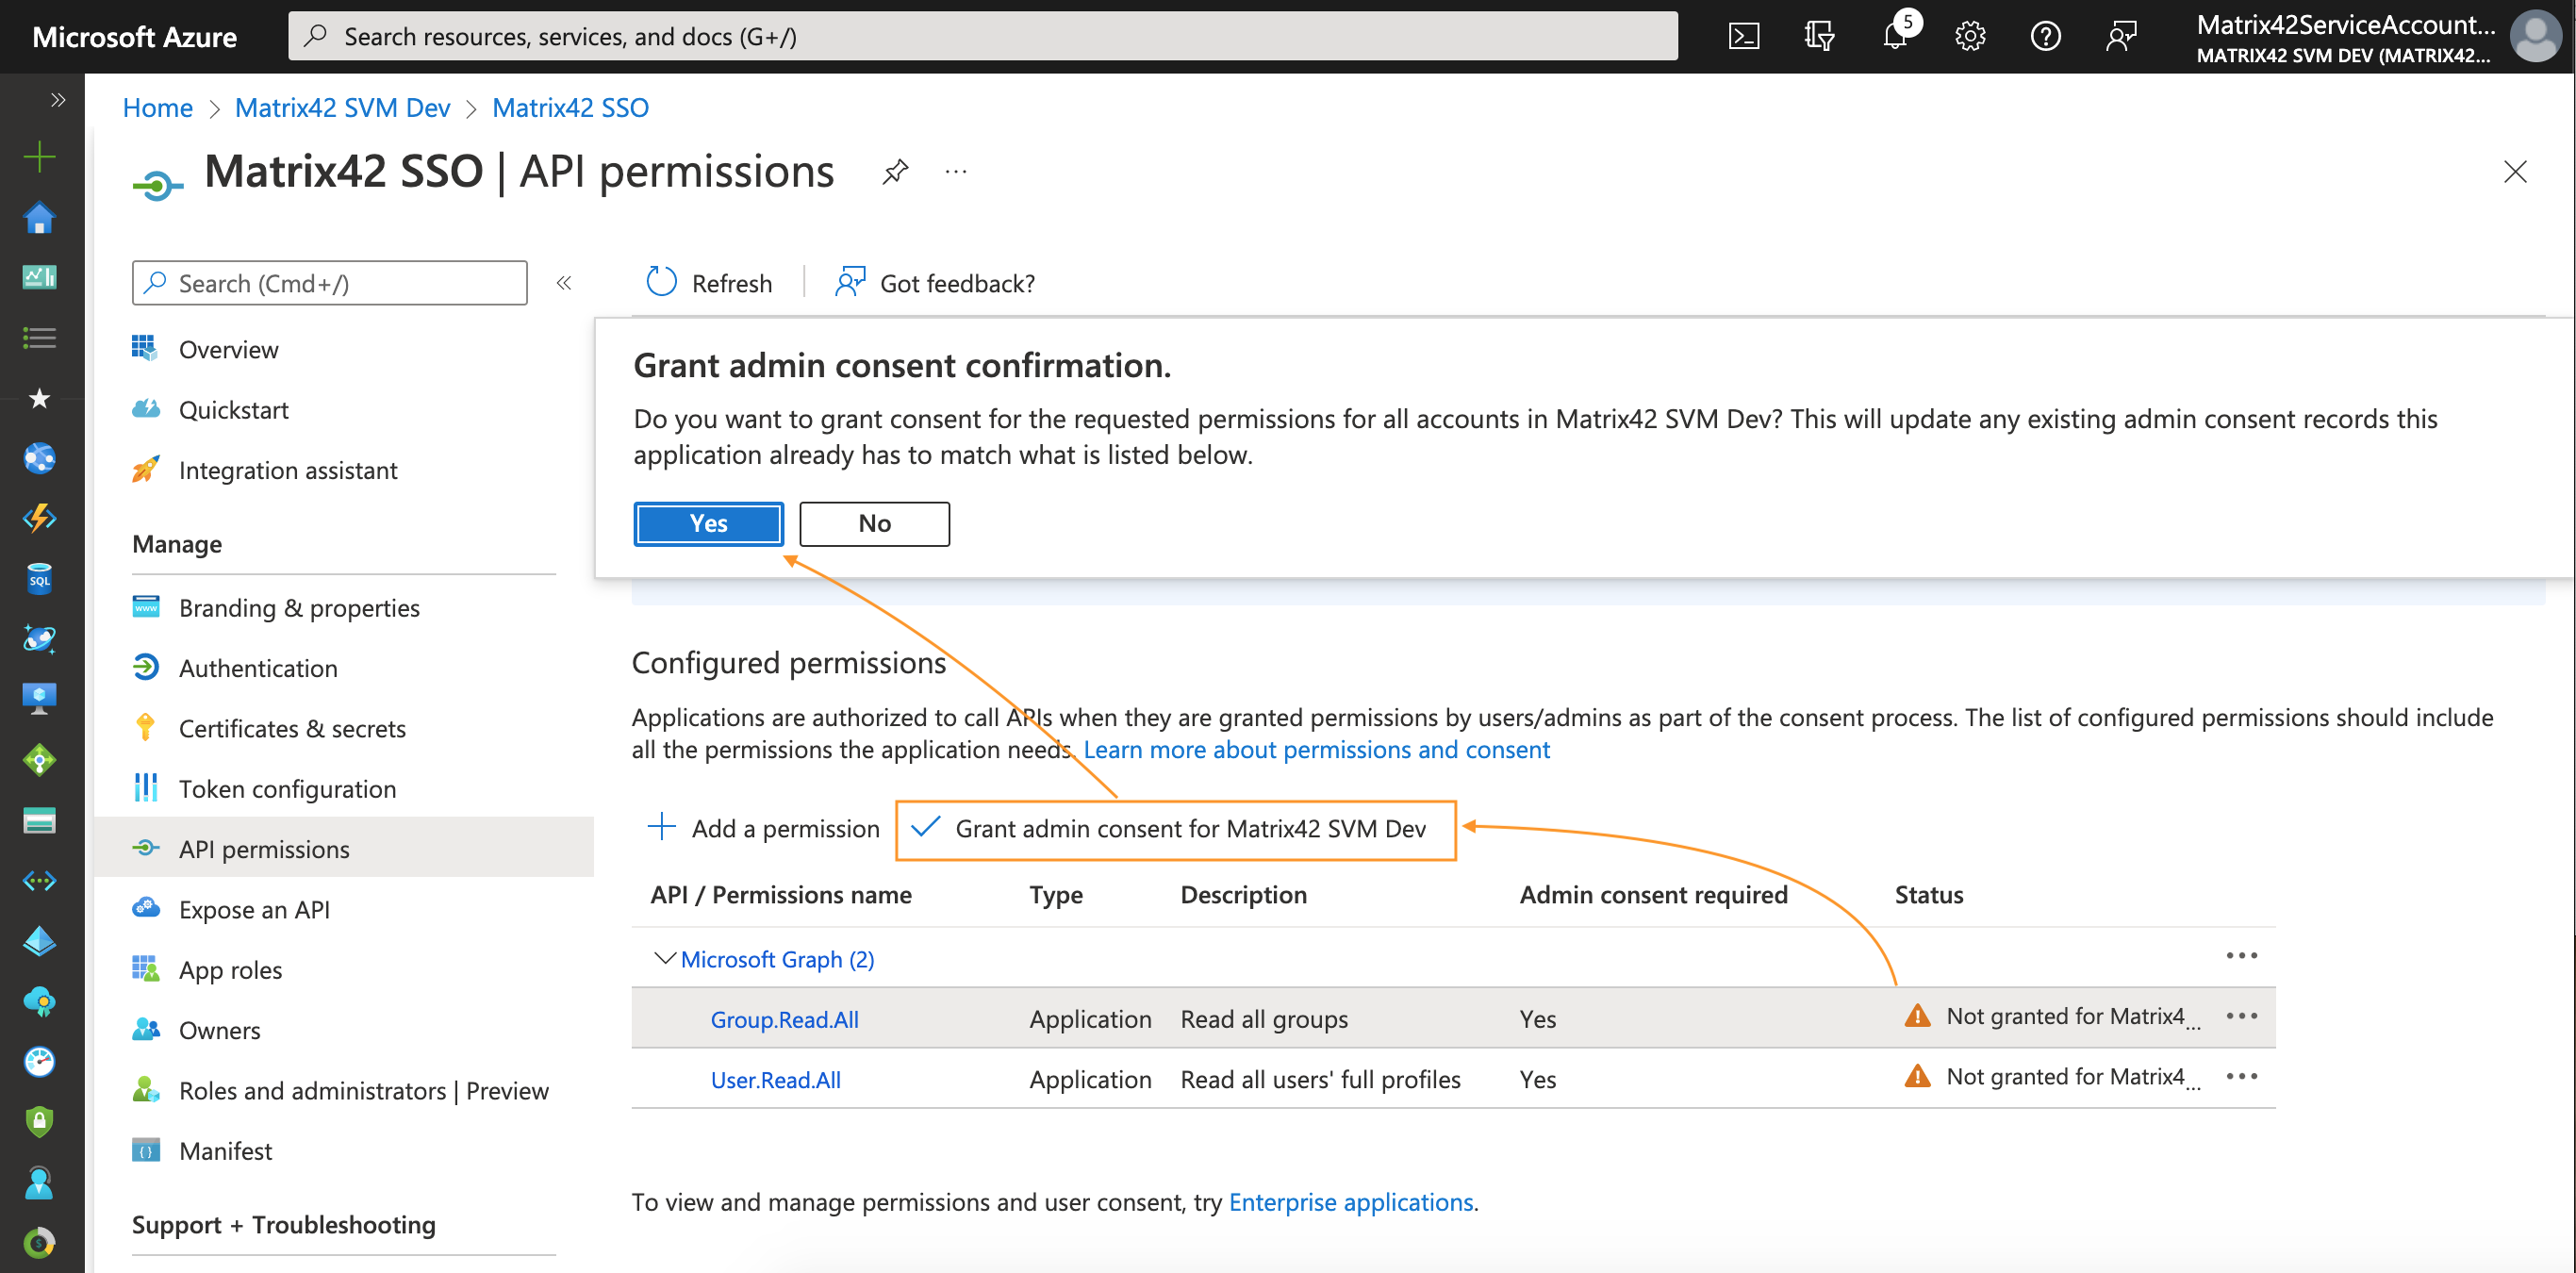
Thus, the only action required from the Global Administrator role is to access the target application and grant consent to requested permissions:
Certificates & secrets
Add credentials to your web application
For a web/confidential client application to be able to participate in an authorization grant flow that requires authentication (and obtaining an access token), it must establish secure credentials. The default authentication method supported by the Azure portal is client ID + secret key.
To add credentials to your web application:
- In Azure portal, navigate to Microsoft Entra ID → App registrations;
- In All applications tab, search for your application by the display name and click on it to open the Overview page:
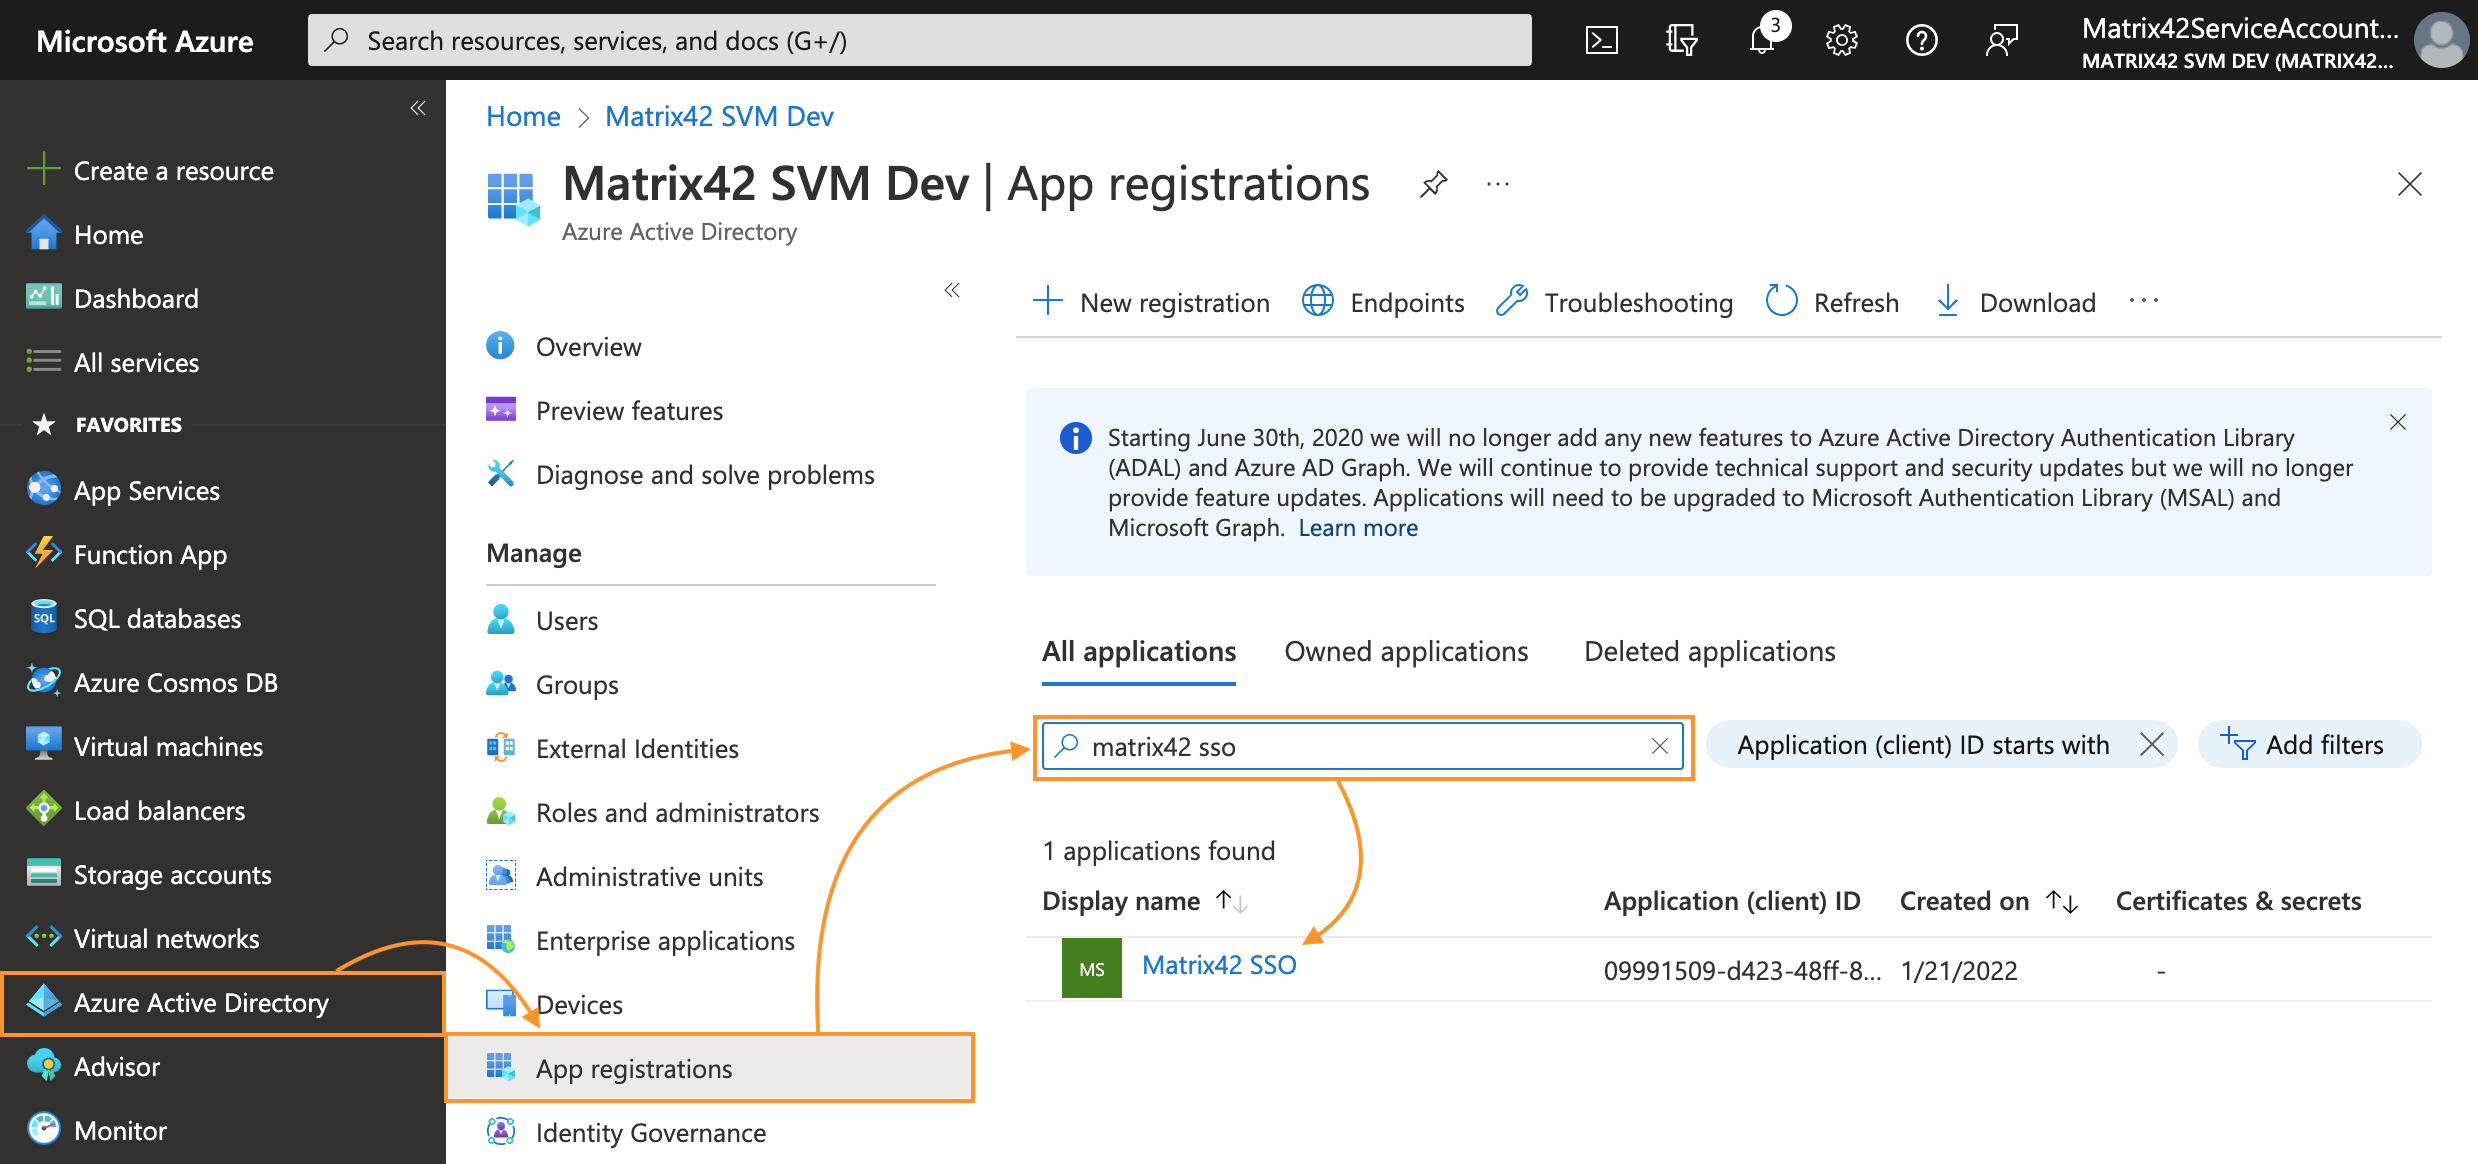
- From the app's Overview page, select the Certificates & secrets section:
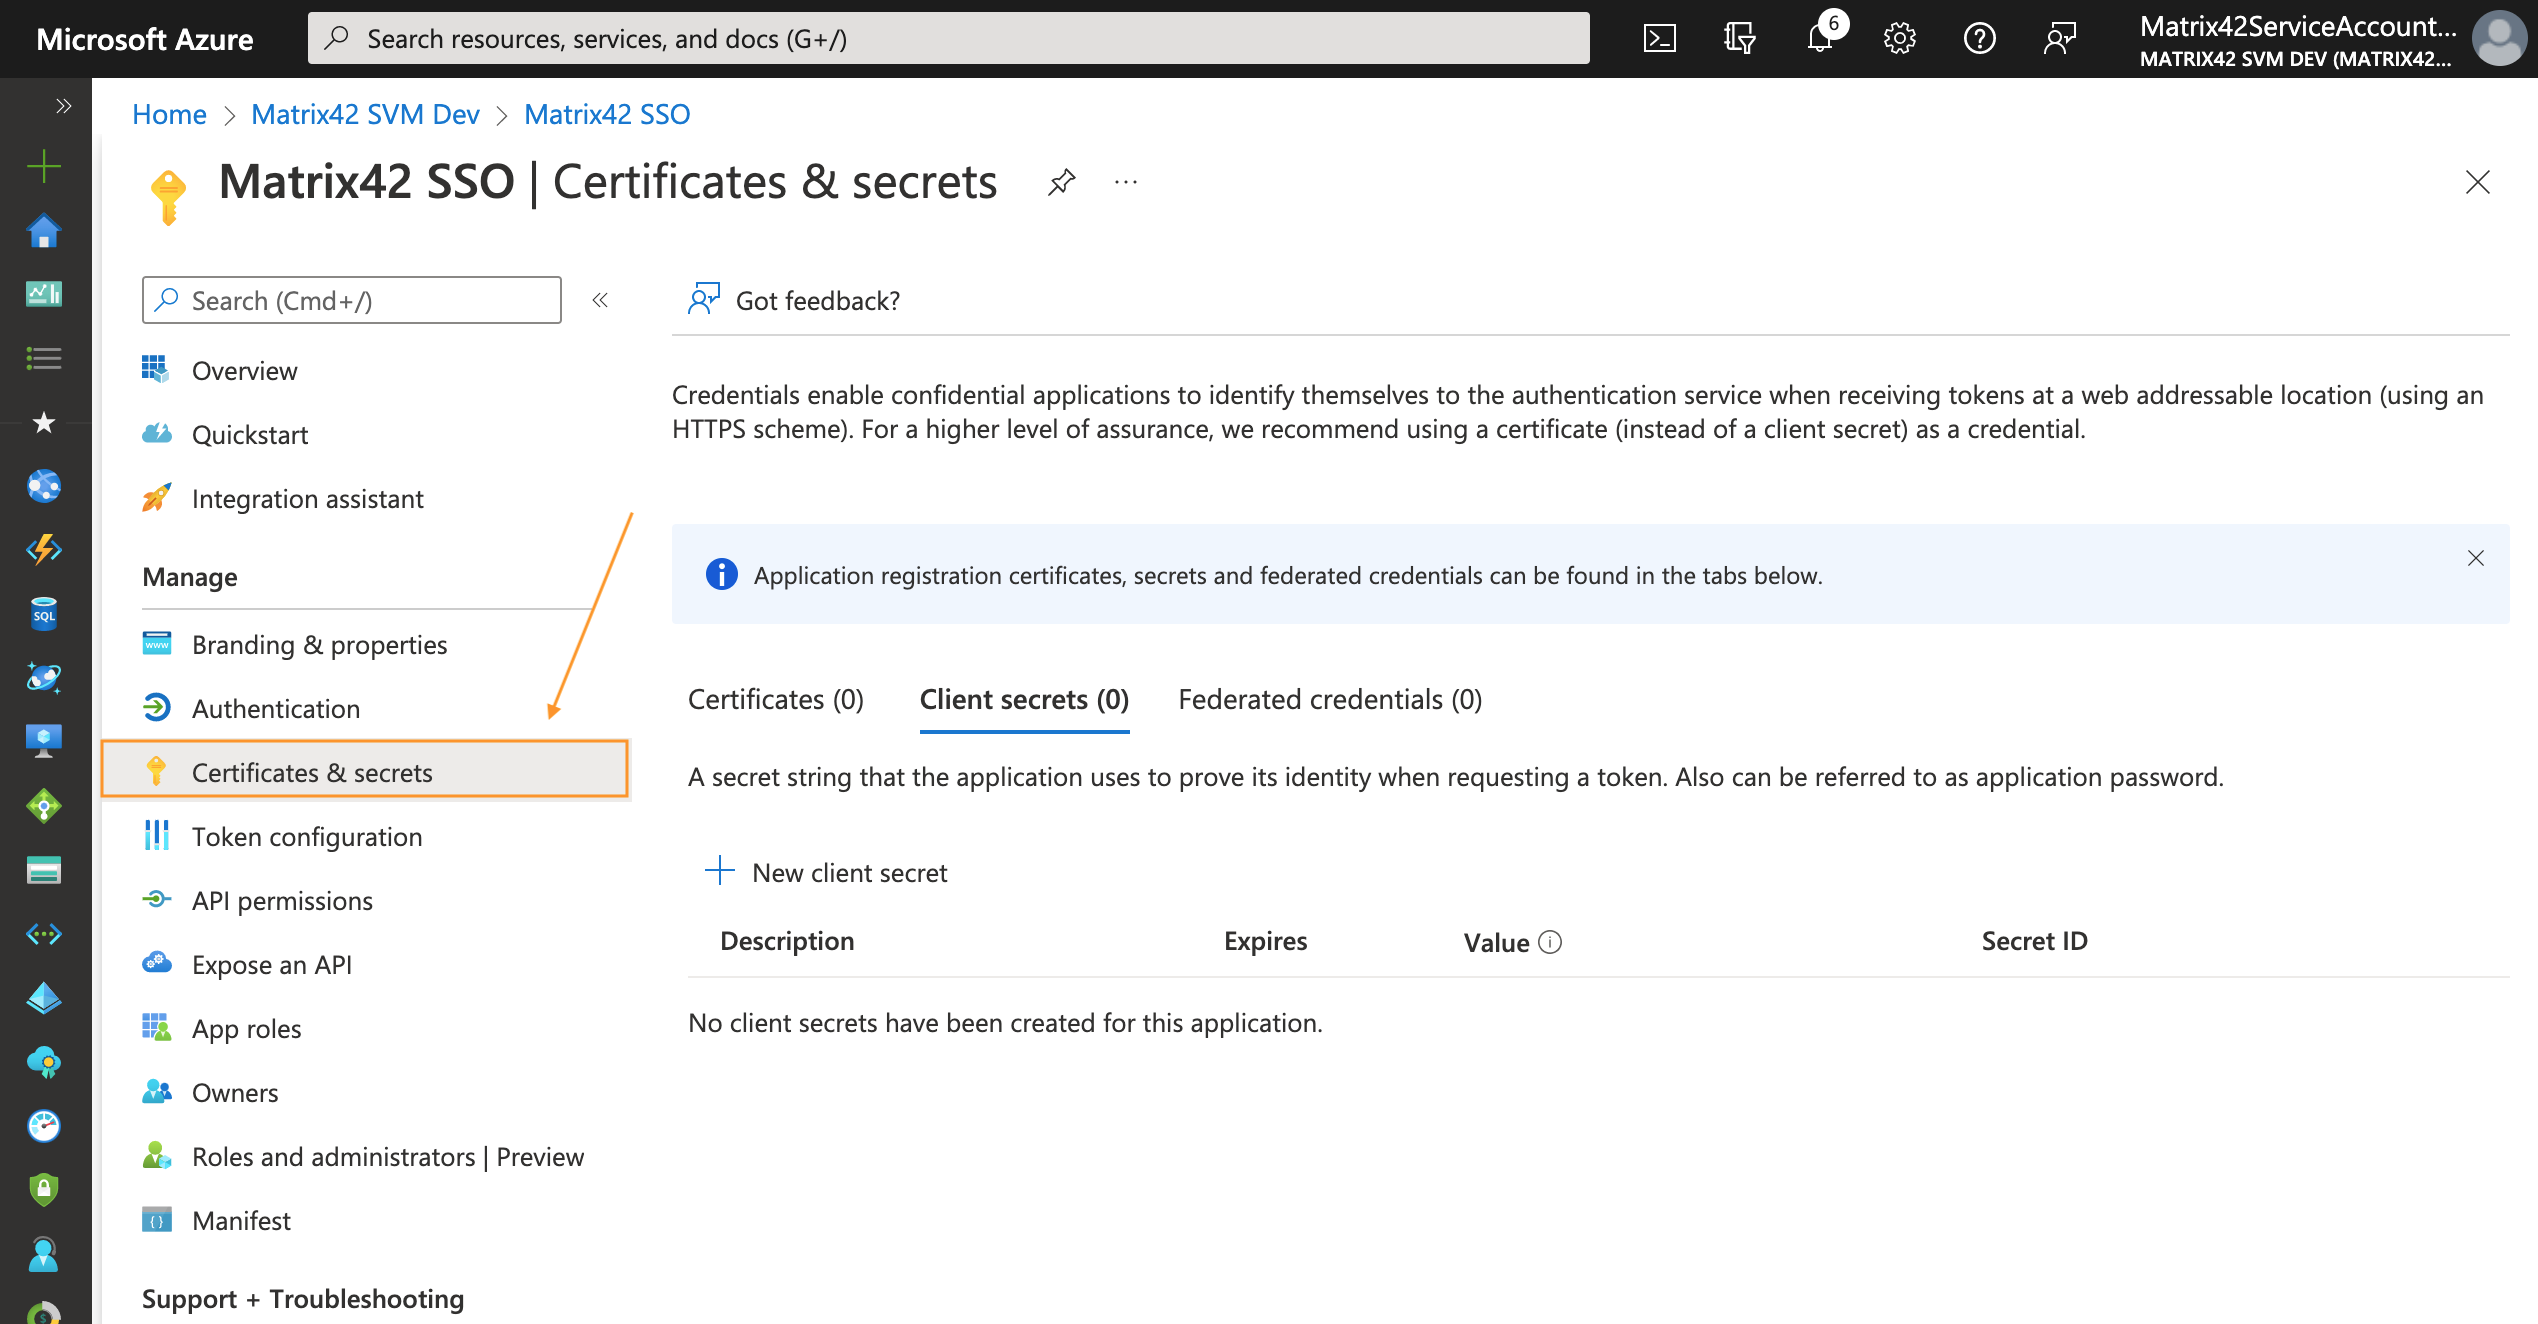
- To add a client secret, follow these steps:
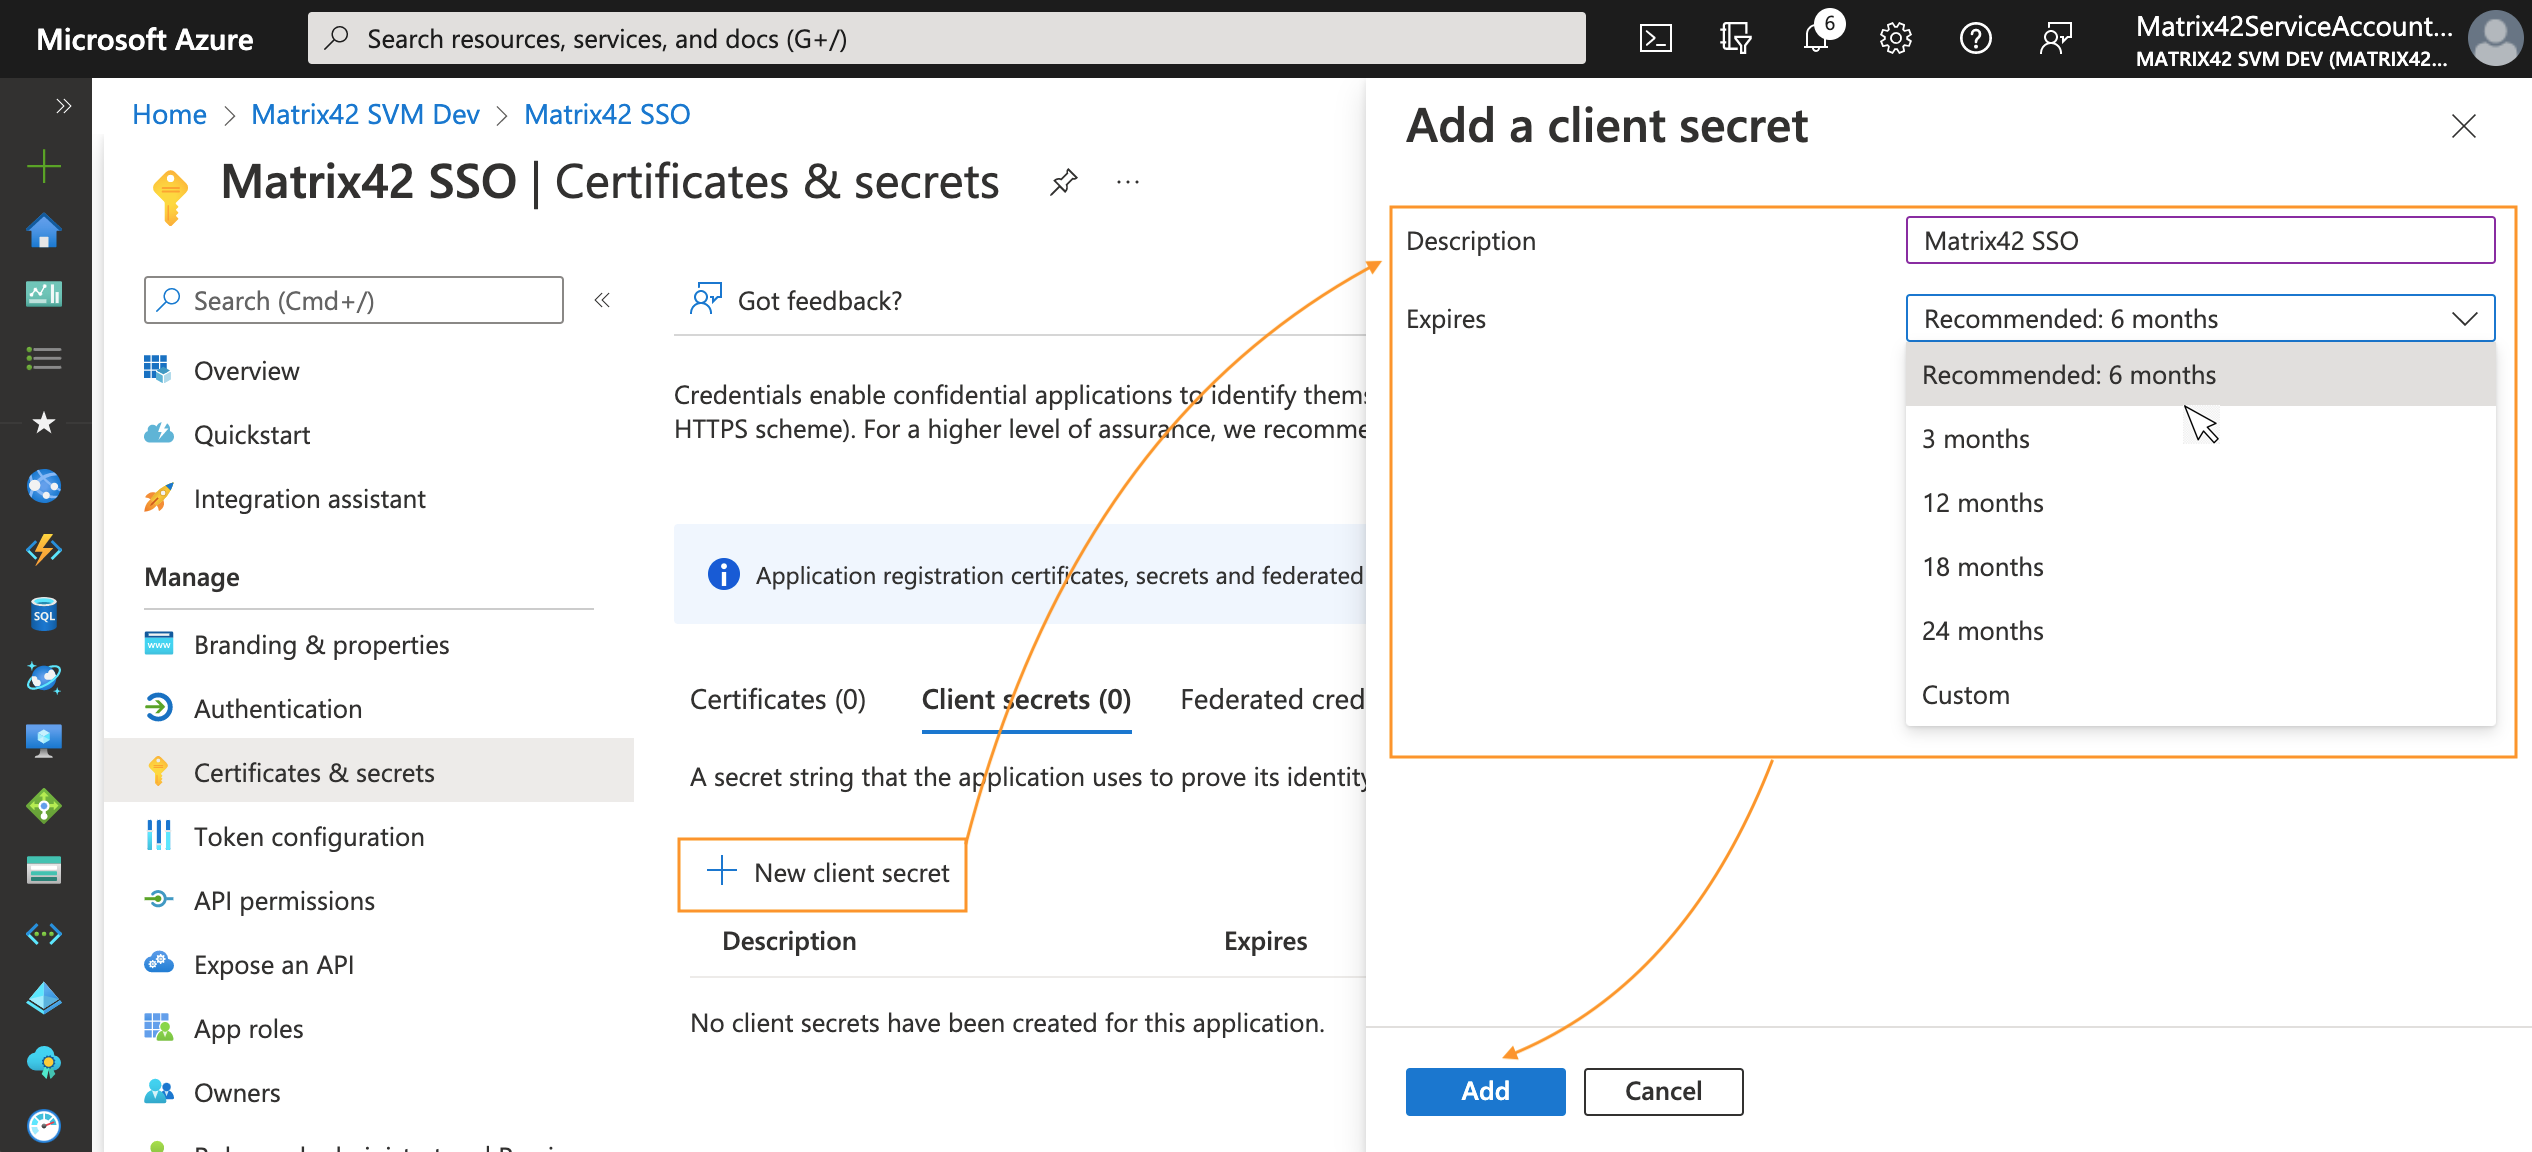
- Select the + New client secret;
- Add a description of your client secret;
- Select the expiration period;
- Select Add:
- After the screen has been updated with the newly created client secret, copy the VALUE of the client secret and store it temporarily as you will need it later as this secure key is required for the configuration of Microsoft Entra ID integration in your ESMP instance, see Client secret field in ESMP Authorization options section of this page.
This secret string is never shown again, so make sure you copy it immediately after it has been generated. In production apps, you should always use certificates as your application secrets:

ESMP Instance Configuration
Add a new Microsoft Entra ID / Microsoft 365 connection
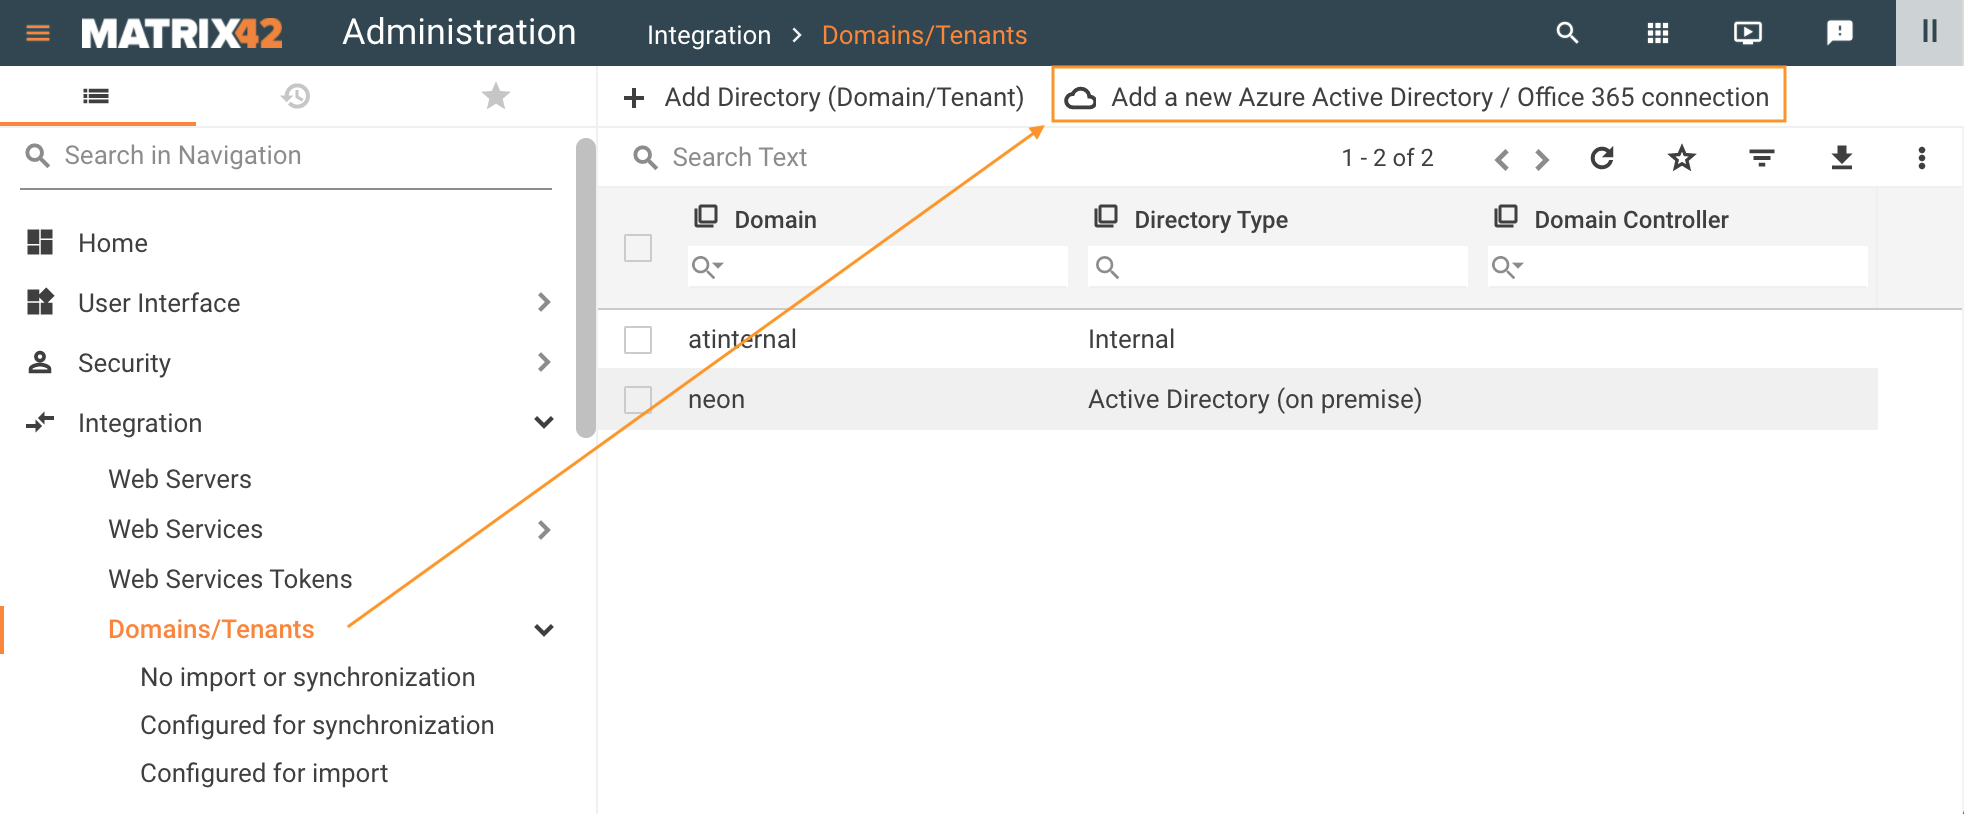
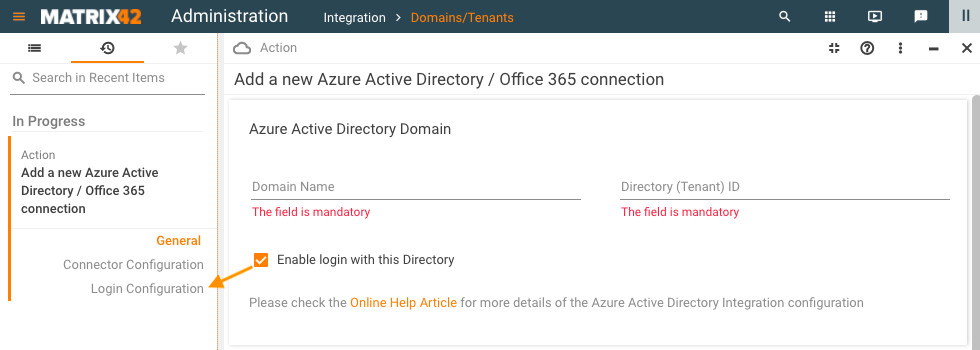
To configure Microsoft Entra ID integration in your ESMP instance, open Administration application → Integration → Domains/Tenants → Add a new Microsoft Entra ID / Microsoft 365 connection:
The action opens a wizard that allows configuring integration in 3 steps:
- Configure connector using data from the Azure Portal registered application;
- Define Users and Groups import settings;
- Configure login (if enabled) according to the Azure Portal authentication settings.
When these steps are completed the wizard allows you to test the connection and in case of success immediately run the import.
Fill out the necessary fields as described below.
General
Microsoft Entra ID Domain
-
Domain Name (mandatory): provide a unique name for the connection. This can be any name as it is used internally in the Matrix42 system only;
-
Directory (Tenant) ID (mandatory): enter the unique directory tenant GUID that you want to request permission from. You may find this information on the Azure app registration overview page (in Azure portal, navigate to Microsoft Entra ID → App registrations → in All applications tab, search for your application by the display name and click on it to open the Overview page → copy the value from the Directory (tenant) ID field).
Only one Microsoft Entra ID / Microsoft 365 connection can be created for the specified Directory (Tenant) ID.
Enable login with this Directory
Skip this step if your Microsoft Entra ID integration does not require Single Sign-On and integration is used for data import only.
- Enable login with this Directory: by default, this option is disabled. Select the checkbox to enable login for imported user accounts directly into ESMP with this connection. The necessary settings will be made in the corresponding Login Configuration view:
Authorization options
- Application (Client) ID (mandatory): enter the Application ID. Copy the ID from the app overview page of the Azure app registration portal. The Application ID has been assigned when you registered your app (in Azure portal, navigate to Microsoft Entra ID → App registrations → in All applications tab, search for your application by the display name and click on it to open the Overview page → copy the value from the Application (client) ID field).
- Client secret (mandatory): the Application Secret that you generated for your app in the Azure app registration portal. The value for this field was generated in Certificates & secrets area of the Azure portal configuration, see Certificates & secrets section of this page.
- Permissions: choose from the suggested options. Choose the same option that is specified in the Azure App registration API permissions configuration step, for details see App registrations: API permissions section of this page.
- Microsoft Entra ID (Delegated): this option is pre-selected by default. Setup Authentication for the Delegated Permissions additionally requires login and password, as the Microsoft Entra ID Data Provider will access the Azure API as the signed-in user.
- Microsoft Entra ID (Application): The Microsoft Entra ID Data Provider runs as a background service or daemon without a signed-in user. Application (Client) ID & Client secret only are required to establish the connection.
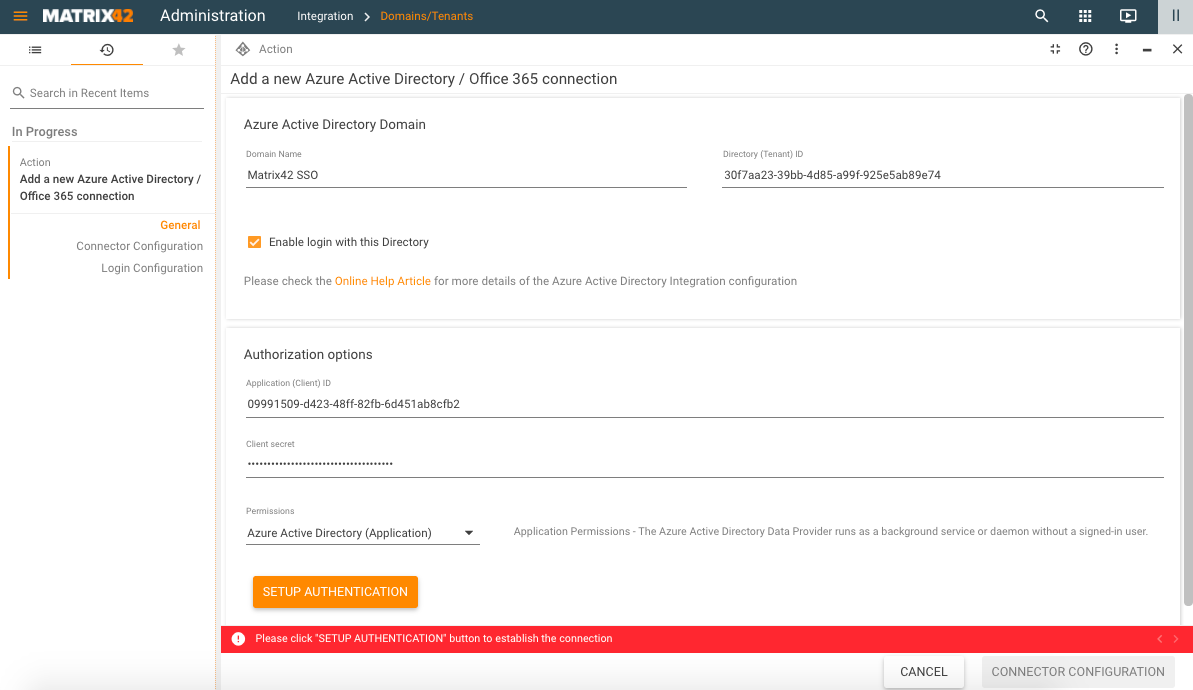
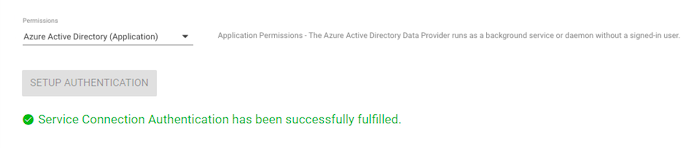
Click Setup Authentication and in case of Delegated Permissions, enter your credentials.
Multi-Factor Authentication (MFA)
The system supports Multi-Factor Authentication (MFA/2FA) for Microsoft Entra ID (Delegated) Permissions. For instance, an additional form of identification such as entering a code from the cellphone may look as follows:
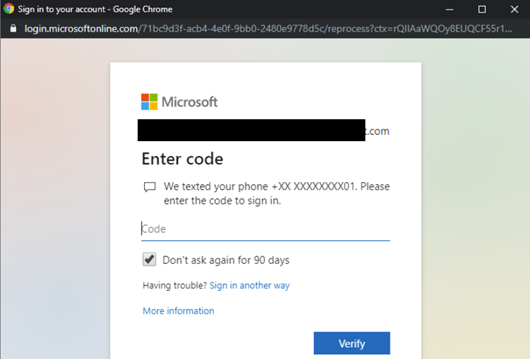
Proceed to the import configuration after the successful authentication:
Connector Configuration (import options)
To proceed, click on the Connector Configuration button.
At this step, the system has already validated your credentials and checks the API permissions that were previously configured on the Azure Portal for your configuration.
Not granted permissions
You will be informed if the permissions are not granted with the following messages:
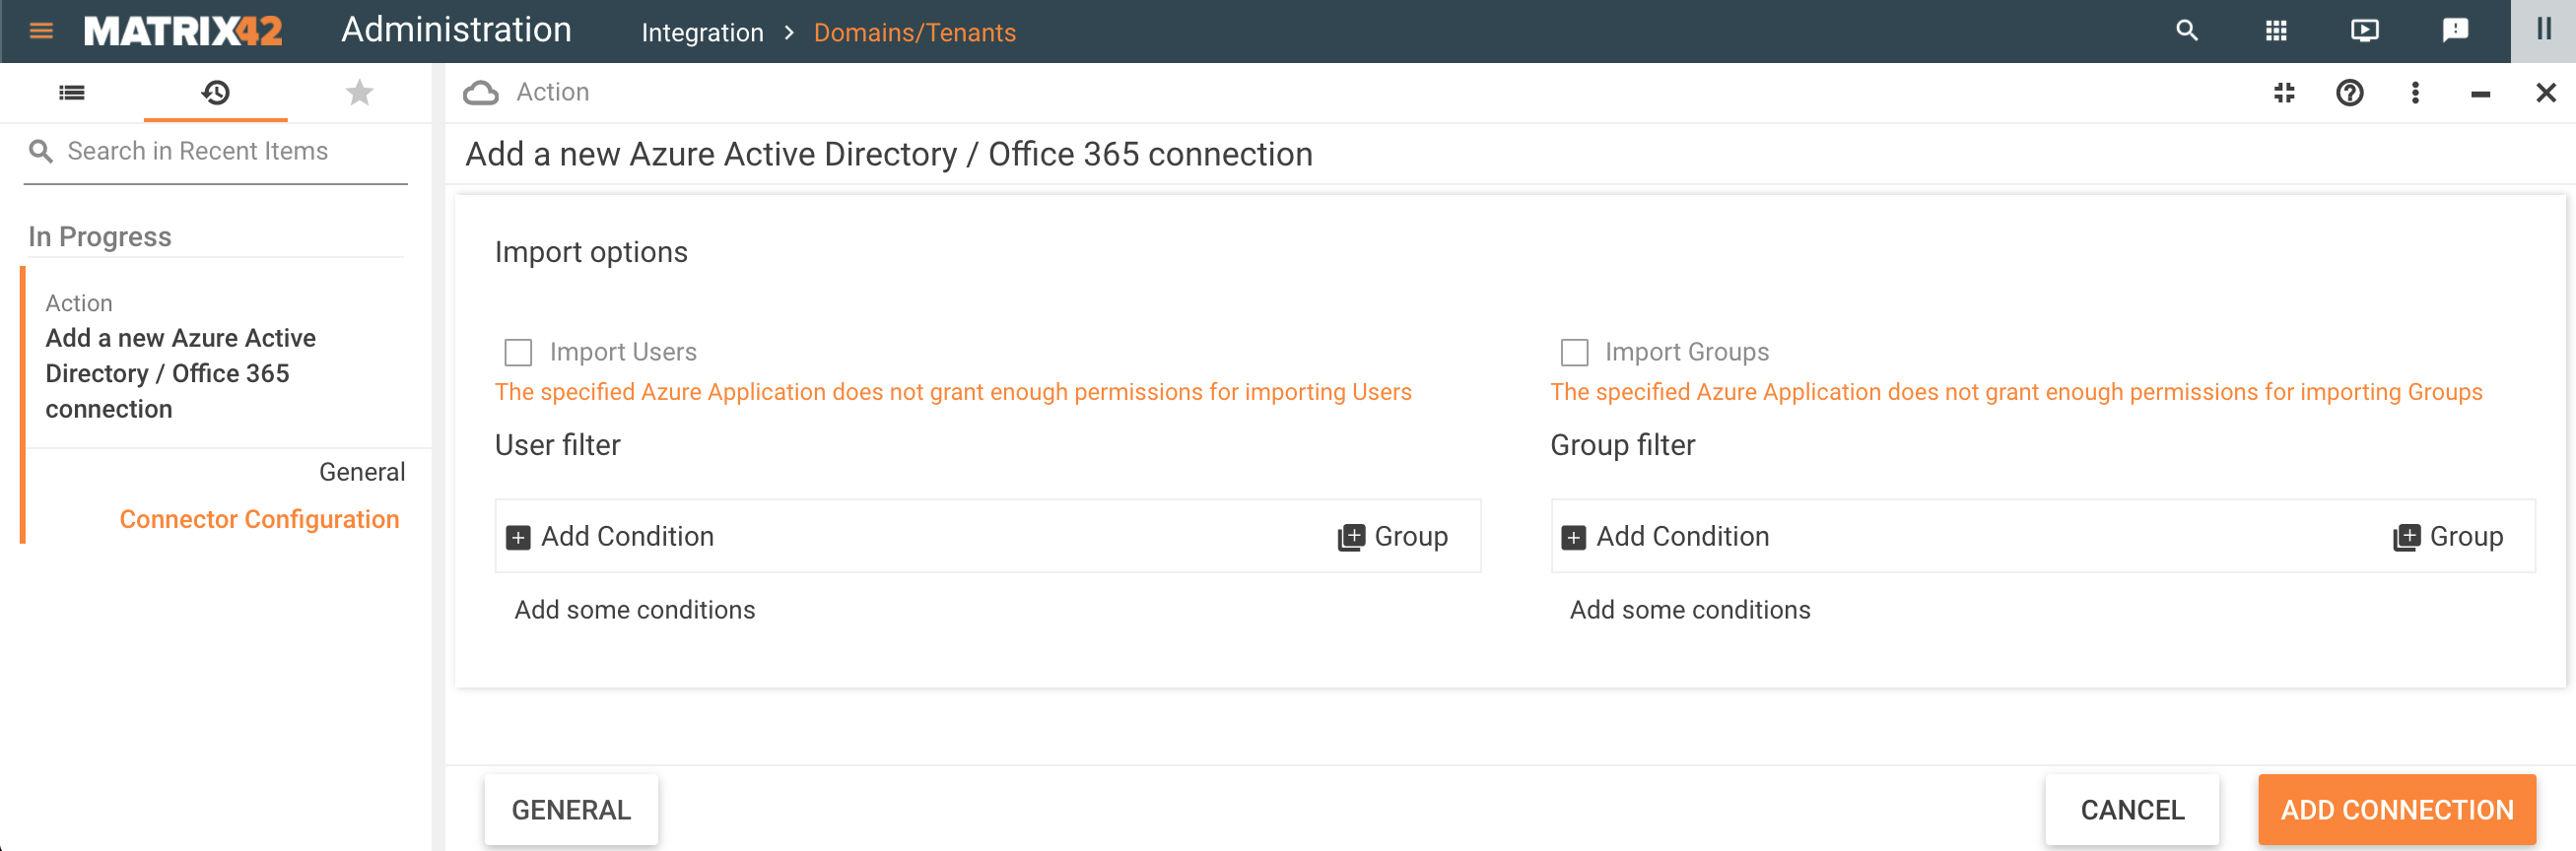
The import options are disabled as well. Adjust the API permissions for your application in Azure portal, cancel the current configuration and restart the Microsoft Entra ID / Microsoft 365 connection from the very beginning.
Granted permissions
Continue the configuration with granted permissions:
- Import Options: by default, the new connection imports all Users and all Groups.
To change the import settings and configure Users and Group filtering see examples from Microsoft Entra ID Data Provider page.
Click Login Configuration if this option has been enabled in the General view or proceed directly to the Add Connection step.
Login Configuration
You will skip this step and proceed directly to the Test Connection section if your Microsoft Entra ID integration does not require Single Sign-On and integration is used for data import only.
The following fields are pre-filled automatically:
- Service Provider Issuer Name: refers to Identifier (Entity ID) provided in Microsoft Entra ID SAML application, see also New application configuration section of this page.
- Identity Provider ID: refers to Microsoft Entra ID identifier
- Single Sign-on URI Endpoint (refers to Login URL)
- Single Sign-out URI Endpoint (refers to Logout URL)
To configure login provide the following information:
- Identity Provider Certificate: use the value for the Certificate (base64) file, downloaded during the new Azure application configuration, see SAML Signing Certificate section of this page.
- Login button title: provide the title that will be used on the login page of the ESMP for this connection;
- SAML2 Name Id policy: use default value "EmailAddress";
- "AllowCreate" value for SAML2 NameID Policy: use default value "None".
Click Add Connection to finalize the configuration.
Test Connection
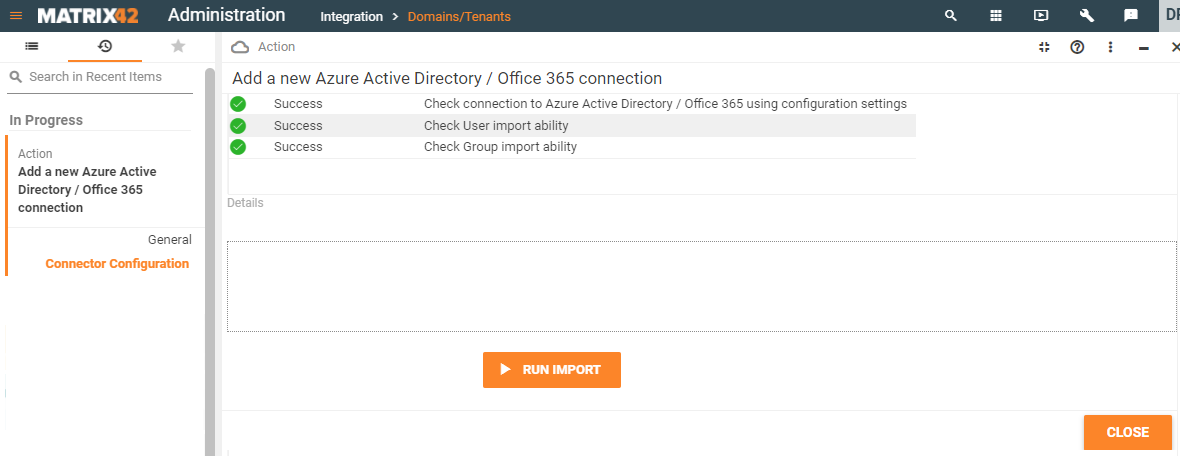
Before completing the configuration the system automatically tests the connection. The following statuses are possible:
- Error: click on the error to see details. The connection settings are saved but import cannot be run. Fix the errors and proceed with the import.

- Success: connection is available and you can proceed with the import:
Activate Microsoft Entra ID / Microsoft 365 Data Provider
In Administration application → Integration → Data Providers → click on the Microsoft Entra ID / Microsoft 365 connector configuration with status Active and run Activate action to start the Data Provider.
For more details, see Microsoft Entra ID Data Provider page.
Adjust Global System Settings to Use new Redirect URL
Make sure that the Use new Redirect URL option is enabled in your ESMP. For this, open Administration application → Global System Settings → Secure Token Service → enable the Use new Redirect URL (/m42services/api/sts/login) checkbox option as shown on the example:

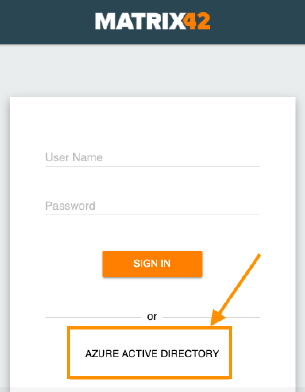
Matrix42 ESMP Login Page Example
The login page with connector configurations created for the Azure application may look as follows:
Microsoft Entra ID B2C support
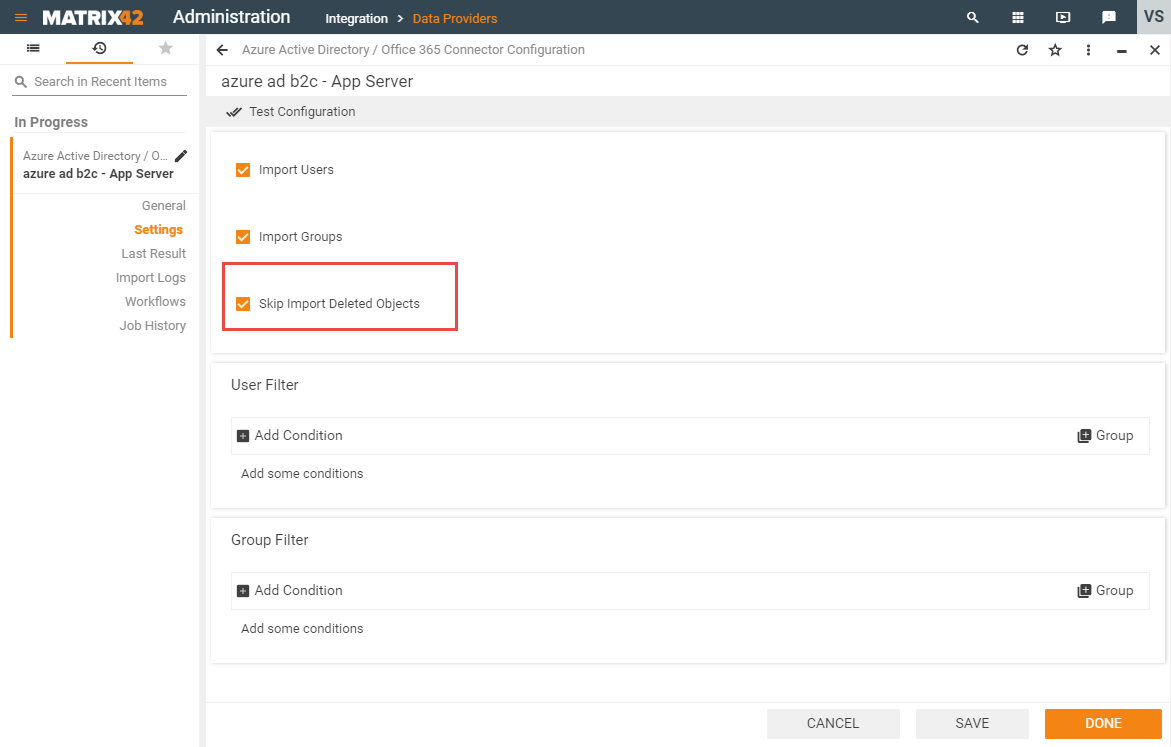
Microsoft Entra ID B2C is supported by ESMP Microsoft Entra ID Data Provider since 10.0.1 release, but its functionality is limited.
To enable import from Microsoft Entra ID B2C, open Microsoft Entra ID / Microsoft 365 Connector Configuration and mark checkbox "Skip Import Deleted Objects" in Settings view.
As a result, Users and Groups will be imported. However, Import of deleted in AAD B2C users and groups will be not synced to ESMP, due to current limitations.
Alternative Microsoft Entra ID login configuration (Microsoft Entra ID SAML Toolkit)
This scenario shows how to configure login and import using Microsoft Entra ID SAML Toolkit. The flow and all steps are the same as in the recommended flow but in this case you will create a new application with Microsoft Entra ID SAML Toolkit.
Use this video tutorial as a reference:
Configuration steps:
- Azure portal:
- New application configuration:
- Enterprise applications: Add New Application with Microsoft Entra ID SAML Toolkit
- Set up SAML-based single sign-on
- Attributes & Claims configuration
- SAML Signing certificate
- Properties: Assignment required configuration
- App registrations:
- New application configuration:
- ESMP instance: