Installing Customer Environments on Matrix42 Labs
Overview
Our customers' privacy and data security are the highest priority at Matrix42. We also want to provide our customers with transparency about all processes involving them.
Our support team sometimes needs to run extensive tests on a customer environment to pinpoint the perfect solution for a customer request. To avoid any impacts on our customers' productivity, we ask to mirror the environment in our internal Matrix42 Lab.
The following document describes all the steps done by Matrix42 to setup, mirror, and secure the individual customer environment in our lab infrastructure.
Because your and the overall data privacy and security are very important to us, this document also outlines the steps for Matrix42 and our customers to take to make sure that no data is compromised. Critical and personal data will always be encrypted or anonymized.
Step 1: Retrieve Customer Resources
To enroll the Customer Environment for vast cases, it only requires the Customer Production Database. For very rare cases, when the examined case includes custom binaries like custom Workflow Activities or Custom Web Services, the required assemblies have to be delivered together with the database.
- Please create a compressed .zip-archive from the Production Database (e.g. M42Production) which is password protected. You find a tutorial to create a database backup here (https://docs.microsoft.com/en-us/sql/relational-databases/backup-restore/create-a-full-database-backup-sql-server?view=sql-server-2017)
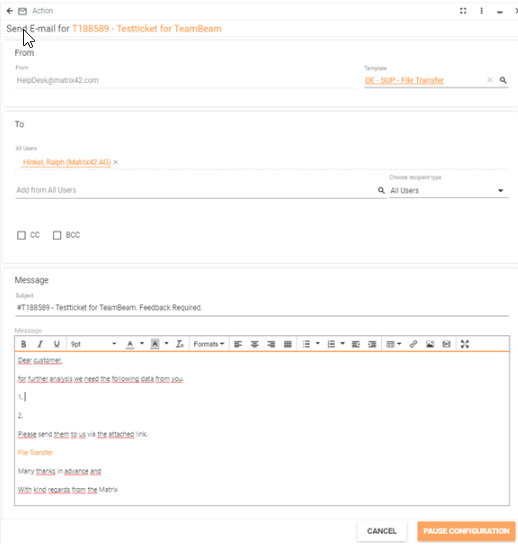
- After that, please upload the password-protected .zip file to our GDPR-compliant file transfer solution www.teambeam.de. The link to upload the file is automatically generated and provided by Matrix42 Support System over the "Send E-mail" action with the specified Template "DE - SUP - File Transfer" for related customer incidents.
Step 2: Setup the Environment
The installation of the Test Customer Environment can be executed either by a responsible Support Engineer or by members of the R&D team.
- Allocate the Virtual Machine on ESX environment. ESX Resource Group (IT generate - permissions)
- Install standard Product with the version of the Customer Database
- Attach Customer database to SQL Server
Step 3: Protect the Data
All Customer sensible data which are not related to examination, need to be either deleted or masked. This procedure also makes it impossible for the Lab Environment interfere with Customer Business Processes.
- Download the archive "AnonymisingDatabaseData.zip", unpack it
- Run as administrator the "run_queries.bat"
- Provide the SQL Server name
- Type the Database name
- Check the execution result in "C:\out.log"
The script performs the following operations:
- Prevent Lab Environment from sending e-mails and use of E-mail Robot.
Script resets the InstallationID (SPSAlertingConfiguration.InstallationID) which is used for activating e-mail notifications and E-mail Robot.
-
Stop all Engine Activations
All Engine Activations need to be stopped. Depending on the research needs any required Engine Activation can be re-activated for a short time only for testing purpose. -
Anonymize users data
The data of all users, like e-mail addresses, phone numbers, addresses, etc. stored in the database are reset or masked. -
Replace all Files with dummy attachments
Prevent reading encrypted Database data.
The Product uses the encryption key stored in <Application Folder>/bin/SPS.confisecurityCryptographyConfiguration.config for encrypting/decrypting all vulnerable data (e.g. passwords). To disable reading of encrypted data, open the configuration file and change the key.
Step 4: Configure the Environment
Once the Database data is secured, it can be attached to the Product.
- Update the connection string in sps.config to use the attached customer database
- Run the SQL script to add local admin.
Download the SQL script SASM_AddAdministrator.sql, define the values for the variables, and execute the script on the attached Customer Database - Share the link and credentials with the responsible team
- Add information about the Lab Environment to the Incident Journal
Step 6: Verification Protocol
To ensure all previous steps have been carefully fulfilled the Verification Protocol needs to be signed
- Download and print the "LabInstallVerificationProtocol.docx"
- The document has to be filled in handwriting and signed
- Attach the protocol scan to the Incident
- Notify the Customer about undertaken actions
Step 5: Managing the Environment
The Environment hosted on Matrix42 ESX can be accessed only from Matrix42 private network.