SQL Cluster Support
Overview
This page describes the way how the databases can be handled in SQL Server Always On Availability Groups. This SQL feature enables multiple copies of the database to be highly available. High Availability Group intends that SQL Server is running your databases on several nodes that might be separated physically so that when one entity fails the other one can take over.
It works only on the database level, so the following components are not part of the clustering:
- SQL Server Agent
- Analysis Services
- Reporting Services
System requirements
- SQL version: minimum required is SQL 2016 Enterprise Edition. Unlike other versions, this version allows configuring the "readable secondary” node option. For more details on availability group features and SQL versions see Microsoft documentation.
- Minimum ESMP Version: 10.0.3.
Permissions & Credentials
- SYSADMIN rights on DB Server: the configuration requires the highest level of the database server operation rights. Also, make sure that you can set the Read-Only permissions for all nodes where production databases are running. This is necessary for the SQL Agent Job configuration and execution in case your ESMP is still using the AppFabric for the workflows processing
- Make sure you have all necessary credentials: Service Account, Database Accounts, sysadmin account;
Prerequisites
Before running the ESMP installation, make sure that the following prerequisites are met:
- Failover/Always On Cluster is up and running;
- Listener Name / FQDN for the Availability Group where the Databases will be placed in is present.
For this you need to have:
- Windows Failover Cluster feature installed: it needs to be added to all machines running SQL Server instances that will be configured as replicas;
- Enable Windows Failover Clustering Configuration for SQL Server: run the Failover Cluster Manager and add the server hostnames of the SQL Server instances that you want to configure as replicas in the Availability Group;
- Enable the SQL Server 2016 Always On Availability Groups Feature by running SQL Configuration Manager and adjusting the SQLServer (MSSQLSERVER) services;
- Databases: create a set of empty production databases that are necessary for your configuration. These databases must not include any user data. All databases need to be in a Full Recovery mode prior to adding them to the Availability Group;
- Add databases to the Availability Group: open SQL Server Management Studio, connect to the SQL Server instance, and add necessary databases to the Availability Group using New Availability Group Wizard. Follow the instructions to complete the SQL Server Always On Availability Group configuration:
- Add Replicas and connect to the other SQL Server instances previously joined as nodes with the Windows Server Failover Cluster. Configure the following options of the Availability Group Properties:
- Endpoint URL: specify the URL that is used to establish communication between the nodes of the cluster. The communication is held over the TCP/IP, so you should consider adjusting the Firewall settings and open ports;
- Set Failover Mode to Automatic Failover;
- Set Availability Mode to Synchronous Commit;
- Readable Secondary: Yes (in case you want to reduce the load on your primary node);
- Seeding mode: Automatic;
These settings may vary depending on the number of nodes you have in the cluster and the infrastructure you use. - Select the Create an Availability Group Listener option within the Listener tab and enter the following details:
- Listener DNS name and Port: this information will be used in the application setup;
Click Add once completed and provide the required IP Address. Make sure that the Listener and the Port are accessible from the application Server. - Select the Full option within the Select Initial Data Synchronization page.
- Add Replicas and connect to the other SQL Server instances previously joined as nodes with the Windows Server Failover Cluster. Configure the following options of the Availability Group Properties:
To set up a productive failover cluster, please see Microsoft documentation for more details.
Databases as a part of Always On Availability Group
All Production Databases from this list can be included in the Always On Availability Group. The list contains the default names of the databases:
- M42Production
- M42Production_REF (obsolete database for ESMP v.11.0.1 and higher)
- M42Monitoring
- M42InstanceStore
- M42Datawarehouse
- M42Archive
- M42Staging
If you are configuring Availability Group it is highly recommended to add all the databases you are using to it (except Analysis and Reporting Services as explained below).
The following databases cannot be added to the Always On Availability Group:
- M42Analysis Services: the cube cannot be put into an Availability Group. But since it is possible to deploy it on any Server, make sure you have a place for this DB, too (independent DB Server or on a single Always On Node for example);
- M42Reporting Services (Web Service): since the Reporting Services could be set to a completely different server it is suggested to put them on an independent DB Server or just onto a single node. Nevertheless, the Reporting Service DB could be set to the clustering, but not the Web Service.
For Reporting and Analysis services configuration see System Requirements page.
New Instance Installation
There are 2 options that allow you to automate the installation with clustering:
- Setup Wizard
- PowerShell Script Installation
Additionally, before running the installation make sure that the standard setup prerequisites for ESMP installation are met. For more details, see System Requirements page.
Setup Wizard
To install the new ESMP or ESM instance with SQL Cluster, use the same Setup Wizard as for any other installation. Run the Matrix42.Setup.exe file on the application server you are going to use for the installation and follow the steps as described in the Installation: Step by Step guide.
On the Database Server, Authentication and Databases step, enter the following data:
- Server Name: specify the listener name and the port, as it was set during the Availability Group Listener configuration step for the cluster, for instance:
NEON-SQL-HA-L02,12002. - Database names: enter the database names, that were created previously as empty databases and added to the Availability Group.
On the Analysis and Reporting Services step:
- Analysis Services Server: specify the name of the Analysis Services Cube;
- Analysis Services DB: enter the database name;
- Reporting Services URL: enter URL;
- Reports Root Folder: additionally you can specify the Reports folder instead of the default one. This option allows using the same Reporting Services Server for multiple application instances.
On the Service Layer Configuration step, enter the existing database names, that were created previously as empty databases and added to the Availability Group:
- Persistence DB Name
- Monitoring DB Name
Complete the rest of the steps as described for the regular setup in the Installation: Step by Step guide.
After successful instance installation, check the system by running the System Diagnostics: go to Administration application → Home → Quick Starts section → System Diagnostics.
PowerShell Installation
The same steps and changes that are available in the Setup Wizard are also available in the PowerShell script samples that are shipped with the product in /bin/ApiHelp/Samples folder.
See also PowerShell Cmdlets: Using Sample Scripts page.
Adjust the samples and create a new installation from PowerShell as described below.
Define:
- DatabaseServerName: specify the listener name and the port, as it was set during the Availability Group Listener configuration step for the cluster, for instance:
<add key="DatabaseServerName" value="NEON-SQL-HA-L02,12002" /> - AnalysisServerName: specify the Analysis Server name;
Set special names for:
- ReportServerFolder: the default is M42, but you can change the folder name to the one of your choice:
<add key="ReportServerFolder" value="My_reports" /> - Every database has a special name for:
- PersistenceDatabaseName
- MonitoringDatabaseName
- ProductionDatabaseName
- AnalysisDatabaseName
- WarehouseDatabaseName
- HistoryDatabaseName
Set the UseExistingDatabases feature to true.
Agent configuration for AppFabric
SQL Server Agent is not part of the clustering. Agent jobs are configured manually and are necessary if your system was not fully migrated to the Matrix42 Worker Engine and is still using Microsoft AppFabric.
This is the final step of the configuration where you need to edit, prepare and copy the SQL Job(s) to all nodes where the production databases included in Always On Availability Group are running.
The Setup deploys the default Agent Jobs on the active or primary node only.
Follow these steps to configure SQL Server Agent Jobs:
- Readable Secondary is set to "Yes".
Make sure that the “readable secondary” option on all nodes of your Availability Group infrastructure is set to "Yes". This option allows exporting and executing SQL Agent Jobs queries. - Create the function for SQL Agent Jobs.
Execute the following script on your "master" database on the primary node and all other nodes where the production databases included in Always On Availability Group are running and SQL Agent Jobs are present:CREATE FUNCTION [dbo].[svf_AgReplicaState](@availability_group_name sysname) RETURNS bit AS BEGIN if EXISTS( SELECT ag.name FROM sys.dm_hadr_availability_replica_states AS ars INNER JOIN sys.availability_groups AS ag ON ars.group_id = ag.group_id WHERE (ars.is_local = 1) AND (ars.role_desc = 'PRIMARY') AND (ag.name = @availability_group_name)) RETURN 1 RETURN 0 END
This Script generates a function for the Service Store SQL Agent Jobs which returns:
- 1 - the node where the Service Store SQL Agent Jobs are running is currently an active (primary) node. The Job is running on the active node and thus should be executed;
- 0 - the node is passive (secondary). It means that the job must be terminated immediately.
In order to make this function work, the SQL Jobs have to be edited.How to crosscheck if it worked:
If the Script was executed successfully, you should check that the function was created by navigating to the Scalar-valued functions folder on the “master” database (master -> Programmability -> Functions -> Scalar-valued Functions):
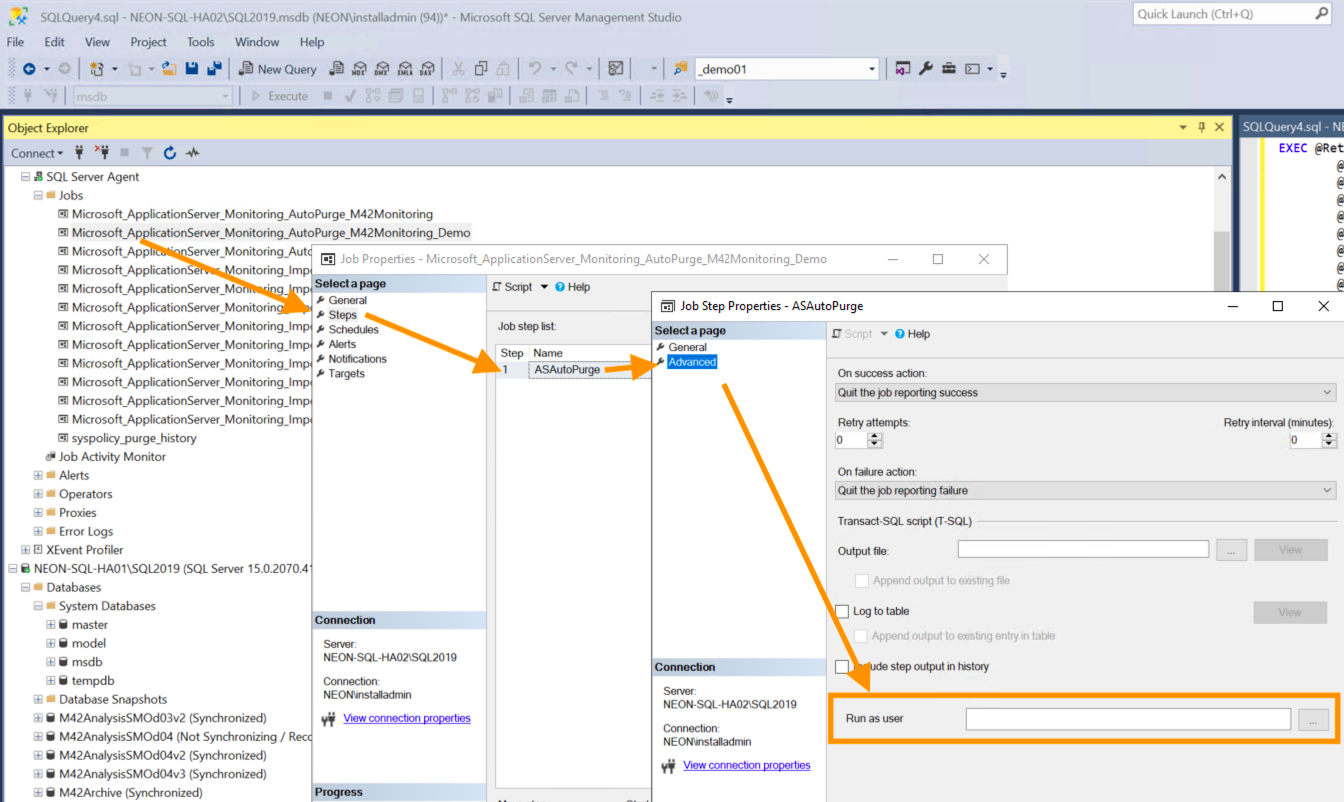
- Edit SQL Server Agent Jobs. Repeat this step for every job on your node.
On the active node in your SQL Management Studio, navigate to the SQL Server Agent → Jobs → Properties → Steps → Edit the step:- General: in the Command section, replace the
exec [ASAutopurge]with the following code:if (master.dbo.svf_AgReplicaState('SET_YOUR_AVAILABILITY_GROUP_NAME_HERE') = 1) BEGIN exec M42Monitoring.dbo.[ASAutoPurge] END - Advanced: clear the Run as user field and save the changes:
To ensure that the queries are running you can execute them on the corresponding database. It is suggested to do this before going to the next step where you will create all those edited Jobs on the passive node(s).
- General: in the Command section, replace the
- Transfer the edited Jobs to each of the passive nodes.
To save you some time there is a quite simple way to do so:- Highlight the “Jobs” Folder in “SQL Server Agent” area and press “F7”. The Object Explorer Details will open.
- Highlight the M42 related SQL Agent Jobs and choose Script Job as → CREATE To → File.
You could also use "New Query Editor Window" and copy/paste the code to the other nodes.
If you have chosen to use the file, save the file (.sql) and copy it over to the secondary node(s) and execute them by using SQL Management Studio.
If you haven't set the readable secondary to YES yet, this will fail.
If you successfully deployed the SQL Jobs on the secondary nodes, please verify that everything is in place and runs without errors, otherwise check the syntax of the scripts.
If everything is ok you can try your first login. To verify that everything is running, trigger some things that create database entries (Create a Ticket or a Service, create a Compliance Rule, etc.). To check the failover just cut off the connection to the active node, for instance, shut down the SQL Service.
Normally you shouldn’t even notice that you have shut down the SQL Service as the secondary node should have taken over by the time the primary node has been cut off.