How to install and update nodes in the cluster
Overview
The purpose of this section is to go beyond the baseline of Matrix42 Software Clustering Basics and see what the possible options are to extend the existing single Matrix42 instance and transform it into a highly available and scalable multi-server infrastructure.
Before we proceed further, we must consider the fact that the current single Matrix42 instance installation or update is complete using well-defined steps provided at Installation: Step by Step guide.
While installing or updating the Matrix42 primary node, it is highly recommended to setup up and enable distributed Redis cache to ensure all subsequent nodes will get connected to it to avoid any inconsistencies in the runtime. All the parties in the cluster must behave like an entire system and utilize one single shared location for the cache.
In the context of the current topic, we denote the very first instance installed as the primary node (which is the same as node 1 in the cluster if using numerical order). It is important to declare the primary node as a basis and generator for all others despite the way we deploy new instances.
It is important to highlight core distinctions between single Matrix42 applications and clustered Matrix42 environments. Any further node included in the farm must utilize the same databases (production, file storage, history, warehouse, reporting services, and cube), distributed cache, and set of configuration files located on a primary node. Thus, the installation procedure of additional nodes conceptually must go differently. There are at least a few steps that become irrelevant for additional nodes:
-
databases installation
-
engines installation
Now and onwards, we’re considering these components already available on a primary node, therefore skipping the steps above to avoid excessive operations.
However, to guarantee all additional nodes in the cluster reflects primary node behavior, it is mandatory to share the following components among them:
-
Security configuration file (securityCryptography.config)
-
Certificates
-
Installed packages
Eventually, the goal is to achieve identical data security mechanisms, users' authorization, utilization of the same certificates and packages throughout the cluster. Any changes to the files listed above must be immediately applied to the rest of the cluster nodes to retain the entire system's consistency and stable work. The load balancer forces the system to process user requests on different instances, hence, regardless of the processing node the outcome of the same request must always be identical to the one processed by another node.
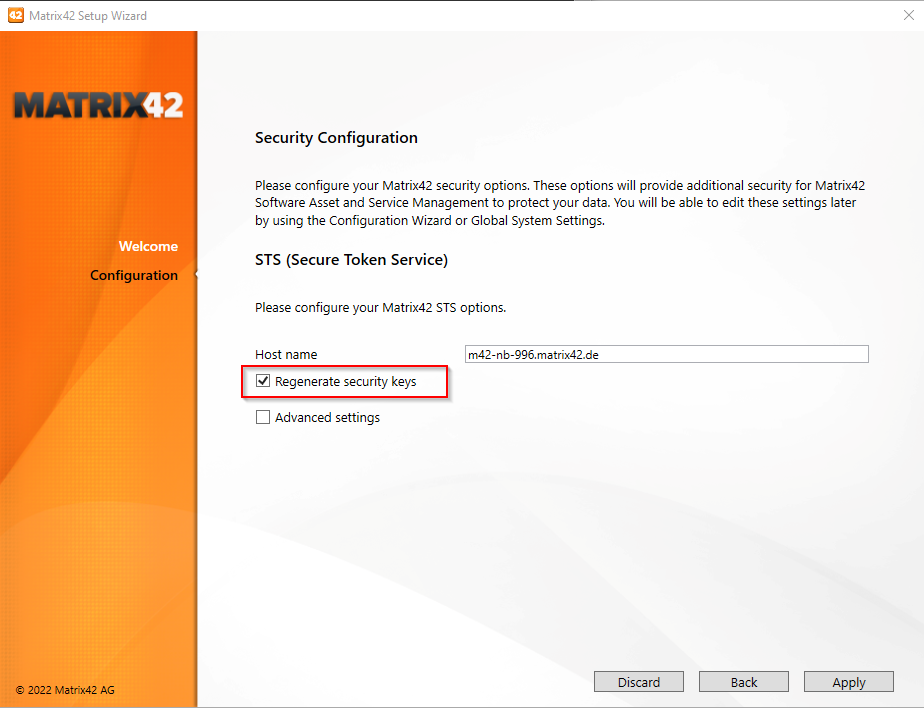
The security configuration file (securityCryptography.config) are generated automatically while installing the product to the primary node. However, using Configuration Wizard they can be changed by enabling the 'Regenerate security keys' option. Considering that, regenerated files on one node must be manually copied to other nodes to keep the system consistency in the cluster.
As stated above, while cloning the primary node all the files are getting copied automatically. The clean distributive installation will require cluster nodes to be synced. This will require the files to be copied manually from primary to all subsequent nodes:
-
{Installation Directory}/bin/securityCryptography.config
-
{Installation Directory}/Certificates
-
{Installation Directory}/InstalledPackages
Additionally, all the installed packages copied from the primary must be unzipped and moved to appropriate directories according to the folder tree contained in the archive, i.e., the package archive could contain folders bin and Workspaces. Unzipped files must be placed in the same folders in the root directory.
It is important to follow this step every time the new packages are installed. The process becomes mandatory regardless of the node installation way. Any additions to the primary must be manually reflected in the rest of the nodes.
Considering that, the primary node should take a leading role in providing the required information while extending the cluster. The availability of the primary node becomes very crucial and qualifies the entire system's stability.
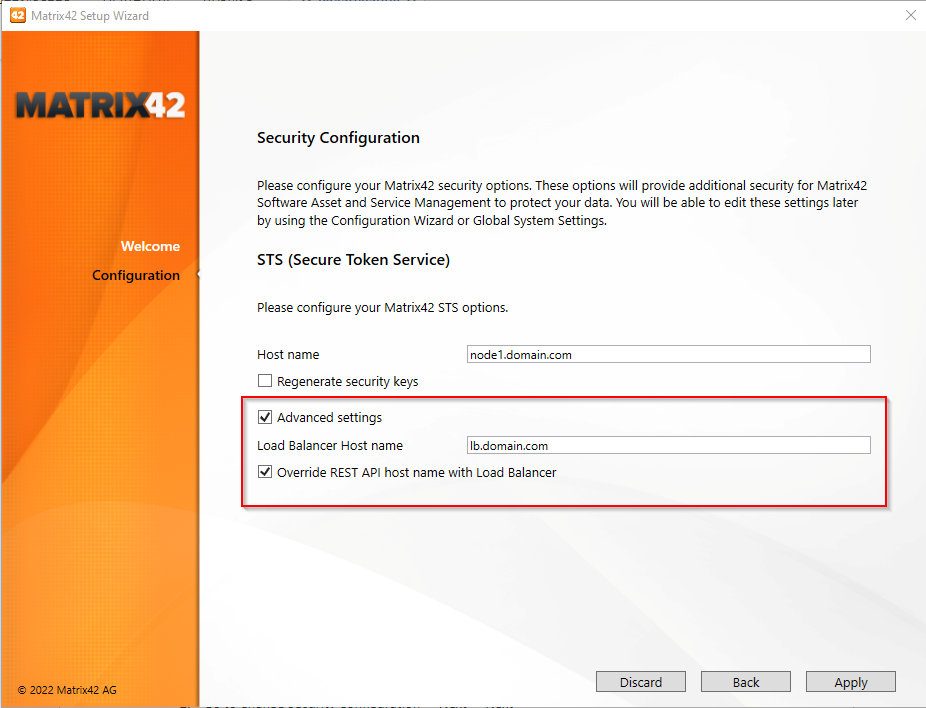
To start running the installation process, the load balancer must be configured, up and running. It should be able to accept external requests forwarding them to the primary node. To add load balancer host to the primary node, follow the next steps:
-
Run Matrix42.Setup.exe in configuration mode on a primary node (node 1);
-
Go to Change Security Configuration → Next → Next;
-
Enable Advanced settings;
-
Enter Load Balancer hostname;
-
Enable Override REST API hostname with Load Balancer;
-
Click Apply.
Load Balancer activation is required, otherwise, the installation of any other node will get blocked asking to activate it on the primary node.
Installing the nodes
Use this video tutorial as a reference:
We assume new environments are completely ready for new installations, all prerequisites are met to install Matrix42 Software from scratch. Overall, there are two possible options to propagate subsequent nodes in the cluster:
-
Cloning the primary node (recommended)
To run the installation based on the primary node clone, zip the installation directory on the primary node and unzip on the target environment to a custom directory (should not be the same as the installation directory). Most of the settings are eventually getting copied to a subsequent node, including security settings, connection strings, packages, etc.
-
Using clean distributive (requires more manual interventions during configuration)
To run the installation based on clean distributive, unzip distribution files to a custom directory on the target machine (should not be the same as installation directory). In opposite to cloning, we must handle all the movements manually if installing from a clean distributive, which includes security settings, connection strings, packages, etc.
In any of the cases above, any additional node in the cluster must be installed using the dedicated PowerShell script located at:
{Cloned or Clean Distributive Directory}/Deployment/WMInstallNewNode.ps1
The script itself accepts a set of input parameters to customize further installation procedures. Most of the parameters become optional if the process goes based on the primary node clone. The installer script will recognize the parameters from the copied source and offer the same to be configured on the new node.
For the clean distributive, we must set the initial values manually to let the script recognize the required settings.
See the complete list of parameters below. The parameters are self-descriptive and are as follows:
-
$InstallerDirectory: source path to grab installation files. Default is the current directory from where the script is invoked;
-
$InstallationDirectory: target path of installation. Default is "
C:\Program Files (x86)\Matrix42\Matrix42 Workplace Management";
-
$ServiceAccount: username of service account;
-
$ServiceAccountPassword: password of service account;
-
$HostName: hostname;
-
$ConnectionString: connection string to production database (must be entered if using clean distributive, otherwise obtained from SPS.config if using clone option);
-
$CertificatesDirectory: path to directory with certificates (certificates must be copied from a primary node if using clean distributive, otherwise already present is using clone option);
-
$SecurityCryptographyConfig: path to securityCryptography.config (must be copied from a primary node if using clean distributive, otherwise already present if using clone option);
-
$CertificatePassword: password for SSL certificate;
To run the script, execute the following commands:
cd {Cloned or Clean Distributive Directory}/Deployment
./WMInstallNewNode.ps1
The script will prompt for the input parameters and offer the default values if available. Click Enter to use the default value and proceed.
Alternatively, all parameters can be provided instantly as arguments to the script. To invoke it, run the script as shown below (all the values are fake ones, just to give a sample):
cd {Cloned or Clean Distributive Directory}/Deployment
./WMInstallNewNode.ps1 -InstallerDirectory “C:\temp”,
 -InstallationDirectory "C:\Program Files (x86)\Matrix42\Matrix42 Workplace Management",
 - ServiceAccount “username”, -ServiceAccountPassword “password”, -HostName “node2.domain.com”,
 - ConnectionString “data source=.;initial catalog=M42Production;user id=matrix;password=password”,
 - CertificatesDirectory “C:\temp\Certificates”,
 -SecurityCryptographyConfig “C:\temp\bin\securityCryptography.config”, - CertificatePassword “password”
Updating the nodes
Similarly, the update process will require WMUpdateNode.ps1 to be executed in the target environment.
Update script supports the following parameters:
-
$InstallerDirectory: source path to grab installation files. Default is the current directory from where the script is invoked;
-
$InstallationDirectory: target path of installation. Default is "C:\Program Files (x86)\Matrix42\Matrix42 Workplace Management";
-
$ServiceAccount: username of the service account;
-
$ServiceAccountPassword: password of the service account.
Normally, the update script will not require customization in the values above unless the installation has not been executed with the default values.
As an example, if the product is installed to a custom directory other than "C:\Program Files (x86)\Matrix42\Matrix42 Workplace Management", the updated script must be customized and configured to update the folder used during installation.
To run the script, execute the following commands:
cd {Cloned or Clean Distributive Directory}/Deployment
./WMUpdateNode.ps1 -InstallerDirectory “C:\temp”,
-InstallationDirectory "C:\Program Files (x86)\Matrix42\Matrix42 Workplace Management",
- ServiceAccount “username”, -ServiceAccountPassword “password”
There are some limitations in the Workflow Studio working process in the current implementation. Suppose one or several nodes become unavailable during the creation/update of a workflow for some reason (for instance, environment update or node failure). In that case, Workflow Studio may stop responding or working properly. This can be resolved by restarting the Workflow Studio.