Compliance Rules
Overview
Compliance rules define how Matrix42 Workspace Management reacts to specific data changes, such as sending alerts, creating tasks, starting Workflow, or changing data.
When the system registers a specific event, the compliance rule analyzes it, checks for conditions and executes the assigned actions.
How to create Compliance Rule
Compliance Rules are managed in Administration application → Services & Processes → Compliance Rules. Click Add Compliance Rule and fill out the necessary fields:
- Name and monitored data: enter a name for the compliance rule and select the type of configuration item to monitor. Click Next.
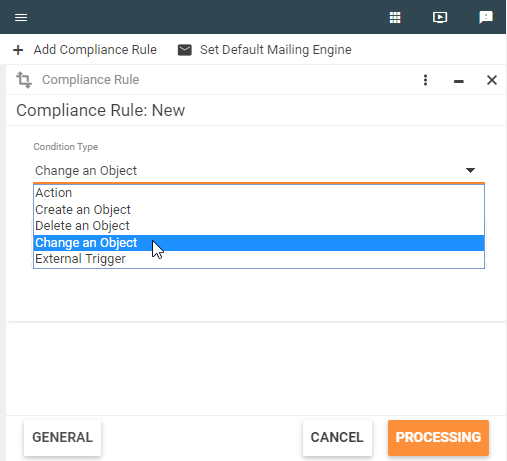
- Conditions and Rules: select the condition type and one or more conditions that should be met for the compliance rule to apply. Click Next.
- Processing options and Time: select the type of processing and the processing time. Click Next.
- Specify performed actions: select actions that should be performed when the compliance rule applies.
- Click New to add additional actions.
- In the Action column, click a field to select the type of action.
- The Order column determines the sequence of actions to perform. Enter one number per row. The action with the lowest number is performed first; the one with the highest number is performed last.
- The Configured column displays whether each action is fully configured (green flag) or not (red flag). Only actions that are fully configured are performed.
- In the last column, click the button to configure the action.
- Click Finish.
The detailed description of each step and their particularities are provided below.
Setting Name and Configuration Items
There are two main options when you create a compliance rule (CoRu):
- Configuration Item: Define a CoRu for a single CI (CI-based rules);
- Data Definition: Define a CoRu for a number of CIs on the basis of a shared data definition (class-based rules)
The main difference is that the second option is more restrictive and supports conditions only for the shared data definition. As a result, you can create rules that can be shared by different connected CIs. Setting a corresponding target means that you create either a CI-based or a class-based CoRu.
Compliance Rules for a Configuration Item
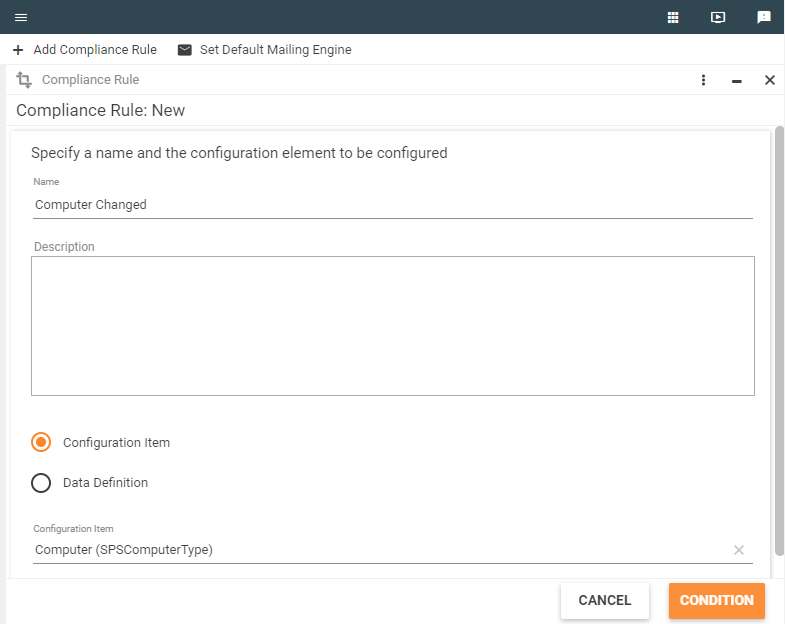
Selected Configuration Item (CI) will be a target; in this case, a CI-based CoRu is created. After you set the provided options, proceed to the page where you can define how the CoRu is triggered.
Compliance Rules for a Data Definition
If you select a data definition, you will see a list of CIs that include this data definition. By selecting the checkboxes, you can choose the CIs with which your CoRu will work.
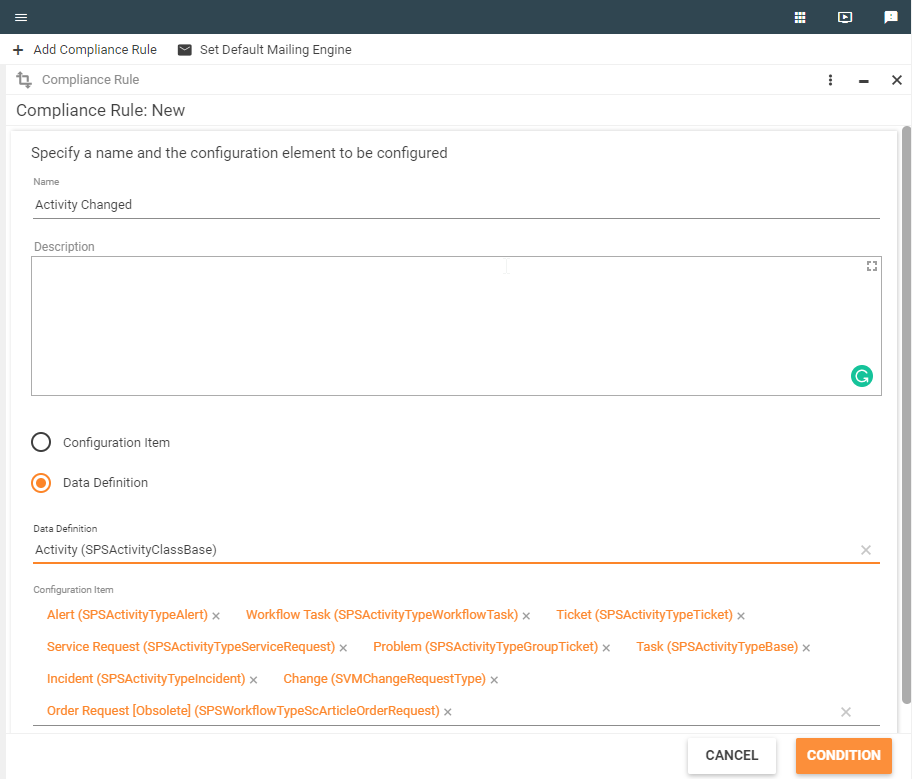
Selected Data Definition will be a target; in this case, a class-based CoRu is created. After you set the provided options, proceed to the page where you can define how the CoRu is triggered.
Setting Condition Types and Rule Conditions
CoRus can react to the following basic events:
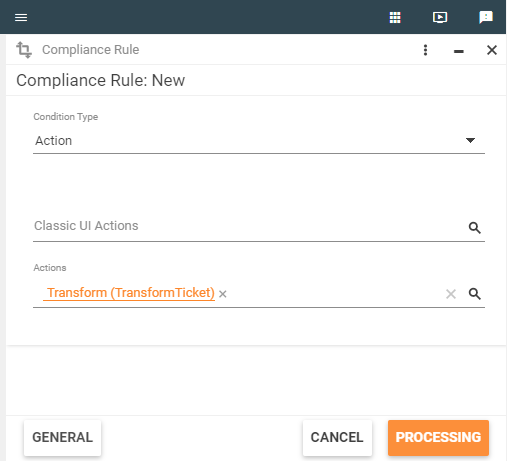
- Action: action was successfully completed.
- Create an object: object/fragment was created.
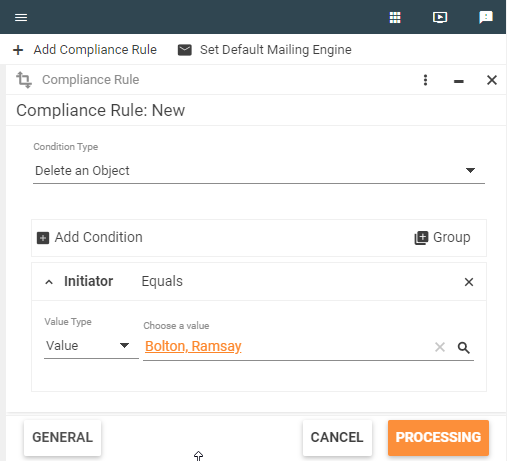
- Delete an object: object/fragment was deleted.
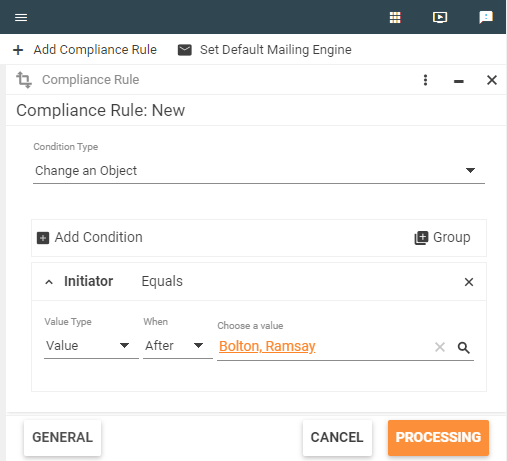
- Change an object: object/fragment was changed.
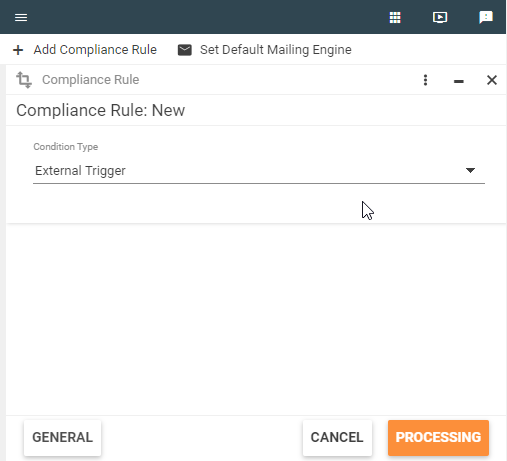
- External trigger: by external code.
Additional conditions can be defined for filtering the events that are generated by basic condition type to a precise number of business events, which will trigger the desired resulting action.
Action Was Successfully Completed
This condition type allows reactions to successful completion of specific actions inside of the system, such as relocating, closing, assigning a license, and so on. It means that the CoRu will be triggered by successful completion of the action.
Successful completion (for UI actions) is usually confirmed by:
- clicking Finish,
- clicking OK without any error messages.
Successful completion for system actions (without the UI) is usually confirmed by the completion of a code block without exceptions. You can also set data condition for actions, but be aware that the following condition clauses are not supported:
- "Before" values of attributes.
- Attribute was changed.
- Relation was added/removed.
- Fragment was added/removed.
Object/Fragment Was Created
- For CI-based rules: When an object (instance of a configuration item - CI) is created, CoRus can react to it. The reaction will follow if the DataLayer or any other component inserts a record in a type table, for example, in SPSUserType.
- For class-based rules: When a fragment is created, CoRus can react to it. The reaction will follow if the DataLayer or any other component inserts a record in a class table, for example, in SPSAssetClassBase.
Supports Data Conditions.

Object/Fragment Was Deleted
- For CI-based rules: When an object (instance of a configuration item - CI) is deleted, CoRus can react to it. The reaction will follow if the DataLayer or any other component deletes a record in a type table, for example, in SPSUserType.
- For class-based rules: When a fragment is deleted, a CoRu can react to it. The reaction will follow if the DataLayer or any other component deleted a record in a class table, for example, in SPSAssetClassBase.
Supports Data Conditions.
Object/Fragment Was Changed
- For CI-based rules: You can define conditions on any data attribute that is a part of the CI (any data definition of the CI). You define a data condition that should result in successful evaluation for the CoRu to be triggered. Whenever any of the attributes that was stated in the condition is changed, the system evaluates the entire condition, and if its result is successful, the action is triggered. For more information about data conditions, see the next section.
- For class-based rules: The only difference is that data conditions can be created only for a data definition that was selected as shared for the CoRu.
By External Code
This condition type allows custom code to trigger a CoRu. This can be useful in the following cases:
- Complex conditions that cannot be evaluated by using the supported features.
- When no action or DB operation can trigger a CoRu. For example, some code in the workflow.
Besides, such rules cannot be executed manually by using the Execute action. If you want to use this option, please contact us.
Data Conditions
As previously stated, the created/deleted/changed conditions support additional data conditions. These conditions are statements that result in a logical expression (returns true or false).
You can:
- define conditions only for attributes of all data definitions that are included in the CI (for CI-based CoRus) or attributes of a shared data definition (for class-based CoRus).
- add several condition clauses and combine them with the AND/OR logical operators.
- group several clauses together in a single group that acts such as '()'. To do it, mark several conditions while holding the SHIFT key.
- set conditional operators and values to check on each clause.
Before/After Values
Each clause can check the value for either Before or After attribute values.
- Before: Value of an attribute that it had before the change which activated a rule. It means that if a CoRu has a clause that checks for attribute value and it was updated, the system will check its value before the update.
It makes no sense to use the Before values for the created CoRus. CoRus that have the Before values cannot be processed online. They can be processed only either by the manual Execute action or by scheduled action that checks dates.
- After: Value of an attribute after the change. You can also consider it to be the "current" value of an attribute.
There can be several possible cases depending on the attribute type:
- Normal data attribute
- Relational attribute
- Pickup attribute
- Date attribute
- Multi-fragment
Normal Data Attribute
In case of a normal data attribute it is possible to select several conditional operators:
- Changed: Tracks only changes and ignores the value.
Fields localized in languages other than English are not supported as trigger conditions.
- Equals
- Greater Than
- Greater Or Equal
- Is Empty: Checks for Null values in the DB.
- Is Not Empty: Checks for Null values in the DB.
- Less Or Equal
- Less Than
- Like
- Not Like
- Unequal
Pickup Attribute
Pickups have the same set of possible conditions as normal attributes except the Value column that provides a set of pickup values in a drop-down list.
In case of the CommonClass.State and CommonClass.Reason pickups, the list of possible values will be filtered by the assigned StateGroup of the target CI for the CoRu. If the StateGroup is not set for the CI, then all possible state values are displayed.
Date Attribute
Date attributes have the same set of possible conditions as normal attributes except the Value column that supports special date syntax. As a rule, performing a date check does not make sense for fixed dates because the CoRus are created for objects in general and using fixed dates limits all objects to conform to a single condition, which is usually not desirable. Therefore, a special syntax exists. You can enter a keyword Today, which means that the value that the system compares to is taken as the current date. The value for dates also supports the +/- operators.
Example:
Today + 5 means that 5 days will be added to the current date. Same with subtraction.
Additionally, you can use values from any integer attribute of the same data definition in this expression: Today + MailNumberOfDaysBeforeExpiration. Besides, you can use an attribute value only without Today. So, the syntax for the date value is the following:
[Today] [<+|-> AttributeName]
Relational Attribute
For relational attributes, there are several options:
- Changed
- Equals
- Is Empty
- Is Not Empty
- Relation Added: True if a new relational binding is set for that attribute.
- Relation Removed: True if a relational binding is removed for that attribute.
- Unequals
Multi-Fragments
Sometimes the list of attributes contains only names of data definitions (not followed by attribute name). It means that these data definitions are multi-fragments. In this case the following operators are available:
- Fragment Added: True if a new fragment has been added to an object.
- Fragment Removed: True if a new fragment has been removed from an object.
Multi-fragments are not supported for class-based rules.
When Rules Are Triggered
There are several nuances that are related to the moment when a CoRu is triggered.
- When you create a CoRu for the created/deleted/changed conditions, a database trigger is created. It means that the CoRu is triggered every time an operation in the DB takes place.
- For created and deleted conditions, these triggers correspondingly react to the insert and delete operations that are performed in the database.
- For the updated condition, an update trigger is created. It reacts only to changes of attributes that were stated in clauses. It means that the trigger first checks if an update was made to any attributes in clauses and only then checks if the conditions are met.
Additional Condition Types: Attributes and Expressions
As previously stated, you can enter a value to compare it with in the Value field of a clause. Additionally, you can set an attribute that you want to compare or write an ASQL expression. It means that the system takes a value of an attribute or result of an expression that is stated in the Value field of a clause and compares it with the attribute value.
To identify what the Value column should contain, each condition has a Type value:
- Value: The value is only data that is compatible with the attribute type as described above.
- Attribute: The value will contain a list with available attributes to compare to.
- Expression: The value will contain an ASQL expression, the value of which will be compared with the attribute in the clause.
The ASQL expression should return a single result.
Setting Options for Processing
Processing
When a CoRu is successfully triggered, it creates a compliance rule event, which is saved in the database. The system processes these events in a periodical manner. This influences the available processing options.
There are two main processing cycles:
- every minute
- every day
During these periods, many compliance rule events can occur. The following three options declare how these events should be processed:
- Process each Compliance Rule event for each object [also multiple]: Processing each event means that the system will take a set of events (the number depends on the Processing Time option) and trigger an assigned CoRu action for each event.
Example: If you changed the state of a user several times, you will get several emails for that CoRu. - Only process the last Compliance Rule event per object within the processing period [prevents duplicate messages]: Processing the most recent event means that the system will take a set of events (the number depends on the Processing Time option) and trigger an assigned CoRu action only for the last event that exists for the same object and same CoRu.
Example: If you changed the state of a user several times, you will get only one email with the most recent changes. - Process the Compliance Rule events for the respective objects conjointly [especially for import/mass changes of objects]: Processing all events means that the system takes a set of events (the number depends on the Processing Time option), groups them by CoRu, and aggregates information about all objects that resulted in the execution of that rule.
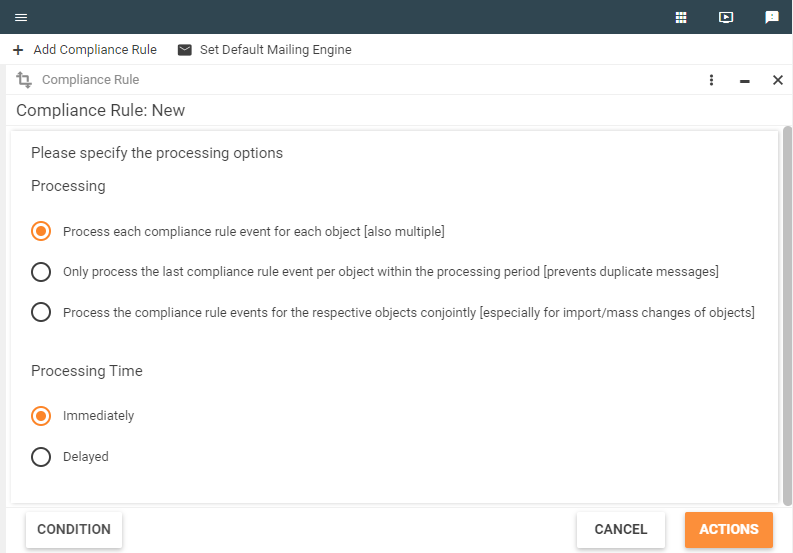
Processing Time
- Immediately: By default, the system scans for events every minute and during these processing cycles it processes only CoRus that are set to Immediately. Besides, to reduce the workload on the system, the system processes events in chunks (pages). The default page size is 300. It means that for each processing cycle, the system will use only the first 300 (by date) immediate CoRus.
You can change the default value by modifying the given setting in SPS.config:
<update4u.SPS.BizLayer.ComplianceRules processingThreshold="300"/>
- Delayed: When a CoRu is marked as Delayed, it means that it will be processed once per day at midnight. Such rules are useful in such scenarios where you need to be notified about all changes during the day, etc. Delayed CoRus are not processed in chunks.
You can change the default values under Administration > Quick Start > Services > Show All Engine Activations.
- The Immediately time interval is determined by the Process Compliance Rules - Immediately service.
- The Delayed time interval is determined by the Process Compliance Rules - Delayed service.
- The Scheduled time interval is determined by the Compliance Rules - Date conditions service process.
Date Conditions
Although it is not marked in the UI, you need to be aware of the third implicit processing option. If your CoRu has a data condition that involves a date attribute such as the one that is shown below, it will be automatically scheduled for an additional daily processing cycle. This cycle will check your rule for the date condition to be true. In the example, you see that there is one date clause. The system needs to process date rules daily because the Value for that clause is time-dependent and changes every day.
The rules are performed by the Process Compliance Rules - Date Conditions Engine Activation and it only works if all conditions in the CoRu are set at After. If only one condition uses Before, it doesn't work.
When such a condition becomes true, it will be true on each subsequent processing cycle. It means that you can get the same expiration email every day. To overcome this, you have to use any special Boolean attribute in your object that will hold the state 'If mail has already been sent.
Setting Subsequent Activities for Processing
When you create a CoRu, you can specify which activities it should start in case of success.
The CoRu can execute one or more of the following activities:
Executing Workflow from Compliance Rule
The Order field specifies the order in which the actions should be executed. Actions with a lower order value are executed first. If actions have the same order value, they will be executed in parallel.
Example: We may need to start an action and send an email simultaneously, or if we have to change the data and send an email with changed data, we should execute the Send E-mail activity (with order 1) after the Change Data activity (order 0).
Although it is possible to use direct actions such as Send E-mail or Create Task as a result of CoRu triggers, it is not the recommended way anymore. The preferred approach is to execute workflow as a result of a CoRu and put business logic into it. You can take advantage of the rich Workflow Activity library and create more sophisticated business processes. In the workflows, it is possible to combine several actions such as Create/Update Task, Execute PowerShell, Create/Update Change, Send E-mail, etc. and orchestrate business processes by using conditions based on data from the system.
In addition, such approach provides the following advantages:
- Increased system configuration transparency by managing and monitoring all business processes (workflows) in one place.
- Ability to adjust business process without changing the corresponding CoRu.
- Possibility to reuse the same business logic in other business processes (workflows).
Starting Custom Actions
You can configure custom actions as a result of a CoRu trigger. However, in most scenarios it is required to write custom code and provide custom assembly (.dll) for use of the action in the CoRu. Therefore, execution of custom business logic is not recommended anymore. The preferred approach is to use workflows. In this case you can take advantage of the rich Workflow Activity library and create complex business processes without coding by using the Workflow Studio. For more information, see Executing Workflow from Compliance Rule.
When you select an action to start, the action list is filtered by the following criteria:
- For CI-based CoRu: Actions that are restricted to a specific CI.
- For class-based CoRu: Actions that are restricted to CIs in which the target data definition is used.
Creating Tasks
Although it is possible to use the Create Task action as a result of a CoRu trigger, it is not the recommended way anymore. The preferred approach is to use a workflow with the Create Task activity. In this case, you can take advantage of the rich Workflow Activity library and combine Create Task with other actions or use conditions to create more complex business processes. For more information, see Executing Workflow from Compliance Rule.
The system is able to create a task (Task CI) as a result of a CoRu execution. You cannot design a template for these tasks. Because tasks do not support HTML, the possibilities of the designer are much more limited. You can only add data attributes to your templates.
Defining Task Recipients
The general principles of defining recipients for a task are the same as for mails. The differences are described below:
- Because a task can have only a single recipient user and role, you can select only one static recipient.
- The important difference is in writing dynamic expressions. There is a strict pattern that the users should follow in an expression:
Related<DD name of CI>.<relational attribute>[[.<relational attribute>]…] - The ASQL expression should always begin with Related.
- The user customizes the section in bold.
Example: RelatedSPSAccountClassBase.Owner
Note for user recipient: The expression should validate to ID of the User data definition: SPSUserClassBase.
Note for role recipient: The expression should validate to ID of the Service Role data definition: SPSScRoleClassBase. - Sometimes, when writing expressions you can encounter an error saying that the attribute is a "virtual attribute", for example, RelatedSPSAccountClassBase.Owner.MemberOf). In this case you should rewrite the expression, so it explicitly targets the ID attribute: RelatedSPSAccountClassBase.Owner.MemberOf.T(SPSScRoleClassBase).ID.
Changing Data
The system can change an attribute value. The change data rule can contain one or more mapping rules. Each rule has the following parameters:
- Target Type: Target attribute. Only Attribute is now supported.
- Target Expression: Target attribute name.
- Value Type: Type of Value Expression (Value or Expression).
- Value Expression:
- Value: Enter a simple value.
Note for Boolean values: If the Target Expression is a Boolean value, enter either true or false here.
Additionally, the following constants are supported:
- Today+0: Current date. The value for dates also supports the +/- operators.
Example: Today + 5 means that 5 days will be added to the current date. Today - 5 means that 5 days will be subtracted from the current date.
- @ChangedDate: Date of change. Like Today, the value supports the +/- operators.
Example: "@ChangedDate+ 5" means that 5 days will be added to a change date.
- @ChangedUserDisplayName: Display name of the user who changed the data, the + operator is supported.
Example: User is:+@ChangedUserDisplayName means that the resulting value will be User is:[UserDisplayName].
- Expression: Value expression contains an ASQL statement for CI level in format <DD name of CI>.<attribute name>.
Example: SPSAccountClassBase.Owner
Sending Emails
The Systems allows easily to setup sending email notifications on triggering Compliance Rule. For that an action "Send E-mail" needs to be added to Compliance Rule actions list, which uses module Email Engine and Designer for authoring, generating and sending emails.
When configuring a Compliance Rule to send an e-mail:
-
Use the Send Email action,
-
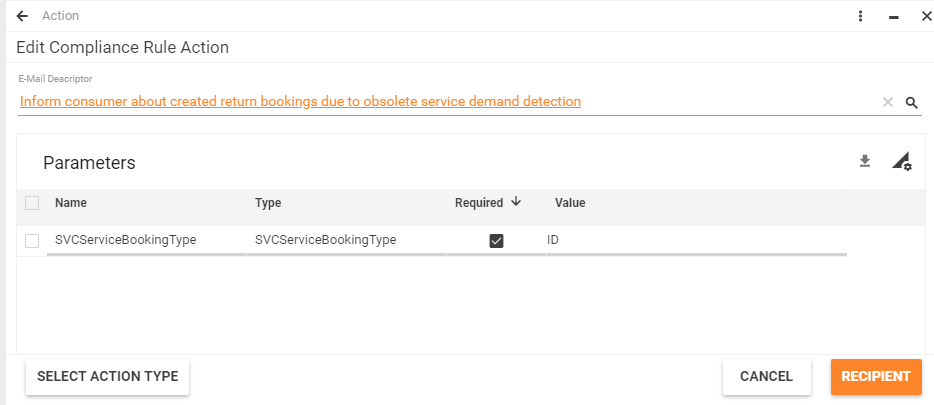
Select existing E-mail Descriptor or create a new one. The System filters existing Email Descriptors to display only those which are relevant for the current Compliance Rule context by checking and suggesting templates having common data type bindings. On picking the Email Descriptors the System automatically displays available parameters which need to be initialized. These parameters can be retrieved based on one of the following types of values:
-
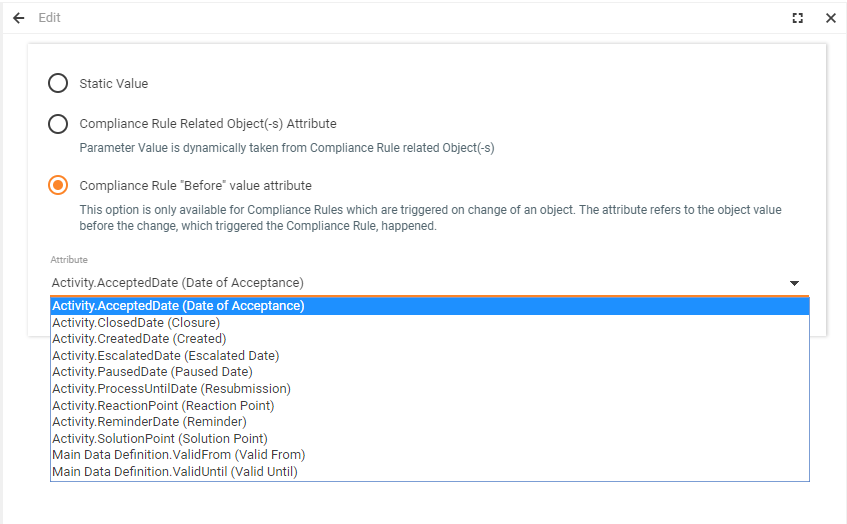
Static Value: manually entered static data;
-
Compliance Rule Related Object(-s) Attribute: parameter will retrieve the current value of the related object and display it in the sent e-mail;
-
Compliance Rule "Before" value attribute: parameter will keep track of the previous value of the modified attribute and display it in the e-mail. This option is available only for Send E-Mail Compliance Rules with "Change an Object" condition type and is suggested only in the case when the selected for the E-mail Descriptor parameter has simple type (String, Integer etc.) and does not have "Is Array" option enabled.
-
Compliance Rule Related Object(-s): reference to required Object(-s) will be automatically detected from Compliance Rule Related Object(-s) ;
-
Send Email Compliance Rule: defining e-mail descriptor parameters source example
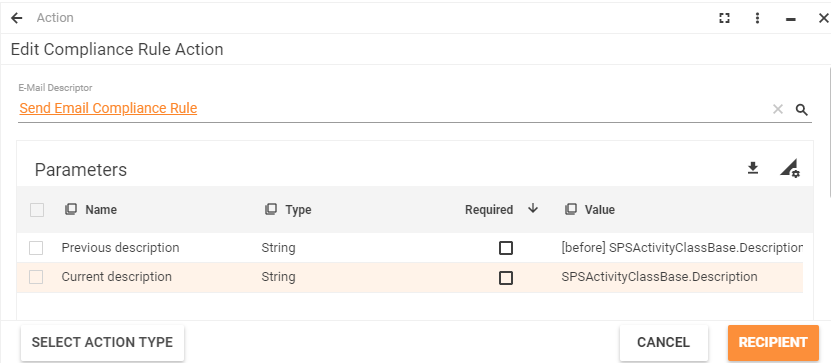
"Send Email" Compliance Rule type allows to keep track of both previous and current values of the same attribute. For this purpose, it is necessary to:
- Configure E-mail Descriptor: add parameters of the identical simple data types to a specific E-mail Descriptor twice;
- Pair the parameters of the identical type to the identical data sources for the following Send Email Compliance Rule options:
a. Compliance Rule "Before" value attribute to retrieve the previous value;
b. Compliance Rule Related Object(-s) Attribute to display the current value.
As a result, "Send Email" Compliance Rule settings may be as follows:
Click on each parameter in the grid to open Edit for parameters. When the values for all required parameters are provided, the wizard allows the proceeding to Recipients settings.
3. Specify e-mail Recipients.
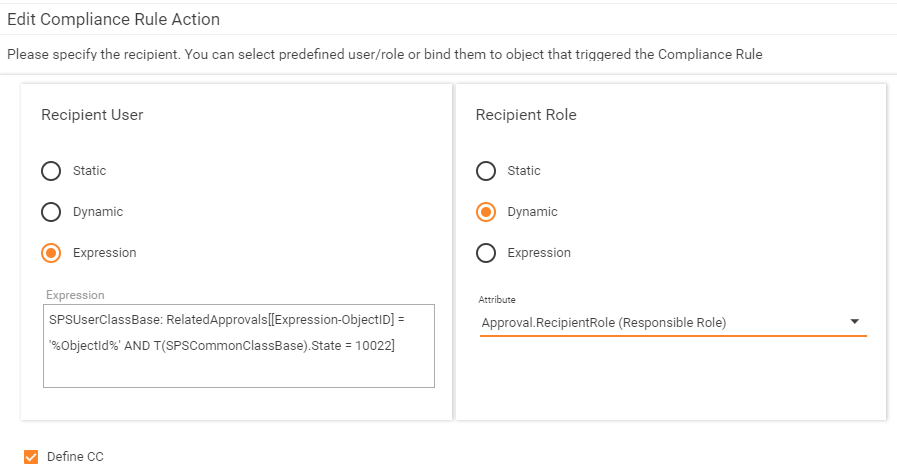
The System allows to specify either specific Recipient User(-s) or the whole Recipient Role(-s), then all members of the role obtain an email. The same functionality for the Carbon Copy recipients, which becomes visible on activate "Define CC". For each of this option, the form provides three different way to reference User or Role.
Static, specific Users, or Roles need to be selected.
Dynamic option uses the Compliance Rule context Object attributes to reference the User (relation to SPSUserClassBase), or Role (relation to SPSScRoleClassBase)
Expression stands for the A-SQL WHERE expression, which is aimed to return data records of users (for Recipient User) or roles (for Recipient Role). The expression has the following format:
DataDefinition: Expression
- DataDefinition: Internal name of the Data Definition which is used for query
- Expression: the A-SQL expression for filtering defined DataDefinition. The expression allows to use parameter %ObjectId% to refer Compliance Rule context object.
Legacy Send Email Actions and Migration
Besides the Send Email action based Email Engine, the Compliance Rule Engine also supports legacy Send Email actions based on Alerting Engine. It is not possible to review and edit this kind of actions in UUX, but only in Classical console.
The legacy Alerting Engine is maintained in a Product, but will be discontinued in the ESMP v.11.0.
All new Send Email Actions for Compliance Rules need to be created only using the new technology.
The Product update automatically migrates all present legacy Send Email Compliance Rule Actions to use a new approach, but as far the full migration is not possible, the System marks the new Send Email actions as disabled.
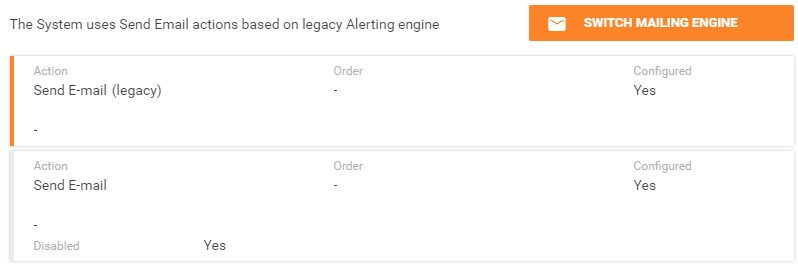
Once the new migrated Send Email action is validated, use "Switch Mailing Engine" action (available on Compliance Rule preview page) to disable legacy action and activate the new ones. In case something goes wrong using the same action the System allows to fallback to use old Alerting engine actions again.
It is also possible to activate the new mailing engine for all Compliance Rule at once. For that use non-context action "Set Default Mailing Engine" in Compliance Rules management area.
After switching Mail Engine, "Matrix42 HostCommon" Service restart is required.
For more information see also Compliance Rules: switching to the new Email Engine page.
Running Compliance Rules Manually
Although compliance rules (CoRus) are designed to run automatically, depending on the state of the system. Sometimes it is useful to run a CoRu manually, in order to test the rule and process all existing objects by using this rule.
It is not required to explicitly Activate new or changed compliance rules. This action is intended only to test new custom
When executed, a compliance rule is applied to all corresponding data objects that match the condition defined within.
There is a limitation for rules that can be executed manually. Only rules that match the following characteristics support manual execution:
- Does not contain conditions with the before clauses.
- Does not contain conditions with the changed clauses.
- Does not contain conditions with the FragmentAdded clauses.
- Does not contain conditions with the FragmentRemoved clauses.
- Does not contain conditions with the RelationAdded clauses.
- Does not contain conditions with the RelationRemoved clauses.
Enabling and Disabling Compliance Rules
- Start Matrix42 Workspace Management and click the Administration workspace.
- In the navigation area, click Services & Processes > Compliance Rules.
- In the selection list, choose a compliance rule.
- To activate a compliance rule, click Enable in the action pane,.
- To deactivate a compliance rule, click Disable in the action pane.
Copying and Editing Compliance Rules
There are three types of CoRus:
- Customizable: Predefined rules of the system that can be changed by users.
- Customized: System rules that were changed by users.
- Custom: CoRus that were created by users.
When you create a new CoRu, it becomes Custom. When you edit a Customizable rule, it becomes Customized. Its name is automatically prefixed with UD_ to indicate that it is user defined. Technically, the copy of the Customizable CoRu is created with the new name and the Customizable CoRu is disabled. This saves customization during the updates of the Customizable rules.
To Edit/Copy a Compliance Rule
- Start Matrix42 Workspace Management and click the Administration workspace.
- In the navigation area, click Services & Processes > Compliance Rules.
- In the selection list, choose a compliance rule.
- In the action pane, click Edit. An input wizard appears.
- Edit the compliance rule.
To Undo Changes
For Customized CoRus, the user can return the Customized rule back to the Customizable state, including all system updates that were installed since the customization.
When reverted, all customization is lost.
- Start Matrix42 Workspace Management and click the Administration workspace.
- In the navigation area, click Services & Processes > Compliance Rules.
- In the selection list, choose the compliance rule that you want to apply.
- In the action pane, click Revert to Original, and then click Yes.
Tips & Tricks
Some general recommendations on how to design compliance rules:
- Try to use class-based CoRus, if possible.
- Try not to use condition clauses on Common class attributes, such as State.
- Try not to set conditions that may result in huge amount of events, such as mass import.
If your compliance rule is not working, you can try the following steps for debugging:
- Check HostCommon.log for any related exceptions.
- Check that the system services are running.
- Set the debug level for logging. You will see some useful processing messages.
- Check whether compliance rules are triggered when you change data. Make a selection in SQL Browser: select * from CREventQueueClassBase
- Immediately after your changes are made, you need to ensure that there is a record there with the object ID that you changed and triggerMaxState = 1. It means that the DB trigger fired successfully and the CoRu should process the event. If such record does not exist, then the problem is either with your condition or the way you changed your object. If such record exists, then the problem is with processing.
- You can also validate your rule by running the Execute action on it. In addition, you can retrieve the ASQL condition from the corresponding record in SPSComplianceRuleClassBase and use it as a "Where" expression in QueryAnalyzer. In this case, you need to query SPSCommonClassBase if you have a CI-based CoRu, and the target class if you have a class-based CoRu.
As previously stated, CoRus that have date conditions are checked every day. In this way, they can result in the situation where a CoRu is triggered every day if the condition is met.
Example
A CoRu should Send mail if expiration date is due in 5 days.The CoRu has the following condition: ExpirationDate < Today + 5. Compliance rules that contain date conditions are retrieved daily. In this case, such compliance rules can be triggered daily, after the set conditions are met. To ensure that the email is sent only once, you need to add a Boolean attribute to your CI (here MailSent) and use it in the condition. The new condition should be ExpirationDate < Today + 5 AND MailSent Equals False.