Release Notes Silverback 19.0 Update 1
About this release
Matrix42 Silverback 19.0 Update 1 provides new and improved features that have been implemented. During the development of this version, we have been focusing on valued feedback from our customers and partners in order to provide an ideal feature selection.
Please find the installation files of this version on Matrix42 Marketplace.
System requirements, instructions for installation and update as well as for basic configuration are available in the Matrix42 Help Center.
Overview
Before you Start
Due to a change in the process for new installations, Silverback will generate during this update a default settings admin account if no settings administrator account is available in your database. The settings account will be generated with a username "settings" with our standard credentials provided in the Installation Guide. Please check after the update if under Admin > User Management a new settings administrator account is listed and change the password in this case or delete this user, if you don't need it. In case of an already existing settings administrator account in your database, no additional changes needs to be done.
New Features
- General
- iOS
- Android
- Windows 10
- MacOS
- tvOS
Improvements
- Samsung Calendar is now enabled by default for Android Enterprise
- Last Connection Time for Cloud Connectors has been fixed
- Only active Cloud Connectors are displayed
- Installed Cloud Connector Version is now shown
- Resultant Tag size has been adjusted for a more comfortable view
- Search button on Tag is activated by default for a faster search
- Device ID is now displayed in Device Overview
- Changes in Device Overviews are now stored in database for every user. This includes
- Enabled or Disabled columns
- Column widths
- Column sorting
- Added new System Variables
- {DeviceID}
- {SerialNumber}
- {DeviceName}
- Added ~100 new device models
- For new installations all relevant URLs can now be generated automatically
- For new installations a default settings administrator will be created automatically
- For an update a default settings administrator will be created if no settings admin role account is available
- Code viewer and editor for Email Templates has been added
- Admin Provisioned a Device Notification for User Template has been adjusted
- {BulkEnrollmentDetails} has been splitted into {Username} and {OTP}
For non modified templates, these changes will take effect automatically. For modified templates, Administrators needs to remove {BulkEnrollmentDetails} and add {Username} and {OTP}
Minor Changes
- Exchange Active Sync Profile Changes on Android and Samsung
- Android for Work Gmail has been renamed to Gmail
- Android for Work Divide has been renamed to Divide
- Samsung Safe has been renamed to Samsung Mail
- Added tooltip for Exchange ActiveSync Settings
- Peak Days are now shown among each other
- Breaks has been removed for Custom Variables
- OSX device type and OS type has been renamed to macOS
- Deprecated Android for Work has been removed
- Deprecated AerialLink has been removed
- Yellow color in Bulk Actions for delete business data operation has been fixed
- iOS WEP Enterprise has been removed from Wi-Fi Security Type
- Glitch for additional settings has been fixed when changing Wi-Fi Security Type
- Tooltip for Only join Wi-Fi networks installed by profiles restriction for iOS has been added
- Default column widths for Associated Devices popup has been changed
- Battery and Storage columns are now hidden by default to avoid right scrollbar on Associated Devices
New Features
General
Please find all new general in Silverback 19.0 Update 1 below.
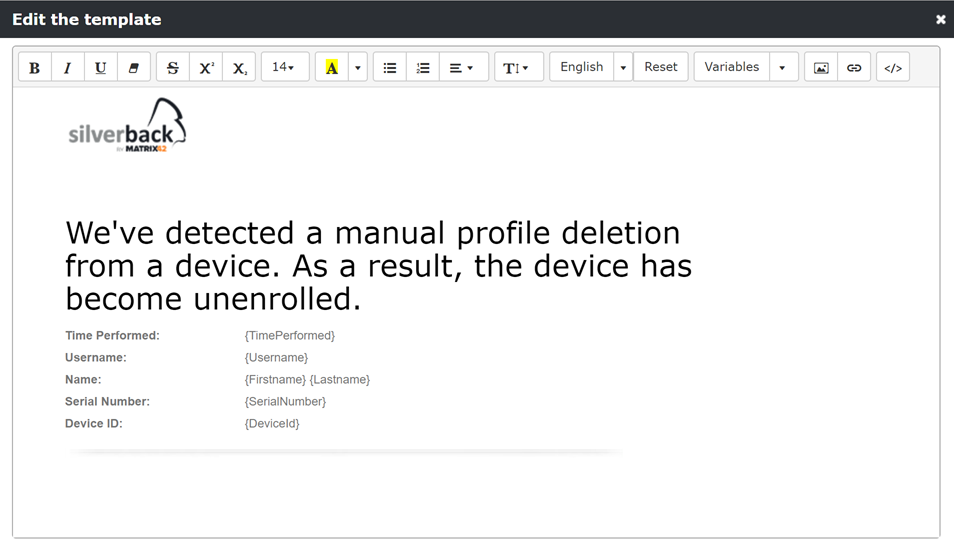
E-Mail Notifications for manual unenrollments
We always appreciate the feedback about improvements or missing features in our product that you provide us in our Idea Portal. One of the most voted feature request was the Send notifications to admin when users remove the profile. With Silverback 19.0 Update we are happy to provide you this functionality for all supported devices types. From now on you will find a new Email Template (Admin > Email Templates) called Manual Unenrollment Alert. After updating to the new release, all Administrators with enabled Receive Email Alerts will receive an Email Notification whenever a user unenrolls the device manually.
iOS
Please find all new iOS Features in Silverback 19.0 Update 1 below.
Device Enrollment Program with Active Directory Authentication
We are happy to announce a more comfortable way to enroll devices with the Device Enrollment Program from Apple. It was one of the most common awaited features in our Idea Portal. So from now on its possible to directly use the Active Directory Credentials to enroll the device during the Out-of-the-Box-Experience for Device Enrollment Program prepared devices. The functionality will be enabled by default after the update. To deactivate the functionality navigate to Admin > Device Enrollment Program > Settings and disabled the checkbox Active Directory Authentication. With activated Active Directory Authentication your end user just need to authenticate with their Active Directory credentials to complete the enrollment.
With the activation it will be impossible to enrol devices with a One Time Password Authentication
QR Code Enrollment for iOS
Another way to make enrollments more user friendly, is to use our new QR-Code functionality in Silverback. Navigate to Admin > Self Service Portal > Simple Enrollment. There you will find the by default enabled checkbox "Use QR-Code". Here you have also the possibility to upload a branded QR-Code Logo (recommended size of 48x48 pixel). As usually Silverback offers multiple way to enroll devices, so we want to recap the different approaches and show the benefits of the QR-Code
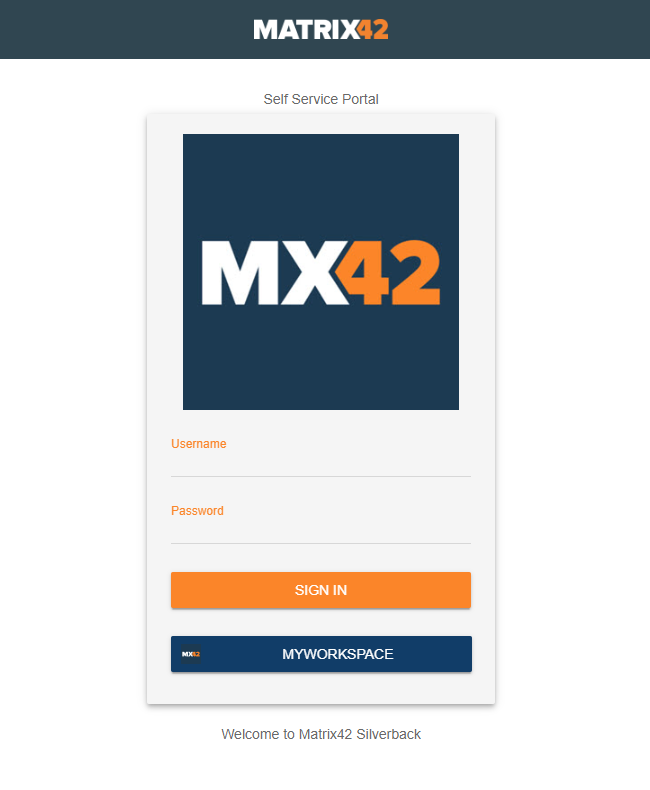
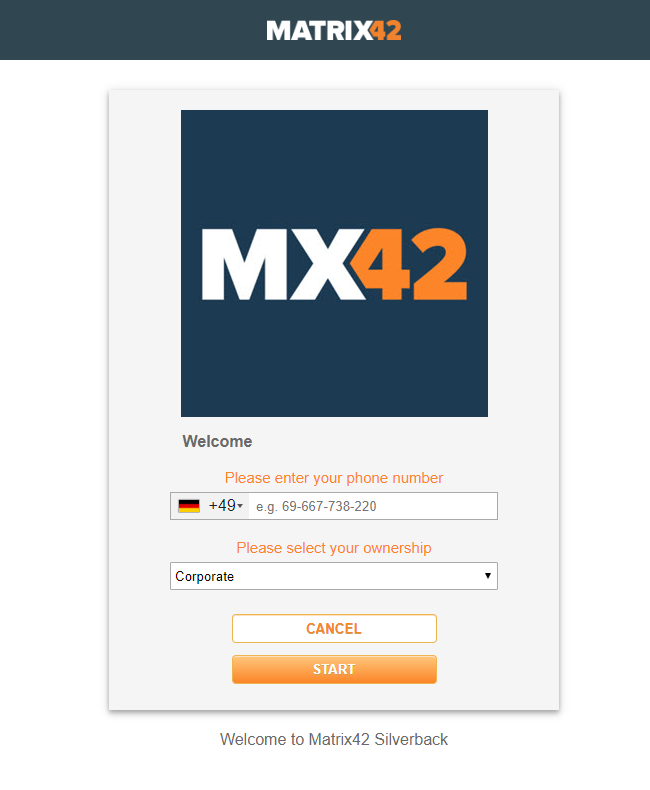
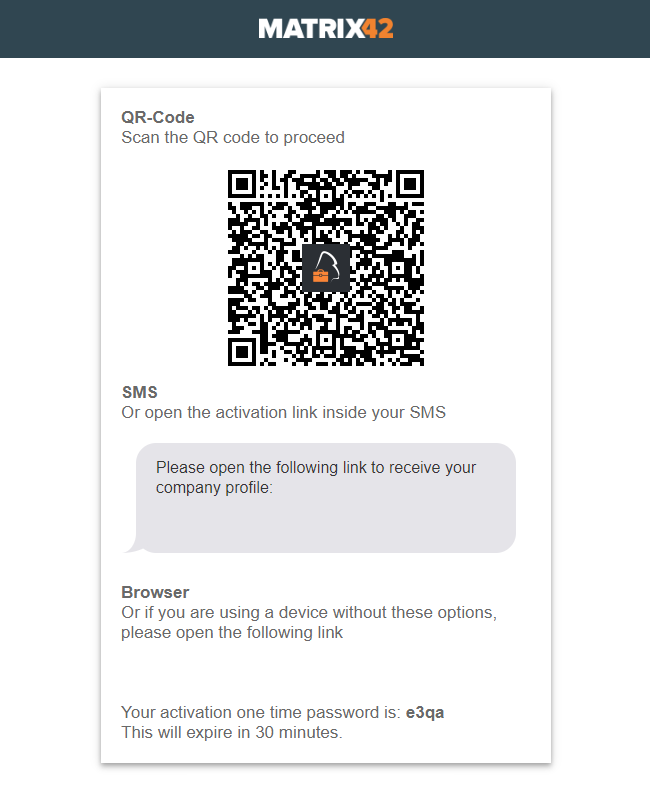
User driven enrollment via Self Service Portal from a second device
A user driven enrollment from a second device starts as usual. First, the end use needs to sign in into the Self Service Portal, then select (depending on your configuration) the ownership and enter the phone number, which is optional. With the last step the QR-Code is shown. If the end user provided a phone number, an additional SMS will be sent, so the end user can decide to use the sent link in the SMS or proceed with scanning the QR-Code with the native iOS camera. After that the end users needs to follow the instructions on the device.
 |
 |
 |
User driven enrollment via Self Service Portal from same device.
In addition, Silverback offers also the ability to proceed the iOS enrollment directly from the device by visiting the Self Service Portal via Safari. In this case the end user can decide to use the sent Enrollment SMS if a phone number has been provided or open the provided link under browser and the enrollment will be start as usual.
Administrator driven enrollment for a single user
Another way to enroll devices is the Administrator driven enrollment. Depending on your workflows it might be that you want to provide your end users a fully configured device. For this navigate to Devices > Pending and click Provision User. On the next screen select the Ownership, enter the Username and provide the common Admin Credentials to create the Pending Enrollment. The next screen will display the Enrollments Details with the QR-Code. Just scan the QR-Code with the iOS Camera and follow the instructions on the device. In this case the end user will receive an E-Mail Notification based on the Admin Provisioned a Device Notification for User Template. When you add a Mobile number during in the Provision User screen, an additional SMS will be send and the displayed screen will be differ.
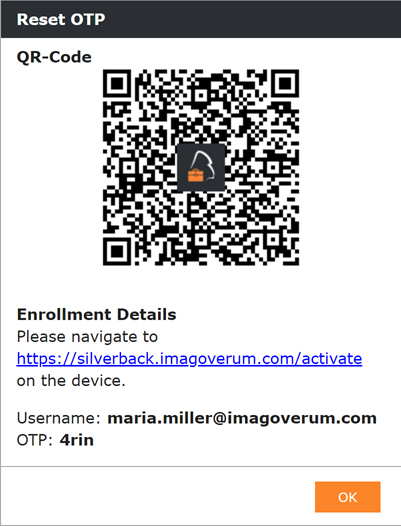 |
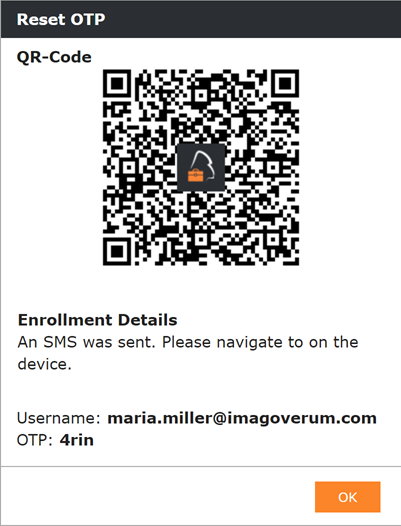 |
| Without mobile number | With mobile number |
Administrator driven bulk enrollment
A fourth possibility is to create Bulk Enrollments. In this use-case you can generate multiple pending enrollments for your end users. The benefit is that they don't need to go through the Self Service Portal and you don't have to create for each user a pending enrollment. For this navigate to Devices > Pending > Bulk Provision Users and click New Bulk Provision to create multiple pending enrollments. Please refer to Devices Guide Part I: Pending for a detailed walkthrough.
By enabling the Email User Details checkbox each user will receive the following E-Mail with an included QR-Code. Depending of the enabled SMS User Details and a provided phone number in your *.csv file, each user will receive as well an Enrollment SMS. Here, your end users again has the choice to scan either the QR-Code with the native iOS camera of open the sent enrollment link in the SMS.

Create Computer Objects in Active Directory
With Silverback 19.0 Update 1 we added the ability to create Computer Objects in your Active Directory. You may already be familiar with the automatic creation of Computer Objects after a Computers joins your Active Directory. From now on, Silverback can do the same and has the ability to create Computer Objects during the Enrollment on your behalf. For this functionality we added under Policy > Computer Objects the following settings:
| Setting | iPhone | iPad | Description |
|---|---|---|---|
| Enabled | Enabled or Disabled | Enabled or Disabled | If enabled, Computer Objects will be created |
| Computer name prefix | e.g. iPhone-{DeviceId} | e.g. {SerialNumber} | Defines the Computer Name. You can use a Prefix and fill it with a variable, but ensure that Computer Names are limited to 15 characters. All Silverback Variables but we recommend to take one of the examples. |
| Organizational unit | e.g. OU=Silverback,DC=imagoverum.com,DC=com | e.g. OU=iPads,DC=imagoverum.com,DC=com | Defines the location, where Computer Objects should be created |
| Domain Administrator | e.g. administrator@imagoverum.com | e.g Imagoverum\Administrator | Administrator credentials are required to create Computer Objects. Please enter your UPN or SamAccountName |
| Password | e.g Pa$$w0rd | e.g. Pa$$w0rd | Administrator credentials are required to create Computer Objects. Please enter your Administrator password |
Assign Computer Certificates to Computer Object
As a second step, you might want to add distributed Wi-Fi certificates to the created computer object in your Active Directory based on computer certificate templates. We are happy to provide you this functionality in this Release. To achieve the adding of certificates to computer objects a couple of steps needs to be done. On a high level the following steps are required
- Add a Certification Authority to Silverback
- Login as Settings Admin
- Navigate to Certificates and enable Individual Client
- Add your CA in the following format
- ca.imagoverum.com\imagoverum-CA
- Create a certificate Request Agent Template
- Open the Silverback Microsoft CA Integration for Android & iOS v1.6.pdf Guide and
- Work through the following chapters:
- 5.2.1. Creating the Certificate Request Agent Template
- 5.3. Publishing the Newly Created Certificate Templates (Enrollment Agent only)
- 5.4. Creating the Certificate Request Agent Certificate
- 5.5. Importing the Certificate Request Agent Certificate
- Create and Publish Computer Certificate Template
- Add a WiFi Profile into the same Tag where you enabled the Computer Object Creation Policy
Create your Template
- Open your Certification Authority Management Console
- Right click on Certificate Templates
- Click Manage
- Perform a right click on Computer
- Choose Duplicate Template
- If prompted, select Windows Server 2003 Enterprise as version
- Click OK
- Configure the Template as following:
- General
- Enter as Template display name e.g. Silverback Computer
- Enable Publish certificate in Active Directory
- Request Handling
- Enable Include symmetric algorithms allowed by the subject
- Enable Allow private key to be exported
- Subject Name
- Enable Supply in the Request
- Accept the prompt with OK
- Issuance Requirements
- Enable This number of authorized signatures
- Change Application Policy to Certificate Request Agent
- Extensions
- Select Application Policies
- Click Edit
- Select Server Authentication
- Click Remove
- Click OK
- Add Secure Email (optional)
- Security
- Click Add
- Enter Silverback and click Check Names
- Select the Silverback Enterprise Device Management Group
- Click OK (2x)
- Enable Enroll Permissions for the added group
- Click OK
Configure Silverback
It is required to configure Creating Computer Objects and Wi-Fi Profile in the same Tag!
- Edit your Tag with enabled Computer Object Creation
- Enable Profile
- Click Save
- Navigate to Profile
- Select Wi-Fi
- Click New WiFi Profile
- Enable Wi-Fi Settings
- Enter your SSID
- Change Security Type WPA 2 Enterprise or AnyEnterprise
- Enable Hidden Network (optional)
- Enable Automatically Join (optional)
- Select Authentication
- Enable Use Individual Client Certificates
- Enter an Individual Client Certificate subject: e.g. u_{firstname}.{lastname}_WiFi
- Enable Populate into Active Directory
- Enable Use Computer Object
- Enter Certificate Template Name, e.g. SilverbackComputer
- Enter Agent Certificate Thumbprint: e.g. d17843663fbaa87f49c4e97cd860867efc2c20b6
- Click Save
Android
Please find all new Android Features in Silverback 19.0 Update 1 below.
QR Code Enrollment for Android
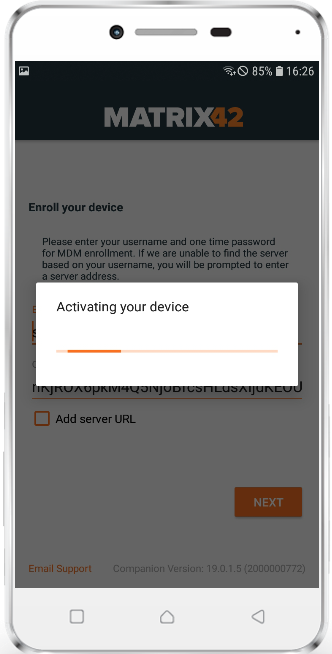
As well as for iOS, we are happy to provide you a more user friendly and more faster way to enroll Android and SamsungSafe device with Silverback 19.0 Update 1. To make it work for Android and SamsungSafe we extended our Companion App with an integrated QR-Code scanner. The first change you may notice is that after the first installation Companion asks for a new app permission called "Allow Companion to take pictures and record video?". This permission is required to use the camera engine on each Android and SamsungSafe device and is needed to use the Scan QR-Code functionality, which is displayed in the initial Companion screen. End users just need to select Scan QR-Code to scan the provided Silverback Enrollment QR-Code. After a successful scan, everything remains the same and the process hasn't changed. You will still have the possibility to enter all needed enrollment information manually by selecting the second option "Enter Manually". Please refer to the iOS chapter where we already recap the different approaches and benefits of the QR-Code
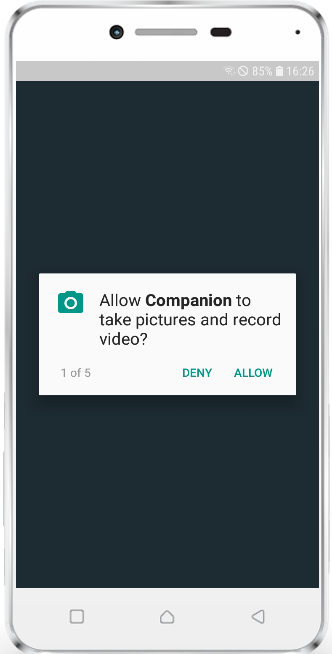 |
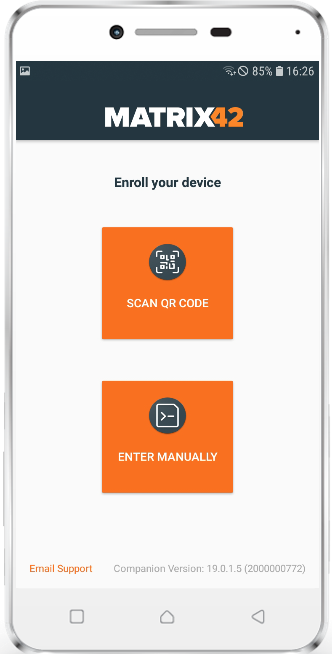 |
 |
Managed App Configuration for Device Owner Mode
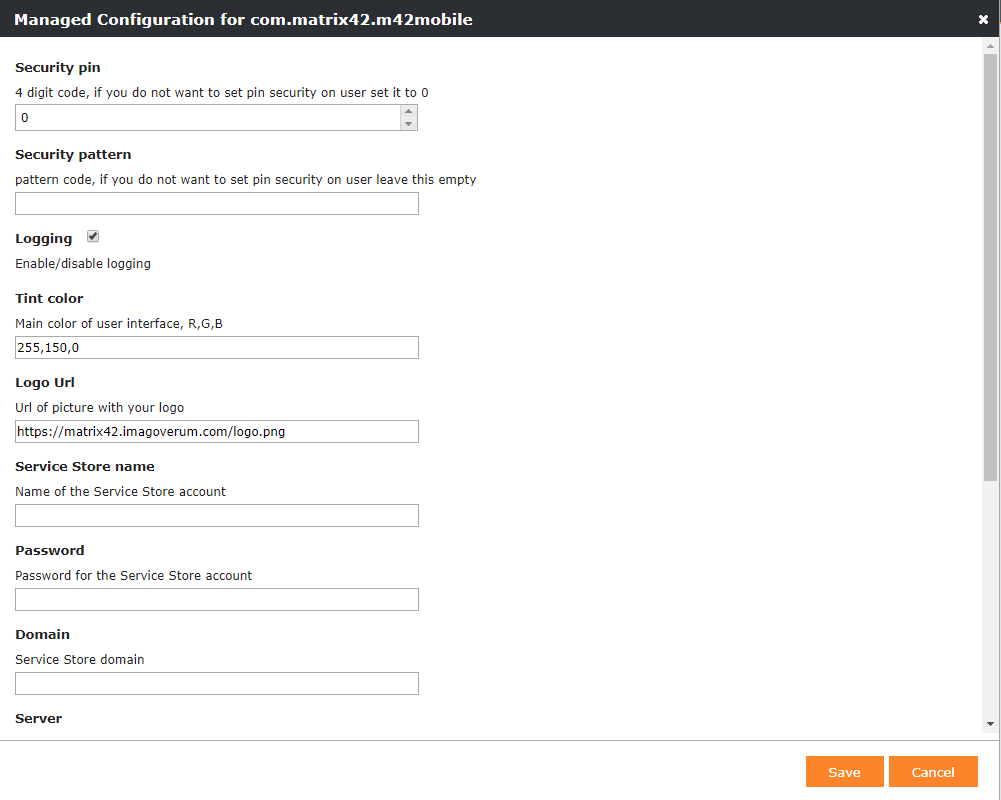
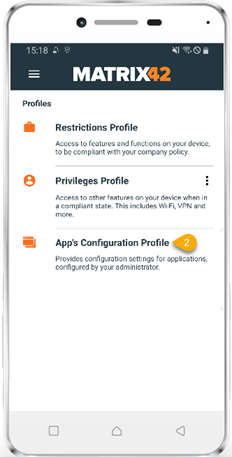
Some Android applications designed for enterprises include built-in settings called managed configurations. You may have already noticed the Edit Managed Configuration button for each Managed Play application that you added into Silverback. If the application is extended with managed configuration you will see a configuration pop-up with all supported managed configuration for this application. This functionality was given for Work Profiles on Android Enterprise and is now fully supported for devices in device owner mode. In Companion we added a profile information "App Configuration Profile" which means that managed configuration is distributed to your end users device(s).
If the application doesn't support managed configuration you will receive a corresponding information
 |
 |
Passcode Settings Update
With Silverback 19.0 Update 1 we updated the Passcode Settings for Android and SamsungSafe devices. Now you have new options to define device passcode settings in a more granular way. These settings were changed both for lock screen in the personal area and in the work profile section. You will find in the Work Profile section also a new checkbox called "Allow same passcode". For Android 9 and later it's possible to require two different passcodes for personal area and for unlocking the work profile section. During the update we fixed also a known issue, where passcodes for work profiles hasn't applied. Please find your appropriate setting in the following overview:
| Quality | Options | Description |
|---|---|---|
| Numeric |
|
The user has to enter a password containing at least numeric characters |
| Alphanumeric |
|
The user has to enter a password containing at least numeric and alphabetic characters (or symbols) |
| Complex |
|
The user has to enter by default a password containing at least a letter, a numerical digit and a special symbol. With this password quality, passwords can be restricted to contain various sets of characters, like at least one uppercase letter etc. |
| Numeric Complex |
|
The user has to enter a password containing at least numeric characters with no repeating (4444) or ordered (1234, 4321, 2468) sequences. |
| Biometric Weak |
|
The policy allows for low-security biometric recognition technology. This implies technologies that can recognize the identity of an individual to about a 3 digit PIN (false detection is less than 1 in 1.000) |
Android Q Support
Android Q is the tenth version of Google's operating system. Currently it's in the beta phase and will be probably launched in August this year. For all early adopters we are happy to announce the general support in Silverback. Please note that Google may change something during the next months, but based on the current development state, the general management of Android Q devices is ensured.
Windows 10
Please find all new Windows 10 Features in Silverback 19.0 Update 1 below.
Device Scope Installations
A Device Scope installation or in other words, a per-machine installations of an application means that the application is available for all users of a computer. The Windows Installer allows to perform an install on a per-user or per-machine basis. This mostly affects the value of certain folder properties at install time such as the DesktopFolder, ProgramMenuFolder, StartMenuFolder, and StartupFolder. Also shortcuts will be installed to the All User Profile. You should consider this option when multiple users access the same machine with the combination of the Allow MSI Always Install With Elevated Privileges Restriction. This will have a positive effect of any Hybrid Management scenarios with the Autopilot functionality where devices requires a reboot, before the Classic Management (Empirum Agent) is able to perform actions on the devices.

Bulk Enrollment via Provisioning Package
A provisioning package (*.ppkg) is a file for a collection of configuration settings. For Windows 10 Devices, Administrator can create provisioning packages that let you quickly configure a device without the need of installing images. Additionally, provisioning packages can be used to enroll devices into a Mobile Device Management like Silverback. With the power of Matrix42 Unified Endpoint Management it's now very easy to perform a migration from a traditional or classic management system, like Empirum, to new modern management scenarios with Silverback. As an outcome, devices will be hybrid managed by Empirum and Silverback with all positive effects for you and your endpoint devices.
With the bulk provisioning method via provisioning packages it is very easy to enroll and configure multiple devices with a standard user account quickly. To use bulk provisioning, download the Windows Configuration Designer tool from the Microsoft Store. This tool creates provisioning packages used to image devices. As part of these provisioning packages, you can include Silverback configuration settings so that provisioned devices will be automatically enrolled into Silverback. Please note that admin permissions are required to run the provisioning package. At this state bulk provisioning only supports single user standard staging. The step by step guide will use for the migration or staging scenario a user called migration.
- Create your Migration User
- Login as an Administrator into Silverback
- Navigate to Users
- Click New Device User
- Enter as Username e.g. migration@imagoverum.com
- Add the following information
- First Name
- Last Name
- Email Address
- Password
- Confirm Password
- Click Save
- Enable Bulk Staging Mode
- Navigate to Admin > Self Service > One Time Passwords
- Enable Allow Multiple Pending Enrollments
- Enable Activate Bulk Staging Mode
- Set OTP Expiration Date to unlimited
- Add your Migration User, e.g migration@imagoverum.com
- Create a new Bulk Enrollment
- Navigate to Devices
- Click Pending
- Select Bulk Provision Users
- Click Create New Bulk Provision User
- Enable Define OTP
- Enter a OTP, e.g. 4444
- Create a *.csv file
- Open any Text Editor, e.g. Notepad++
- Enter in the first line your created username, e.g. migration@imagoverum.com
- Copy the username and paste it as often a you want in the lines below
- Save the file as *.csv
Each Created Pending Enrollment will bind one license, so do not exceed your remaining Silverback licenses.
- Upload the *.csv file
- Navigate back to Silverback
- Select Choose File and upload your created *.csv file
- Provide LDAP or Local User Credentials to authorize this action
- Click Submit
- Depending on the amount of lines in the *.csv, the process may take a while, so proceed with next steps
- Download Windows Configuration Designer
- Open on a Windows 10 device the Microsoft Store
- Search for Windows Configuration Designer
- Download and Install Windows Configuration Designer
- Click Launch
- Create Provisioning Package
- Select Advanced provisioning
- Enter a Name and Description (optional) and click finish
- Select All Windows desktop editions and click next
- Click Finish
- Expand Runtime settings in the left pane
- Left click Workplace
- Click Add in the middle pane
- Enter as UPN your created user, e.g. migration@imagoverum.com
- Click Add
- Double Click on the newly generated Enrollment
- Configure the Enrollment as following:
- Change Auth Policy to OnPremise
- Enter as DiscoveryServiceFullUrl: e.g. https://silverback.imagoverum.com/En.../Discovery.svc
- You find your Discovery URL under Settings Admin > Windows Phone > Enrollment URL. You need to add Discovery.svc at the end
- Enter as Secret your defined OTP, e.g. 4444
- Click File and Save your project
- Click Export and select Provisioning Package
- Provide a name, e.g. Matrix42 UEM Migration and click Next
- Click Next (3x)
- Click Build
- Open your Output Location and click Finish
- Run the provisioning package
- Copy the created *.ppkg file to your Windows 10 Device
- Execute the *.ppkg file on the device and follow the instructions
- Navigate to Settings > Accounts > Access work or school
- After a successful run the device should be enrolled into Silverback
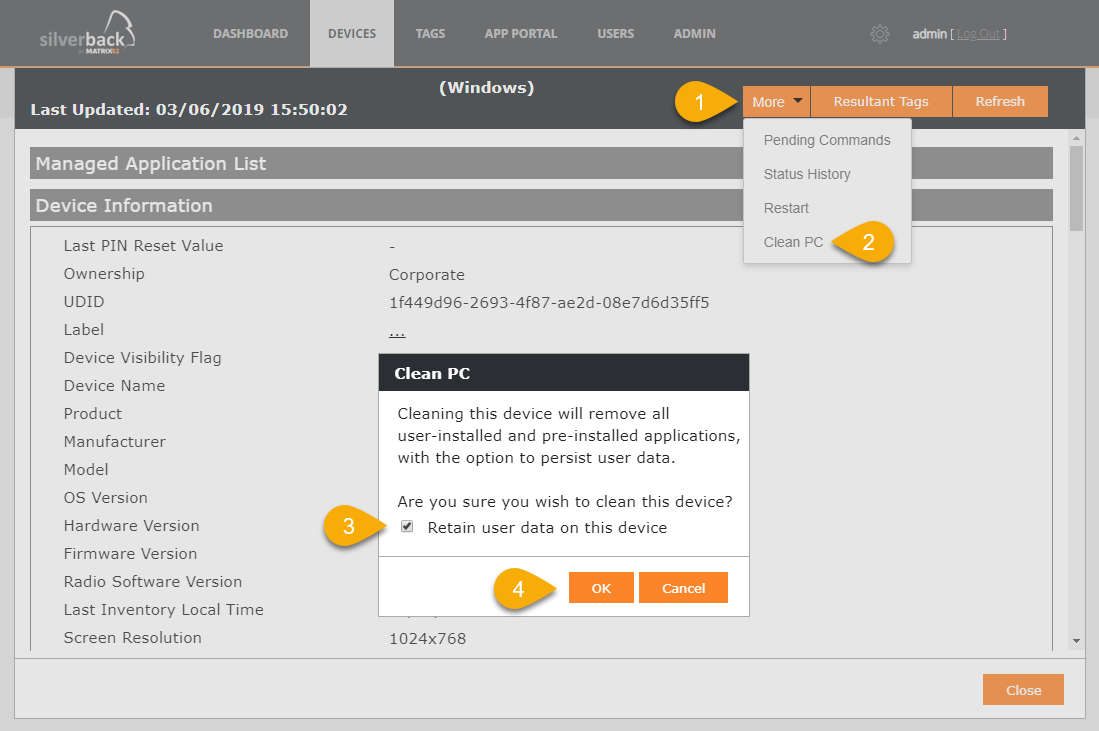
Clean PC
CleanPC device action requires minimum Windows 10 Version 1703 and allows removal of user-installed and pre-installed applications, with the option to persist user data. Navigate to Devices > Managed and open one of your enrolled Windows 10 Devices. Select More and click Clean PC.
Select Retain user data on this device to
- Keep the device Azure AD joined
- Device will be re-enrolled into Silverback when when an Azure Active Directory enabled user signs into the device.
- Device user's Home folder, and remove apps and settings are kept
When not enable retain user data, the device will be restored to its out-of-box state. BYOD devices will be unenrolled from Azure AD and Silverback. Azure AD joined devices will be enrolled into Silverback again when an Azure Active Directory enabled user signs into the device.
macOS
Please find all new macOS Features in Silverback 19.0 Update 1 below.
Device Enrollment Program Support
The Device Enrollment Program helps you and your organization to to deploy and configure Apple devices easily. DEP provides a fast, streamlined way to deploy organization-owned Apple devices purchased directly from Apple or participating Apple Authorized Resellers or carriers. Silverback supports since a very long time the Device Enrollment Program for iPhones and iPads and we're happy to announce the general DEP support for macOS devices and Apple TV devices (cf. tvOS chapter) in this Release. In contrast to iPhone and iPad devices, MacOS Devices needs to be exclusively purchased directly from Apple or from any participating Apple Authorized Resellers or carrier.
Please refer to the Apple Deployment Integration Guides if you are new to the DEP Program.
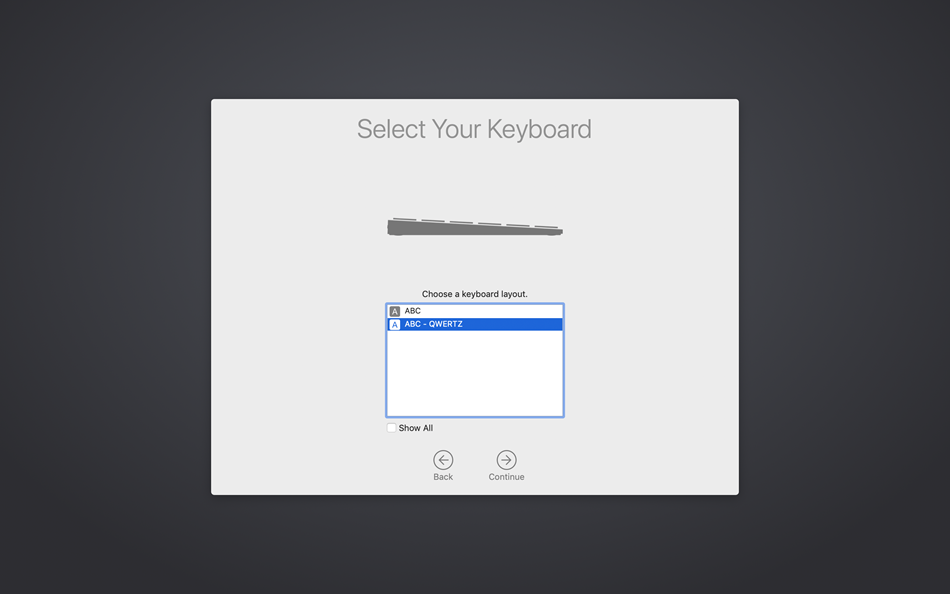
After purchasing a DEP ready macOS device, the complete enrollment process can be shortened to allover 5 steps for any end user:
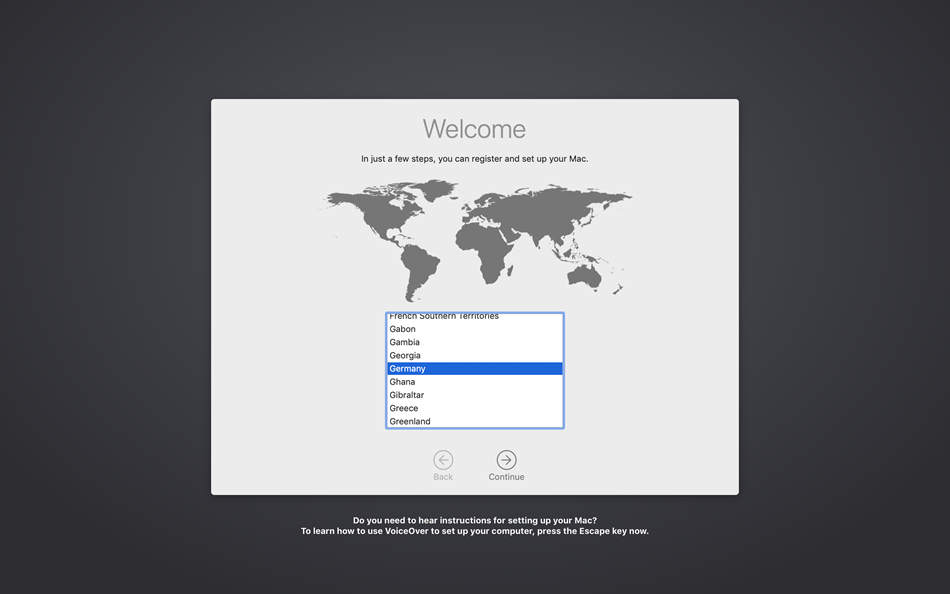 |
 |
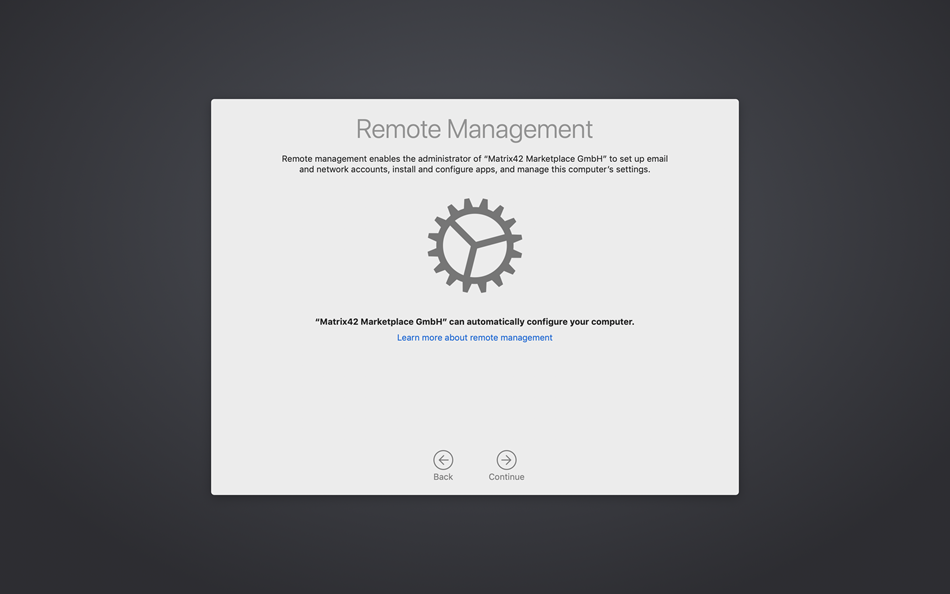 |
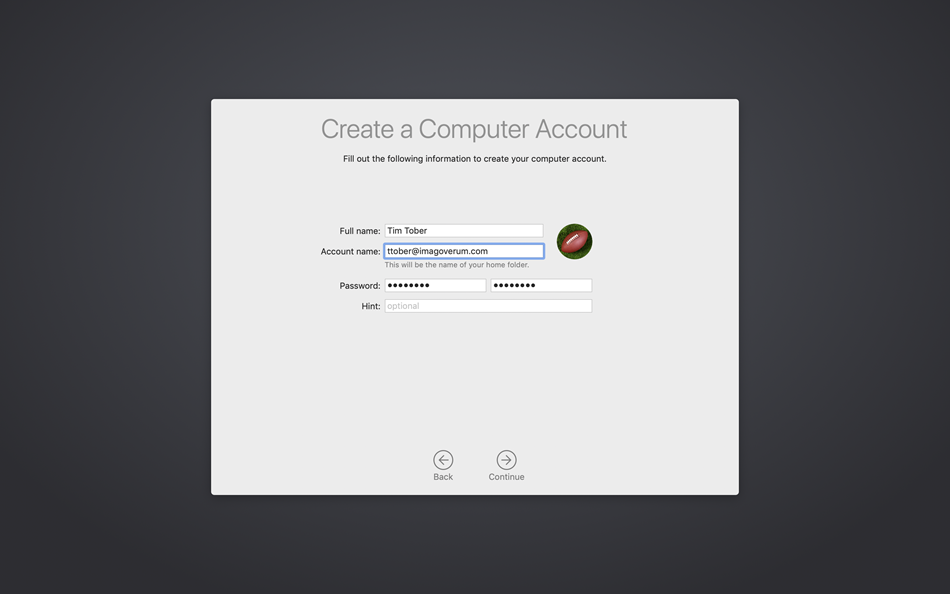
| Select your Region and Language | Select the Keyboard Layout | Enter credentials on the Remote Management Screen |
 |
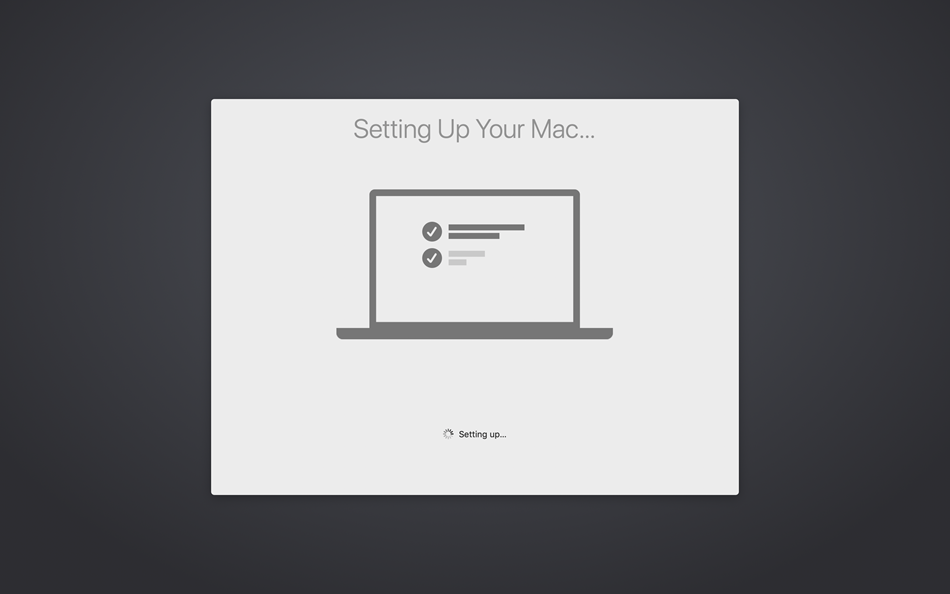 |
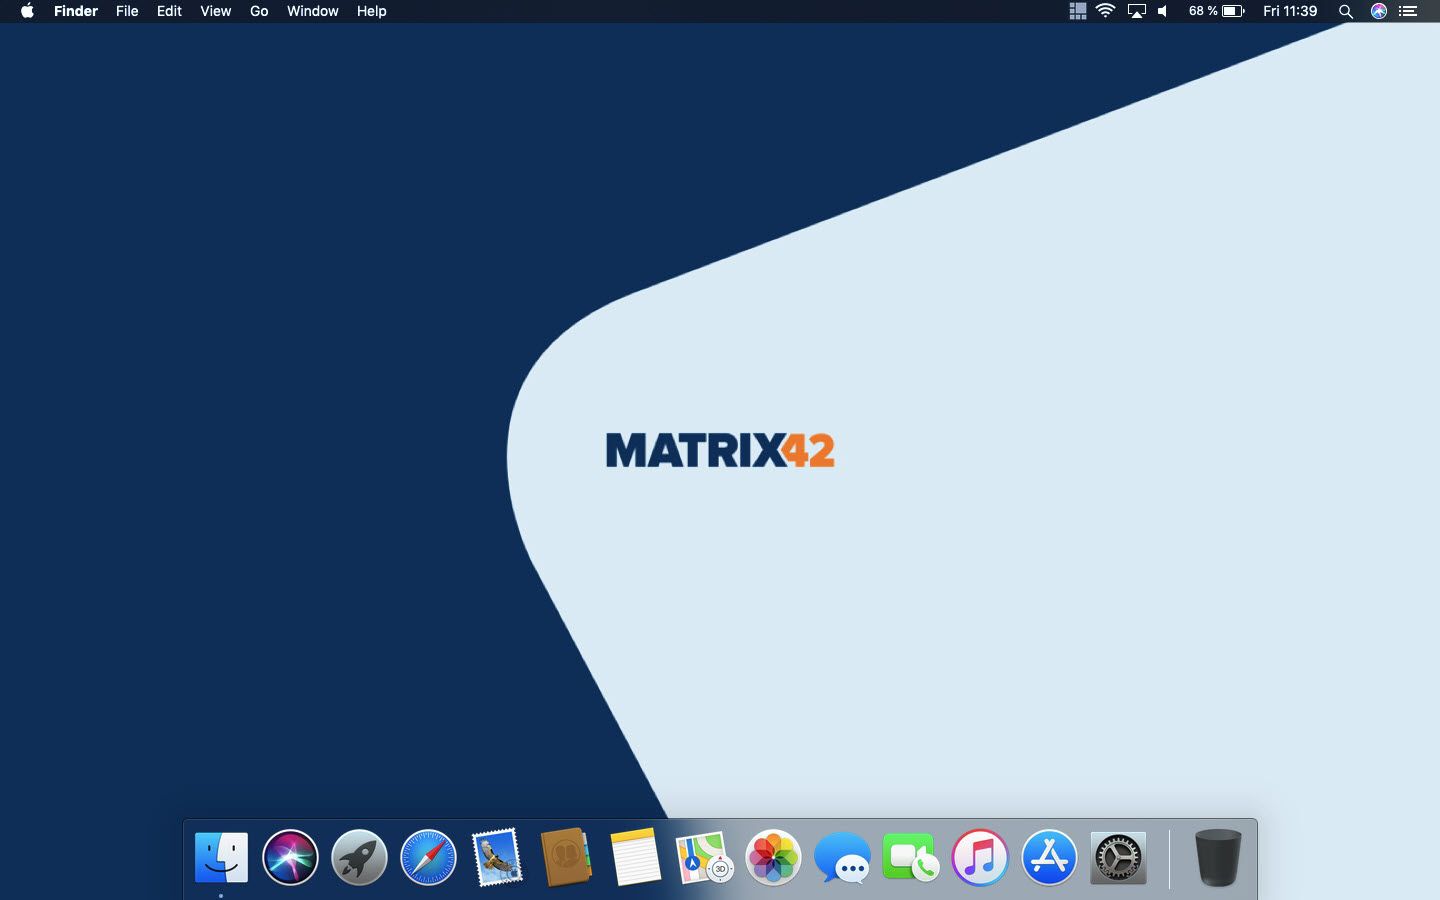 |
| Enter Full Name for the Computer Account | Wait until the Process is finished | Device is ready to use |
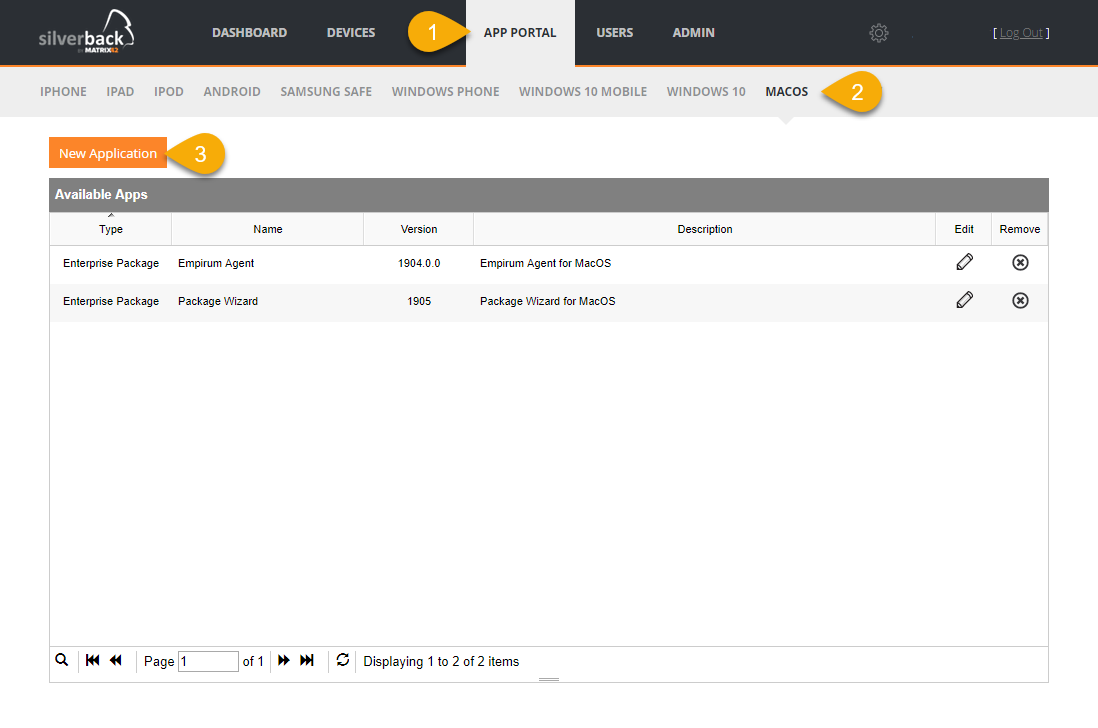
Application Distribution
With Silverback 19.0 Update 1 we are happy to provide you the functionality to distribute enterprise application to macOS.
- Navigate to App Portal
- Select macOS
- Click New Application
- Enter a Name
- Upload your *.pkg file
- Upload the corresponding manifest *.plist file
 |
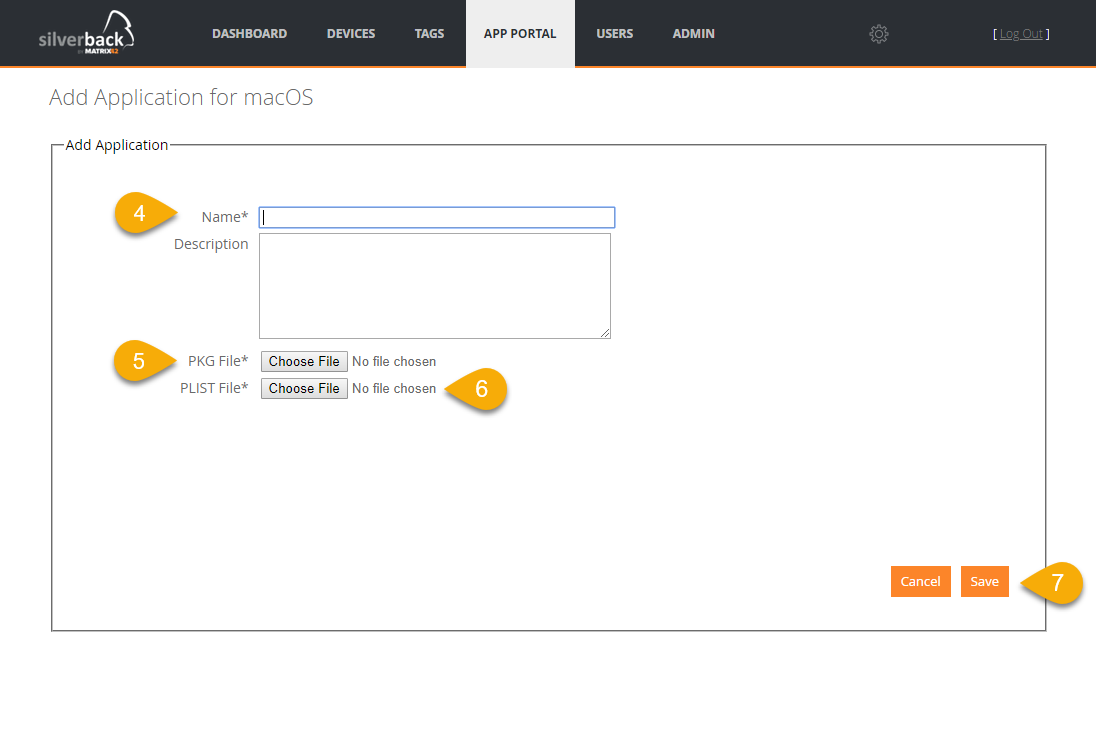 |
Manifest *.plist
Please contact your application developer to provide you the needed manifest file. Any manifest file for macOS enterprise applications contains the following information.
- md5-size (needs to be splitted in several blocks if the application exceeds 10MB)
- size in bytes
- download url (will be added automatically by Silverback)
- bundle identifier
- bundle-version
- kind
- subtitle
- title
Please download your example *.plist for reference here: Download
Hybrid macOS Management
The functionality of distributing enterprise applications to macOS devices opens the door for a Matrix42 Hybrid macOS Management. You may have seen already our streamlined process for new employees on the Windows 10 platform, where devices will be shipped to employees and with the power of combined Autopilot capabilities with an Out-of-the-box enrollment to a modern management layer (Silverback) and the fulfillment of classic management scenarios (Empirum), like installations of legacy applications, the starting process for new employees is very fast and quite unique in the Unified Endpoint Management Market. With our new Silverback release, we will bring these capabilities to the macOS Platform. So, please stay tuned for upcoming announcements, demonstrations and white papers.
On a high level process you are now able to distribute the Empirum macOS Agent to already managed macOS devices, or you combine this capability with shipping an Device Enrollment Program ready macOS device to your end user.
tvOS
Please find all new tvOS Features in Silverback 19.0 Update 1 below
Overall Supported Features
- Enrollments
- Restrictions
- Wi-Fi Configuration
- Global HTTP Proxy
- Custom Profiles
- Home Screen Layout
- Defer Operating System updates
- Remote Restart
- Remote Renaming
Enrollment with Apple Configurator
Prerequisites:
- Enabled Apple TV as Device Type under Settings Administrator
- Accomplished Apple Deployment Programs I: Create Managed Apple ID
- Created Organization in Apple Configurator. Please refer to: Apple Deployment Programs IV: Manually add devices to DEP
- Installed Apple Configurator on your macOS. Please refer to: Apple Deployment Programs IV: Manually add devices to DEP
Add your Server
- Open Apple Configurator 2 on your macOS device
- Click in the Top Menu Apple Configurator 2 and select Preferences
- Navigate to Servers and Click +
- Click Next
- Enter as Name e.g: Silverback AppleTV Enrollment
- Enter as Hostname your Activate Apple Location. It is shown under Admin > Device Enrollment Program > Settings
- Click Next
- If your receive the message "Unable to verifiy the server's enrollment URL" perform the following workaround
- Click Previous
- Remove /activate/AppleActivate part and enter /admin
- Click Next
- Click Edit
- Change the Enrollment URL back to /activate/AppleActivate
- Click Save and close the Window
Prepare your Apple TV
- Connect your Apple TV via Ethernet cable into the same LAN as your Mac Computer
- Reset your Apple TV to factory settings
- Navigate to Settings
- Select System
- Choose Reset
- Keep your Apple TV plugged into power until the Reset process finishes
- When the Apple TV is back on the "Pair Your Remote" screen, do nothing on the Apple TV
- Navigate back to Apple Configurator 2 on your Mac
- At the top of your screen, click the Apple Configurator 2 menu option
- Select Paired Devices
- Select the Apple TV and click pair
- A 6-digit code will appear on the Apple TV
- Enter this codes in the Apple Configurator screen
- Close the Paired Devices window
- After pairing the Apple TV successfully, your Appe TV should appear in the Apple Configurator devices overview
- Select the Apple TV and click Prepare
- Choose the following options
- Prepare with: Manual Configuration
- Disable Add to Device Enrollment Program
- Keep Supervise devices enabled or disable it
- Enable Allow devices to pair with other computers
- Click Next
We recommend to supervise Apple TVs
- Select your previously created Silverback AppleTV Enrollment Server
- Click Next
- Select your Organization
- Click Next
- Configure tvOS Setup Assistant to your needs
- Click Prepare
Enroll your Apple TV
- After the successful preparation the status either
- Is Supervised and should be changed from No to Yes in Apple Configurator
- Or without supervising the Apple Configurator is awaiting a paired remote control to proceed
- Follow now the instructions on your Apple TV
- At one point a Remote Management Screen will appear
- Select Apply Configuration
- Enter your Active Directory or Local username
- Select Continue
- Enter your Active Directory password or the created OneTime Password for the chosen user
- e.g. Pa$$w0rd
- Select Continue
- Your Apple TV is now successfully enrolled
- Navigate to Settings > General > Device Management and check the installed Silverback MDM Profile
- Check our Supported Features and create one or more Management Tags
Enrollment with Device Enrollment Program
- Enabled Apple TV as Device Type under Settings Administrator
- Accomplished Apple Deployment Programs I: Create Managed Apple ID
- Accomplished DEP Parts on Apple Deployment Programs II: Configure Deployment Programs
- Accomplished Reading and understanding Apple Deployment Programs III: DEP in Silverback
- Created Organization in Apple Configurator. Please refer to: Apple Deployment Programs IV: Manually add devices to DEP
- Installed Apple Configurator on your macOS. Please refer to: Apple Deployment Programs IV: Manually add devices to DEP
Add your Server
- Open Apple Configurator 2 on your macOS device
- Click in the Top Menu Apple Configurator 2 and select Preferences
- Navigate to Servers and Click +
- Click Next
- Enter as Name e.g: Silverback AppleTV Enrollment
- Enter as Hostname your Activate Apple Location. It is shown under Admin > Device Enrollment Program > Settings
- Click Next
- If your receive the message "Unable to verifiy the server's enrollment URL" perform the following workaround
- Click Previous
- Remove /activate/AppleActivate part and enter /admin
- Click Next
- Click Edit
- Change the Enrollment URL back to /activate/AppleActivate
- Click Save and close the Window
Prepare your Apple TV
- Connect your Apple TV via Ethernet cable into the same LAN as your Mac Computer
- Reset your Apple TV to factory settings
- Navigate to Settings
- Select System
- Choose Reset
- Keep your Apple TV plugged into power until the Reset process finishes
- When the Apple TV is back on the "Pair Your Remote" screen, do nothing on the Apple TV
- Navigate back to Apple Configurator 2 on your Mac
- At the top of your screen, click the Apple Configurator 2 menu option
- Select Paired Devices
- Select the Apple TV and click pair
- A 6-digit code will appear on the Apple TV
- Enter this codes in the Apple Configurator screen
- Close the Paired Devices window
- After pairing the Apple TV successfully, your Appe TV should appear in the Apple Configurator devices overview
- Select the Apple TV and click Prepare
- Choose the following options
- Prepare with: Manual Configuration
- Enable Add to Device Enrollment Program
- Disable Activate and complete enrollment
- Enable Allow devices to pair with other computers
- Click Next
- Select your previously created Silverback AppleTV Enrollment Server
- Click Next
- Select your Organization
- Click Next
- Configure tvOS Setup Assistant to your needs
- Click Next
- Click Prepare
- Your Apple TV will now reboot and will be configured for the Device Enrollment Program
Enroll your Apple TV
- After a successful configuration the Connect your Remote Control screen will appear
- Click any button on your Remote Control
- Select a Language
- Select a Region
- A Remote Management Screen will appear
- Click Continue
- Enter your Active Directory or Local username
- Select Continue
- Enter your Active Directory password or the created OneTime Password for the chosen user
- e.g. Pa$$w0rd
- Select Continue
- Your Apple TV is now successfully enrolled
- Navigate to Settings > General > Device Management and check the installed Silverback MDM Profile
- Create one or more Management Tags and assign them
Restrictions
| Setting | Apple TV | Description |
|---|---|---|
| Allow Remote Pairing | Enabled or Disabled | If set to false, the AppleTV cannot be paired for use with the Remote App or Control Center widget |
| Allow Changing Device Name | Enabled or Disabled | If set to false, prevents device name from being changed |
| Allow iBookstore Erotica | Enabled or Disabled | If set to false, the user will not be able to download media from Apple Books that has been tagged as erotica |
| Allow Explicit Music or Video | Enabled or Disabled | When false, explicit music or video content purchased from the iTunes Store is hidden. Explicit content is market as such by content providers, such as record labels, when sold through the iTunes Store |
| Force Set Date and Time Automatically | Enabled or Disabled | If set to true, the Date & Time "Set Automatically" features is turned on and can't be turned off by the users. Note: The device's time zone will only be updated when the device can determine its location |
| Allow Password Proximity Requests | Enabled or Disabled | If set to false, a user's device will not request passwords from nearby devices |
Mobile Applications
Companion (Android)
Release Version: 19.0.1
- Added support for Android Q beta
- Added QR code scanner and enrollment functionality
- Added support for managed app configuration for device owner mode
- Added profile view for managed app configurations
- Added Samsung calendar to default apps
- Added Allow unified passcode for work profile option for Android 9 and higher
- Added quality types of passcode restriction: complex, numeric complex, biometric weak
- Added certificate support for Outlook on Android 9.0
- Change to request passcode every 30 seconds if passcode is not sufficient
- Change to request Camera permission on startup
- Change confirmation display text for unenrollment
- Fix for Unlimited sync days option in Samsung Exchange Active Sync
- Fix for Disallow factory reset will prevent from console wipe
- Fix for Default enforce storage encryption crash
- Fix for Passcode for work profiles
- Fix for Epic Engine Watcher crash
Secure Container
Release Version: 1.0.419 (Android), #11- Version 46 (iOS)
- Updates to the calendar list view – iOS
- Policy Acknowledgements - iOS and Android
- Updates to support 6 character PINs vs password – iOS and Android
- Lock user out of container when screenshot detected offline or online – iOS and Android
- Ability to restrict a user from casting/mirroring their device – iOS and Android
- MFA support –iOS and Android
- Support for outlook.com mail – iOS and Android
- Added Support for military time – iOS (Android already had it)
- Ability to view and edit PDF files via Smart Office
- Dropbox integration – Android (already on iOS)