Service Bus I: RabbitMQ
About this document
This document describes the first steps needed for successfully deploying RabbitMQ as a message broker. Please also review the alternative Microsoft Azure Service Bus which is provided as a cloud service and does not require any local implementation. For a more in-depth guide on configuring the RabbitMQ Server, please refer to the official RabbitMQ manual.
Overview
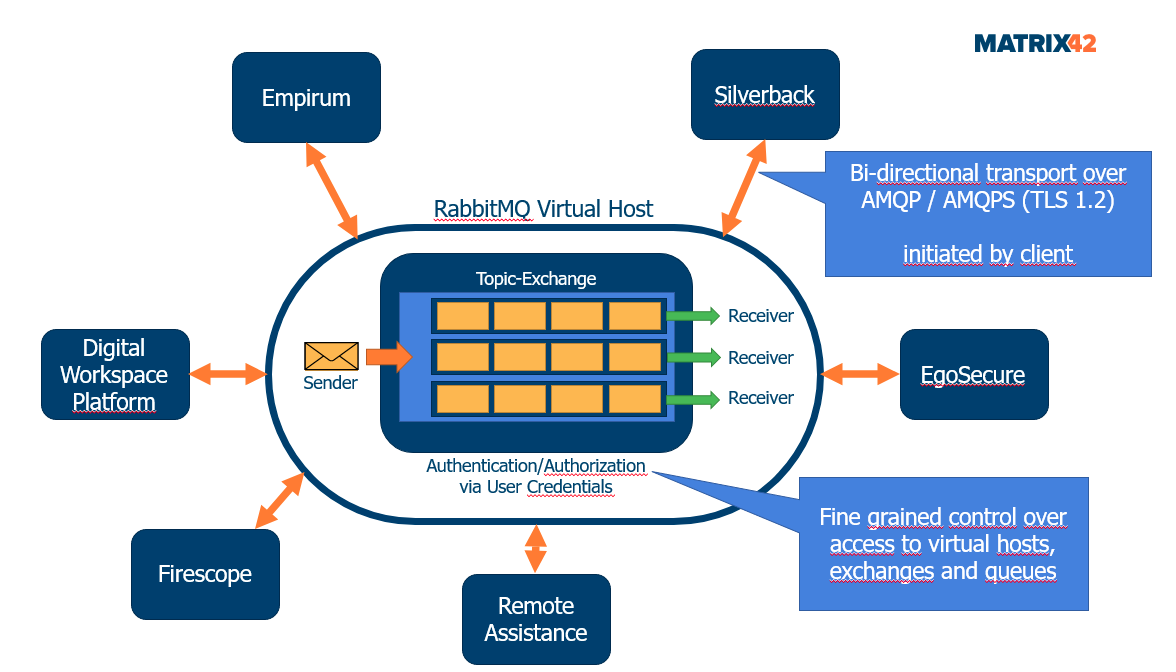
RabbitMQ is a message-queueing software also known as a message broker or queue manager. Simply said; it is software where queues are defined, to which applications connect in order to transfer messages. RabbitMQ is particularly interesting for a on premise deployment of a message-queueing software, as it allows you to enjoy all the benefits of a fully-fledged message-queueing software, without the involvement of third-party services in the cloud. Below, you can see an abstract overview of the way platforms are connected to RabbitMQ, enabling them to securely and remotely communicate with each other.
Download Binaries
- Open Matrix42 Marketplace
- Login with your Matrix42 Account
- Navigate to Secure Unified Endpoint Management
- Select Secure Unified Endpoint Management (UUX for SUEM)
- Locate the Current Release Section and select Download UUX for SUEM
- Download the latest Matrix42 Service Bus Rabbit MQ package
- Extract your RabbitMQ Installation Package
RabbitMQ Installation Package content
The current RabbitMQ getting started package contains:
- Erlang OTP 24.0
- TTP is a set of Erlang libraries and design principles providing middle ware to develop these systems. It includes its own distributed database, applications to interface towards other languages, debugging and release handling tools. It is a pre-requisite for the RabbitMQ server
- RabbitMQ Server 3.9.5 for 64bit Windows system
- Matrix42 Install-RabbitMqServer.ps1 - PowerShell script
- Matrix42 CreateRabbitMqExchangeAndQueues.ps1 - PowerShell script
Prerequisites
RabbitMQ Firewall Settings
Please open the following Ports used by RabbitMQ:
| Port | Purpose |
|---|---|
| 5672, 5671 | Used by the protocol AMQP 0-9-1 and 1.0 clients with and without TLS |
| 15672 | HTTP API clients, management UI and rabbitmqadmin (only if the management plugin is enabled) |
Installation Options
Please select your preferred installation method:
- Automated Installation and configuration (recommended)
- Manual Installation and configuration (choose if you want to have more control about the installation)
Automated Installation and configuration
The installation can be executed with the downloaded and extracted self-extracting package. When you run the RabbitMQ_InstallPackage.exe, it automatically executes the PowerShell script Install-RabbitMqServer.ps1, which is part of the package. It allows an automated installation of all of the required components. In this case, the installation will be placed in the default directories of the corresponding programs and after the automated installation, the RabbitMQ server will also be configured with default values for exchanging messages - except the username and its password (those will be asked during the script execution). To perform the automated installation, proceed with the following steps:
Execute Installation and Copy Connection String
- Run the extracted RabbitMQ_InstallPackage.4.15.1.exe
- Confirm with Yes
- Wait until all required packages will be installed
- When you get asked if you want to configure RabbitMQ now, type y and press enter
- Provide a username and press enter, e.g. rabbitmq
- Provide a password and press enter, e.g. password
Do not use the characters '/\@%#.* in the password, otherwise your created connection string will get invalid which you will recognize only later.
- The following queues will be ask for installation:
- Digital Workspace Platform
- Empirum
- Silverback
- EgoSecure
- Remote Assistance
- Type Y to install the necessary queues.
- Wait until the RabbitMQ configuration will be finished
- Copy your displayed connection string to your clipboard or to any text editor
- Press any key to finalize the installation
Open Management Console
- Use a web browser of choice and navigate to: http://localhost:15672
- Login with your previously defined username and password.
- Navigate to Exchange and Queues and review the automatically created Virtual Host, Exchange Name and Queues:
| VirtualHost | matrix42 |
|---|---|
| Exchange Name | matrix42.suem.topic |
| Digital Workspace Platform Queue Name | matrix42.uux.subscription |
| Empirum Queue Name | matrix42.empirum.subscription |
| Silverback Queue Name | matrix42.silverback.subscription |
| EgoSecure Queue Name | matrix42.egeosecure.subscription |
| Remote Assistance Queue Name | matrix42.fastviewer.subscription |
Change your guest password
- Navigate to Admin
- Select your guest account
- Expand Update this user
- Enter a new password, e.g. Pa$$w0rd
- Confirm your password, e.g. Pa$$w0rd
- Press Update user
You can also delete the guest user as this user must only be used during installation from and to localhost (https://www.rabbitmq.com/access-control.html).
Additional Notes and Next Steps
- When installing the RabbitMQ Server on the same server as Empirum make sure that the Matrix42 Empirum Service Bus Service is set for delayed startup.
- To remove or add the queues see in Adjust Queues.
- Keep your Connection String ready and proceed with the Next Steps
Adjust Queues
In case you are not utilizing Empirum or Silverback or you have additionally EgoSecure Data Protection or Remote Assistance in place, you should consider to modify your created Queues.
Delete created queues
- Use a web browser of choice and open: http://localhost:15672
- Login with your username and password
- Navigate to Queues
- Select as an example the matrix42.silverback.subscription
- Expand Delete, press Delete Queue and confirm with OK
Add additional queues
By default, only the queues that were selected during installation are created. Additionally required queues can be created, e.g. if you need queues later.
- Select Queues
- Press add a new queue
- Select your previously created Virtual Host, e.g. matrix42
- Type in matrix42.egocesure.subscription or matrix42.fastviewer.subscription in the name field
- Click on Message TTL and enter 2419200000 in the value field (this is the time in milliseconds how long messages stays in the queue if no one retrieves them)
- Click Add Queue
- Select the new queue in the table
- Expand Bindings
- Enter the exchange name i.e. "matrix42.suem.topic in the From exchange field
- Click Bind
Additional Information
Question: Are messages persistent and survive a Server/RabbitMQ Service Restart?
By default the messages are processed and removed. The default queue setting is non persistant and restarting the service will remove all unprocessed messages.
Next Steps
- Proceed with Service Bus III: Install Empirum Service
- Proceed with Service Bus IV: Configure Silverback
- Proceed with Service Bus V: Configure EgoSecure Service Bus Adapter
- Review how to secure Rabbit MQ with SSL/TLS: RabbitMQ Securing with TLS/SSL
- Review RabbitMQ Troubleshooting